As you can understand, there are not many ways to connect pieces and sections of LED strips. Or rather, there are only two of them). Connecting LED strip by soldering and connecting LED strip using connectors. Both methods exist. Of course, connecting with connectors is faster. But soldering is more practical. I’m getting ahead of myself and if I don’t forget, I will definitely mention the pros and cons of connecting LED strips with connectors and a “soldering iron”.
In the conditions of corrupted human imagination, incredible design ideas often come to our minds, which we have to put into practice. Experiments with tapes are no exception. We don’t have to install them in any corners and holes, niches and basements)). At different angles, incredible tilts, twists, folds, etc. and so on.
In some cases, connecting with connectors helps, but in other cases, connecting with a soldering iron is simply indispensable. I, honestly, don’t really like (to say the least) soldering LED strips. I just hate it... But there are times when you can’t do without this type of connection...
—> —>
Connecting LED strips with connectors
In almost any store selling LED products, you can find a huge variety of connectors and connectors on the shelves. Using them, we can connect not only segments, but we can also easily create right angle connections, T-shaped connections and other original solutions.
Prices for connectors for LED strips are very affordable, regardless of which group they belong to - connecting or connecting-feeding.
The main purpose of connectors is to connect two or more pieces of tape to each other and connect to the power supply. The advantages include speed and ease of installation. The disadvantages are the susceptibility of contacts to oxidation in a humid environment.
Connectors are divided, as we have already found out, by the type of connection and the width of the connected tape. The most common widths are 8 and 10 mm, they are suitable for connecting single-row LED strips of both monochrome and RGB light. For two and three rows, it is necessary to use connectors that match the width.
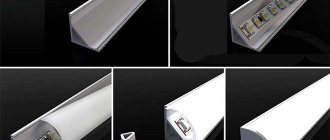
Below you can see the most common connectors.
The most popular types of connectors
1 of 4
How to connect a single-color LED strip with connectors to a power supply
For work we will need:
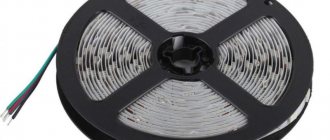
- LED Strip Light
- scissors
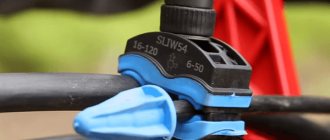
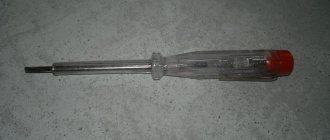
- terminal connector
Using this connector, we can easily connect one end of the LED strip to the power supply.
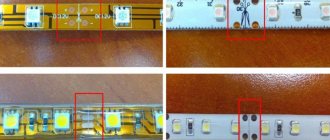
The tape is cut only in sections that are multiples of three LEDs. The cut points can be easily seen from the lines marked on the front side of the tape. Remember that this specific distribution of diodes on the tape will not allow you to accurately cut the required size “snail-to-skin” and will always be either larger or smaller.
We cut with scissors so that the copper coins along the cutting line remain on both sides of the ribbon pieces. In the photograph, nickels can be seen in the form of small round copper pads.
We take a connector for quick installation of the tape. Place it as you see in the photo. White, wide stripe up. Next, pull the ends of the second plastic latch without much effort. When performing these operations, never hold onto the conductors, otherwise you will have to work with a soldering iron later.
When inserting the LED strip into the connector, check the polarity. The color of the wires may not always match “+” and “-“. This is especially true for those who purchase cheap Chinese connectors. I'll calm everyone down. There is nothing wrong with Chinese connectors. 99 percent come to Russia from there. It’s just that some people buy them in Russian stores, while others do it smarter and buy them on Chinese sites.
After the tape is inserted into the connector, you need to return the latch to its place. And without making any serious efforts, check the reliability of the fastening. If everything is in order, connect the wires to the power supply and check the operation of the tape.
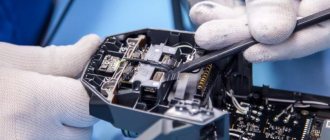
How to connect a waterproof LED strip using soldering
Let's consider another option for connecting LED strips using soldering wires.
- Before attempting to solder a wire to an LED strip, you need to have the right tools. We recommend using any 30W-60W soldering iron, with a temperature control of 500°-600°C. Stronger heating is undesirable, because can lead to overheating of components and peeling of the copper substrate of the board. Use liquid rosin in syringes to prevent excess from getting onto other components. The soldering iron tip should be as thin as possible.
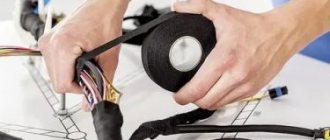
- To seal the treated end of the tape, make sure you have waterproof auxiliary “tools” in advance. Glue, sealant, special plugs and shrink tape.
- We take the LED strip and, as in the previous tutorial, cut the strip into the pieces we need. Waterproof tape is quite difficult to cut, because... the cutting line on the front of the tape can be distorted and refracted under the action of dense silicone or plastic. Be careful. It is necessary to cut clearly between the connecting nickels. Be sure to use a sharp tool. Be careful not to damage the tape board or jam the conductive tracks.
- Now is the most crucial moment. We take a utility knife and begin to carefully remove the layer of waterproof coating exactly behind the heels, where we will solder the wires. The coating must be cut very carefully. One strong pressure will damage the flexible board and you will have to start cutting the tape and removing the coating again. There is no point in removing the waterproof layer from the bottom side. Leave it as is. Only the top one.
- Next, we work according to the usual scheme) We clean the soldering iron tip from oxides, after warming it up. Next, we take the wire and tin it.
- We put a plug on the wires. We solder the wires to the LED strip. We coat the inside of the plug with glue and place it on the tape so that there is a cavity between the end of the plug and the end of the tape. We fill the cavity with sealant. Let it dry. And we put a heat-shrinkable tube over our entire structure according to size. And going over it with a hot hairdryer. All that remains is to connect the LED strip to the power supply.
Permissible LED strip voltage
I conducted an experiment: I connected a 24-volt strip to a voltage source and began to lower the voltage. Photos cannot convey the change in the brightness of the glow; you have to watch it live and compare it. The conclusion is this: at 22 volts the tape burns dimmer, but only a little dimmer. Let's just say it's acceptable. At 21 volts the tape burns even dimmer. At 20 volts it is even a little dimmer.
We can assume this: reducing the supply voltage of the tape by 10% slightly (to 21.6 volts) reduces the brightness of the glow, but is still acceptable. More is undesirable. It is better to take 6-8% as an acceptable voltage drop.
Next, we calculate according to the formulas presented above.
The tape comes in different capacities and different voltages. I believe there is no need to explain that it is always more profitable for us to use a tape of higher voltage. More voltage - less current. Less current means less unwanted voltage drop. The most common tape itself has a voltage of 24 volts. We don’t look at 12 volts or lower, unless there is a very short cable to the tape and there is a free 12-volt power supply.
Let's imagine that our tape has a power of 9.6 watts per meter (the most common option) and is 10 meters long. Voltage 24 volts. The distance to the tape from the power supply is 20 meters. What section should I use for the cable?
First we count the current. That's 4 amps (power per meter * length/voltage). I made a table in Excel in which I wrote down all the formulas for a simple calculation of the voltage drop as a percentage.
Here is this sign for everyone: home-matic.ru/voltagedrop.xlsx
I found that with a cross section of 1.5 mm2 the voltage drop will be 1.92 volts or 8%. With a cable length of 25 meters - 10%. With a cable cross section of 0.75, the length can be no more than 10 meters. These are the maximum values; if you want the tape to burn not “a little dimmer than usual,” but rather brightly, then you need to increase the cross-section. Taking into account the fact that cables are often sold with a smaller cross-section than stated, it is worth taking a cross-section one step larger.
Another way is to increase the voltage of the power supply. Some power supplies have an adjustment screw (usually marked ADJ, “adjustment”) that allows you to increase the voltage to 27 volts. When twisting the screw, it is advisable to measure the voltage on the tape so that it becomes exactly 24 volts, no more. Do not get carried away with this method; excessive heating of the cable is undesirable.
There is also a tape for 36 volts and 48 volts. It is not very common, but its use will help reduce the voltage drop in absolute value and as a percentage relative to the nominal value.
Pros and cons, advantages and disadvantages of connecting LED strips with connectors and soldering
At the beginning of the article, I said that I would describe the disadvantages and advantages of both types of connecting LED strips. No sooner said than done…
Connectors are easy to install and come in a variety of types. Using them, you can connect ribbons into various shapes. These are the main advantages.
One of the disadvantages of connectors is the great “fear” of wet rooms. Contacts oxidize very quickly. The tape begins to blink. I will name another negative property - low-quality connectors. “Frankly” bad connectors simply do not create the necessary contact with the tape; this does not even allow the tape to be turned on. It simply won't glow...
I forgot to include the fact that most connectors do not require additional insulation as a plus. They work on the “set it up and it works” principle.
When connecting an LED strip by soldering, there are still more negative moments than positive ones. There are times when it is necessary to place tapes on vertical round surfaces, oval surfaces, etc. In this case, the connectors practically cannot cope... They become brittle and one or more LEDs fall out of the overall picture. In this case, soldering will help out. Those. The advantage of soldering is that it can be used to design absolutely any surface with ribbons. The disadvantage of soldering is that you cannot overexpose the tip to the tape when soldering. Beginners especially suffer from this. When soldering, it is necessary to prepare the surface well. And of course, after soldering the connection, it is necessary to additionally insulate the joints. All these operations require time, and as always, we don’t have enough of it...
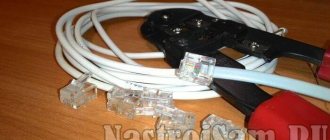
Cables for LED strips
I’ll tell you about one important point, namely how to calculate the cross-section of the cable required to connect the LED strip.
At the beginning, an important idea, which I hope everyone knows: the cross-section of the cable depends on the current passing through it.
Not voltage or power, but current. Which is in amperes. You can easily find tables that tell us what maximum current can be passed through cables of various cross-sections:
- Cable with a cross section of 0.5 mm2 - 6 amperes
- Cable with a cross section of 0.75 mm2 - 10 amperes
- Cable with a cross section of 1 mm2 - 14 amperes
- Cable with a cross section of 1.5 mm2 - 15 amperes
- Cable with a cross section of 2 mm2 - 19 amperes
- Cable with a cross section of 2.5 mm2 - 21 amperes
Based on this, for power loads with a voltage of 220 volts, a 10A machine is installed on a cable with a cross-section of 1.5 mm2, and a 16A machine is installed on a cable with a cross-section of 2.5 mm2. The margin is taken into account because the machine, at rated or higher current, will not work immediately, but a little later. But we would like the maximum permissible current not to flow through the cable. In addition, a cable that says 2.5 may in reality be less than 2.5.
Since we are talking about an LED strip, our voltage is not alternating, but constant (we do not take into account a strip with a 220-volt power supply), and it is very important to understand that we select the cable cross-section not according to the maximum current that the cable can withstand, but according to voltage drop in the cable.