How to crimp a telephone cable with 2-4 cores: complete step-by-step instructions
Hello, fellow system administrator or just a lover of computer and not so much technology.
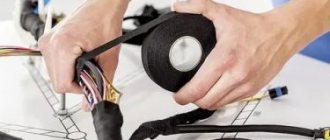
Today we will talk about crimping a telephone cable with 2 or 4 cores. I’ll say right away that they are much easier to crimp. For crimping we need the cables themselves. There are standard telephone cables of the SHTLP type, and there are KSPV-2 or KSPV-4, which are often used in alarm connections. In order to remove the braid, we need to take a utility knife. I think it’s much more convenient for them to do it. By the way, some stores sell separate knives specifically for cleaning network and telephone cables. I remember my colleague had one - it was quite convenient and fast.
And of course, crimping tongs, or more correctly, “crimping tongs.” It is best to use a metal structure if you will be crimping frequently. The fact is that cheap plastic pliers very often fail and they begin to crimp crookedly. Because of this, the core does not fall into the center of the wire and does not pierce it. Because of this, there is no connection and you have to crimp again. Also, these pliers very often have an additional knife for cutting the braid, but most often they are not convenient and additionally cut the wires, so it is best to use a regular stationery knife.
Scheme and crimping
- First you need to carefully bite off the desired length of wire. From experience I will say that it is better to leave at least a meter or one and a half - for every firefighter. Next, carefully remove the braid to the length so that the base is under the connector when crimping.
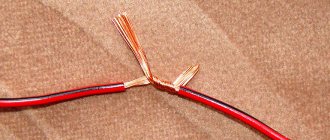
- Now we insert these two wires in the center into the connector, so that there is one free wire on each side. There is no difference in the colors of the wires, so feel free to insert them as they are inserted. You also need to look from the reverse side so that both wires reach the very end. Now, holding the base of the cable and the connector itself, insert it into the pliers and press them in one fell swoop. To be sure, the procedure can be repeated;
- If crimping is done on 4 cores, then the classic “Straight-Pinned” line is most often used - it can be seen in the picture above on the right side. But some devices use the reverse “Cross-Pinned” scheme. Which one to use – this needs to be looked at in the configuration for the connected devices.
Here are a few more crimping schemes for RJ25, RJ14, RJ11 connectors:
Here the complexity increases with the number of wires. So, when pushing them into all the grooves on the connector, it often happens that the side ones simply lift up and crimping does not occur. Therefore, when you insert the wire, check a few more times to ensure that all the wires are in their place. You can push the base of the cable slightly to get them into place.
Now you know how to crimp a telephone cable and there’s really nothing complicated. The most important thing is to choose the right circuit for a particular device. For a regular telephone line and communication, connections via 2 wires are suitable. Also, if you have any questions, feel free to ask them in the comments.
How to crimp a telephone cable - 2 and 4 wires
Despite the fact that the world has almost completely switched to cellular communications, wired telephony still occupies a significant market share. Moreover, it is with its help that Internet access using ADSL and SHDSL technologies is organized in small towns and rural areas. And while the crisis is gaining momentum, there is no need to wait for the transition to fiber optics. At the same time, very often in residential buildings, as well as in various institutions, room wiring is in an unsatisfactory condition: the telephone cord is pinched by chairs, crushed by heels, cats, dogs and even drunk people chew it (this is not a joke, but a real case from practices). Therefore, sooner or later, the question arises of replacing the wire with a new one, for which they usually call an installer and pay money. You can do all this yourself, the main thing is to get the right tool and buy the wire of the required footage. But very often everything comes up at the moment when you need to crimp the telephone cable into the RJ-11 connector. We will talk about this procedure today.
What do we need?
Firstly, the telephone cable itself is 2- or 4-wire. Personally, I don’t like the SHTLP telephone cable (aka CLT) because I didn’t live there alone and if you need to make a twist, sometimes you’ll have a hard time with it. Therefore, in my practice I try to use the cable for signaling KSPV-2 or KSPV-4. There are no problems with crimping it either. Secondly, we will need a stripping tool in the form of a stationery or construction knife. Thirdly - crimping tool. By the way, many of them, like mine for example, have a special knife for cutting cables. Well, RJ-11 connectors, of course, into which we will crimp the telephone cable for the Internet or wired telephone.
Sequencing:
We strip the end of the telephone wire from the outer braid, about half a centimeter:
There is no need to strip the cores themselves - they will be cut through by the connector blades. The cable layout is simple. In regular telephony, only 2 cores are used. The connector has two middle contacts:
With a four-wire wire the situation is a little more complicated. The point here is that abroad, due to the widespread use of mini-PBXs and faxes, a cross-over layout is often used - that is, the wires in pairs are swapped (see diagram on the right):
Here in Russia, we use a straight layout, as in the diagram on the left. Therefore, cables that come to us from abroad often have to be re-crimped. After you have cut and prepared the cable, you need to insert the wires all the way into the connector:
From the front side of the connector, make sure that the wires reach the end of the channels:
Now carefully insert the connector into the crimping tool and clamp it:
We remove the crimped telephone wire from the crimp and make sure that the knives in the connector go in all the way. If necessary, you can clamp it again. Now you know how to crimp a telephone cable for the Internet or telephone with your own hands,
Did it help? Recommend to your friends!
How to crimp a telephone cable - 2 and 4 wires:
- Alexander July 26, 2015 at 12:35 pm
When I was young, I had no problem traveling by car. I filled it up, sat down, started it, put it in gear and drove off. The only thing missing was a car :)
When the office started downsizing in the spring and everyone started “stitching,” they quietly took away a whole crimping set from RJ-11 to RJ-45. In 3 months I spent enough time to renovate my 24 sq.m garage =p
And our crimping tool was the worst, so I bought my own.
The disadvantages include a fairly high price, on average 15-25 rubles per meter, and in some regions P-296 is quite difficult to purchase. Like any other 4-core cable, P-296 is not suitable for creating gigabit networks.
The large thickness of the cable makes it difficult to lay it around the apartment. The cable braid must be grounded, otherwise it will not perform its functions well. Due to the greater thickness of the conductors, P-296 is difficult to crimp, so in any case, it will be necessary to attach twisted pair sections to the ends of P-296 for crimping. Therefore, P-296 is best used in open areas, in apartments or entrances, switching to twisted pair.
The polarity on a 2-core cable does or does not matter. Sorry, maybe this is a stupid question.
We use the direct version, that is, the polarity does not change.
For some reason, my crimper on some types of cables cuts the insulation with the conductors, although there is a special notch for the wire (does not help). Therefore, you have to manually cut off the insulation, which increases the crimping time to about 30 minutes. And on some connectors there are no separations to properly insert the cores, so the time for crimping increases to 1 hour. And therefore I would like to draw attention to the fact that not every equipment is suitable for quick installation or for beginners...
Installing an outlet
All work must be performed in several stages. They are not complicated, but you should know the sequence of actions.
RJ45 cable pinout
When talking about how to connect an Internet outlet, you first need to get acquainted with the connector pinout diagram. There are two types of them:
- Direct - used to connect the end device to the router.
- Cross - necessary for connecting similar devices to each other, for example, two PCs.
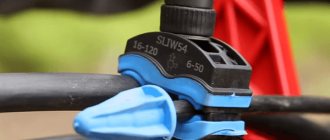
When connecting directly, all wire colors on each connector must match. If a cross circuit is implemented, then the orange and green wires must be swapped. Having chosen the connection method, you should leave 100-150 mm of cable from the wall plane and cut off the rest. Most often, the twisted pair contains a thread with which you can easily release all the conductors. You can also use a simple knife or cutting edge, which is located on the crimping pliers.
Wiring check
In order for the connected equipment to function normally in the future, it is necessary to perform a connection test. To do this, you will need to use a conventional electrical tester. First, you need to place the second end of the Internet cable into the terminal block and connect the patch cord to it. By switching the tester to the sound alert mode, the presence of a signal in each twisted pair conductor is checked.
Terminal block installation
If the signal passes, you can proceed to the final stage of installing the socket. The remains of the cable should be carefully removed and the terminal block should be installed in the socket, tightening it with the fixing screws to the pre-installed plastic cup
It is also important to check that it sits tightly in the socket and that the wires are not sticking out or pinched
After performing all these manipulations, it is worth checking the presence of a signal again by connecting any device, for example, a laptop, to the terminal block. If there is no Internet connection, you will have to return to the cable pinout stage again. Often the cause of problems that arise is a conductor that has fallen out of the installation socket. The last step will be to install the pad - simply place it on the socket and press until a characteristic click appears. After connecting the cable to the Internet outlet, you can go online.
Crimping telephone cable 4 cores
The connectors are made of transparent plastic; inside there are built-in contacts in the form of knives, which, when crimped using a special tool, cut through the conductor insulation.
There are several types of RJ series connectors: 4P4C, RJ-11 6P2C and 6P4C, RJ-12 6P6C, RJ-45 8P8C, 10P10C:
The 4P4C connector, another name for RJ-9, is used mainly for connecting handsets to telephone sets; these are the smallest connectors in the RJ series, they have four lamellas and four contacts.
RJ-11 connectors, these connectors are used to connect telephone cables and connect landline phones, RJ-11 plugs come in two types: two-pin, marked 6P2C and four-pin, marked 6P4C.
RJ-12 connectors, also known as RJ-25, have six pins, are marked 6P6C, and are mainly used to connect system phones with a six-pin connector.
To install RJ-11 and RJ-12 connectors, use a flat telephone cable with four or six cores; you can also use a two-pair UTP twisted pair cable.
RJ-45 connectors, have eight contacts, are marked 8P8C, are intended for connecting telecommunications equipment: computers, sockets, network switches, patch panels. These connectors are divided into several types, depending on the cable used:
RJ-45 connectors for single-core cable, where the conductor has a solid conductor.
RJ-45 connectors for a multi-core cable, where the conductor consists of several conductors intertwined.
Required tools and materials
Depending on the type of telephone jack, as well as the standard used, different tools and materials may be required.
However, it is recommended to have all the necessary equipment available at once:
- A screwdriver that, in terms of the type of working surface and dimensions, corresponds to the screws used to fasten the device. The screwdriver handle must be insulated to avoid electric shock.
- Socket box.
- Cable, if the old device is not being replaced, but a completely new one is being installed.
- A hammer drill, as well as a cable, will be needed if a new outlet is being installed.
- The outlet itself.
- Knife with a sharp blade.
- Self-tapping screws.
- Wire cutters.
- Insulating tape.
- Universal multimeter or tester.
- Protective gloves.
- Single-sided and double-sided adhesive tape.
- Graphite pencil and marker with bright paint, which will be needed for marking.
Telephone cable internal flat 4 wires (100m) SHTLP-4 copper, m
Price when purchasing per piece:
Delivery
We deliver orders throughout Russia.
The cost of delivery of any order by courier in Tyumen is 500 rubles, and for orders over 5000 rubles. - for free! Delivery is carried out from Monday to Friday, from 9:30 to 18:00. The possibility and cost of delivery of orders in the suburbs of Tyumen are discussed separately.
Delivery to other cities of Russia is carried out by transport companies at the buyer’s expense (payment for delivery usually occurs upon receipt at the TC office).
Details about delivery conditions and a list of supported transport companies can be found in the “Delivery and Payment” section or by calling +7(3452)541‑541.
Payment
Payment for the order is possible in the following ways:
Payment in cash upon delivery by courier or upon receipt of the order in our office.
At the office of our company or upon receipt of the order from the courier, payment by bank cards is also possible.
Non-cash payment to the company's account from individuals and legal entities.
More information about payment terms can be found in the “Delivery and Payment” section or by calling +7(3452)541‑541.
Our services
We provide the following types of services:
Installation of fiber optic networks
Network quality measurements
Installation of video surveillance systems
You can receive an estimate for installation work by calling +7(3452)541‑541 or by writing to us by email
- Description
- Reviews (0)
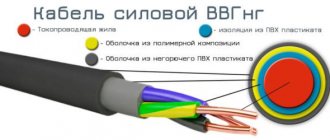
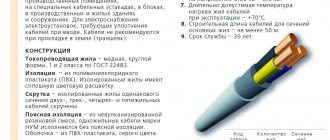
Telephone cable (SHTLP) is a telephone distribution wire. The cord has copper stranded conductors. The conductors are insulated in a polyethylene (PE) sheath that is resistant to high humidity and ultraviolet radiation. The cable sheath is made of polyvinyl chloride (PVC).
The SHTLP cable is used for the installation of hidden and open distribution networks in premises. Wires are used to connect wall sockets and telephones.
The telephone cord is available in different modifications - equipped with 2, 4, 6 or 8 stranded copper conductors. They are not twisted and are located parallel to each other. Depending on the number of conductors, it is marked with the required number, for example, SHTLP-4.
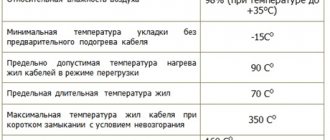
Characteristics:
- The conductors consist of copper stranded wire 6x0.10 mm
- Rated voltage - up to 120 V
- Electrical resistance of the conductor is no more than 0.165 Ohm/m
- Minimum bending radius, not less than 10 times the minimum wire size
- Core diameter in polyethylene (PE) insulation 0.95 mm
- Cable diameter - 2.4x4.6 mm
- Number of conductors - 4
- Conductor material - tinned copper
- Number of conductor cores - 7
- Diameter of conductor cores - 0.12 mm
- Insulator material - PVC
- Insulator color - black
- Operating temperature from -50 to + 60°С
- Service life - 10 years
RJ-45 cable - how cable categories differ
- RJ-45 cable categories
- RJ-45 cable crimping diagrams: straight and crossover
- Cabling
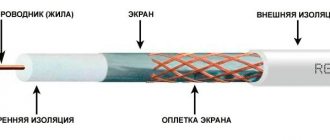
What is twisted pair?
Twisted pair is a type of communication cable that consists of one or more pairs of insulated conductors, twisted together (with a small number of turns per unit length), covered with a plastic sheath.
Twisting of conductors is carried out in order to increase the connection of the conductors of one pair (electromagnetic interference equally affects both wires of the pair) and subsequently reduce electromagnetic interference from external sources, as well as mutual interference when transmitting differential signals.
To reduce the coupling of individual cable pairs (periodic bringing together of conductors of different pairs) in UTP cables of category 5 and higher, the wires of the pairs are twisted with different pitches. Twisted pair is one of the components of modern structured cabling systems. Used in telecommunications and computer networks as a network media in many technologies such as Ethernet, ARCNet and Token ring. Currently, due to its low cost and ease of installation, it is the most common solution for building local networks.
The cable connects to network devices using an 8P8C connector (often erroneously called RJ45 or RJ-45), slightly larger than an RJ11 telephone connector.
Types of cable used in networks
Depending on the presence of protection - an electrically grounded copper braid or aluminum foil around twisted pairs, the types of this technology are determined:
- unprotected twisted pair ( UTP - Unshielded twisted pair ) - there is no protection or shielding;
- foil twisted pair ( FTP - Foiled twisted pair ) - also known as S/UTP there is one common external shield;
- protected twisted pair ( STP - Shielded twisted pair ) - there is a screen for each pair;
- foil shielded twisted pair ( S/FTP - Shielded Foiled twisted pair ) - differs from FTP by the presence of an additional external shield made of copper braid;
- protected shielded twisted pair ( S/STP - Screened shielded twisted pair ) - differs from STP by the presence of an additional common external shield.
Shielding provides better protection from electromagnetic interference, both external and internal, etc. The entire length of the screen is connected to a non-insulated drain wire, which unites the screen in case of division into sections due to excessive bending or stretching of the cable. Depending on the structure of the conductors, the cable is used single-core or multi-core. In the first case, each wire consists of one copper core, and in the second - of several.
A single-core cable does not require direct contact with connected peripherals. That is, as a rule, it is used for laying in boxes, walls, etc. followed by termination with sockets. This is due to the fact that copper strands are quite thick and with frequent bending they quickly break. However, such conductors are ideally suited for cutting into the connectors of socket panels. In turn, a multi-core cable does not tolerate cutting into the connectors of socket panels (thin wires are cut), but behaves well when bent and twisted. In addition, stranded wire has high signal attenuation. Therefore, multi-core cable is used mainly for the manufacture of patchcords connecting peripherals to sockets.
RJ-45 cable design
The cable usually consists of four pairs. The conductors in pairs are made of solid copper wire with a thickness of 0.5-0.65 mm. In addition to the metric system, the AWG system is used, in which these values are 24 or 22, respectively. The insulation thickness is about 0.2 mm, the material is usually polyvinyl chloride (PVC), for higher quality samples of category 5 - polypropylene (PP), polyethylene (PE). Especially high-quality cables are insulated with foamed (cellular) polyethylene, which provides low dielectric losses, or Teflon, which provides a high operating temperature range.
Also inside the cable there is a so-called “breaking thread” (usually nylon), which is used to facilitate cutting of the outer sheath - when pulled out, it makes a longitudinal cut on the sheath, which opens access to the cable core, guaranteed without damaging the insulation of the conductors. Also, the breaking thread, due to its high tensile strength, performs a protective function.
The outer shell has a thickness of 0.5-0.6 mm and is usually made of the usual polyvinyl chloride with the addition of chalk, which increases fragility. This is necessary for precise cutting at the cut site with the cutting tool blade. In addition, so-called “young polymers” are beginning to be used, which do not support combustion and do not emit halogens when heated (such cables are marked as LSZH - Low Smoke Zero Halogen and usually have a brightly colored outer sheath).
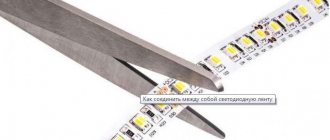
How to make a twisted pair UTP cable from 4 pieces of wire
Communication lines are made, unlike power lines, according to a symmetrical circuit of twisted pairs of wires. Thanks to this solution, the influence of electric and magnetic fields on the line is reduced to zero, since the electric current induced by noise on each of the twisted pair wires flows in antiphase and is mutually destroyed on the receiving side.
Based on this rule, a twisted pair cable can be made from any wires running in parallel. The greater the distance between the conductors, the stronger the influence of interference will be, therefore the conductors in the cable are twisted in pairs with a frequent winding pitch.
In transmitting the information flow in a twisted pair UTP cable, out of the four available, only two pairs of wires are used. Therefore, you can make a homemade cable with just 4 wires. Four pairs of cable are used only when laying networks to transmit information at speeds up to 1000 Mbit/s; this is the CAT6 cable category.
Color coding of RJ-45 compression for two pairs
The EIA/TIA-568 specification provides several color schemes for crimping twisted pair cables into an RJ-45 plug. For the CAT5 cable category, the information signal is transmitted only over two pairs shown in the photographs.
Color marking of compression into RJ-45 twisted pair computer - hub, option B.
Color marking of compression into RJ-45 twisted pair computer - hub, option A.
Color marking of compression into RJ-45 twisted pair computer - computer.
Instructions
In order to crimp a twisted pair (connect a twisted pair to a plug), you will need:
Device for removing insulation (stripper);
Crimping pliers (similar to pliers);
Standard cable tester;
— “twisted pair”;
RJ-45 standard plug.
Use a wire stripper to cut the outer sheath of the twisted pair cable. The cut should be made at a distance of 3 cm from the edge.
The cut insulation must be removed. Unravel the pairs and distribute them according to the colors indicated on one of the diagrams in the attached picture.
Then align the conductors. Squeeze the conductors tightly. Using a knife, remove excess parts of the conductors, leaving about 1 cm unraveled.
After aligning the conductors, attach the plug to them as follows: the sections of the conductors should reach the end of the grooves. The cable sheath must be pulled out past the locking latch; bring the cable all the way.