An LED spotlight will provide a powerful light source with low power consumption. At the same time, you can take into account your own needs - make a shock-resistant case or a portable structure. You can use an old lighting fixture, an aluminum profile or a plastic frame as a basis. You can make your own LED spotlight from spare parts from old computers, and LED lamps are sold in electrical stores.
Design features of the spotlight
You can take an old halogen or LED spotlight and upgrade it with a better light source and reflector. If this is not available, you can buy a cheap street lamp; you will only need to replace some elements.
If the task is to make a lantern to suit your own needs and preferences, you will have to think through the entire design yourself. This is an option for experienced craftsmen who have assembled more than one electrical appliance with their own hands. In this case, you need to select a light source and a current source. It is better to provide cooling so that the device does not overheat.
Spotlights that are constantly used outdoors must be protected from moisture. The glass and all joints of the case must be well sealed. It is recommended to hang a canopy over the lantern to protect from precipitation.
DIY LED spotlight
New generation lighting devices are radically different from older models.
They are economical, demonstrate high power and require virtually no maintenance. The steady demand for high-quality light sources has caused the appearance on the market of a large number of products from Southeast Asian countries that are neither reliable nor durable.
A DIY LED spotlight will allow you to get a fairly high-quality product. Let's look at how to make a cheap and fully functional spotlight from improvised materials.
Required materials and parts
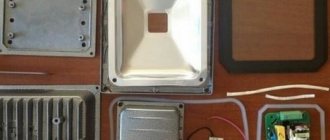
The necessary parts for assembling an LED spotlight can be taken from an old computer or laptop. If there is no suitable housing, you can assemble it yourself from a metal profile.
Housing material
Cheap flashlights are made with a plastic body. Their advantage is light weight and low cost. But plastic is inferior to metal in durability; it cannot be used all year round. If you plan to hang the spotlight above the entrance to a garage or house, it is better to make a metal body. Depending on the operating conditions, you can provide a carrying handle and shock protection.
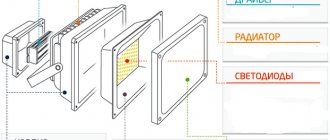
The main thing in the case is the openings at the top and bottom for ventilation . LEDs get hot when they work for a long time; they need to be cooled effectively. Air enters through the upper holes, blows through all the parts and takes away heat from them. Fans blow out exhaust air through the lower openings. This floodlight design is not suitable for outdoor use.
Sources of light
The main advantage of LED lamps is their long service life. They last 50,000 hours, 10 times longer than halogen lamps. With proper placement of reflectors, the brightness of the LEDs in the spotlight will be much higher than that of other lamps.
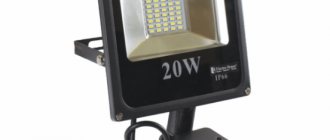
If you need a bright light source, it is better to take several small LEDs of 1 or 3 W each. For a medium-sized device you will need 20 pieces. The street lamp must have a minimum power of 30 watts.
Power supply
You can make your own LED spotlight for 12 or 220 Volts. You can find a power source at a computer parts store. For example, for a spotlight with 20 1 W LEDs, a 19 V power supply from a laptop is suitable. It is better to immediately buy current sources in a moisture-resistant case, then you will not need to come up with your own protection.
Build process
To make an LED spotlight, you need to prepare:
- soldering iron;
- hot glue;
- sealant;
- power wires;
- reflector.
To enhance the light, use a ready-made reflector or mirror tape.
Assembling the spotlight
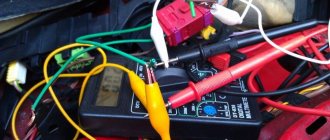
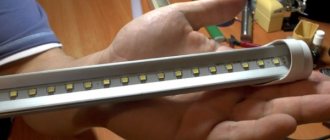
Individual LEDs need to be assembled in a circuit directly on the radiator. A cooler from a computer, laptop or server will do. The diodes are attached with hot glue and connected by tracks or wires. After this, connect the power source, check the operation of the light bulbs and fan. It is important to make sure that the radiator maintains a constant temperature; you can use an infrared gun to do this.
To enhance the power of LEDs, it is recommended to make a reflector for each lamp. They can be assembled from thin cardboard covered with mirror tape. The entire structure is glued together and placed in a housing.
The spotlight body can be assembled from an old flashlight, bracket and aluminum pipe. You need to make a hole in the bottom of the lantern for fans. An aluminum pipe will work as a base, and an old bracket can be used as a carrying handle.
Do it yourself
In principle, it is quite possible to assemble a simple reflector for dnat with your own hands from scrap materials. Galvanized iron, aluminum sheets, and pipes are also suitable, and it is not at all necessary to take new materials.
For testing, you can make a reflector from an empty aluminum can. So, we cut the washed and dried jar and bend it as shown in the pictures.
Reflector from a can
Tip: Considering the impressive size of sodium lamps, it is better to look for cans with a capacity of 1 liter or rive together a large canvas from several standard cans.
It is worth noting that such a reflector will be quite flimsy, so it is better to install it in places well protected from the wind (in greenhouses, for example).
If a large, powerful lamp will be used for street lighting, instead of a can, use a galvanized pipe of suitable size, which is usually used to remove carbon monoxide into the chimney.
Galvanized pipes
It’s convenient that they come in different diameters, lengths and thicknesses - you can always choose the size for any lamp. Cut the pipe with pliers and bend it in half like a bird, similar to the can version. However, if the pipe wall is thick, bending it evenly will be quite problematic. Therefore, you can cut it into two parts - lengthwise in half, riveting it a little and aligning the rounded ends on one side. Then connect the halves to each other in the center, folding the riveted sections overlapping. This will be a kind of stiffening rib, which will further strengthen the structure.
Stiffening rib
Use scraps of pipe (or metal profile) to make a mount for the cartridge and screw it to the reflector.
Chuck mount
Such a reflector can be installed on a console lamp anywhere near the house - the increase in the intensity of the glow will be noticeable even to the eye.
Or you can make it even simpler - take half of a large-diameter galvanized pipe (a drainage pipe, for example). Attach the cartridge to it on a metal profile (corner, level) - the reflector is ready!
Easy way
In addition to reflection, it will also perform a protective function and serve as a visor.
If you are not looking for easy ways, and have certain engineering skills, we will present several more complex reflector designs.
Below is a “pattern” of an octagonal reflector - it is as close as possible to industrial lanterns. Cutting a metal sheet can be done according to the following scheme:
Cutting method
Transfer it to a sheet of tin (steel, aluminum) to the required scale. Make cuts (with seam allowance at the joints) and bend the workpiece. To obtain a smooth edge when bending, lay wood profiles on both sides.
We bend the workpiece
You will also need a piece of strip of the required length - the light bulb socket will be fixed in it in the future.
Chuck mount
This is what you should end up with. If you want it to give a softer, diffused light, paint the inner surface with light heat-resistant paint. After this, the reflector will be indistinguishable from a factory-made one - only the protective glass is missing. All that remains is to install it on the console lamp.
Ready reflector
You can also bend such a reflector from a single sheet of tin or aluminum. There will be five bend points in total. On the sides, attach metal holders and a chuck holder made from scraps to the workpiece.
One-piece reflector
The previously mentioned cellular aluminum sheets are also perfect for this. The reflective characteristics of such a craft will be very high. Just choose sheets of high density, at least one to one and a half millimeters thick - they will hold their shape better. Alternatively, you can make something similar to factory-produced models. Just do not forget to make a fastening strip in the center, which enhances the rigidity of the structure. Otherwise, due to gusts of wind or icing in winter, it may bend.
Ready reflector
Or you can rivet a reflector consisting of three parts from a piece of tin. The design is simple: two halves of an oval and a straight sheet. In one of the halves you need to make a hole for the cartridge. Select the dimensions based on the dimensions of the HPS bulb used.
Simple reflector
To prevent the internal metal surface from excessively reflecting, cover the reflector with matte thermal paint.
An important point is that you need to ensure sufficient ventilation for this design, since the lamp and the reflector itself become very hot during operation. Therefore, it is better to place such a reflector on a cantilever street lamp, and make several additional ventilation holes in the reflector body.
Reflector ventilation
Of course, you should not expect that a “homemade” product will have the same high performance as a cantilever lamp created in a factory. But one thing is for sure - it will cost you tens of times cheaper than finished products. Why not try it?