A switch with a brightness control (another name is a dimmer) is a device designed to adjust lighting parameters. The device allows you to change the light brightness levels from 0 to 100% of the nominal value.
Dimmers can be used as a replacement for a regular switch, while having significantly greater functionality.
Dimmer purpose
The purpose of a dimmer is to change the brightness of lighting devices. Adjustable light switches allow you to achieve any lighting intensity: from dim light to extremely bright. The use of dimmers makes double or triple switches unnecessary, and there is no need to buy expensive lighting fixtures with voltage controllers.
Note! To control the light intensity of energy-saving light bulbs, you will need a special device - an electronic starter.
The advantages of dimmers include the following characteristics:
- light brightness control;
- setting the brightness change time;
- remote control control;
- long service life;
- programmed artistic flickering, creating backlit paintings;
- economical energy consumption (some models).
Disadvantages of dimmers:
- excessive electricity consumption in some cases;
- creating radio interference that interferes with the operation of electrical appliances;
- small loads cause dimmers to malfunction;
- The operation of dimmers often leads to unwanted flickering of the light.
Operating principle
All dimmer models have similar lighting brightness control schemes. The differences lie in the presence of additional elements to give a smooth glow and stability of the lower limits.
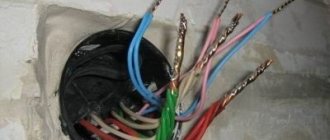
The figure below shows the purpose of the terminal posts in the dimmer.
The capacitor is charged through a variable resistor. As soon as the charging becomes sufficient, the triac opens and the light comes on. After this, the triac closes. A similar process is observed on the negative half-wave.
The figure below shows the operation diagram of a switch with adjustable light intensity.
By selecting the values of resistors and capacitors, the initial and final periods of lamp ignition are replaced, as well as the stability of its glow.
Dimmer compatibility with different types of lamps
It is worth understanding why, when purchasing a whole set of elements for a control system, there is a need to select them for each other. If the selection is incorrect, they simply may not make money together. This can happen for a number of reasons:
- A huge variety of adjustment devices and electronic circuits are available on the market. Manufacturers from different countries have their own voltage threshold; often it may be incompatible with other manufacturers, due to this the adjustment range is reduced. This may affect the comfort level of lighting.
- It may happen that the lamp or the power driver in the LED lamp will not turn on at all, and may also begin to make extraneous sounds.
- There is a possibility of not using the full power of the light bulb due to the fact that the output dimmer does not provide the required 220 Volts.
- Intermittent flashes of the lamp may appear, like flashing.
- There are failures in the adjustment mechanism itself, which prevents the lamp from being controlled in a timely manner.
These are possible consequences of incompatibility of the dimmer, lamps and LED lamps, which should be taken into account when choosing.
To reduce the likelihood of misalignment, it is best to further study the information about the LED lamps and dimmers themselves on the packaging and in the manufacturers' instructions. You can also contact the consultants in the store and ask them about compatibility; they have not only theoretical, but also practical experience and can give you useful recommendations.
Dimmer classification
There are two types of dimmers - monoblock and modular. Monoblock systems are made as a single unit and are designed to be installed in a box as a switch. Due to their small size, monoblock dimmers are popular when installed in thin partitions. The main area of application of monoblock systems is apartments in multi-storey buildings.
There are several types of all-in-one devices on the market:
- With mechanical adjustment. Control is carried out using a rotary disk. Such dimmers have a simple design and low cost. Instead of a rotary control method, a push version is sometimes used.
- With push-button control. These are more technically complex and functional mechanisms. Multifunctionality is achieved by grouping regulators controlled from a remote control.
- Touch models. They are the most advanced devices and the most expensive. Such systems fit well into the surrounding interior, especially those decorated in a modern style. Commands are transmitted using an infrared signal or radio frequencies.
Modular systems are similar to circuit breakers. They are installed in junction boxes on DIN rails. Modular devices are used to illuminate stairwells and corridors. Modular systems are also popular in private homes where it is necessary to illuminate the surrounding areas. Modular dimmers are controlled by an external button or a key switch.
Dimmer power is a key parameter when choosing it. The total power of the connected devices should not exceed this figure for the dimmer. There are systems on sale with power levels between 40 watts and 1 kilowatt.
According to design features, single, double and triple modifications are distinguished. In most cases, consumers choose single dimmers.
Additional functions
Older dimmers were designed as electromechanical devices. With their help it was impossible to do anything except adjust the brightness of incandescent lamps.
Modern models have significantly expanded functionality:
- Work on a timer.
- The ability to integrate a dimmer into a larger-scale system - a “smart home”.
- A dimmer, if necessary, allows you to create the effect of the presence of the owners in the house. The light will turn on and off in different rooms according to a certain algorithm.
- Artistic shimmer function. The lights on a Christmas tree garland flash in a similar way.
- Possibility of voice control of the system.
- As standard, commands are issued from the remote control.
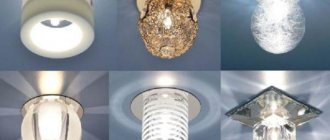
Types of light bulbs
Dimmers use a variety of types of light sources: incandescent, halogen (regular and low-voltage), fluorescent, and LED bulbs. Options for connecting a dimmer with a switch differ depending on the type of lamps used.
Incandescent and halogen lamps
These light sources are rated for 220 volts. To change the lighting intensity, dimmers of any model are used, since the load is all active due to the lack of capacitance and inductance. The disadvantage of systems of this type is the shift of the color spectrum towards red. This happens when the voltage decreases. The power of the dimmers is between 60 and 600 watts.
Low voltage halogen light bulbs
To work with low-voltage lamps, you will need a step-down transformer with a regulator for inductive loads. A distinctive feature of the regulator is the marking with the abbreviation RL. It is recommended to purchase the transformer not separately from the dimmer, but as a built-in device. For an electronic transformer, capacitance indicators are established. For halogen light sources, the smoothness of voltage fluctuations plays an important role, otherwise the life of the bulbs will be sharply reduced.
Fluorescent lamps
The standard dimmer will have to be replaced with electronic ballasts (electronic ballasts) if the start is carried out by a switch, a starting glow charge or an electromagnetic choke. The simplest diagram of a system with fluorescent lamps is shown in the figure below.
The voltage to the light bulb is sent from a frequency generator of 20–50 kHz. The glow is formed due to the resonance of the circuit created by the inductor and capacitor. To change the current (which changes the brightness of the light) you need to change the frequency. The dimming process begins immediately after reaching full power.
Electronic ballasts are manufactured on the basis of the IRS2530D controller, equipped with eight outputs. This device acts as a half-bridge 600-volt driver with triggering, dimming, and anti-failure functionality. The integrated circuit is designed to implement all possible control methods due to the presence of multiple outputs. The figure below shows a control circuit for fluorescent light sources.
LED light bulbs
Although LEDs are economical, there is often a need to reduce their brightness.
Features of LED light sources:
- standard bases E, G, MR;
- ability to operate with a network without additional devices (for 12-volt lamps).
LED light bulbs are not compatible with standard dimmers. They simply fail. Therefore, to work with LEDs, special switches with brightness controls for LED lamps are used.
Regulators suitable for LEDs are available in two versions: with voltage control and with control via pulse-width modulation. The first type of device is very expensive and large (it includes a rheostat or potentiometer). Voltage dimmers are not the best choice for low-voltage light bulbs and can only operate on 9 and 18 volts.
This type of light source is characterized by a change in spectrum in response to voltage adjustment. For this reason, the adjustment of light diodes is carried out by monitoring the duration of the transmitted pulses. This way it is possible to avoid flickering, since the pulse repetition rate reaches 300 kHz.
In order for the lamp to work correctly, it contains a driver. The possibility of dimming is indicated in the product data sheet. If dimming is not possible, it is recommended to buy special devices with pulse-width control.
There are such PWM regulators:
- Modular. Control is carried out by remote controllers, remote controls or using special buses.
- Installed in an installation box. They are used as switches with rotary or push-button control.
- Remote systems installed in ceiling structures (for LED strips and spotlights).
Pulse width control requires expensive microcontrollers. Moreover, they cannot be repaired. It is possible to independently manufacture a device based on a microcircuit. Below is a dimmer circuit for LED light bulbs.
Normal frequency of oscillations is achieved through the use of a generator, which contains a capacitor and a resistor. The intervals for connecting and disconnecting the load at the output of the microcircuit are set by the size of the variable resistor. A field-effect transistor serves as a power amplifier. If the current is higher than 1 ampere, a cooling radiator will be needed.
How to choose a dimmer for halogen lamps
Currently, halogen lamps are increasingly used, which have a number of advantages over other lighting devices. They are designed for two types of voltage: 12 or 220 volts. Most often, consumers prefer the second option, for which they need to purchase a dimmer for 220 volt halogen lamps. Although, as practice shows, 12-volt lamps are much more powerful, they have a longer service life. Therefore, in this case, a special dimmer is required for 12 volt halogen lamps. In order to understand what the main differences are, it is necessary to compare both types of these lamps.
Typically, comparisons are made between lamps with the same power and approximately equal beam angles. Ultimately, it turns out that the glow of 12-volt lamps is 3-4 times higher, and their service life is almost 2 times longer. At the same time, the cost of each model differs slightly from each other. Such a large difference in indicators occurs due to spirals that differ in size. In both cases, a dimmer for halogen lamps with a control panel can be used.
The only inconvenience is the need to use a dimmer for 12-volt halogen lamps in conjunction with a step-down transformer. Although, at present, such transformers are presented in a fairly wide range, at a very reasonable price. However, if it is necessary to install lamps in suspended ceilings, preference is given to 220-volt lamps, which do not require any additional devices when connecting dimmers for 220-volt halogen lamps. Adjusting the illumination of such lamps is much easier than the 12-volt version, which requires the optimal combination of transformer and dimmer for 12-volt halogen lamps. In this case, the cost of electrical equipment increases slightly.
There are 220 volt lamps with a special base and without reflectors. They are small in size, allowing them to be used in surface-mounted and recessed lamps. Therefore, there is a special demand for this type of product, and standard dimmers for 220-volt halogen lamps are used to regulate lighting. It should be remembered that for halogen lamps it is advisable to use protective blocks that ensure smooth switching on.
When connecting 12-volt halogen lamps to an electrical circuit, you must follow the basic rules. For example, step-down transformers should only be in induction versions, since the electronic version simply will not work. It is necessary to ensure that dimmers for halogen lamps with a remote control are connected in the break of the phase supply conductor. In addition, the dimmer capabilities must match the connected power. All manufactured dimmers are wall-mounted dimmers and differ in control methods. Their main types are represented by rotary, keyboard and touch models. In rotating devices, the required illumination is adjusted by rotating the round switch. In key dimmers, adjustment is made by simply pressing a key, and in the touch version, you just need to slide your finger over the sensor, made in the form of a panel.
This classification is supplemented by dimmers for halogen lamps with a remote control, which can be used for radio-controlled or infrared remote control. This option provides additional convenience and comfort, since the lighting can be adjusted without leaving your seat. These dimmers can be installed not only on the wall, but also in electrical panels.
Connecting the dimmer
There are several dimmer connection schemes.
Dimmer circuit with switch
In the described case, the dimmer is installed in front of the dimmer in a phase gap. The switch controls the flow of current. The connection diagram is shown in the figure below.
From the switch, the current is directed to the dimmer, and from there to the incandescent light bulb. As a result, the regulator determines the desired brightness level, and the switch is responsible for turning the chain on and off.
The scheme is well suited for bedrooms. The switch is placed near the door, and the dimmer is located near the bed. This makes it possible to control the light directly from the bed. When a person leaves the room, the light goes out, and when a person returns to the room, the light lights up with the characteristics that were set by the dimmer.
Connection diagram with two dimmers
This circuit contains two soft light switches. They are mounted in two places in one room and are essentially pass-through switches that control individual lighting fixtures.
The circuit involves connecting three conductors to the junction box from each point. To connect dimmers, connect the first and second contacts in the dimmers with jumpers. Then the phase that goes to the lighting device through the third contact of the second dimmer is supplied to the third contact of the first dimmer.
Circuit with two pass-through switches
This scheme is used quite rarely. It is in demand for organizing lighting control in walk-through rooms and long corridors. The circuit allows you to turn the light on and off, as well as adjust it from different ends of the room.
Pass-through switches are placed in a phase gap. The contacts are connected by conductors. The dimmer enters the chain in a sequential manner, after one of the switches. A phase approaches the first contact, which then goes to the incandescent lamp.
Brightness control is carried out by a dimmer. However, it should be borne in mind that when the regulator is turned off, the pass-through switches are not capable of switching light bulbs.
Pass-through dimmer: application and installation methods
To control the level of lighting, special devices are used - dimmers. But sometimes situations arise when it is necessary to control the brightness of light sources from several points in the room.
This task is similar to connecting pass-through switches, but has some special features.
Operating principle
A dimmer is a device for regulating power; as a rule, they are used to control the brightness of light sources , and are divided according to the type of adjustment into mechanical, touch, and remote.
Their operating principle for incandescent and halogen lamps is based on the principle of voltage regulation. LED lamps are regulated using controlled current sources and PWM controllers .
A pass-through switch is a switch that allows you to control the inclusion of electricity in one place from different places. Thus, the main purpose of the pass-through device is to control lighting fixtures from different places in the room.
Learn from this video how to choose the right dimmer:
Connection diagrams
Also widely used, as the most economical, are circuits containing a dimmer and a regular switch . Such circuits are easy to install and can be installed independently.
Sequential
There is no difficulty in installing two dimmers in different places that will control one light source. To connect them in series, it is necessary that three conductors come from each regulator to the junction box.
Both devices are connected to each other using jumpers through the first and second contacts, the phase comes to the third contact of the first device, the wire from the third contact of the second device is connected to the lamp.
Parallel
The peculiarity of parallel connection of two regulators is that they depend on each other. Connected in parallel, they act as switches rather than switches . Therefore, the disadvantage of this connection scheme is that each regulator controls only its part of the half-cycle.
This means that if one dimmer is set to 100%, the second one will not be able to control the brightness of the lighting.
With a regular switch
A simple and economical scheme, can be used, for example, in the bedroom. A dimmer can be installed near the bed, allowing you to adjust the lighting level, and a switch can be located at the entrance to the room. You can also use pass-through switches with the dimmer without any problems . This scheme can be used, for example, in long corridors.
A switch or pass-through switches are connected between the phase and the regulator, in the same way as usual.
The disadvantage of these schemes is that with a simple connection the light will only turn on at the set power.
This is not always convenient, besides, if the dimmer is turned off, the pass-through switches will not control turning on the light .
Connection diagram for a pass-through switch with a dimmer:
Some types of controls work like switches, such as rotary controls that switch when you press the turn signal.
Alternative devices on controllers and with remote control
Touch devices with a controller or remote control are more expensive, functional and intelligent types of dimmers.
For independent dimming of lamps from several points, you can use not mechanical, but sensory dimmers . Such devices are synchronized with each other thanks to electronic components and controllers, which allows you to control each device independently of the other.
You can install a touch dimmer and connect adjustment buttons to it where required. This option does not have the disadvantage of simple circuits with a switch. The buttons of the touch device can work as simple switches and adjust the lighting.
The disadvantages of such devices are their high price, complexity of installation - they must be installed by qualified specialists , as well as a small choice of design.
Remote devices are an excellent option for regulating lighting from anywhere in the apartment. Such devices can be divided into two types:
- Using a radio transmitter in their work;
- Using infrared radiation.
We bring to your attention video instructions on how to properly connect a dimmer:
They can also be combined with conventional wired switches. They perform all the same tasks as others - they control the switching on and off of lamps and the brightness of lighting, remote control is just another useful function of a dimmer .
The problem of regulating lighting power from several places is quite solvable, although each method has some disadvantages.
A simpler option for controlling a lamp is to install a dimmer and switch. This scheme is more economical and does not require large investments . A more expensive but comfortable solution to the problem is the use of intelligent systems based on controllers or using remote control.
Source
Requirements for installing a dimmer
When installing a dimming device, you should pay attention to several important circumstances:
- Fluorescent and energy-saving lamps are not dimmable in the standard way. Both types of light bulbs can work with a dimmer, but their service life is sharply reduced. Sometimes the life of a light bulb is reduced to 100–150 hours. In addition, the risk of damage to the dimmer itself increases.
- Dimmers require a certain minimum load. Most often its value is 40 watts. A decrease in load occurs due to the burnout of one of the light bulbs, deterioration of contacts, and the appearance of flickering with a frequency of 50 hertz. When the load drops below the minimum permissible, the protective system is triggered or the device becomes faulty.
- Dimmers are sensitive to ambient temperature conditions. At temperatures above 25 degrees, overheating is possible, which can lead to damage to the dimmer.
- The maximum permitted load on the device should not be exceeded. If necessary, it is recommended to add power amplifiers, which can be used to switch devices up to 1.8 kilowatts.
- Capacitive and inductive loads cannot be connected at the same time. This can cause damage to the device.
As for the installation location, experts recommend proceeding from the following information:
- Dimmers should not be installed in rooms where there are usually a lot of people. In crowded areas, the equipment will operate with interference.
- It is necessary to avoid installing dimmers in rooms where there is no permanent place for installing lighting equipment.
Conclusions: advantages and disadvantages
pros
- Reduced energy costs.
- Increased service life of LED light bulbs.
- Simulating the presence of the owners when the apartment is empty.
- Fashionable ways to decorate an apartment.
- Integration into the “smart home” system.
Minuses
- High price. High-quality models, especially touch and non-contact ones, are expensive.
- Models operating on the leading edge cut-off principle interfere with the operation of household appliances.
- You should carefully select LED lamps and dimmers for each other, otherwise the equipment will not work as it should or will simply break.
- The dimmer will break if the manufacturer's recommendations for power characteristics are not followed.
A dimmer is not an essential item. However, it is convenient, fashionable and provides significant opportunities for design and some savings.
- Related Posts
- Modern office lighting (ideas and recommendations)
- What glow (color) temperature to choose.
- Why do you need a starter for fluorescent lamps?
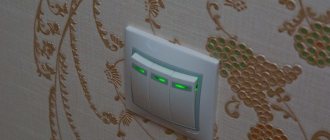
Installation of switches
In terms of dimensions, the dimmer switch resembles a standard device for turning lights on and off. Installation of the dimmer is carried out using special claws in the break of the lighting chain. The main requirement for the installer is to observe polarity.
The figure below shows the dimmer connection diagram.
You can learn how to connect two dimmers from the following diagram.
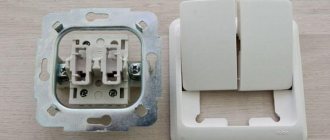
If you are going to install a dimmer instead of a switch, you will first need to dismantle the old model. But even before this, you should turn off the power supply and check the absence of voltage using an indicator. To remove the old switch, take a screwdriver and unscrew the screws of the mounting tabs. After this, remove the device panel. Then loosen the screws on the terminals and disconnect the switch from the wires.
The next step is installing a dimmer. Installation is carried out in the reverse order to that described above for dismantling. After installing the dimmer in the socket box, fix it with screws and install a decorative frame. If it is necessary to adjust the lighting in several places, you will need additional dimmers and installation of socket boxes with cable laying to them.