- How to use an indicator screwdriver: basic steps and safety
- Indicator: This is a device to detect the presence of voltage
- Indicator screwdriver diagram: main elements of the device
- Types of voltage indicators: single-pole and double-pole devices
- Passive voltage and current indicators: operating features
- Characteristics of active voltage indicator screwdrivers
- Digital multimeter tester: how to use the device
- How to determine phase and zero using an indicator screwdriver
- Indicator screwdriver with hidden wiring detection function
- The price of well-known indicator screwdrivers: a simple homemade electrician's probe
- How to check the phase without an indicator screwdriver
- How to use an indicator screwdriver: safety precautions
- Video: How to use the LED indicator
How to use an indicator screwdriver: basic steps and safety
My home is my fortress, hearth, refuge... And if this place is so important for everyone, then it is necessary to maintain certain conditions in it. By trying to depend less on others, you will be able to create the most comfortable life possible. It is worth understanding and mastering how to use the indicator , and then electrical appliances and lighting will work normally if they have working contacts and are provided with uninterrupted power.
If you understand how to use an indicator screwdriver, then electrical appliances and lighting will work without interruption.
Indicator: This is a device to detect the presence of voltage
An indicator is a device that monitors the state of a physical process and visually reflects its changes. Quite often this tool is called an “electrician’s screwdriver.” You can’t argue with this: every specialist involved in laying electrical cables or repairing electrical equipment has such a device.
An indicator screwdriver is often called an “electrician’s screwdriver.”
Users of electrical appliances can also monitor the state of power supply or equipment, determine the location of breakdowns and broken circuits. And in these situations, such opportunities will be provided to them by the same device that is generally available for use - an indicator. Today it is found in almost every home. The absence of an indicator makes it difficult to make the right decision in the event of a power failure, since it is almost impossible to find out whether only the house (apartment) is de-energized or whether this is a consequence of a larger breakdown without the presence of a tool.
The operating principle of the indicator screwdriver is quite simple and is as follows:
- the tip of the device touches the energized electrical wiring;
- the passing current illuminates the light bulb;
- the resistor reduces the voltage by creating significant resistance;
- Through sensory contact with the human body, the current goes into the ground.
It is worth paying special attention to the fact that the tension passing through the human body is imperceptible and completely safe for life and health. The device does not require any special skills when using it.
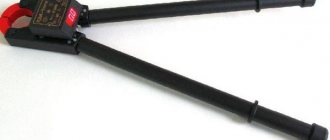
Operating principle of an indicator screwdriver
Slotted screwdriver
The simplest screwdriver indicator works as follows:
- When the tip comes into contact with the phase wire (positive terminal of the battery), electric current begins to flow through it;
- After the sting, the current passes through a resistor with a resistance of 1 mOhm. The strength of the passing current is reduced to a value that is safe for the human body.
- Bypassing the resistor, the current passes through the neon lamp, causing the gas pumped inside to glow;
- The remaining current goes through the body of the person using it into the ground.
Thus, the entire process of determining the presence of current in a separate section of the circuit takes a few seconds.
Indicator screwdriver diagram: main elements of the device
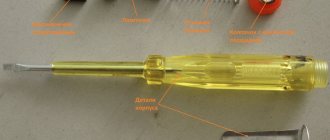
The tool is small in size and has a shape that is easy to grip with the palm of your hand. The main elements that make up the design of an indicator screwdriver include:
Elements of an indicator screwdriver: plastic body, tip, resistor, light bulb.
- a plastic body consisting of a handle and a tip, the latter housing the sting;
- resistor;
- indicator light (lit when voltage exceeds 50 volts);
- metal spring for retracting the tip;
- metal plate to ensure contact with the human body.
Listed above are the main details that are typical for the simplest devices. To understand how to use a tester screwdriver, you should study the design of the tool, which may differ depending on the type of product. For example, the industry produces devices with LED lamps, sound indication, and an additional board that allows switching between different modes.
The design may not have a spring. In such a device, the tip is not retracted into the body and does not extend, but has a constant position and is closed with a cap during storage of the device. If the indicator is powered by batteries, there is an additional compartment in the housing. Some models are equipped with a holder similar to that found on writing pens. This detail greatly simplifies the portability of the device.
On a note! When choosing a screwdriver, it is worth considering that the indication will be more noticeable on a device with a light or translucent body, especially if the device is used in a well-lit room.
Standard circuit used in most indicator screwdrivers.
Types of voltage indicators: single-pole and double-pole devices
Modern industry produces a large number of different indicators. There is no specific standard classification for them. According to the characteristics of the technical device, devices can be divided into single-pole and double-pole, and they also distinguish between passive and active products. This section will discuss classification based on the first criterion.
Single-pole indicators. This type includes the simplest devices, the design diagram of which is described above: based on a tip and a neon lamp for indication. More advanced single-pole devices have an LED lamp, battery power, and an audible signal - in addition to the glow of the lamp. According to the principle of operation, such indicators are identical to the simplest devices, but it becomes possible to test the wires.
The most advanced single-pole models have a complex structure, although the principle of operation remains the same. In addition to the functions already listed, they have the ability to detect the break of hidden wires located under a layer of plaster.
The two-pole type of indicator screwdrivers is distinguished by the fact that it has not one, but two bodies. Each is made of dielectric material and has a backlight - neon or LED lamp. Some devices are equipped with a sound signal. The two housings are connected by a wire, the length of which usually does not exceed 1 m, and both have a sting. Such devices are considered professional and are used to check the presence of current between two contacts. Among the bipolar ones, there are models that determine not only the presence of voltage, but also its magnitude.
The two-pole type of indicator screwdrivers is characterized by the presence of two bodies.
Passive voltage and current indicators: operating features
The second sign of the classification of indicators is their division into active and passive devices. The basis is the functional features of the tools. Passive devices include those with the following characteristics:
- Not complicated. Single-pole, consist of one housing with elements placed in it.
- Limited functionality. The only thing that an indicator screwdriver of this type shows is whether there is voltage at a certain point in the electrical circuit.
- Unprofessional tool. Most often used in everyday life, it is unacceptable for electricians due to the lack of opportunities to provide the necessary inspection of the condition of electrically conductive cables.
The advantage of these indicators is that when determining the presence of voltage, a zero is not needed; its role is performed by a person holding an indicator screwdriver in his hands. The peculiarity of its device is also that the resistor, due to its significant resistance, does not detect the presence of voltage below 50 volts.
It is not difficult to understand how to find a phase with an indicator screwdriver of this type. You should touch the conductor with the sting, and press the plate on the device body with your hand. If there is voltage, the neon light will light up.
Passive indicators only determine the presence of voltage at a certain point in the electrical circuit.
Electronic or smart indicators
These devices can be called a “mini-multimeter”, since the functionality is quite wide. The difference is that this is not a measuring device and its readings can be trusted with a stretch. You can get approximate values, but for accurate measurements you still need a multimeter.
Can have two operating modes:
- contact;
- contactless.
One of the most common electronic indicator screwdrivers is IEK OP 2E
In non-contact there is usually work with greater and less sensitivity. So this device combines the two described earlier - a contact and non-contact indicator screwdriver. There are two options:
- with signal LEDs;
- with liquid crystal display.
For models with LEDs, you will first have to remember in which case which LEDs light up. Usually there are two of them - red and green, but there may be other options. With a liquid crystal display it is easier - reading the readings is not difficult.
Characteristics of active voltage indicator screwdrivers
Active indicators have a more complex structure. Inside the case there is a circuit that functions slightly differently than passive devices. This device is more sensitive. The LED voltage indicator reacts not only to the presence of current, but also to the electromagnetic field that necessarily forms around the conductor.
Active indicators have the following technical characteristics:
- Having your own power source. There is a battery inside the case that powers the internal device.
- LED instead of neon lamp.
How to use an LED indicator screwdriver? If you hold the tip with one hand and touch the plate on the body with the other, the LED lamp will react and light up. This functionality is actively used when testing wires.
On a note! When working with an active indicator, it is necessary to take into account the following feature: increased sensitivity, in addition to providing additional functions, often becomes a problem, since the indicator sometimes indicates the presence of voltage where there is none and cannot be.
Active indicators have their own power source.
How to use a screwdriver indicator
Well, we looked at three types of indicator screwdrivers, now we’ll look at how to use an indicator screwdriver and test them in operation.
Regular indicator
The pointer of this indicator screwdriver is equipped with two working areas. The first one looks like a flat-head screwdriver - it comes into contact with electrical wiring elements that are energized. The second provides sufficient resistance and is located on the handle of the screwdriver. It also has a two-pole switch.
Let's consider an example in which a phase wire is connected to the first contact, and a neutral wire is connected to the second. The voltage indicator determines which wire the phase is going through.
To determine, it is enough to hold the contact on the handle of the voltage indicator with your thumb, and then bring the working area of the indicator alternately to both contacts of the circuit breaker. In this case, you need to make sure that your thumb remains bare - you should not wear gloves when using the device.
How to use an LED indicator screwdriver
As mentioned above, these indicators are distinguished by the presence of a function not only for contact, but also for non-contact use in the presence of a light warning.
If you are using the classic contact method and you need to find out where the phase is, it is enough to bring the working part closer to both contacts of the circuit breaker. When you bring the device to the zero contact, you will not notice any changes. When you check the phase one, the signal light will immediately light up, which will allow you to immediately find out that there is voltage at this contact.
To determine the presence of a phase using a non-contact method, it is sufficient to use the second working part, also known as the heel. It must be brought close to the cable insulation. You don’t even need to touch it - if there is a phase, the diode will light up at a short distance from the cable.
A serious plus is the ease of testing (detection of breaks in the circuit). It is necessary to connect one working part to the first end of the circuit that is being tested, and the other to the second. If the circuit is working properly, the LED light will light up. Otherwise nothing will happen.
If the contact is energized, the indicator will immediately signal this - a red light will light up in it. If you bring the voltage indicator to the zero contact, no signal will follow.
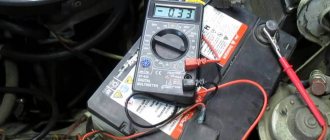
Digital multimeter tester: how to use the device
This device is an improved version of the active indicator. This is a voltage measuring tester. It can also be used as a regular device. Professionals call this tool a “multimeter” because it can perform several functions:
- indicate the presence or absence of voltage;
- determine the current strength and resistance value.
Such testers have switches that adjust the sensitivity level. The device can be used for contact and non-contact methods of detecting the presence of voltage and voltage.
The device, in addition to the light, is also equipped with a sound signal. The design has a digital display that displays the measurement indicators.
Note! It is easy to purchase additional pliers for the multifunction tester, which can be used to determine the current strength without removing the insulating layer.
The digital multimeter tester is equipped with an electronic display.
To confidently understand how to find phase and zero with an indicator screwdriver of this type, you need to carefully study the description of the device and instructions. Some models, in addition to the above functions, can check the temperature of equipment under the influence of current. Such capabilities are important for those who control the operation of electrical switchboards, electric motors, etc.
Almost all modern houses are equipped with cabinets from which electrical cables are routed. And relatively powerful engines are not uncommon on the farm. Therefore, a multifunctional tester is often needed in everyday life, and not a simple indicator screwdriver.
How to determine phase and zero using an indicator screwdriver
The need to determine phase and zero arises quite often. Basically, this need arises when replacing an outlet or switch. Before posting information on how to check zero and phase with an indicator screwdriver, it is worth saying a few words about what these two concepts mean. Line voltage, that is, the voltage between two phases, is 380 volts, but in homes it is 220 volts. Connecting the neutral wire to the phase provides the required voltage level.
Determining phase and zero in the presence of two wires can be done in the following way:
Using an indicator screwdriver, determining phase and zero is quite simple.
- de-energize the wires by disconnecting from the power supply;
- strip the ends by 1.5 cm, separate them so that when electricity comes in, a short circuit does not occur;
- apply voltage;
- Use an indicator screwdriver to touch the end of the wire, pressing your hand against the metal plate on the handle of the screwdriver.
If the light on the device lights up, this is a phase; if not, it is zero.
In conditions where there are three wires (phase, neutral and ground), a simple device and even an indicator screwdriver with a battery are not enough. You will need a multimeter. Finding the phase with its help will not be difficult. But you can determine the other two wires as follows: touch the phase with the first probe, and touch one of the remaining conductors with the second. If the voltage is about 220 volts, then it is zero. Then you should repeat the steps: attach one of the probes to the remaining wire. The voltage will be significantly less than 220 volts. Therefore, this is grounding.
What to remember
When using an indicator screwdriver, it is better to consider the following recommendations:
- It is necessary to register the mains voltage before any manipulation.
- All contacts of a switch, socket or circuit breaker are checked.
- When working with conventional indicator screwdrivers, do not use gloves or remove your finger from the cover.
Indicator screwdriver with hidden wiring detection function
The term “dialing” has already been used in the article. This is one of the functions that the tool can have. These devices are LED and are powered by a battery. Precisely because a test screwdriver requires a battery, many people prefer simple options that, in fact, last forever.
Using an indicator screwdriver, you can find hidden wiring.
A device with dialing may be based on the following circuits:
- with field effect transistor;
- with bipolar compound transistor.
The control coefficient of both types of element is quite high. Even circuits with high resistance, enclosed between the contacts of a screwdriver, unlock the transistor, and the LED is triggered - it lights up. A similar thing happens when the tip gets into an electromagnetic field.
If the broken wire is connected to a phase, then when the tip is passed along the place where it is placed and when you hold the top of the screwdriver with your hand, the light will glow. After the break, the glow will disappear.
Note! When using a voltage indicator as a continuity test, it is necessary that there is a zero parallel to the phase, and that the end of the wire being tested has a load.
A device such as a detector will determine the location of hidden wiring more accurately.
When moving the indicator along the cable under the plaster, the LED will also light up. In this case, be sure to ensure contact with the top point. If the screwdriver is moved 2-3 cm relative to the wire, it will go out.
The function of detecting an open circuit, including under plaster, is inherent only to indicator screwdrivers - such operations cannot be performed with a multimeter.
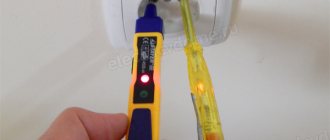
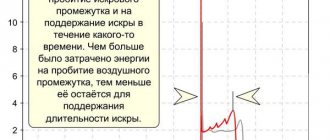
Determination of alternating voltage using a non-contact method (up to 600V)
We take a screwdriver by the probe and bring the back side - the snout - to a wire, socket, switch or the expected area of hidden wiring in the wall (pictured).
A lit LED is an indicator of the presence of alternating voltage in the area being examined.
False triggering: when the housing rubs against the plastic of the cable or other surface, static voltage arises, which can cause false signals.
Also, the disadvantage of this method when detecting hidden wiring is low accuracy. If the house is panel, then this exercise will be completely useless since the reinforcement in the floor slabs will distort the signal.
We are looking for a break in the cable (pay attention to the gap between the screwdriver and the cable - this is correct):
We close the probe of the screwdriver and draw the tip along the wire. In the area where the LED went out the wire is damaged.
Price of indicator screwdrivers from well-known manufacturers
As for the cost of voltage indicators, devices should be divided into three categories.
Simple options. These are screwdrivers that have a blade, a body, a neon lamp and a resistor. The price for such products ranges from 20 to 40 rubles. Despite their long service life, manufacturers provide a one-year warranty on such devices. The likelihood of mechanical damage to the plastic case probably plays a role.
Multimeters are the most expensive.
Screwdrivers with additional functions. The ability to test and determine a break under the plaster provides for a more complex design. Consequently, the price of indicator screwdrivers of this type will be higher. The minimum cost is 45–50 rubles, the maximum reaches 200 rubles. Among this type of device, those models with the ability to adjust the sensitivity level have a high price.
Multimeters. They are distinguished by the highest cost, since they are a combination of three devices in one device: an ammeter (current measurement), a voltmeter (voltage measurement) and an ohmmeter (resistance measurement). The price of such testers varies from 2500 to 5000 rubles.
Many domestic and foreign companies are engaged in the production of indicator screwdrivers. According to users, the most reliable and durable products are considered to be JTC, EXPERT, JONNESWAY. The above price range is focused on devices from these manufacturers.
“Control”: a simple homemade electrician’s probe
If you have an indicator screwdriver in your arsenal, the steps for its use are clear. What if one is not at hand and for some reason cannot be in the near future? In such situations, knowledge and ingenuity will come to the rescue. There is no need to reinvent the wheel, since the simplest homemade device for determining the presence of voltage already exists - this is a tester. That's what professional electricians called it.
The “control” consists of a light bulb and two wires.
The device consists of a light bulb screwed into a socket and two wires that act as probes. How does the indicator light screwdriver work? Simple and quite effective. The wires must touch the elements in which the presence of voltage should be checked. By the brightness of the lamp, you can determine not only the presence of voltage, but also its compliance with the norm.
This homemade device allows you to check three phases at once. For this, two series-connected controls are used: if two wires have the same phase, the lights will not light up.
This self-made device will not function if there is no zero, but such a situation is practically impossible both in everyday life and in production.
Note! All regulatory documents relating to the use of electrical appliances and power tools in everyday life and in production recommend the use of only factory-made devices.
In "Control" an LED can be used instead of a light bulb.
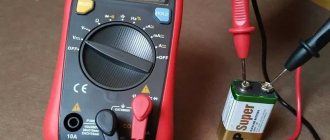
Battery or accumulator polarity (1.5V to 36V DC)
We had a half-dead Cosmos battery at hand - we don’t need anything more now.
We close the screwdriver with our finger and touch the probe to the battery terminal. With the other hand we close the other terminal.
The LED on the positive terminal shines much brighter.
Thus, the range of uses of the indicator screwdriver is quite extensive and makes this inexpensive and practical device an indispensable assistant for the home craftsman for simple electrical work in everyday life.
How to check the phase without an indicator screwdriver
How to determine the phase without an indicator? There are several ways. They are sometimes the only way to correctly install a switch or replace a burnt out socket.
The first of them is the fastest, simplest and most reliable. It is based on a visual inspection of the wires. The fact is that the multi-colored braid is not random. It is the color that indicates neutrality or being under the phase of the vein. Remembering the correspondence is difficult, and it is not necessary. If necessary, just look at the marking table.
The second option allows you to determine the presence of voltage using the same control. One wire should be attached to the metal of the heating system, cleaned to a shine, and the other should touch the conductors where the phase needs to be determined. If you touch a live wire, the light bulb will light up. If you don't have an incandescent lamp on hand, you can use a neon lamp.
The third method, which tells you how to find a phase without an indicator screwdriver, may make you smile, since the diagram includes... potatoes. In addition, you will need two wires about 50 cm long and a 1 MΩ resistor. One cable must be connected to the heating metal, and the second cable must be probed for the core of interest. The ends of the wires must be inserted into the cut of the potato. If after a few minutes traces of darkening appear, it means the vein is phase. If not, then zero is determined. It is worth noting that the holding period should be 5, maximum 10 minutes. There is no point in drawing conclusions before the expiration of the extreme time threshold.
You can determine the phase without an indicator screwdriver by the color of the wire.
Types of indicator screwdrivers
Currently, there are a series of measuring devices on sale:
Types of indicator screwdrivers
Indicator screwdriver without batteries
This type is used only to establish the “phase”. Such a device belongs to the simplest type and its use does not require great skills and abilities. Its design consists in the fact that the electric current passing through the tip of the tool is short-circuited to the person holding the tool by the metal contact.
Without the touch of a person's finger and contact, this tool will not perform its functions.
The advantages of this model include low cost, simple mechanism, long service life, and no need to periodically replace batteries.
The disadvantages include such shortcomings as the inability to recognize a broken wire, voltage measurements in a current-carrying network with a voltage of more than 60 volts, as well as an insignificant degree of illumination.
Indicator screwdriver with batteries
This type finds the “phase” and is also used to check a de-energized cable for the integrity of the electrical line. Externally, the tool of this model resembles the screwdriver described above. There are batteries in the mechanism body that allow you to turn on the indicator light during the process of checking for a break.
Universal indicator screwdriver
Universal indicator screwdriver
This type of screwdriver helps to identify the presence of a “phase”. This method can be performed either with or without joining. The difference between this screwdriver and previous models is that it is possible to check the electrical network with a voltage of 60-1000V for alternating current, and from 1.5-9V for direct current.
What types of switches exist and where are they used? All about switches here
In addition, the study can be carried out on a live line. When installing electrical networks, this tool is able to find insulated wires located both on the surface of the walls and built into them.
How to use an indicator screwdriver: safety precautions
Electricity is a source of increased danger. According to the standards, a room that has at least one switch or socket cannot be considered safe. It follows that when using electrical appliances or tools used to repair or maintain conductive elements, certain requirements must be strictly observed.
The first thing you need to know when detecting the presence of current in the conductors is how to check the indicator screwdriver. In order to make sure that the device is working properly, you will need to simultaneously touch the plate on the handle and the tip. The LED lamp should light up. This is a test for models with batteries. You can check a simple screwdriver by touching the live parts with the tip and touching the metal plate on the handle with your hand.
To avoid exposure to current when using the indicator, it is strictly forbidden to place your hand below the handle.
To avoid exposure to current, do not place your hand below the handle of the screwdriver.
Do not use the tool as a screwdriver. The plastic part may become damaged, causing the device to become unusable.
When performing such actions as checking the socket with an indicator screwdriver, establishing zero and phase, determining the presence of voltage in the network up to 1 kW, there are no restrictions on the use of the device. If this indicator exceeds this level (more than 1 kW), it is imperative to use dielectric gloves when working with the indicator.
Electricity is a source that provides comfortable life through the operation of various household mechanisms. Food, light, hot water, massagers, hair dryers, etc. will not be able to function without power. Many defects and breakdowns can be eliminated using an indicator. Which device option to choose is an individual decision, depending on the needs and the availability of certain experience.
Indicating screwdriver with LED – greater functionality
The indicator screwdriver, equipped with an LED, has a lot in common with the model described above. Their operating principle is the same. But there is still a difference - LED probes are suitable for working with electrical networks in which the voltage is significantly less than 60 V.
Another factor that distinguishes an LED indicator from a regular one is the presence of its own, autonomous power source - batteries. They are also distinguished by the presence of a transistor, most often bipolar.
Therefore, this type of indicator screwdriver can already be called multifunctional. With its help, you can not only check the presence or absence of a phase in a contact or non-contact way, but also check the integrity of circuits - fuses, wires and cables.
The index consists of two working parts. The first one looks like a flathead screwdriver. It is used when working with direct contact with live elements.
The second part is suitable if it is necessary to determine the presence of voltage without contact. When used with the first part, it also allows you to determine the integrity of the network
The insulated handle made of transparent material contains an LED, which indicates the presence of voltage in the network.