Connecting a double switch is considered a pressing problem. For many, connecting a single switch does not pose a problem, and the design is quite understandable, but a double switch is more complex in design, and its installation requires more careful consideration.
In rooms of any purpose, lighting plays an important role and it includes two important components:
- lighting fixture;
- switch.
The lamp is the most important element as it ensures the creation of light. The light is controlled using switches that allow you to turn the light on and off at the right time. Without switches, lighting devices connected to electricity work around the clock, which is unreasonable and economically unprofitable.
The main function of the switches is to control the connection and disconnection of wires that come to the device from the junction box. That is, when you press a key on the device, the mechanism connects or disconnects the contacts, this depends on the degree of tilt.
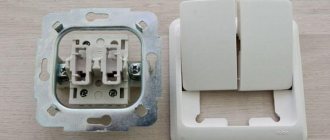
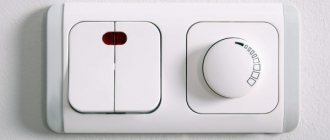
Switch device with two keys
In terms of external features, such a switch is very similar to a conventional device, the only difference is in the design of the internal mechanism. The case consists of a frame and keys.
A switch with two keys allows you to control the lighting of two groups and consists of:
- frame;
- two buttons for switching;
- input and output terminal blocks.
Terminals and screws can be used as fasteners. Electric current is supplied to the first terminal. After this, 2 wires are connected to the mechanism, which control the interaction of the key devices. A cable harness is connected to the clamps, which connects the switch to the lighting devices. It is believed that a two-key switch is a modification of a single-key device.
Often there are modular switches that consist of 2 single connecting parts.
The principle of operation of a double switch is the interaction of contacts and wires that are connected to lamps of various designs.
Connection of cables and wires occurs thanks to terminal blocks. Terminals are special devices that are equipped with self-clamping mechanisms. Terminal clamps have recently become very popular because to make a connection you just need to clear the ends of the wires of the insulating material and connect them to the terminal.
There are switches with screw terminals; everything happens in them in a similar way, only the fixation occurs by tightening the screws.
Important! Experts recommend using a double switch with terminal blocks. This connection is considered durable and easy to install. Screw terminals loosen contact over time, which leads to a disruption in the flow of electrical current.
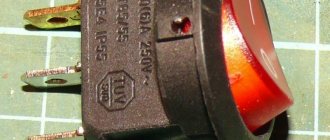
There are types of modern two-key switches that are equipped with a backlight and an indicator. The backlight helps to detect the device in the dark, and the indicator shows the presence of a closed circuit in the lamp.
Connecting a two-button switch
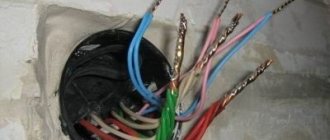
Before installation, you should carefully familiarize yourself with the location of the switch contacts. Sometimes you can find a switch contact diagram on the back of switches, which shows the normally open contacts in the off position and the common terminal.
A double switch has three contacts - a common input and two separate outputs. A phase from the distribution box is connected to the input, and two outputs control the switching on of groups of chandelier lamps or other light sources. As a rule, the switch should be mounted so that the common contact is located at the bottom.
If there is no diagram on the back of the switch, then the contacts are determined as follows: the input contact is on one side of the switch, and the two terminals to which the lighting devices are connected are on the other side.
Accordingly, the two-key switch has three terminals for connecting wires - one on the input contact, and one on each of the two output contacts.
So, we figured out how the switch works. Now you need to prepare your workplace, tools and materials. We must not forget that the most important thing when performing any work related to electricity is safety.
Each of the keys of a two-key switch can be set to one of two positions, turning the electrical appliance on or off. Each group can have a different number of light bulbs - it can be either one or ten or more lamps. But a two-key switch can only control two groups of lamps.
First you need to check the wires, that is, test which one is phase. Using an indicator screwdriver it is not difficult to do this: upon contact with a phase in the screwdriver, the signal LED will light up.
Mark the wire so that when performing further operations you do not confuse it with the neutral one. Before you begin installing the switch, you must secure your work area.
If we are talking about a chandelier, you should turn off the power to the wires coming out of the ceiling. When the type of wires has been determined and marked, you can turn off the power (to do this, use the appropriate circuit breaker in the panel) and begin work on installing a double switch.
Decide in advance and ensure that you have connecting material for the wires.
- Typically used:
- self-clamping terminals;
- screw terminals;
- caps or electrical tape for hand-twisted wires.
The most convenient and reliable way is fixation with self-clamping terminals. Screw clamps can weaken over time, and electrical tape tends to lose elasticity and dry out. Because of this, the reliability of the connection may weaken significantly over time.
Self-clamping terminals provide a reliable, strong connection. To correctly connect the switch to the light bulb, you must carefully study the step-by-step instructions on how to do this. After this, you can not only carry out the installation according to the diagram, but also identify possible malfunctions. When providing electrical installations indoors, the question often arises of how to lay the cable using a corrugated pipe.
- To perform all operations accurately, you must have the following tools:
- 2 screwdrivers – flat and Phillips;
- assembly or stationery knife or other device for stripping insulation;
- pliers or side cutters;
- construction level.
Advantages of double switches
Devices with two keys have the following advantages:
- one device can control the operation of several lamps or lighting fixtures;
- ensuring control over the intensity and brightness of light in the premises. A single switch, when pressed once, turns on all the light bulbs of the lighting fixture, but a double switch can be used not at full strength by turning on one key;
- the ability to adjust lighting in two rooms at once;
- economical consumption of electricity;
- rational use of cables and wires;
- It is allowed to turn on one lamp, which has a beneficial effect on eye health. Everyone knows the feeling when all light bulbs are connected at once; this happens with a single switch;
- convenience when connecting two-key switches for damp rooms or street lighting, since one device is much more convenient to camouflage from bad weather or shocks. When installed outdoors, switches must be protected with special covers.
Important! To create uniform lighting, it is possible to use a dimmer, which allows you to adjust the light.
Methods of application
The large number of advantages of such a device allows it to be used in almost all rooms of a house, apartment, office, etc. In addition, a two-key switch can serve as a regulator for the operation of lamps in several rooms at once, for example, a bathroom and toilet or a corridor and a kitchen. In order to carry out installation correctly, you need to know how to connect a double switch to two light bulbs.
Important! Devices that control lighting in two rooms at once are most often installed outside the room. This requirement is specified in the PUE (electrical installation rules).
Thus, we can conclude that the scope of use of two-key switches is huge.
Connecting protection, control and lighting devices
Let's start by installing the lighting circuit protection device. For our example, a two-pole circuit breaker is used; the rating should be calculated for each individual case individually, since the lighting power will be different everywhere. In some places there will be only one 150 W lamp, and in other cases there will be several 3 kW spotlights.
The wire we use has double insulation, common outer and inner, separate for each core.
Carefully, without damaging the internal insulation of the cores, remove the outer layer. First, from the wire supplying the protection device.
Then, from the wire going to the junction box.
Now, we connect the two-pole circuit breaker.
We measure the length of wire required for connection. We bite off the excess. Then, remove the insulation from the wires and connect the wires to the terminals. The wire has a different color for each core.
- We define the blue core to transmit zero;
- Yellow with a green stripe - for grounding;
- We use the remaining core for phase transmission. In our case, the phase on the wire approaching the machine is white with a black stripe, and on the wire going to the junction box it is simply white.
When making connections, carefully ensure that the upper wires suitable for the machine match the colors of the lower ones. At the top, the phase is on the left, at the bottom there should be the same on the left. At the top, zero is on the right, so the bottom should be on the right.
We will not use grounding conductors in our example, but in principle, they can be used to transfer grounding to the corresponding contacts of the lamps. Unless, of course, it is structurally provided for in the electrical supply system of your home.
Many lamps have a metal body and are designed with a grounding contact. This is especially true in rooms with high humidity.
We isolate the unused grounding conductors and put them aside so that they do not interfere.
Let's move on to connecting the two-key switch.
We strip the wires and remove the outer insulation.
Next, we prepare the wire cores for connection. We remove 1 centimeter of insulation from each core.
Now, let's look at how to connect a double light switch.
Our example uses a switch with plug-in contacts.
We turn the mechanism with the back side. As you can see, it shows a wiring diagram for a specific switch. As a rule, such a scheme is found on all lighting control devices, but there are exceptions. Connecting two-key switches of various types is described in great detail in the instructions on how to connect a two-key light switch.
Following the symbols of the switch circuit, we connect the wires. In our case, “L” is the suitable phase, and the two arrows at the bottom of the phase are outgoing.
Let me remind you that in our example, we chose a white core for phase transmission. There is a corresponding contact for it on the switch; for a specific model it is designated by the letter “L”, a contact of a suitable supply phase.
We connect the two remaining strands of the wire to the outgoing contacts, on this model they are indicated by arrows, from them the phase, at the command of the keys, will be supplied to the lamp of the first or second room, or to both rooms at once.
The switch is connected. We install it in the socket box.
You can find out more about how to install other electrical wiring elements (sockets with and without grounding, double switches, including backlit ones, chandeliers, lamps, bathroom exhaust fans) here.
Let's continue. The lighting control element is installed, all that remains is to mount the lamps. In our example, they are presented in the form of two sockets with light bulbs.
We prepare the wires of the first and second lamps for connection. We remove the outer insulation, measure out the required amount of wire, and strip the core for connection. As a rule, lamps are equipped with standard plastic terminals; to connect through them you will need approximately 0.5 centimeters of bare wire strand
We connect the lamp of the first room, also known as a socket.
Then, the lamp of the second room.
Ground wires are not used in our example, so we isolate them.
And we put it aside so that it doesn’t get in the way.
All circuit elements are installed. Now, let's move on to the actual assembly of the circuit.
Drawing up a drawing for connection
Before carrying out installation work, a connection diagram is required. The drawing must clearly show the routing of the wire. Basically, a phase wire is connected to the switch. The ground and neutral wires are connected directly to the lamp. There are 2 cable wires coming from the switch, each of which must be connected to light bulbs or other lighting devices.
The basic principle of the diagram is to indicate the connection of wires from the junction box to the lamp.
Materials required for connection
After drawing up the diagram, they begin to prepare the materials necessary for installation. The list of additional materials includes:
- electrical wires, the cross-section of which must be at least one and a half square millimeters. To accurately determine the footage, you should measure the room using a tape measure;
- two-key switches;
- insulating tape;
- mounting box;
- terminal blocks or screw terminals.
List of tools:
- Phillips and flat screwdrivers;
- assembly knife for removing insulating material;
- side cutters;
- level;
- pliers;
- hammer and chisel in case of need for the process of scoring or deepening for socket boxes.
Installation of electrical wires
Before making the connection, you need to check the wires used. To do this, it is necessary to test and determine which of the wires is phase. For testing, an indicator screwdriver is used, which will indicate the presence of current with an LED signal. It is necessary to mark the phase wire so as not to later confuse it with the neutral wire.
Before installing a double switch, you should correctly lay out the electrical wiring to the location of the device. In cases where a hidden wiring method is used, the wiring is carried out before the walls are plastered. Only after this are switches and lamps installed in place, and then connected. The wiring is carried out according to a pre-drawn diagram.
When using the open method, the wiring is laid in cable ducts or corrugated pipes. In cases of replacing electrical wiring, the hidden method is considered more labor-intensive, since you first need to dismantle the old wiring and then install a new one. The open wiring method is more economical and does not require cost or labor. It's fairly easy to remove the old wiring and connect the new one.
Preparatory stage of connection
After the cable is placed in the designated place, the process of connecting the switches begins. During installation and connection, it is necessary to de-energize the room in which the work will take place.
Important! To turn off the current, just turn off the automatic switch located at the beginning of the branch.
In a well-designed distribution panel, all circuit breakers are marked, and therefore de-energizing the required circuit breaker will not be difficult. If the wires are not labeled, then the machine can be detected by selection.
After wiring the wires, the installation of the two-key switch begins.
The work begins with stripping the ends of the wires. You can connect a double light switch using 3 wires: the first is input, which provides the input of current, and 2 outputs, which are connected to lighting devices. The ends of the wires are stripped of insulation; the stripping distance is approximately 10 cm.
Then the cleaned wires are connected to the terminals. This fastener is designated in the system by the letter “L”. Such a clamp is located on one side of the structure, that is, separately, and cannot be confused. This method is used for two-key switches if their design is not modular.
For modular switches, the connection occurs differently. In this case, the input cable is connected to the terminal of the first module. This terminal is also designated by the letter “L”, only it is connected by a thin wire to the second module. This is how the connection to the phase wire occurs. The output terminals are indicated in the diagram in the form of arrows, and the wiring to them is connected in the same way.
There are several options for connecting a double switch:
- The simplest method is characterized by an equal number of wires from the ceiling and the lighting fixture. To connect such wires, simply twist them together.
- If there are 3 wires on the ceiling, and the chandelier has a larger number of shades, then in this case the wires are distributed into sections and connected to the phase wire.
- If 4 wires come out of the ceiling, in these cases the wires are twisted together. One of the four wires is grounding; it can be identified by its light green color and the “PE” marking.
There are 2 screws on the sides of the structure, with which you can adjust the fixation of the legs. If the device is loose, you can use screws to tighten it and secure it more firmly. To do this you will need a shaped screwdriver.
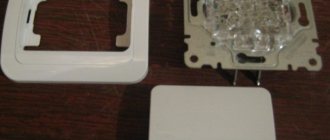
The box is mounted in a specially prepared recess, after which the upper decorative frame is installed. Then the switch is mounted in the socket box. Bolts or clamps are used for fastening. This process depends on the design of the switch you purchased. There are varieties that have removable frames and push buttons. These elements are removed before connection and installed after completing the entire scope of work.
Preparatory work
When working with electrical equipment, extreme precision and caution must be observed, therefore all materials and tools needed for the work must be prepared and purchased in advance:
- flat and Phillips screwdriver;
- pliers;
- side cutters;
- insulating tape;
- a good construction knife with a sharp blade (for stripping wire ends);
- for crimping it is more convenient to use a special tool - a crimper (it is not necessary if the wires are not stranded);
- switch;
- wires.
Attention! It is very important to turn off the power supply before starting work!
It is extremely important (especially for non-professionals) to correctly draw the connection diagram and lay out the wiring in advance.
The circuit should include the following three wires:
- Ground wire (exited to the light source, indicated on the diagram as “0” or with an arrow pointing down).
- Neutral wire (also led to the light source, designated by the letter “N”).
- Phase is a live wire that, when turned on, should provide power to the light bulbs (the terminals for the phase wire are designated by the Latin letter “L”).
You can install the wiring in one of two possible ways: open or closed. For the first, you will need additional materials - corrugated pipes or grooves, for the second - you need to cut grooves in the walls.
Please note that wiring is done before plastering the walls and ceiling. This means that only after all the wires have been laid and are sufficiently insulated, you can begin finishing work.
To make a small recess under the switch, you will also have to use a chisel and a hammer (this is not necessary if the switch will be installed in the old place).
What is an RCD in electrical engineering: types, principle of operation
How to connect a pass-through switch: connection diagrams