In the instructions for modern lighting devices, manufacturers indicate “magic” service life, but in practice, even high-quality and expensive light bulbs rarely work for more than 1 year. Products of outdated designs, in which the light source is a hot tungsten filament, will last even less. To avoid accidentally throwing away a lamp that is still suitable for further use, it is recommended to check such products. The simplest method is to install it in another lighting fixture. Unfortunately, this method is not always convenient, and if products with an original type of base are used, then its implementation in practice is impossible without performing rather dangerous actions using electrical wires under high voltage. A good alternative to this diagnostic option is the use of portable measuring instruments. How to check a light bulb with a multimeter will be described in detail in this article.
Which multimeter to use for testing
In order to check the functionality of a light bulb, you can use almost any model of multimeter. One of the most affordable devices equipped with an electrical circuit ringing function is the DT832 model. This device can be used to check not only light bulbs. For example, using a multimeter you can easily repair cars, for example, you can determine the position of the carburetor throttle valve or test the wiring. If the tester does not have an audible alarm, you can use it in resistance measurement mode.
If you urgently need to check the functionality of the light bulb, but you don’t have a multimeter available or the device turns out to be faulty, then you can assemble a homemade device that can completely cope with this task. For this purpose, you can use a dial indicator and a 1.5 volt battery. It is enough to connect these elements in series using a gap with 2 probes. In this way, you can effectively check for breaks in an electrical circuit that is not critical to increased current.
Preparatory work
No special skills in handling electrical measuring instruments are required. In addition to a multimeter, the only thing you may need to successfully test light bulbs is gloves. Some models of electric light sources must not be handled with bare hands, otherwise the grease marks left on the surface of the lamp can lead to rapid failure of the product. You may also need rubbing alcohol and an old toothbrush to clean the contacts. If the light bulb has been used in a humid environment, a fairly strong oxide film can form on its metal elements, which often causes a false conclusion that the electric light source is faulty. You can also use universal WD-40 for this purpose.
Before performing a diagnostic operation, you should also make sure that the measuring device is in working order. For this purpose, it is enough to switch the device to the “ringing” mode and connect the positive and negative probes. By the sound signal you can determine the serviceability of the multimeter. If it is not possible to check the multimeter in this way, the device should be switched to resistance measurement mode. The serviceability of the tester can also be established by connecting the contacts, but, in this case, a numerical display of resistance (about 1 Ohm) should appear on the indicator.
The safety of performing the diagnostic operation is paramount, therefore, if you are not sure that the phase wire is connected to the lamp through the switch, it is recommended to turn off the safety circuit breakers in the electrical panel before removing it from the socket.
Checking the incandescent lamp
In most cases, a faulty incandescent lamp can be determined by visual inspection. If the spiral inside the bulb is damaged, then further operation of the electric light source is impossible.
Sometimes damage to the conductors occurs in the places where the contacts are soldered or in the area between the base and the spiral. It is almost impossible to determine such a breakdown by eye, so if the spiral is intact, you should use a multimeter to make sure there is no break in the circuit. If the glass bulb is made of opaque glass or has been painted, then without a tester it will also not be possible to determine the internal break of the conductor.
How to check a lamp with a multimeter (sequence of actions):
- Set the multimeter to ringing mode.
- Connect the probes to the contacts of the incandescent lamp (polarity does not matter).
The serviceability of the electric lamp will be determined by a sound signal. The presence of electric current passing through the inner spiral can also be determined by measuring the resistance of the light bulb. For this purpose, the multimeter should be switched to resistance measurement mode, and then also connect the probes to the metal contacts of the light source.
If, as a result of the test, the display of a digital device shows an infinitely high resistance or there is no sound signal, then the incandescent lamp will need to be replaced (when using a pointer device, there will be no mechanical movement of the indicator). To make sure that the cause of the lamp malfunction is an open circuit, you should carefully inspect the contacts of the electric light source. Even if there is a slight oxide present, they must be moistened with alcohol and cleaned with a toothbrush or any non-metallic hard object, and then re-diagnosis must be carried out.
Using a multimeter, you can diagnose an open circuit in a car light bulb. If you need to check the head lighting element, then you should pay attention to the fact that such devices use 2 threads designed for 12 Volts, which must be ringed separately.
There are no differences in how to check a halogen lamp of the same voltage. Such a light source differs from a conventional element only in the use of an inert gas in the bulb.
Checking car light bulbs and radio tubes with a tester
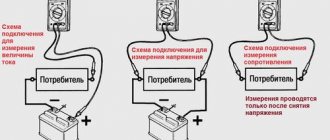
A tester or multimeter is a device designed to determine the health of electrical devices and radio components: current conductors, batteries, accumulators, switches, light bulbs. Other names for the device are multimeter, less often avometer. There are different versions of testers with different sets of functions. In its simplest form, a multimeter combines the capabilities of an ammeter, voltmeter and ohmmeter.
Such a device can be used as a tester for checking lamps, electrical circuits or radio components. With its help, you can carry out basic measurements of the characteristics of electrical appliances and their individual elements, and identify existing violations of the integrity of the electrical circuit. More complex multimeters come with a variety of additional functions.
Application of the tester
One of the applications for using a multimeter is checking light bulbs. For this procedure, it is enough to use the simplest version of the device.
What information can be obtained using a multimeter? There are several indicators of the performance of light bulbs displayed on this device:
- suitability of the light bulb - violation of the integrity of the electrical connection leads to the cessation of current flow;
- determination of light bulb resistance;
- calculation of its power based on the resistance shown by the multimeter.
Thus, you can check the basic characteristics of the lighting device and understand whether it is suitable for further use.
Dialing mode
To check the functionality of a light bulb, it is enough to know how to ring a regular electrical circuit. To do this, the switch is set to the “ringing” mode - in the position with the diode symbol.
Then touch the central contact of the base with one probe, and the side surface with the thread with the second. The signal will sound if the resistance is less than 50–70 ohms. This indicates good electrical conductivity of the circuit and means that the light bulb is working.
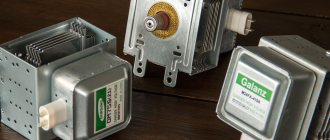
Testing a mercury arc lamp
A lamp with an arc mercury phosphor lamp (MAFL) can usually be found on the street or in a factory workshop. To determine the performance, the choke is called - a device that limits the current that supplies the DRL.
If the circuit was broken, then the resistance will be unlimitedly large, as the device will show. If there is a loss of insulation leading to a short circuit, the value increases slightly. If there is a short circuit in the inductor winding, the resistance does not change.
If no problems were identified when checking the choke tester, then the arc lamp may not function due to malfunctions in the power supply system, for example, due to oxidation of the contacts. The principle of operation of the lamp is very simple, so malfunctions directly in the DRL lamp are rare.
Considerable caution must be exercised when testing DRL. If the integrity of a glass flask containing high-pressure gas is damaged, mercury vapor can spread over long distances, polluting the room.
Car light bulb testing
Car enthusiasts are often interested in the question of how to check a lamp that has failed. What is the cause of the problem? The problem may lie not only in the car light bulb, but also in the wiring or socket. Testing with a multimeter is carried out in the same way as when testing conventional incandescent light bulbs. The following procedure is recommended:
- After the car's electronic system has cooled, remove non-working light bulbs;
- set the tester to the minimum resistance testing position;
- Apply probes to the contacts to check the bulbs using a multimeter.
If the device measures the resistance, then the light bulbs are working, but if there are alphabetic symbols or an infinity sign on the screen, this indicates their unsuitability.
Analysis of the performance of diodes and radio tubes
Radio tubes are tube diodes previously used in electronic equipment. They have now been replaced by semiconductor diodes. Testing any types of diodes, including radio tubes, using a multimeter has its own characteristics.
A diode has two poles - a cathode and an anode. If you place a multimeter's positive lead (red) near the anode and the negative lead (black) near the cathode, current will flow through the diode. The threshold voltage will be displayed on the multimeter screen, the value of which can range from 200 to 800 mV.
If you swap the probes of the tester, no current will flow, since the diode has unidirectional flow. In the case of a radio tube, the resistance must be determined between the filament, which is the cathode, and the control grid.
There is a special device called a lamp tester. Such analyzers, which test electric lamps, are equipped with devices for testing vacuum. These devices are useful not only as testers, but also as analyzers for quickly measuring the operating conditions of the tube elements of any radio device.
The tester is somewhat different from a multimeter; it is more like a stand and allows you to measure anode-grid characteristics. It contains sockets for light bulbs, a milliammeter that works like a millivoltmeter, and power supplies. For lovers of old tube receivers, the tester becomes an excellent assistant in their work.
Source: https://evosnab.ru/instrument/test/kak-proverit-lampochku-multimetrom
Diagnostics of a fluorescent lamp
It’s easy to figure out how to check a fluorescent lamp with a multimeter if you know the operating principle of this lighting device. In each individual element, spiral electrodes are installed on two opposite sides, with the help of which a glow discharge is launched inside the flask. The failure of a fluorescent lamp occurs when the filaments burn out, therefore, as in the case of a tungsten filament, it is enough to measure the resistance between the contacts to find out the possibility of further operation of the product.
In order to check a fluorescent lamp with a multimeter, simply remove it from the holder and measure the resistance between the contacts on each side. If there is no sound signal or the presence of infinitely high resistance, a malfunction of the lighting device can be stated.
Many owners of powerful mercury light sources are interested in the question of how to check a DRL lamp with a tester. Most often there is a need to determine the serviceability of DRL 250 at 220 Volts. The diagnostic operation is carried out using a tester, which should also be switched to resistor testing mode, then touch the terminals of the lighting device with the probes. If there is no change in the device readings, the lamp will need to be replaced.
Halogen bulbs
To begin with, let us recall that a halogen lamp is classified as a thermal lighting source. It, like a regular light bulb, has a spiral. Under the influence of current, it heats up and produces light radiation. Increased brightness and saturation is created due to the presence in the flask of a gas mixture, which includes halogens (hence the name). This type of lamp is widely used to create spot lighting or backlighting.
What to do if a halogen light bulb stops working?
- First, you should check the voltage in the base of the lighting fixture;
- If the voltage is ok, check the light bulb.
Halogen lamp test sequence
We will also check with a multimeter. To do this, set the device to a mode for measuring the minimum resistance.
Attention! We do not touch the light bulb with our bare hands. If the skin touches the flask, a fatty imprint appears. Subsequently, the light bulb will heat up more in this place, which will shorten its service life or lead to complete failure. That's why we wear gloves.
- put a light bulb next to the device;
- we take the probes in our hands;
- apply to the terminals of the light bulb.
The readings depend on the type of light bulb and how much it has cooled since the previous turn on. The resistances will also be different for a household lamp of 220 volts and for a car lamp of 12 volts, but in any case the resistance value will be in the range from 0.5 Ohm to units of Ohm. If the value tends to infinity, then the lamp is considered inoperative.
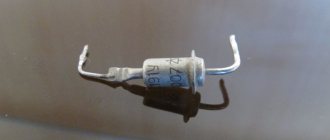
Throttle check
If the bulbs turn out to be in good working order, then the failure of the glow discharge to start may occur due to a failure of the inductor. This part can also be checked using a tester.
Instructions on how to check the choke of a fluorescent lamp with a multimeter:
- Switch the multimeter to resistance measurement mode.
- Connect one probe to the input, the second to the output of the electronic element.
If there is no open circuit, the fluorescent lamp choke can be considered serviceable, but only if its insulation is not damaged. If there are darkened areas, then an electrical breakdown may have occurred in such areas, which may cause the element to malfunction.
The simplest way
The simplest diagnostic method is suitable for both incandescent light bulbs and fluorescent and LED lamps. He suggests screwing the suspicious light bulb into another lamp and turning it on. Unfortunately, this is not always possible. Sometimes the threaded part of the base is made with a deviation from the standard size and, when screwed into the socket, does not close both electrical contacts. Or there are no more lamps with the exact same socket in the house.
When buying a light bulb in an electrical goods store, many people paid attention to how the seller checked it using a tester. The tester body has several connectors designed for diagnosing different types of light bulbs: incandescent, fluorescent and halogen
Its task is to check the integrity of the conductors inside the lamp, as evidenced by the sound signal. This same operation can be done at home using a multimeter or a multifunctional indicator screwdriver.
Checking the LED lamp
In order to check the LED lamp, you will need to carefully remove the diffuser. Then switch the measuring device to resistance measurement mode up to 200 Ohms. In this case, there will be a small voltage on the tester probes, which will not be able to completely light the LED, but it is quite possible to slightly illuminate it.
When checking this, it is important to maintain polarity. At the point where electricity is output from the internal power supply, “+” and “−” are usually indicated. Semiconductors are connected in series, so to check them you need to connect probes to each element one by one (the red probe is connected to the “plus” side). First of all, you should ring the elements on the surface of which there are dark spots.
It would be useful to know how to check an LED light bulb if each element “responds” to the touch of the multimeter probes with a slight glow. In this case, the wires from the base to the power board ring. You should also check the serviceability of the transistor and diode bridge.
If the inspection reveals faults in the internal elements, then it is cheaper to replace the energy-saving lamp than to waste time searching for suitable electrical parts.
Diagnosing a malfunctioning monitor backlight How to check the monitor backlight correctly depends on what type of lighting elements are used in the computer screen. To accomplish this task the following can be used:
- CCFL (fluorescent light bulbs).
- LEDs.
Fluorescent backlight bulbs can be checked using a special tester. LEDs are checked in the same way as when diagnosing semiconductor lamps operating from the mains. If you connect the probes to the elements observing the polarity, they will begin to glow a little (in resistance measurement mode up to 200 Ohms).
The main problem when performing a diagnostic operation is getting to the lighting elements. Care should be taken when performing work, because even when the monitor is turned off, life-threatening voltage may remain.
How to test a light bulb with a multimeter at home?
A visual inspection does not always allow a qualitative assessment of the condition of an electric incandescent lamp; even with an intact spiral, the internal circuit may be broken. Therefore, it is better to trust devices that, if used correctly, will accurately indicate a malfunction. Let's look at how to check an incandescent light bulb with a multimeter.
Household 220-volt incandescent lamps for indoor lighting have the two most common standards of bases and sockets for them - E14 and E25, the numbers indicate the diameter of the threaded connection. The easiest thing, at first glance, is to screw a lamp with a whole spiral into the socket of another known-to-be-good lighting fixture and make sure that it works. But there is not always a lamp with a suitable socket on site, much less a working one. Therefore, multimeters are used; these devices are small-sized, lightweight, easy to use, even an amateur can work with them in dialing mode.
Setting the device to dialing mode
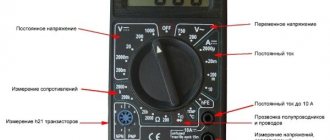
The term “continuity” means checking the electrical circuit for integrity and presence of contact. Every modern multimeter has such a mode, the classic arrangement of controls on devices, this is a packet switch in the center of the case, under the liquid crystal display. By turning it, the required modes are set; their letter and symbolic designations are indicated on the case in a circle, which experts understand well; in our case, this is the sign of a diode or buzzer.
Examples of locations of dialing symbols on different multimeters
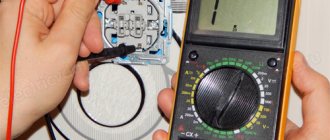
In addition to the switch position, the contact test leads must be connected correctly. Above in the right photo this is clearly visible - in the lower right corner of the multimeter, a black probe is inserted into the lowest hole with a grounding sign and the letters “COM”. The red one is inserted into the connector above labeled “VΩmA”.
After installing the controls in the desired position, you can carry out testing and dialing, but before that, make sure that the device is working. Connect the metal tips of the red and black probes; if the device is working properly, you will hear a characteristic buzzer tone.
Zeros will appear on the screen, which means that there is no break or resistance in the electrical circuit; when the circuit is opened, the display will show “1”.
Checking the lamp
Place the tip of one probe to the central contact of the lamp, the second to the thread of the base, if the lamp is working, you will hear the buzzer working, the display will show numbers from 3 to 200. The value of the resistance of the spiral in Ω (Ohm) depends on the material and length of the spiral. To be safe, before testing, clean the areas where the probes touch with a file; they tend to oxidize.
In this way, you can not only check the light bulbs for serviceability, but also determine the approximate power consumption. If for some reason there is no inscription with the value on the glass bulb, for accurate measurements, set the device to the 200 Ohm measurement mode.
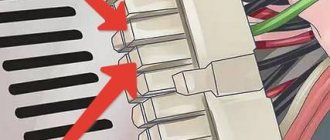
The red arrow indicates the measurement position within the range of up to 200 ohms
An example of how to ring or measure the resistance of an incandescent lamp filament
Letter designations for light bulbs
If you have learned how to ring a light bulb, but do not know what type of battery the product belongs to, then you should look for the designation on its body. The type of lighting fixture is usually indicated by several symbols:
- LED - light-emitting diode.
- CCFL - fluorescent.
- DRL - mercury.
- LDS - daylight.
- LN - incandescent.
Fixtures may also be marked with letters. By the first character you can determine whether the device belongs to a certain category, for example:
- N - incandescent.
- D - LED.
- And - quartz-halogen.
- R - gas-discharge mercury lamp.
Regardless of whether the lighting element is used at twelve volts or connected to a household electrical network, the letter designation remains unchanged.