Types of rafters
The rafter system is the basis of the roof, which consists of wooden beams that hold the covering and roof structure, and also create the required roof configuration. At the top they are connected at an angle, and at the bottom they are attached to the mauerlat beam. With the installation of this main load-bearing element, the fastening of the rafters to the brick wall begins. The following types of roofs with corresponding rafter systems are distinguished:
- single-pitched;
- gable;
- hip;
- tent;
- broken
Frame systems consist of rafter legs, mauerlat, ridge, sheathing and supporting elements. At the same time, the rafters themselves come in two types:
- Layered. They have two supports - at the top they are attached to the ridge support, at the bottom to the mauerlat beam by cutting.
- Hanging: with one lower support - in the upper part they rest against each other at an angle and are connected;
- at the bottom - they are attached with movable fasteners to the Mauerlat.
Return to contents
Possible dimensions of rafter legs
| Rafter material | Sections, cm | ||
| Length | Thickness | Height | |
| Boards | 300 | 4 | 18 |
| 6 | 16 | ||
| 8 | 14 | ||
| 400 | 6 | 20 | |
| 8 | 18 | ||
| 500 | 8 | 22 | |
| Bars | 300 | 10 | 12 |
| 400 | 10 | 16 | |
| 500 | 10 | 20 | |
Return to contents
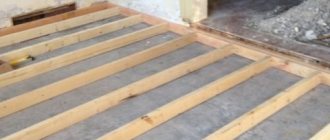
Basic installation work
Tools and materials:
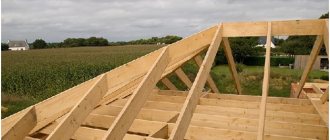
Gable roof structure: 1 - Rafters; 2 - Screed; 3 - Mauerlat; 4 - Ridge beam.
- timber 80*200;
- steel corner;
- roulette;
- a circular saw;
- pencil and cardboard;
- wire;
- anchors;
- hammer drill
Now the installation of rafters on the walls begins. The rafter system depends on the type of roof chosen, but most often a gable roof is used:
- Rafters.
- Screed.
- Mauerlat.
- Ridge beam.
This option is quite easy to install, and there is no need to make additional partitions under the roof. At the very beginning, screed beams are installed in increments of 0.8-1.2 m, depending on the weight of the roofing materials (for ondulin or reeds, 1.2 m is enough, while for slate - 0.8 m and no more). Fastening to the Mauerlat is carried out using special corners made of galvanized steel. Only now is the wall ready to begin attaching the rafters.
Their length is calculated in such a way that the wall does not limit their length, and the beam extends 50 cm beyond its limits. At the junction of the wood and the wall, you need to cut out triangles that clearly follow the contours of the corner at which the joint occurs. Here it is best to make a cardboard model, from which measurements will be taken, and use a circular saw to cut it.
At the very beginning, 3 beams are grabbed together, 2 are guides, and 1 is a ridge beam. There is no need to grab the ridge beam immediately, so as not to strain the material. You need to lift it in such a way that the corners match perfectly. After one side has been lifted, you need to lift the opposite side and only then fix them tightly using steel corners.
Related article: Original curtains for the kitchen
Each raised beam is immediately wrapped with galvanized wire, after which the wire is intertwined and taken down. At a distance of 5 rows of masonry, you need to make a hole with a puncher, then string the wire onto the anchor and screw it in until it is completely fixed.
Dimensions of rafter legs.
The fastening of the rafters is completed here, but you need to remember a number of factors:
- When working with a hammer drill, only drills and bits with diamond attachments are used. Any other options will most likely split the material.
- All metal is strictly galvanized. If you attach the rafters to simple steel, then over time it will rust, and along with it the wood will become unusable.
- All wood is carefully treated with an antiseptic against moisture and insects. This step will add up to 20 years of service life.
Methods for attaching rafters to beams, walls, beams
For most private developers, the pressing question is how to attach the rafters to the timber. Attaching rafter legs can be done in the following ways:
- The emphasis is on the beam.
- Tooth with emphasis.
- Tooth with a spike.
The slope of the slopes determines the number of teeth. Using the methods listed above, the load from one element of the rafter frame can be transferred to another:
- The use of a single tooth cut is permitted if the slopes have a slope of more than 35 degrees. In this situation, a tooth with a tenon is placed in the heel of the rafter leg, and a stop and a socket for the tenon are cut out in the beam. The main thing is that the nest does not go deeper than a third of the thickness of the beam. The notch should be located at a distance of 0.25-0.35 m from the edge of the beam, which is located behind the plane of the wall. The presence of a tenon does not allow the rafter leg to move laterally.
- For a roof with slopes of a slight slope, up to 35 degrees, the installation of rafters involves increasing the contact area of the rafter leg and the beam to increase the supporting area of the structure. To do this, a cut is made into two tenons, into a lock, with a stop and a tenon or without a tenon.
The connection between rafters and beams can also be done using bolts or bolts and clamps.
Methods of fastening to aerated concrete
It is worth noting that laying the Mauerlat on aerated concrete is much more difficult than, say, on a brick wall. Usually it is laid at a distance of 5 cm from the outer edge of the wall.
The following elements can be used to lay and fix the Mauerlat:
- steel wire;
- anchor bolts;
- chemical anchors;
- steel studs.
The Mauerlat is fixed to a reinforcing belt or to a brick wall using anchor bolts.
After the beam is installed, the rafter leg is pulled to it and wound with twisted steel wire with a cross-section of 3 mm. 6 cm below the beam you need to install a short piece on which the rest of the wire will be fixed. Alternatively, the wire can be wrapped around the floor slabs for secure fixation.
If we are talking about a roof of a complex structure, then it is recommended to fasten the Mauerlat beam to aerated concrete using a reinforced concrete belt. It will provide not only greater reliability of the structure, but will also allow the load to be evenly distributed.
The Mauerlat bars are secured to each other using an oblique cut and then secured with nails or bolts. Staples or steel plates provide additional rigidity to corner joints.
Mauerlat - roof support element
Before talking about how to install rafters on a brick wall, you should pay attention to the installation of the mauerlat beam, since it is the main load-bearing element of the rafter system. Accordingly, the installation of the roof begins with it.
- It is necessary to think about fixing the Mauerlat to the brickwork at the stage of wall construction . Completing the wall is done in two different ways. Most often, this is simply a horizontal and even cut of the masonry, on the inside of which the strapping beam is laid.
- In the second case, the masonry is finished with a ledge, which from the outside forms a cornice along the perimeter of the walls. The outer part of the ledge is higher than the inner one, due to which a niche is formed in the wall into which the Mauerlat will be laid. This option is very good from all points of view, since in this case the structure is better isolated from external influences.
In addition, the protrusion of the masonry is an additional barrier to the influence of expansion forces. Therefore, this option is most preferable when building a house. But not everyone can complete such a completion, especially if the owner, without the skills of a mason, builds the house with his own hands.
Fastening the harness: methods
In the first case, long threaded rods are embedded into the masonry to secure the mauerlat. But before putting beams with holes drilled for anchors on them, the horizontal surface of the wall is coated with bitumen mastic and a strip of any rolled waterproofing material is laid on it.
- After installing the Mauerlat, put washers and nuts on the studs and tighten them with force. When the wall ends with a ledge, it is impossible to attach the strapping to studs. But there are other options.
Preparing masonry trim for installation of the Mauerlat
- For example: three rows before the end of the masonry, rolled steel wire with a diameter of 6 mm is placed in it, with outlets on the sides, the length of which should be enough to thread it through the holes in the beam and twist it. In this case, the distance between the fastenings must correspond to the pitch of the rafters.
In another option, the Mauerlat can be attached to wooden inserts in the masonry, which are cut to the size of the brick and carefully waterproofed. During the process of laying the edge of the wall, the working bricks in the places where the rafters are installed are replaced with wooden plugs. The rafter legs are attached to them with metal brackets.
Mauerlat and methods of its installation
Tools and materials:
- roulette;
- timber 100*100;
- perforator;
- waterproofing;
- studs, steel rods or wooden wedges.
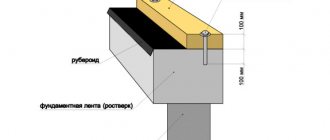
The entire structure fastening scheme can be seen in Fig. 1:
Figure 1. Scheme for attaching rafters to a brick wall: 1 - Strapping; 2 - Mauerlat; 3 - Waterproofing; 4 - Rafters; 5 - Wire; 6 - Fixing anchor.
- Strapping. This method of fastening is carried out most often, but there are exceptions for studs.
- Mauerlat.
- Waterproofing.
- Rafters.
- Wire.
- Fixing anchor.
At the very beginning you need to install the Mauerlat, because... the design begins with it. Before installing it, a cut brick is laid on the front side in order to cover it later. Some craftsmen place the brick after finishing the work, which is also effective, but takes a little more time. It is better to use penetrating options as waterproofing, but if it is not possible to get them or the price is prohibitive, it is quite possible to get by with roofing felt. After the roofing material is rolled out at its location, you need to burn it with a gas burner.
There are 3 ways to attach the Mauerlat:
- Hairpin. This method is the simplest, because... you need to make a vertical hole in the wall to the depth of 1/2 a stud, pour a little non-hardening mastic into the bottom and immerse a metal rod there. A beam with holes made in the right places is installed on top. The fastening pitch is usually 30-40 cm, because the increase will affect the strength indicators.
- Wooden wedges. Everything is much simpler here, because... When laying bricks, special gaps are left where wedges of the required length will be installed. All that remains is to simply make holes in the timber in the selected places with a drill and fasten them together. The wedges should be made of softwood or more expensive varieties in order to last as long as possible.
- Steel rods. The installation step is 30-40 cm, and the method is identical to wooden analogues. Such rods are much cheaper than wood, and their installation is easier. The only negative is the need to deepen 3 rows of masonry so that lateral pressure does not cause cracks in the roof to appear in the house (working with lightweight materials does not require such precautions, but it is better to be on the safe side).
Related article: See how easy it is to divide a room into zones
Some craftsmen heat the waterproofing to a viscous state before laying the Mauerlat, which improves adhesion. This move is not possible when using mastics, because for them it is extremely destructive.
How to attach wood sheathing to a brick wall. Attaching a board to a brick wall
During construction, the question arises of how to attach wooden sheathing to a brick wall, as well as timber and other wooden elements. For this, anchors, dowels, and cement mortar are used. The option for fixing wooden elements depends on what function they will perform and how much weight needs to be supported. The moment of installation is also important: during construction, the boards go into the walls, and then they are attached to it.
In what cases may it be necessary to fasten the board?
You may encounter problems with timber installation during work:
- redevelopment and construction of new wooden walls;
- door frame installation;
- installation of hanging furniture;
- extension of the veranda;
- construction of a canopy over the front door;
- insulation of the house.
What tools are needed to attach a board to a brick wall?
The set of tools is determined by the type of fastening and functionality of the wooden elements. When attaching the timber you need:
- drill or hammer drill;
- drills and drills;
- hammer;
- roulette;
- pencil;
- dowels;
- corners;
- staples;
- nails;
- screws;
- screws, etc.
General recommendations
To choose the type of fastening, take into account what material the walls are made of, their thickness, and also what load they will withstand.
The hole in the wall must be made using a drill.
Using a drill, carefully drill a hole in the brick wall. While working, try not to expand it so that the brick does not crack. A dowel is inserted into the opening, which, when screwed, will curl into a knot and securely lock. This option is suitable for hollow brick. Next, a self-tapping screw will be screwed into the dowel. If the beam must withstand a large load, then it is better to use an anchor.
Methods of fastening to a brick wall
Soft method
This method is easy and quick to use, but unreliable - it is not suitable for heavy loads. But it is used for decoration and sheathing. This method can be used without the help of others, since it does not require construction skills. If you follow the instructions, the result will be satisfactory.
To perform fastening, you will need U-shaped metal brackets. They are fixed to the brick at a distance of 40 cm. At a level of half a meter from the floor, a 60 cm indent is made between them. The more fastenings, the more firmly the board holds. This will avoid deformation of the cladding. Under mechanical stress, the timber becomes loose and the structure is damaged. Therefore, be careful when working.
Hard method
To fix the board more firmly, wooden plugs are used.
This method is durable, reliable and will allow the structure to last for a long time. A hole is made in the brick into which a wooden plug soaked in glue is driven. A nail is driven through the beam into the cork. This method allows you to securely fasten the sheathing and prevent its deformation. It is designed for light load.
Other methods
Attaching timber to a brick wall is possible in other ways. To attach hanging furniture, the board is applied horizontally to the wall and secured using self-tapping screws, nails, and screws in the prepared openings. To ensure that the lockers can withstand the load, there are many attachment points. For partitions, the same rules are used, but they are fixed vertically. The timber should be secured with anchors for structures with heavy loads. This method is suitable for the door frame and roof canopies above the door.
The installation of timber for an extension occurs during the process of placing the end of the beam into the masonry. To do this, make a corresponding opening in the wall. But this is possible with a thick wall of one and a half bricks. If this is not the case, then the design will be end-to-end, which is unacceptable. In this case, you will need to use a support beam. It is attached to anchors, maintaining a distance of 30 cm. After which the beam is attached to the tree using metal corners and self-tapping screws.
Several basic rules for attaching rafters to the Mauerlat
- It is necessary to ensure a reliable, durable and high-quality connection of the fastened parts.
- In the places where the rafters adjoin the mauerlat, it is necessary to ensure high accuracy of cuts.
- Fastening work should be carried out using metal angles, plates, brackets, threaded rods or bolts with nuts.
- Use bolts and nuts only with metal plates or washers.
- Nails and screws are used as a temporary fastening option. Later they are replaced with angles, plates or bolts.
Fastening the rafters has always been an important point when constructing a roof. The reliability of such a structure is guaranteed not only by the correct calculation and choice of material, but also by the correct installation of the rafters to the mauerlat, as well as to the floor beams.
When constructing roofs, two types of rafter structures are used - hanging and inclined rafters. Let's try to briefly consider both types of such structures and their attachment to the Mauerlat.
To evenly distribute the loads of an inclined roof structure, spacer and non-spacer methods are chosen for attaching the rafters to the Mauerlat. When a non-thrust design of rafter legs is used, then there is no thrust pressure between the walls and supports of the building.
To arrange a spacer structure, only rigid fastening of the rafters along the gable is used without the use of sliders. The force from the roof through the rafter legs is absorbed by load-bearing walls and supports. Attaching the rafters to the Mauerlat is done in this way:
- The support for the rafter leg is the mauerlat. The rafters are fastened using the sliding leg principle, and the upper part is fixed to the ridge run.
- The lower part of the rafter leg is secured to the Mauerlat using a slider. At the top, the rafters are connected by bolted joints or other means.
- The rafter structures and ridge purlins are connected into a durable structure, also called a ridge assembly, using a wooden block. They are fastened with nails, which must be driven in on both sides parallel to the ridge.
Fastening rafter structures to the Mauerlat using a non-thrust method is somewhat different from what was described earlier:
- It would be the right decision to make fastenings using sliders. In this case, there will be no auxiliary support at the bottom of the rafter leg. In the upper part, the structural elements rest against one another and they are connected to each other by various overlays.
- Fastening is carried out by rigidly pinching the lower ends of the rafters with the Mauerlat. To do this, use the lower support bar or gash, and the upper end rests on the ridge run into the horizontal notch. You can use a fastening with a slider, then there will be a slight possibility for vertical rotations at the joints.
In cases where the roof structure provides for the installation of hanging rafters, and this happens if there are no internal supports in the building or pillars, the lower end of the rafter leg has an overhang and extends beyond the supporting wall. The entire load coming from the roof is distributed over the external walls.
The system has the form of a symmetrical triangle, the side of which can have a length from 7 to 12 meters. Its design includes horizontal braces made of timber, as well as rafter legs, which are installed at an angle with a certain angle. The upper ends of the rafters on the ridge are installed in the completed cut. The structure is strengthened using a crossbar.
The places where the rafters are fastened are called the support node. There are several types:
- The unit is hinged and has one degree of freedom. With this connection, it is possible to rotate the beam in a circular manner.
- The unit is hinged and has two degrees of freedom. This connection allows the beam, in addition to circular rotation, also the possibility of horizontal displacement. Fastening is done using slides or sliders.
- The hinge joint, which has three degrees of freedom, gives the beam the ability to move horizontally and vertically. There is the possibility of circular rotation, but for this it is necessary to make a special hinge. It is installed on the Mauerlat.
- The most common are nodes with zero degrees of freedom. With this method of fastening for rafters, both ends are rigidly fastened with rafter corners on both sides. This method eliminates the possibility of the beam moving.
It is considered optimal to mount this material flush with the inner surface of the walls of the house. It is strictly not recommended to lay the Mauerlat on the house closer than 5-6 cm from the outer plane of the walls.
- The Mauerlat must be attached to the wall of the building. In this case, it is recommended to make a protective fence for the Mauerlat outside, preferably from brickwork. We should not forget about waterproofing, it is necessary to protect the wood. You shouldn’t overdo it, two layers of roofing material will be enough.
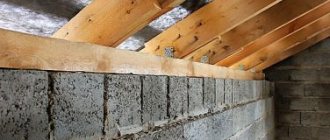
- There are several ways to directly attach a structure such as a Mauerlat to a house. If the walls are brick, wooden blocks are built into the masonry several (2-3) rows below the top row of the wall.
- It is to these bars that the Mauerlat will subsequently be fastened using staples. When constructing roofs for houses built from expanded clay concrete or foam concrete or gas silicate blocks, a reinforced concrete belt should be made under the roof.
- When pouring this belt, it is necessary to insert threaded rods into it. After this, holes are drilled in the Mauerlat beams for these studs and beams are installed directly on them, which are pulled to the walls of the house with nuts and washers.
We suggest you familiarize yourself with the best way to insulate the ceiling in a bathhouse with your own hands: a review of methods and materials
The most common are studs with a diameter of 1 2 - 1 6 mm. They must be installed at least every 1.6-2 m.
There is also fastening of the Mauerlat to the house using studs, intended for brick walls. So, during the construction of walls, studs are embedded in the brickwork so that the depth is at least 3 rows of bricks.
To save money, instead of studs, it is recommended to embed simple reinforcement, welding nuts to it by welding. In the same row of brickwork where the studs (reinforcement) are embedded into the house, it is necessary to insert thick (3-6 mm) steel wire, the ends of which must be of sufficient length to tie the Mauerlat.
Note that often during the installation of a structure such as a Mauerlat, it becomes necessary to splice the beams together. This is done by cutting the beams into half a tree, and then fastening them with bolts or nails.
- One of the most popular recently is the fastening of the Mauerlat, which uses exclusively edged boards measuring 50x150 mm (usually up to 60 x 160 mm).
- Initially, you need to lay out one row of boards on the walls, and then secure them to the house using anchor screws (not bolts, since their heads will protrude). The length of the anchors must be at least 20 cm.
- Holes in a reinforced concrete belt or brickwork are made using a hammer drill, having first drilled the board with a regular drill. Then you need to lay out the next row of boards on the house, nailing them to the first row using simple 100 mm nails.
- The joints of the boards should be made in other places, thus performing the dressing. In the corners, the boards also need to be laid with a bandage. The result will be a Mauerlat with a thickness of 100 mm, which is quite enough.
This method of attaching a mauerlat to a house, especially to expanded clay concrete blocks, is popular for several reasons. First of all, it is much easier to lift boards to a height than bars. The next reason is that there is no need to cut half a tree.
Basic methods of fastening to beams
The following options for fastening rafters are used, both independently and in combination
:
- tooth with emphasis;
- tooth with a spike;
- emphasis at the end of the beam.
The use of one or two teeth is determined by the angle of inclination of the rafters. The above fastening methods allow you to transfer the load from one element of the rafter system to another.
Single-tooth cutting is used when installing roofs with slope angles greater than 35 degrees.
. A tooth with a tenon is made in the heel of the rafter, a stop is cut out in the beam, in which a socket is provided for the tenon. The depth of the nest should not exceed 1/3 of the thickness of the beam. The cutting is carried out at a distance of 25-35 cm from the edge of the beam, extending beyond the plane of the house wall. The spike prevents lateral movement of the rafter leg.
For a roof with a smaller slope angle, the rafter legs are mounted in such a way as to increase the contact area between the rafter and the beam, thereby increasing the supporting area of the structure. For this purpose, cutting into two tenons, into a lock or stop with a tenon or without a tenon, and other combinations is performed.
In addition to cutting, connecting rafter legs to beams can be done using a bolted connection or a bolt and a clamp.
Fastening the Mauerlat using a wire method
This method of attaching the Mauerlat is the simplest. Fixation is performed with thick steel wire. Sometimes rafters are used for such fastening: they are connected to steel reinforcement embedded in the masonry using twisted wire. In this way, a tight fit of the roofing base to the walls is achieved. Fastening the Mauerlat in this way is advisable only when other fastening options are impossible for certain reasons.
The classic version of wire fastening is as follows:
- The wire pieces are placed 4 or 5 rows before the wall masonry is completed. They are placed in increments, 60-70 cm from each other. The segments are made of such length that the longer parts of the segments up to 30 cm protrude above the upper border of the wall.
- If the walls of a building are plastered on the outer parts of the sections, the wires are embedded in the mortar.
- When the solution hardens and becomes strong enough, the ends of the wire on top of the Mauerlat bar are twisted and press the wooden elements against the wall.
Fixing the Mauerlat using wire
Before attaching the Mauerlat to aerated concrete using steel wire, it must first be fixed in the thickness of the wall. This should be done while laying the last rows of gas blocks - the wire is placed under them.
The installation technique in this way looks like this:
- A couple of rows before the end of the masonry, a twisted wire of several thinner wires with a cross-section of 6 mm is placed between the blocks.
- In this case, the central piece of wire will be placed in the thickness of the masonry, and the ends will hang down on both sides of the masonry. The length of the ends is made such that they are enough to wrap freely around the beam.
- There should be so many pieces of wire that it is enough to tie all the rafter legs.
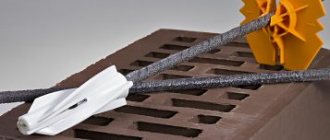
By chemical anchor we mean a liquid injection mass made on the basis of a polymer resin, which quickly hardens and firmly fixes the metal rods in the thickness of the Mauerlat.
The advantage of this material is the absence of bursting stress, so fragile aerated concrete does not collapse. If mechanical anchors fix parts by expanding the dowel, then the adhesive composition of a chemical anchor fills the pores of aerated concrete and holds the rod motionless.
The process of attaching liquid dowels looks like this:
- A recess for the anchor is drilled in the gas block. The size of the recess should be larger than for a regular anchor bolt.
- Remove dust and debris from the hole, for example, with a vacuum cleaner.
- The adhesive composition is poured into the hole.
- Next, a threaded metal rod is inserted into the glue - an M 12-14 pin or a piece of reinforcement.
- Complete crystallization of the polymer composition occurs in 1/3 hour if the ambient temperature is above 20 ℃.
- Once the glue hardens, the pin will be securely fixed. It is noteworthy that such fasteners are stronger than mechanical ones.
We invite you to familiarize yourself with Attaching rafters to a mauerlat without sawing
Installing a mauerlat for a roof on a wall made of aerated concrete using liquid dowels has a number of undoubted advantages:
- The fastening does not lose strength for more than 50 years.
- Due to the polymer structure of the glue, this method of fixation is widely used at the edges of walls, where there is a risk of the gas block splitting.
- The chemical anchor has good chemical resistance.
- Even damp weather and wet surfaces of the joining elements do not prevent the installation of these fasteners.
- The installation of the roof mauerlat on aerated concrete blocks can be carried out without pouring an armored belt, since the reliability of fastening a chemical anchor is much higher than that of a mechanical one.
- The chemical composition of the anchor is ideally combined with the porous structure of aerated blocks.
- To install liquid dowels, holes of a shallower depth are required than in the case of mechanical anchors - there the depth is 2-3 rows.
However, welding work cannot be carried out on anchors installed by this method - overheating of the metal rod will lead to disruptions in the polymer structure of the material, causing it to lose strength.
Before attaching the Mauerlat to aerated concrete using steel wire, it must first be fixed in the thickness of the wall. This should be done while laying the last rows of gas blocks - the wire is placed under them.
By chemical anchor we mean a liquid injection mass made on the basis of a polymer resin, which quickly hardens and firmly fixes the metal rods in the thickness of the Mauerlat.
The advantage of this material is the absence of bursting stress, so fragile aerated concrete does not collapse. If mechanical anchors fix parts by expanding the dowel, then the adhesive composition of a chemical anchor fills the pores of aerated concrete and holds the rod motionless.
However, welding work cannot be carried out on anchors installed by this method - overheating of the metal rod will lead to disruptions in the polymer structure of the material, causing it to lose strength.
Mauerlat installation
There are certain rules for the design of this system.
The width of the beam should be approximately a third of the thickness of the load-bearing wall; this value is usually about twenty centimeters.
You should not try to make the maeurlat section wider in the hope of getting a more reliable device, this can only complicate the situation.
A thick beam will also have significantly increased weight. Not only will it place a much greater load on the walls of the building, its mass will also complicate the installation of this structure.
To prevent damage to the wood, it is necessary to place a layer of waterproofing material between the wall and the Mauerlat. You can use the simplest roofing material.
Preparing to attach the Mauerlat
Before installing this element, you need to complete a number of important preparatory work. The Mauerlat is made from finished timber or a pair of boards of appropriate dimensions. Nails are used to connect boards. It is important to choose the right wood. The most preferred species is pine. To create a Mauerlat, you can use material with a humidity of up to 22%. There are several ways to attach the structure to the walls.
When choosing a specific method, you must first of all take into account the material that was used to construct the structure, the area of the building and a number of its design features. The most important thing is to mount the Mauerlat to the walls as securely as possible. Such elements must be installed on an extremely flat surface and in a strictly horizontal position. Loosening of the fastening is unacceptable. In view of this, the creation of thrust slots is allowed only from the side of the rafters.
To make the system more stable, a protrusion must be made on the inside of the wall during its construction. When attaching the base under the rafters to the walls, this protrusion will prevent its accidental dropping even when uneven and too strong loads appear on the roof of the building.
To work you will need:
- Beam. Select material with a cross-section of 15x15 cm.
- Waterproofing material (roofing felt is most often used).
- Building level. With its help you will control the horizontal installation of elements.
- Drill.
- Adjustable wrench.
- Hammer, bolts, nails.
The set of materials for work may vary in accordance with the chosen fastening method. So, if you choose to tie the timber with wire, you will need to buy thick steel wire rod. In most cases, material with a diameter of 0.5 cm is sufficient.
If wooden plugs are used during the work, you will additionally need the following:
- Wooden bars. Choose them in a size that would approximately correspond to the size of an ordinary brick.
- Metal staples. In this case, you will need products 25 cm long.
If construction studs will be used for connections, additionally prepare the following:
- L-shaped metal pins with threads about 12-14 mm in diameter. Select products such that the length of the short part is 12-14 cm, and the length of the threaded part is 5 cm.
- Metal washers.
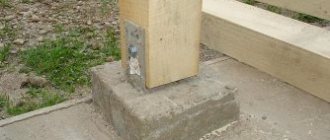
- If you are installing concrete pads, you will need concrete. Grade 250 material will suffice.
- Nuts for the threads of the selected pins. In most cases this is an M12 thread.
Summarizing
Before fastening the rafters with your own hands, you need to carefully prepare for this process. The wood chosen is predominantly coniferous, the metal is galvanized, and the tools are reliable.
Usually, fastening rafters on an area of 100 m² without assistants takes up to 1 week, so you need to check the weather forecast in advance to avoid getting caught in the rain.
If rains are expected, and the work must be completed ahead of schedule, then during the rainfall the work is stopped and covered with polyethylene, and immediately after its completion, work can continue.