Attaching joists to a concrete floor: section answers to readers' questions
Hello again and thank you very much for your detailed answer regarding puttying cracks in concrete. I have done this work, now I am starting to insulate the floor. And again I had a question: is it necessary to attach the joists to the concrete floor or can I just assemble the lattice and fasten it with rough flooring? In my case it's plywood.
If necessary, how is this done correctly, and what fasteners are best to use?
Hello, Ivan. We are glad that we helped you, we will try to help you again.
Let's see what consequences can result from a reluctance to follow technology when installing a floor along joists on a concrete base.
Step-by-step instructions for attaching joists to concrete with your own hands
Attaching wooden joists to a concrete floor is easy, even on your own. There are several mounting options, and below are the steps of one of the standard methods.
- Lay waterproofing (roofing felt or simple PVC film) on the concrete base. The joints between the pieces must be secured with special tape.
- Next, you need to lay out the logs along the floor in a certain step. This step will depend on the material from which the finishing flooring will be made: when using a 25x100 mm tongue and groove board, the logs can be laid with an indent of 70-80 cm, but for other materials the step will need to be reduced to 40 cm.
- If the length of the material is not enough to cover the entire room, then the elements can be joined using an iron angle or by making cuts that form a connection into a root tenon.
- Before installing the joists on the concrete floor, you need to take care of the outermost joists that will be located near the walls. They must be laid level, clearly leveling their height by placing wooden planks or pieces of plywood under the beams. It is most convenient to use a laser level. When the outermost logs are fixed, a nylon thread is stretched between them, which will serve as a guide when installing the remaining logs.
- To attach timber to a concrete floor, you need to make holes in both. You need to drive a dowel or steel anchor spacer into the hole in the concrete. Each joist must be fixed with at least four anchors, and the screws must be placed 40-60 cm from each other.
- You need to prepare levelers for the joists in advance - cut chipboard or plywood into even strips. With the help of these elements, the joist structure is fixed in a level position (pieces of plywood are simply placed under the joists if you need to raise them) so that the finishing coating on it does not creak or move.
- If, on the contrary, there are bulges in the concrete base, then you will have to level the lag not by placing plywood, but by selecting part of the material from below using a plane.
- When all the logs are installed in their places, thermal insulation should be laid between them, for example, expanded clay.
Methods for installing joists on a concrete floor
Installation work consists of laying wooden beams on prefabricated or monolithic reinforced concrete foundations.
An important condition for high-quality performance of work is the correct choice of fasteners and compliance with the technological scheme for placing logs on the base surface:
- The beam should be installed across the line of light from the windows, parallel to the window or doorway. It is necessary to leave a gap of 25-30 mm wide between the walls and the profile.
- If sound insulation is needed, then the substrate under the logs is laid in a continuous strip along the entire length, without breaks.
- Mounting holes and seams between prefabricated elements must be filled with cement-sand mortar of a grade not lower than M150.
- The joists must touch the surface of the floor slabs without gaps. It is recommended to fill the voids between the timber and the base with fine sand or fill them with polyurethane foam.
- The minimum length of the bars to be joined must be ≥ 2 m. Short profiles should be joined together with their ends facing each other anywhere in the room with the seams in parallel joists offset by 0.5 m.
- In the doorways of adjacent rooms, it is necessary to place a widened beam protruding beyond the partition by 50 mm on both sides. This is done so that the finishing coating in different rooms rests on the same base.
- The horizontal level of laying profiles is checked with a two-meter rack tool.
- Before installing the finishing flooring, the space under the floor is cleared of wood chips, shavings and debris.
Self-tapping screws
Through holes are drilled in the joists 0.5-1.5 mm smaller than the diameter of the screw. Holes for plugs are drilled in the floor slab using a hammer drill. Then a nylon dowel is inserted into the concrete floor and the profile is laid. Check the alignment of the holes and screw in the screw. The horizontal level of the logs is adjusted using fasteners and substrates, loosening or tightening the connection.
Fastening with anchors
Anchors provide a stronger connection than dowels or screws. The principle of installing devices is the same as for self-tapping screws, but instead of a nylon dowel, a metal spacer sleeve is inserted into the base. The optimal fastener diameter is 6-10 mm, length is 50-150 mm. Due to the high connection density, one anchor is enough per 1 m of timber.
Fastening the log to a metal corner
The profile is attached on either side to the base of the floor using a dowel or anchor. The lag is placed in the cavity of the corner and screwed in place. The distance between the fasteners depends on the length of the room and should be 35-50 mm.
The same procedure can be done using metal perforated brackets. In this case, the beam will be covered on both sides by the shelves of the device.
Adjustable joists
Adjustable fasteners for the subfloor can be of 4 types:
- plastic supports (posts);
- studs with nut and washer;
- polymer bolt-stand;
- threaded bushings.
The most convenient are factory-made designs with through threaded couplings, which can be of the following sizes:
- 0.45 x 0.45 x 2.0 m;
- 0.45 x 0.70 x 2.0 m;
- 0.45 x 120 x 2.0 m.
They are supplied with threaded posts for adjusting the profile rise level and dowels for attaching post bolts to the base.
- Before installing the structure, plastic post bolts are screwed into the holes in the profile, on which the logs will rest.
- The bars must be placed parallel to each other in increments of 350-375 mm.
- Then holes are drilled in the concrete base for installation of vertical connections. A dowel-nail is placed in this place through the stand.
- Using a special key, turning the mounting post left and right, adjust the horizontal level of the log.
- Drive the dowel-nail all the way, check the reliability of the connection and move on to the next profile.
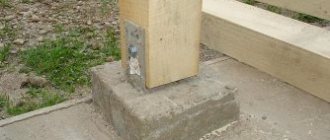
Attaching joists to concrete pillars
Under the logs installed on concrete pillars, 1-2 layers of waterproofing material (roofing material, etc.) are laid, the edges of which should extend beyond the boundaries of the base by 30-40 mm. A fiberboard substrate is placed on top of the insulation in one layer. The profiles are fastened using dowels or self-tapping screws.
Methods for installing logs
There are four ways to install joists on a concrete base. After reviewing the material provided, you can choose the best option for you.
Self-tapping screws
This fastening scheme is considered the simplest and fastest. It looks like this: the logs are laid in place and drilled through. Please note that the drill must go through the wood and go deeper into the concrete surface. A dowel is driven into the hole and a self-tapping screw is screwed in.
The recommended distance between fasteners can vary from 40 to 80 centimeters. The length of the fastener depends on the thickness of the log. Please note that the self-tapping screw must penetrate the concrete no less than 50 mm. For better adhesion of the lag to the surface, it is recommended to use self-tapping screws with threads that do not reach the head.
Anchors
This method is used not only for fastening elements, but also to give the structure additional strength. It is quite problematic to pull out an anchor from a concrete base, so difficulties may arise when dismantling such a structure. Anchors are installed, like self-tapping screws, by drilling through holes. A locking element is inserted into the concrete, into which the bolt itself is screwed through the joist. In order for the bolt head to “sink” into the wood, the holes must first be countersinked.
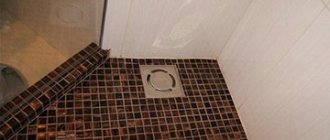
USEFUL INFORMATION: 3D floors in the bathroom and toilet: 9 photos, price, technology
During the work, it is recommended to use anchor bolts with a diameter of about 10 mm. The length is selected individually, taking into account the bolt penetration into the concrete by 5-6 cm. To attach one log you will need 4-5 anchors.
Metal corner
Another way to install wooden elements on a concrete base. To do this you will need a galvanized metal corner. The installation process looks like this: the corner is attached to the joist using a self-tapping screw (the fastener must extend into the wood at least 3 cm). Then the corner is attached to the concrete surface with a self-tapping screw through a dowel.
Installation process
It’s worth clarifying right away that using floor joists is only advisable in apartments with high ceilings. This floor installation technology “steals” the height of the premises quite significantly. So, the installation of the logs occurs according to the following scheme:
- It is recommended to level the screed or concrete base. Otherwise, the elements will not be in the same horizontal plane. Accordingly, they will need to be leveled by placing plates. This can lead to the floors in the apartment creaking.
- You need to lay a layer of waterproofing on the base, or treat the concrete with a special mastic. In the first case, the use of soft materials should be avoided. Over time, they will sag, and the floor will no longer be reliable and solid. For a waterproofing layer, roofing felt or polyethylene film is perfect.
- The logs are treated with an antiseptic compound and cut according to the size of the room.
- The installation process begins with installing joists at two opposite walls. These elements are leveled using a building level and immediately fixed to the concrete floor. Then a string is stretched between the installed joists. It will serve as a guide for the installation of other elements.
- The remaining logs are laid. The distance between the elements directly depends on the thickness of the future floor covering.
- Insulation is poured between the joists. For this, ecowool or rolled materials can be used. In the second case, you need to mount the material as tightly as possible without leaving gaps between the layers.
- A layer of vapor barrier is laid down. This is a necessary condition for protecting the insulation from external influences. The vapor barrier can be attached using a stapler; the joints must be taped.
- You can lay a layer of plywood. This will serve as the basis for installing the flooring.
Installing a floor on the ground
Installing floors on joists is not as difficult as it might seem at first glance. They have a simple design; they can be made for an apartment, private house, or country cottage. Unlike concrete pouring, the weight of such a structure is less, but the floor is in no way inferior in strength.
To install logs, you need to follow fairly simple instructions:
Scheme of a wooden floor on joists on the ground
- First, the soil base is inspected, after which the soil is thoroughly compacted with a vibrator. If there is no such equipment, then the work can be done with a piece of large diameter log.
- A layer of crushed stone is then poured onto the ground; it should be approximately 5 cm. This layer will serve as the base.
- After this, it is necessary to construct the formwork for each support separately. A preliminary diagram of the location of supports is drawn up in accordance with the size of the room and the conditions of construction of the entire structure. If the formwork is ready, then pouring can be done.
- Next you need to build brick supports. In this case, a layer of waterproofing must be provided between the supports themselves and the base. This will reliably protect the structure from moisture. Another layer of waterproofing should be done over the brick support and a soundproofing gasket should be installed.
- Next, floor joists are installed. The boards are pre-cut into pieces of the required size, and then their surface is treated with an antiseptic and fire retardant. This will protect them from damage by insects, from mold, and make them more protected from fires.
- The logs are fixed to the supports with special dowels, which ensure reliability and stability. After this, you can lay a special cranial block, make a primary plank flooring, you can use ordinary boards for it. After rolling, you can lay out another layer of waterproofing material.
- A heat insulator must be installed between the joists. Various materials can be used in this capacity. Manufacturers offer a wide variety of insulation materials suitable specifically for floors on joists. In this case, you can take expanded clay, other bulk materials, foam boards, mineral wool boards.
- During insulation, it is necessary to ensure that no air layers or cavities remain, as this will negatively affect the condition of the thermal insulation and heat loss will be observed.
- After this, it is necessary to level the floor joists. The upper horizontal level is determined. All excess is cut off, and the horizontalness of the coating is checked with a building level.
- The finished floor is mounted from sheets of plywood or chipboard; any floor finishing materials can be laid on them. During installation, you will have to ensure that there is a temperature gap of 2 mm between the slabs, and 10 mm between the slabs and the wall. For strength, plywood can be laid in 2 layers, the total thickness of the sheathing is from 12 mm to 20 mm, it all depends on the requirements for the floor. It is necessary to leave a small ventilation gap between the sheathing and the insulation.
- After the floor covering is completed, it is necessary to once again check the horizontalness of the floor, and then sand the surface. To avoid damaging the sander, the heads of the screws should be sunk into the wood during fastening. The last step is laying the flooring. The process depends entirely on what material was chosen for the job.
We install the floor on joists
The floor is installed on joists in several stages, which we will now describe:
Determining the total floor height
First of all, it is necessary to determine the thickness of the substrate. Let's calculate and add up the thickness of the required materials:
- thickness of the cork substrate (under the log);
- log thickness;
- thickness of subfloor boards;
- thickness of cork backing (under plywood);
- plywood thickness;
- parquet thickness.
Let's say we got it: 2+20+20+2+12+18=74 mm. The resulting height should match the height of your new floor and at the same time, the resulting floor should be approximately at the same level as the floors in other rooms.
The example shows the minimum thickness of materials. You should not use thinner boards, especially plywood! Thicker - please :)!
Preparing materials
The materials we will need are:
- logs;
- cork backing;
- mineral wool;
- self-tapping screws
Preparing the tools
The tools we will need are:
- screwdriver;
- scissors;
- knife.
Once again we make sure that the concrete strips of the base have finally dried out and become light gray - about a week after pouring the last strip. Once we are convinced, we get to work.
We lay the substrate on concrete blocks
We remove everything unnecessary and sweep away all the dirt.
On a flat floor, roll out a roll of cork backing and use a ruler to mark strips a little wider than the width of the concrete strips and a length equal to the length of the room. Then we cut the strips:
Important! The cork is necessary to level out micro-irregularities in concrete strips!
We remove all roughness from the concrete strips - grains of sand, pebbles, lumps and dirt. To do this, we run a spatula along the plane of the concrete blocks and sweep away all the dirt from them. Roll out the prepared cork strips:
Laying the joists
We lay the prepared logs on the cork substrate.
Important! The joists must be dry!
Most likely, the logs will consist of pieces that do not need to be held together. The main thing is that the joints are not located one after another, but in a checkerboard pattern (if possible)! We leave a temperature gap of 5-10 mm between the wall and the joists.
This is what the laid logs look like:
To ensure that the laid logs do not go astray, we will throw several boards across them and secure all the ceilings with self-tapping screws.
We do sound insulation
In the gaps between the strips of concrete with joists we lay mineral wool (50 mm thick is sufficient). It is better to take stone wool, it is easier to cut with a knife:
Using a sharp knife, cut the cotton wool into the required pieces. The wool should not exceed the height of the logs. In those places where the height of the concrete floor together with the log is less than the thickness of the wool, the wool will have to be cut lengthwise with a knife. If this results in uneven rags, it’s okay:
So, today we learned how to make a floor on joists. In the next article we move on to the subfloor.
Attaching the joists to the concrete floor yourself. To fasten or not to fasten?
Opponents of fastening argue that such a procedure can destroy the screed; moreover, at the junction of the joists and the base, sound insulation is disrupted and so-called sound transmission bridges arise, and the neighbors below will definitely not like this. But supporters of rigid fixation cite examples from their practice when the deformation of wooden beams negated all efforts to repair the floor.
How is it really going? As for destroying the screed, doing this with a drill by drilling holes in the concrete will not work if the screed is strong enough. A solid foundation is one of the prerequisites, without which they cannot begin to repair the floor. The old screed, if it has already begun to fall apart, must be removed.
Removing old screed
Regarding the violation of sound insulation, the issue is controversial. Yes, indeed, rigid structures are capable of transmitting sound, but is everything so bad? A layer of insulation is placed in the cells between the joists, which has soundproofing properties.
A layer of insulation is placed in the cells between the joists
A shock-absorbing pad is placed under the joist supports, which also prevents the propagation of sound waves. The sound transmission bridge formed at the fastening site transmits vibrations into concrete, and this material is quite dense and does not conduct sound as well as, for example, wood. Therefore, the neighbors below are unlikely to notice the difference in noise levels before and after the renovation.
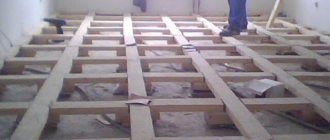
A floor on joists is a structure consisting of many elements: beams, fastening devices, rough flooring. All these parts, moving relative to each other, will emit a constant squeak, which is much worse and will no longer please the neighbors. One way to avoid unpleasant squeaking is to firmly attach the joists to the floor.
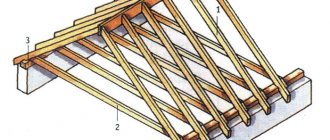
Floor on joists construction
Another argument in favor of fastening is fixing the lag. It is impossible to check the degree of drying of the wood by eye, so you have to trust the seller. Insufficiently dry beams can bend and twist after some time, and this will lead to shifts in the coating, so that the entire complex device will be skewed.
Those who are still wary can opt for a traditional floating floor, that is, a system in which the flooring does not have a rigid connection with the supporting structures. This guarantees excellent sound insulation, but requires well-dried logs that will definitely not fade over time.
Floor installation using adjustable joists
The rigidity of the floating floor is provided by beams securely fastened to each other, forming a lattice. Insulation is placed in its cells, and a rough flooring is attached on top, so that the entire structure will be pressed to the floor by its own weight. If everything is done correctly, then such a floor will not deform over time and will last a long time.
However, most often the joists are still attached to the floor: there are more positive aspects than possible disadvantages.
Work order
How to lay floor joists with your own hands
- The main thing on which the success of the renovation will depend is quality materials. Coniferous wood with a moisture content of no more than 18% is suitable for logs. The purchased beams need to be brought home and allowed to lie in the room for several days so that the material gets used to the microclimate of the room. Those logs that began to bend in the heat should be discarded. By the way, all wooden elements of the future floor must be treated with an antiseptic so that they do not become moldy and insects do not infest them. Treatment with special compounds that reduce flammability will also be required.
Coniferous wood is suitable for logs
Installation, fastening and alignment of joists
Now that the joist system is completely ready, all that remains is to attach them to the floor. The actual fastening is carried out in three ways: dowels + self-tapping screws, anchor fastenings and galvanized corners with self-tapping screws. Which one to choose is a matter of budget and personal preferences of the developer, since each method has its own characteristics.
Video - How to lay joists
Fastening the joists with self-tapping screws
Perhaps the simplest and cheapest option that allows you to achieve excellent results. Through holes are drilled in the beams, and symmetrical ones are made through them at the base. A plastic dowel is inserted there and a self-tapping screw is screwed in. Step – 40-80 cm depending on the situation.
The length of the screw depends on the thickness of the timber and should allow it to go 5-6 cm into the base. By the way, some craftsmen recommend self-tapping screws with a neck, that is, those in which the thread does not reach the head. This will allow the joist to be better pulled to the floor.
Fastening joists with anchors
Anchors guarantee reliability and durability of fastening. Their main advantage in this case is that they not only hold the beam in place, but also attract it to the floor, giving the structure additional rigidity.
Essentially, an anchor is the same dowel, but more powerful. Its advantage is resistance to tearing, so it is used when installing heavy structures that create a high load on the fasteners. A floor laid on joists will most likely not have situations where its entire complex structure will be completely torn away from the concrete surface, so you can limit yourself to self-tapping screws, but the use of anchors is a very common practice.
Fastening is carried out in the same way as in the previous case. Holes are drilled in the joists, which are then duplicated on the concrete base. The joists additionally need to be countersinked to hide the bolt head without damaging the wood.
As a rule, on a room scale, 3-4 anchors are enough to secure one joist. The locking part of the anchor is inserted into the holes in the floor, and the bolt itself is screwed into it through the beam.
The length of anchor bolts can be very different, from 45 to 200 mm. You need to buy those that will be buried in the base, stitching through the lag, by 6 cm. The recommended diameter is 10 mm.
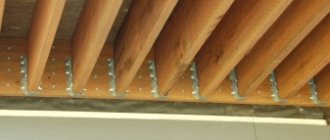
Fastening joists with corners
Fastening joists with corners
Galvanized metal angles are another option for attaching wood beams to a concrete floor. To do this, one side of the corner is connected to the beam by screwing a self-tapping screw into the wood. The depth is 3-4 cm, and it is recommended to do it at an angle to increase strength.
The remaining side of the corner should rest on the floor. It is fixed on this base using the methods already described above: with dowels or anchors. As an option, you can use not corners, but a U-shaped profile.
Attaching adjustable joists
Attaching adjustable joists
An adjustable system costs more, but is easier to use and will make it easier to achieve horizontality. Here, instead of anchors, plastic posts are used, screwed into wood and attached to the base with dowels. The height can be adjusted by rotating special bolts, the protruding part of which is cut off after the adjustment is completed.
Attaching adjustable joists
So, you will have to decide for yourself whether to attach the logs to the floor or not. This definitely should not be done in wooden houses, but as for rooms with a concrete base, fastening will not hurt. The technology is simple and accessible to everyone; the main thing in such work is to choose high-quality materials and strictly follow all the rules. Then none of the structural elements will become loose over time, and the floor on the joists will be reliable and durable.
Materials and tools
Fasteners
The question of how to secure joists to a concrete floor has different answers: simple or adjustable structures can be used for this. The latter use special screws, by tightening which the logs can be leveled. In addition, the choice of fasteners and fastening methods depends on what kind of joists are used.
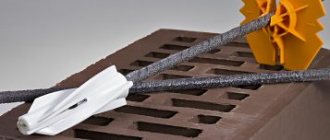
Most often, the lags are fastened to the concrete floor with metal anchors or self-tapping screws with polypropylene dowels, the dimensions of which are selected depending on the cross-section of the selected beam for the lags.
The choice between anchor nails or self-tapping screws is determined by the following:
With modern technologies, logs under a wooden floor could not be secured at all, however, such a solution would greatly increase the likelihood of the floor covering being skewed or the logs moving from their original location. Therefore, when it comes to fastening lags, it is best to rely on old methods that have been time-tested more than once.
However, fastening may not help if low-quality or unsuitable lumber or incorrect fasteners are chosen for the work.
Tips for choosing lags
When choosing logs for a concrete floor, you need to pay attention to the following points:
- type of wood;
- type of lumber;
- length and section;
- price.
For reasons of economic feasibility, you should not take expensive wood, because spruce, fir or pine, if properly processed, can last no less. The appearance of the material is not particularly important, however, you need to sweep away specimens eaten away by grinders or blackened by mold. Evenness of tone and correct geometry of the lag are of less importance. For this work, grades B and BC with a humidity not exceeding 20% are suitable. As is customary to work with lumber, they should be stored in a dry room for some time so that they equalize the humidity with the surrounding atmosphere.
Before attaching the logs to the concrete floor, all wooden elements must be thoroughly impregnated with an antiseptic.
Tools
Since the task is how to lay logs on a concrete floor, you will have to use the following tools in your work:
- Drill and hammer drill.
- Carpentry tools: circular saw, hacksaw, plane.
In addition, you will have to spend money on waterproofing, which must be spread over the entire surface of the concrete. When calculating the amount of material, you need to add another 10-15 cm overlap to the floor area.
Preparing the base
The easiest way to lay logs on a concrete base is if it is perfectly level. Therefore, before installing them, it is better to fill the base with a leveling screed. Similar work has to be carried out on an existing concrete floor: it often needs repair.
To make a concrete floor suitable for laying beams, it is necessary:
- remove the old coating from it;
- remove peeling screed fragments, dirt, debris, mold from the ceiling;
- dry the base thoroughly;
- soak it with an antiseptic composition;
- After the antiseptic has dried, treat the floors with a primer;
- plaster the cracks and deep depressions in the base.
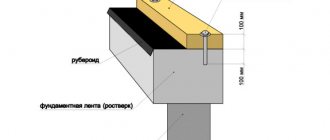
When the solution hardens, waterproofing is placed on the concrete - dense polyethylene or rolled bitumen material. Bitumen-based mastics are often used as a waterproofing agent. They coat not only the concrete floor, but also the walls in the lower part. Also, film, roofing felt, etc. are placed on them with an overlap. The height of the overlap depends on the thickness of the screed that is to be poured.
Without special devices for determining the plane, it will be difficult to obtain a flat concrete base for the logs. To achieve a high-quality result, you will have to use the following materials and tools:
- chalk;
- hydraulic level;
- roulette;
- painting cord;
- synthetic thread;
- gypsum;
- beacons;
- rule.
You will also need an impact drill, a screwdriver, and dowel nails.
On any wall of the room at a height of 1-1.2 m you need to put a chalk mark. On the same horizontal line as the first point, 2-3 marks should be made on all walls of the room. On each of them, between the marks, you need to beat off the lines with a paint cord rubbed with chalk.
The highest protrusion is determined from the base. A mark is placed on the wall at the level of the highest point of the floor. Another one is applied 2-3 cm higher. The distance is measured between the last mark and the previously marked line. Based on the measurement results, other marks are made on the walls, which are also connected by a horizontal line. Dowel-nails are inserted into the walls along it. Threads are pulled between opposite walls.
The screed plane has been built. Using the threads on the base as a guide, you need to place the beacon profiles. They are fixed to the floor with plaster. When it hardens, you can pour the screed. Align it with the rule.
Which tree to choose?
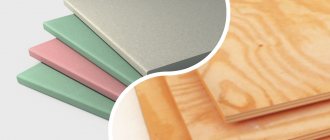
Types of materials
An important point in installing wooden floors is the choice of wood. For these works, the building materials market offers the following types of building materials for the consumer to choose from:
Six-meter boards can be used as covering material.
- Six meter boards. The thickness of the products ranges from 20 to 60 mm. Using grooves and tongues at the edges, the wood is joined.
- Two-meter parquet. These products are not only shorter in length, but also thinner. It is 18-25 mm. The joining principle is similar to the previous type.
- Engineering. They are products glued together from three layers of wood. Pine is used for the lower part, and the upper parts are made of valuable wood.
Criterias of choice
Wooden boards are used for both rough and finishing installation. If the wood flooring is planned to be covered with laminate or linoleum, then the quality of the material can be chosen even unplaned. If the wooden covering on the concrete base is the finishing one, then the boards chosen are tongue-and-groove with a planed surface. When choosing wood, the following criteria are adhered to:
To perform such work, the material must be carefully sanded.
- The wood must be dried, but not overdried, since excessive dryness leads to deformation of the boards under the influence of moisture and temperature changes.
- The material is purchased with a margin of 15%.
- The boards must be smooth, sanded and free from defects.
- Wood from different batches may differ in shade and texture, so experienced experts recommend buying boards of the same type.
- Regardless of the quality of the wood, the boards must be at least 2 m long.
- When installing flooring on a concrete base, raw materials made from softwood are most often chosen, as they are resistant to abrasion. Material made from oak and beech is more durable and expensive.
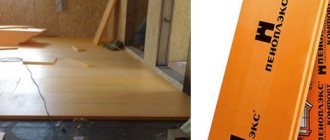
Installation on plywood base
Laying a wooden floor on a concrete screed can be done using moisture-resistant plywood, the thickness of which ranges from 12 to 18 mm. How it's done?
- Plywood is cut into squares 40x40 or 80x80 cm.
- Plywood sheets undergo rough sanding.
- The sheets are spread at intervals of 4 mm diagonally towards the future wooden floor. First, the plywood is fixed with glue, and then with dowels. It is necessary to retreat 10 mm from the wall. Laying plywood sheets is similar to laying bricks. The screw heads are recessed by 3-4 mm.
- The surface is cleaned of dust and dirt.
- The floorboards are attached with self-tapping screws to the plywood.
Laying wooden floors on a concrete screed is not difficult. If the installation technology is followed, such floors will last for many years and will provide warmth and a comfortable microclimate in the house.
Dear reader, leave your opinion on the article in the comments and share your secrets of installing wooden floors.