Fastening for wooden poles
If you have had to build country gazebos, house foundations, country fences and other structures based on wooden posts, you have already used a metal base to support the timber. The appearance of this metal product is simple: a rectangular plate bent in half , equipped with special holes (perforations) is located on a hollow cylinder or square box (base).
And oddly enough, such a small detail plays a significant role in the construction of large construction projects. The strength of the structure depends on the quality of fasteners. Therefore, our company, which sells building materials in Pervouralsk, pays attention to checking the quality of all products arriving at our warehouse. We offer you nails, screws, mounting angles and plates, bolts and self-tapping screws from the best manufacturers.
Column bases
Column base is used to fix round and square columns or supports to any solid material. This product is used to install fences, signs, billboards, and flagpoles. In addition, the column base is successfully used in the repair or capital construction of buildings for both external and internal work.
The design of the product consists of a threaded base and perforated fastening. The special coating of the column base gives it a number of advantages:
- the material does not corrode even with prolonged and systematic exposure to moisture;
- resistant to temperature changes;
- has high technical characteristics;
- the thickness of the metal ensures the stability of the structure.
The base of the column is marked according to the size of the products: OK 90 and OK 70.
How to use the column base correctly?
The lower element of the column base makes it possible to firmly secure heavy supports using any anchor fastener. Through the perforation hole, screws, self-tapping screws, anchors or rough nails are inserted into the wooden base. Thus, the support is attached.
It is important that during installation the supporting system is not made heavier and no insertion is required. Column base 70 is attached to stone and concrete foundations using several specially selected anchors.
To ensure that the fixation of wooden pillars and racks on the foundation is easy and simple, and the quality of the resulting structures is of a high level, the base of the column is made of high-quality steel.
Product types
Differences in the shape, design and functions of column bases allow us to distinguish the following types of hardware:
- PB column base is specially designed for installing posts and posts in concrete. The gap between the concrete and the base plate should not exceed more than sixty millimeters. Rough nails are used to secure this base;
- PPA bases are produced for columns made of laminated and valuable wood of any size. The tree is always attached to the top plate, and the base to the concrete;
- PPD column is a U-shaped support plate welded to a reinforcing bar, the length of which ranges from 200-250 millimeters.
Our company sells from a warehouse in Pervouralsk wholesale and retail column bases, mounting angles, anchors, nails and other high-quality metal products at manufacturer prices. You can order products on the website after consulting with our specialists. We guarantee the best value for money. In addition, we provide full support for the consignment of goods, in other words, we undertake the preparation of accompanying documents.
Source: https://stroyka-ur.ru/perforirovannyij-krepezh/kreplenie-dlya-derevyannyix-stolbov/
How to fix a wooden pole on concrete: concreting the pole and mounting it on the base
All photos from the article
In the process of performing various construction works, sometimes it becomes necessary to attach a wooden pole to concrete. As a rule, this operation raises many questions among novice masters. In this article we will look at how to attach wooden poles to a concrete base in several ways.
Wooden pole mounted on concrete
General information
The need to install wooden poles on concrete can arise in a variety of situations, for example, when installing fences, building gazebos and other wooden structures on a strip foundation.
At first glance, it may seem that installing a wooden pole on concrete is very difficult, but in reality, professionals have some tricks that allow them to cope with this operation without any difficulties. Below you can see for yourself.
Installing a wooden post on concrete
First of all, it should be said that installing pillars on concrete often means different operations:
| Type of transaction | Peculiarities |
| Concreting | The post is installed in a hole that is filled with concrete |
| Fixing on a concrete base | The pillar is fixed on a flat concrete surface using special devices. |
Below we will take a closer look at each of them.
Concreting the support
Pillar concreting
Many novice home craftsmen doubt whether it is possible to concrete wooden poles, since wood in concrete can quickly rot. In fact, if you follow a certain technology, the wooden support can stand for quite a long time.
Instructions for performing this operation look like this:
- The first step is to make a hole to the depth of soil freezing. In different areas this depth may be different, but on average in our country it is 1.2 m. If you make the hole shallower, then there is a possibility that the pillar will be pushed out as a result of soil heaving. The easiest way to dig a hole is with a garden drill, but if it is missing , you can also use a regular shovel.
- Next, you need to fill the bottom of the hole with crushed stone or gravel and compact it well. The layer thickness should be about 15 cm.
Treatment of timber with impregnation
- Before concreting a wooden post, it is necessary to treat the wood with a protective compound. Currently, specialized stores sell special impregnations that protect wood from moisture penetration, exposure to microorganisms and other negative factors.
- After processing, the post must be installed in the hole and secured with spacers. In this case, its position should be checked with a building level to prevent deviation from the horizontal.
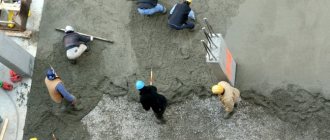
- Next, the space in the hole is filled with concrete.
- Protruding concrete must be smoothed down with a slope away from the post to prevent water from accumulating near the wood.
- Then the concrete must be covered with damp burlap. It must be moistened periodically throughout the week. This procedure prevents concrete from cracking during the drying process.
In the photo - treating the joint with sealant
- After the concrete has completely hardened, you need to treat the area where it meets the wood with a sealant. This will prevent moisture from entering the joint space, which will form during the freezing/thawing process.
Advice! The durability of a wooden structure largely depends on the type of wood. For example, pine and larch have good moisture resistance.
Moreover, the price of pine is the lowest among other species.
Installing a wooden post on concrete
First of all, it should be said that installing pillars on concrete often means different operations:
| Type of transaction | Peculiarities |
| Concreting | The post is installed in a hole that is filled with concrete |
| Fixing on a concrete base | The pillar is fixed on a flat concrete surface using special devices. |
Below we will take a closer look at each of them.
Pillar concreting
Many novice home craftsmen doubt whether it is possible to concrete wooden poles, since wood in concrete can quickly rot. In fact, if you follow a certain technology, the wooden support can stand for quite a long time.
Instructions for performing this operation look like this:
- The first step is to make a hole to the depth of soil freezing. In different areas, this depth may be different, but on average in our country it is 1.2 m. If you make the hole shallower, then there is a possibility of the pillar being pushed out as a result of soil heaving. The easiest way to dig a hole is with a garden drill, but if you don’t have one, you can use a regular shovel.
- Next, you need to fill the bottom of the hole with crushed stone or gravel, and compact it well. The layer thickness should be about 15 cm.
Treatment of timber with impregnation
- Before concreting a wooden post, it is necessary to treat the wood with a protective compound. Currently, specialized stores sell special impregnations that protect wood from moisture penetration, exposure to microorganisms and other negative factors.
- After processing, the post must be installed in the hole and secured with spacers. In this case, its position should be checked with a building level to prevent deviation from the horizontal.
- Next, the space in the hole is filled with concrete.
- Protruding concrete must be smoothed down with a slope away from the post so that water does not accumulate near the wood.
- The concrete must then be covered with damp burlap. It must be moistened periodically throughout the week. This procedure prevents concrete from cracking during the drying process.
In the photo - treating the joint with sealant
- After the concrete has completely hardened, you need to treat the area where it meets the wood with sealant. This will prevent moisture from entering the joint space, which will form during the freezing/thawing process.
Advice! The durability of a wooden structure largely depends on the type of wood. For example, pine and larch have good moisture resistance. Moreover, the price of pine is the lowest among other species.
This completes the process of concreting the pillar. It should be noted that there is another way to install a wooden pole in the ground. Its meaning lies in the fact that a small column (concrete stepson) is concreted, to which a wooden beam or log is attached on the surface using wire tying.
Securing the support with a concrete stepson
Advice! Before concreting, it is advisable to perform waterproofing. To do this, place roofing felt rolled into a tube into the hole.
In addition, you can securely fix the support directly into the ground without concreting it.
According to this technology, the work is performed as follows:
- After treating the support with an antiseptic composition, its area that will be in the ground is covered with bitumen mastic for wood and wrapped with a layer of roofing felt.
- Then the bottom of the hole is covered in the same way with a layer of crushed stone and gravel.
- Next, the support is fixed with spacers in a vertical position.
- After this, the pit is backfilled and compacted. To do this, the space needs to be filled with stones, broken bricks or large crushed stone. Every 30 centimeters, the stones must be compacted with a crowbar, sprinkled with a layer of sand and then spilled with water, which will improve the quality of compaction.
- When about 15-20 cm remains to the top of the pit, the space needs to be filled with concrete. In this case, the concrete ring will provide stability to the support and prevent it from warping.
How to install a wooden pole: step-by-step instructions
. We are engaged in the installation of fences, gates (including automatic ones), installation of poles and power lines throughout Moscow and the Moscow region. Call from 09:00 to 21:00 daily.
Wooden poles, despite their fragility, are still widely used in construction. They are used as load-bearing supports for fences, in columnar foundations, and in the design of terraces. But not everyone knows how to install a wooden pole without errors and extend its service life.
Wood selection
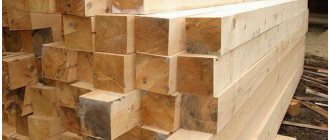
When installed, the pillars are dug into the ground, which means that the tree will be exposed to dampness and temperature changes. Softwoods deteriorate more quickly in such conditions, so they are not suitable for posts. The best posts for a fence or foundation will be larch or pine logs - they have a very dense structure, are less susceptible to rotting and are almost not damaged by insects. In addition, when drying, such pillars practically do not deform, unlike birch, aspen and maple logs.
Oak or beech logs are also very dense and resistant to negative impacts, but their cost is too high and not justified for such use. Common and cheaper coniferous species are significantly inferior in quality to pine, and are used very rarely for posts. Therefore, if you need high-quality and inexpensive wooden poles, the best choice would be pine or larch.
Wooden pillars
An important point in the selection of wood is its moisture content. You should not buy wood that is too fresh - if it is dried incorrectly, deformations can occur that cannot be straightened out later. In addition, the wood may crack, which is also undesirable. It is best to purchase logs with a moisture content of no more than 20%, without visible cracks, chips, or rotten areas. Such defects significantly reduce the durability of the pillars.
Proper installation of wooden posts includes preparing the logs for work: removing bark and treating the wood with special products that protect it from negative influences. The presence of bark will make it difficult to fasten the pillars and reduce its density; moreover, the bark gives the pillars an untidy appearance. If the pillars are already cleaned upon purchase, you need to go over their surface with sandpaper or a grinding machine. This will eliminate minor irregularities and help the protective agents penetrate deeper.
Important! Since part of the pillar is in the ground, two different compositions are used to treat it - an antifungal mixture and bitumen mastic. The above-ground part of the support is coated with an antifungal primer; It is recommended to do this in two layers, or cover it with wood varnish on top. The lower part of the support is very carefully covered with a bitumen mixture, the first layer is allowed to dry, and then the second is applied. The denser the layer of mastic, the more reliable the protection of the pole.
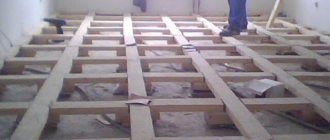
Installation of wooden poles
The installation process includes marking, digging holes and vertical placement of posts followed by compaction.
To work you need to take:
- drill or shovel;
- tape measure and level;
- spacers;
- crowbar for tamping;
- crushed stone;
- concrete solution.
Marking and drilling holes
Mark the places for the posts using pegs, tape measure and cord. First, determine the location of the corner support, drive in a peg and measure the length of the run in a straight line. As a rule, this length does not exceed 3 m to avoid sagging sections of the fence. The optimal width of the run is a distance of 2-2.5 m. So, measure the required length from the post and put a mark, then repeat everything until the end of the fence. The marks must be strictly along the line; this is the only way the fence will be smooth and neat.
Load-bearing fence posts
The holes for the posts are dug to a depth of soil freezing - approximately 1.2 m. A shallower depth can facilitate the pushing out of the posts by the soil after freezing. Wooden supports are buried at least 1/3 of their height so that they do not become loose after installation. The width of the holes should not be too large; it is enough if the diameter of the hole is 20 cm larger than the diameter of the post. These conditions will help you figure out how to properly install a wooden pole, and in the future you will be able to do similar work much faster.
Wood Post Installation Methods with Step-by-Step Guide
It is worth choosing the most suitable one after a thorough analysis of the type of soil, the climatic conditions of the region, the size of the fence and the future load on it.
There are the following methods:
- Concreting.
- Driving into the ground.
- Butting of supports.
Sometimes there is the option of installing bars inside a part of a metal pipe or steel cup tightly fixed in the soil.
We will consider the first three - the most popular and accessible.
Concreting
Tools you will need:
- Boer;
- roulette;
- pegs with rope;
- level;
- spacers;
- scrap;
- crushed stone (broken brick);
- concrete.
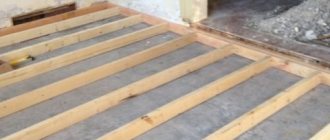
Photo: the 50x50 timber is concreted, it’s time to start installing the fence sections
. Work order:
- They make markings. You need to start it from the corner along the length of the section line. In these places, pegs are driven in, onto which the rope is pulled tightly. The recommended span width is from 2 to 3 m.
- Next, they begin drilling holes for supports. If you don't have a drill, you can use a regular shovel. The depth should be at least ⅓ of the height of the pillars. They will not stagger and be subject to swelling of the soil in frosty weather. Often this figure is 1-1.5 m. The width is 20 cm larger than the diameter of the support.
- But the bottom is filled with crushed stone and compacted.
- The bottom of the pillar is coated with mastic and wrapped with roofing felt.
- Now you need to try to install the beam. Verticality is checked with a level.
- Spacers are placed on the sides. If somewhere the height does not agree, add more crushed stone, pour water on it, and tamp it down.
- The remaining space is filled with concrete mortar.
Let the racks stand for up to 2 weeks. After that, the spacers can be removed and you can begin covering the fence sections.
Driving into the ground
It is considered a temporary but budget-friendly method of fixing supports. Not suitable for rocky, soft soils.
It is used in the construction of low fences on stable soil.
To make it easier to hammer the timber into the ground, the lower part is sharpened symmetrically to form a stake. A board of soft wood is placed on top to avoid damage to the upper part of the support. Vertical installation is checked with a level. If the tilt is incorrect, it is changed by side blows on the beam. The soil around the fixed support is carefully compacted.
Why pour mortar into fence posts - Handyman
Concreting pillars must be approached responsibly, because the reliability and service life of the entire fence depends on it.
How to install fence supports, what materials are best to choose? Let's look at the main points of building a fence.
Why concrete fence supports?
Advantages:
- The pillars will not loosen in the ground. If the pillars are not concreted, when the groundwater level rises, they simply may not withstand the load and fall.
- Protection against corrosion processes is provided.
- You can extend the operating time.
The downside is that if the pillars are concreted, over time they begin to stick out of the ground due to precipitation.
This situation will arise when there is close-lying groundwater, which pushes supports with a concrete base out of the earthen cover.
There is also a possibility of cracks in the concrete.
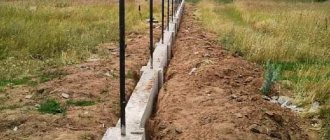
The strip base is one of the most reliable
How to prepare a construction site?
Take these materials:
- shovel, crowbar, concrete mixer;
- fittings;
- drill;
- cement, crushed stone, sand;
- roofing felt;
- level, plumb line, tape measure;
- theodolite, cord;
- timber for formwork;
- wheelbarrow;
- plastic bags.
First you need to prepare the surface and only then install the supports for the fence. Use a shovel to cut off the rhizomes and turf so that there are no obstacles during drilling.
The size of the hole may vary depending on the diameter of the drill. Install it as deep as possible. Remove the soil from the pits immediately so that it does not interfere with construction work.
Drill the soil to the freezing depth (about 1.5 m), then install the expander on the plow and begin arranging the anchor expansion at the bottom of the hole. Thanks to this, winter frosts will not affect the position of the pillars; they will remain in place.
Which fence posts to choose?
The main criteria for selection are not only external characteristics, but also technical ones, as well as installation methods, which include additional elements.
Types of pillars:
- Made of wood - short-lived. They will last an average of 10 years. If you choose this option, treat the supports with antiseptic preparations or copper sulfate solution. This will extend the service life.
- Asbestos cement pillars are characterized by practicality, ease of installation, and affordable price. Suitable for summer cottages or commercial areas. The disadvantage is that the pipe is empty. When it rains, water accumulates inside, and during frost the pipe may burst. The logs are difficult to attach to the base.
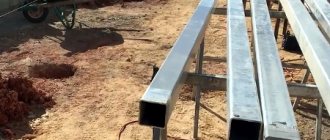
- Metal poles are the most practical and popular. Pros: easy to install, reliable, can be used for all types of fences, have a long service life.
- Made from concrete . Finished products are expensive; they are often made independently, since this does not require large investments. They are used often, but require skills to pour the design efficiently the first time.
- Brick pillars are the best decorative material. They are expensive and difficult to work with. Laying of the foundation is required, mutual bandaging, decorative treatment and preventive methods are needed, but the appearance is attractive.
What are the types and how to install screw piles for a fence - read in this article.
Whether it is necessary to concrete posts for a fence made of corrugated board is described in detail here.
If you are interested in how to make wooden fence posts with your own hands, read this article.
Choosing the right pole type
Follow these tips when choosing supports:
- For fences made of corrugated sheets, those supports that are able to stand reliably in the ground and support the structure without any problems are suitable. The weight of such a fence is light, so you can even use wooden posts. Although the best option is concrete types, as well as metal and brick. To make the structure more durable, use iron corners as a frame along the fence.
- Are you planning to install a chain-link mesh ? Buy small-diameter iron poles. This option will not be expensive. Bury deeply so that the mesh, when stretched, does not bend the supports. Place a reinforced concrete pillar in the corner area.
- For a brick fence, take pillars made of brick, concrete with the correct dressing and with a high-quality foundation. Other options will not be able to withstand heavy loads and will spoil the overall appearance.
- For concrete structures - pillars made of concrete, metal (wide in diameter).
Metal supports are the most practical option
What type of concreting to choose
A wooden post does not need to be filled with concrete, since if the wood is damaged, it will simply be impossible to replace the post.
You will have to break the concrete and start the process again. It is better to install a steel or asbestos glass, this will allow you to replace the timber in the future.
But for metal supports, use cement compounds.
Pouring supports can be of the following types:
- spot concreting is inexpensive .
- partial concreting option is used to fill the top layer of earth. The disadvantage is deformation of the support due to the influence of low temperatures on the soil. The structure is weakened.
- Mounting a strip base is an expensive method, but reliable.
- With the dry type, there is a possibility of the pillars swaying during the wind, this weakens them.
Concreting scheme for corrugated board fencing
Preparatory stage of concreting pillars
Measure the future fence. Based on its length, calculate the number of supports.
When using slate (flat, wave) as a fence, a distance of less than 2 m must be maintained between the posts. If it is corrugated sheeting, 2 m is sufficient.
With lightweight structures (chain-link mesh), the gap will be 3 m or even more.
The next step is to complete the markup. Measure the area where the fence will be installed. Its length is divided by the length of the fence sections and 1 is added - this will be the number of columns.
Did you get a non-integer number? Reduce the flight distance. For example, the width is 10 m, the material is corrugated sheeting, between sections is 2.5 m. The calculation is as follows: 10/2.5+1=5 pillars .
Take measurements and mark where the structure will be installed. Take this into account if a gate or wicket will be installed.
Their length usually does not correspond to the section markings, so the number of supports will fluctuate. A standard entrance gate is about 3 m, and a wicket is 1 m.
Now start drilling or digging holes to install the column.
If your site is located in a humid area, which is characterized by severe frosts, refuse this type of partial concreting. Replace with tape mounting.
Advantages of a pole or what can be installed on a street pole
Pillars are a complement to the architectural design of the city, streets, areas. With the help of supports it is easy to maintain the style of historical centers, parks, or any place. The supports are highly durable and resistant to bad weather conditions.
Based on the material used, poles can be divided into wooden, reinforced concrete, and metal.
The advantages of the last two:
- strength;
- long service life;
- corrosion resistance;
- pole mounting allows for quick installation of devices;
- safety.
You can install it on a street pole:
- Street lights;
- street electrical panels;
- CCTV Cameras.
Street lights
Several types of lamps are used for street lighting:
- Spotlights. These are large luminaires with powerful lamps. They are used to illuminate large areas.
- Landscape gardening. These lanterns are designed for tiered lighting.
- Floor lamps. This type of lamp is necessary when it is necessary to install the lamp vertically at the top of the support.
- Console. These are common devices that are attached using a console.
Street electrical panels
Outdoor electrical panels, designed for installation of metering devices and meters, are mounted on a pole or support. They are needed for:
- electricity metering;
- protection of electrical equipment from overloads and short circuits;
- protecting devices installed inside the electrical panel from external natural factors.
Fastening a wooden post into concrete
Wooden building material, despite its fragility, is constantly used in buildings. Used as a base for fences, decoration of extensions, as foundation parts. During work, the tree must be periodically attached to the concrete. Many questions immediately arise: how to properly install wooden poles, how to extend their durability? Answers to them require preparation.
general information
At first glance, the situation is complicated, but there are tricks that help you cope with the work without much difficulty. Before you begin installation, you should choose what kind of wood the future base will be made of and carefully process it. Wood processing is an important process, because when exposed to the environment, it deteriorates.
Processing is carried out on the prepared post. The support is divided into two halves, each of them is treated with a different chemical. The part that is underground is more susceptible to moisture; it is treated with bitumen-based solutions twice, maintaining an interval of a day. The second part of the post is usually coated with varnish, protecting the wood from wind, sun and moisture.
Important! Before processing, the wood must be dried, and careful sanding will help save bitumen impregnation.
Installation methods
The base is a box for installing supports.
After completing the preparatory work, we proceed to installation. We mark and prepare the place for the supports. Options for installing poles are determined by the design features and the nature of the work. Installation means concreting a support or fixing it to concrete. There are main methods:
- universal concreting of the base;
- use of concrete stepson;
- installation on concrete;
- use of frame;
- special connection;
- platform with a box.
Versatile method - concreting
Installation of wooden poles using concreting is well suited for soils with low humidity. The installation method involves preliminary preparation of holes for the base, installation of pillars in them and filling the remaining space with concrete.
To increase efficiency when digging holes, the ground is watered; the ground becomes soft and easy to work with. When the height of the pillars is 1.5 m, the depth for the hole is 0.5 m; for higher ones, the depth is increased to 0.8 m. The pillar is deepened by 1/3 of its length.
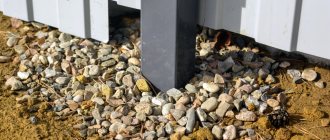
When the groundwater level is high, the supports are deepened below the soil freezing level and the bottom of the holes is covered with a layer of crushed stone up to 15-20 cm, which acts as drainage. The bottom of the supports is wrapped with roofing felt, fired, and treated with resin to better protect the wood.
Having completed the preparation, they begin to compact the holes. The holes are filled with crushed stone, pieces of brick mixed with soil, and compacted tightly. We leave 15-20 cm to the top of the hole, and the empty space is filled with concrete. After the solution dries, the pole holds tightly and will not bend under the load. The joint between concrete and wood is treated with a sealant, which prevents moisture from getting between them.
Concrete stepson
The second way to install a wooden pole is to use a concrete stepson. The essence of the concreting procedure is to use not the entire log, but a small column. The sequence of the procedure is as follows:
- before installation, the support is treated with an antiseptic, the part of the stepson that will be in the ground is covered with bitumen and wrapped with roofing felt;
- crushed stone is poured onto the bottom of the hole;
- vertical fixation of the support with spacers;
- Be sure to fill the wooden post with crushed stone, gravel and compact it well. Maintaining a compaction interval (every 30 cm), adding sand and water will help increase the density of the backfill;
- 15-20 cm to the top, the hole is filled with a concrete solution, which ensures stability.
After the concrete has hardened, it is necessary to secure the log with wire to small posts.
Concrete base
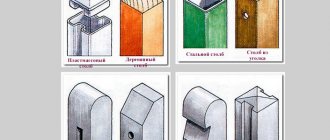
Installation of a wooden support using a concrete base can be easily done in several ways:
- Special mount embedded in concrete. By special fastening we mean a pin with a special fastening in the form of the letter P at its end. The cross-section of the beam must correspond to the dimensions of the fastening so that the tree fits easily into the device. The inserted beam is attached with screws and bolts. The method has its drawback - only timber is used as a wooden support.
- Fittings. In the absence of a specially prepared connection, ordinary reinforcement is used. The inserted iron pin into the concrete should protrude 20-25 cm above the surface. A hole is drilled on the support, the diameter of which corresponds to the diameter of the reinforcement. A seal is applied to the concrete to protect the structure from water penetration. The size of the seal is smaller than the wooden support. The joints between the pillars and concrete are covered with mortar. If necessary, the upper and lower frames will help connect all the pillars into a common structure. This option is more often used on a strip foundation.
- A box with a platform is used for hardened concrete. The wooden material is placed in a specially made box, to which a platform is welded from below. Dowels are screwed into the holes on the platform, with the help of which the box is attached to the concrete.
Fixing wood to concrete is not difficult if all technologies are followed. It is worth taking care not only of reliable fixation of the material, but also of minimal environmental impact on the wood. Then the wooden supports will serve you for many years.
Source: https://kladembeton.ru/tehnologija/inye/derevyannye-stolby-v-beton.html