Published: 09/16/2019 | 20574
One of the components of a complex of building structures is a fence. It fences off the territory of residential buildings, industrial facilities, parking lots, parks, etc. The more reliable the design of the barriers, the more efficiently they perform their functions. The reliability and rigidity of the entire structure largely depends on the supporting pillars - the basis of the fence. Their stability, in turn, determines the method of fixation in the ground - simple compaction, butting, concreting, screwing in piles, etc.
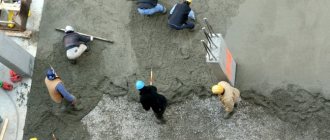
Backfilling a square fence post with crushed stone
Advantages and disadvantages
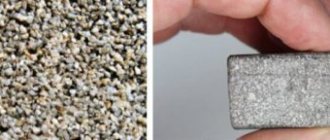
Butting is the technology of dry concreting using crushed stone, gravel, expanded clay, broken bricks, and stones. A similar technique has been used in the construction of barriers since ancient times, due to its simplicity, efficiency and minimal economic costs.
The essence of the technique is very simple and understandable: a well is dug in the ground, into which a support is installed, crushed stone with a fraction of 20-40 mm is filled, often mixed with gravel. All this is filled with water and carefully compacted, reducing the voids between the filled material to a minimum.
This technology has a number of characteristic positive features:
- Versatility. Suitable for installing posts made of any material (wooden posts, metal square pipes, plastic, etc.) and for any soil.
- The natural drainage cushion made when installing the support pillars eliminates soil vibration due to temperature changes.
- The material used for butting perfectly removes moisture, preventing it from accumulating around the racks. It is this property that determines the versatility of the technology - the fence can be installed in any type of soil. Materials poured into the well form a buffer between the support and the soil, which absorbs multidirectional forces, preventing the fence from skewing.
- Save time. To carry out butting, you will need to spend 3 times less time and put in less effort than when concreting. Technology also saves human resources. Only one worker can participate in the workflow.
Butting with gravel
However, the technique also has its drawbacks:
- Fragility. Over time, strong gusts of wind and ground vibrations will cause the structure to loosen. The procedure will need to be repeated. It is not recommended to use the technology in regions where stormy winds regularly blow and high seismic activity is observed.
- Labor intensity. For greater stability, you will need to dig a deeper hole. The deeper the well, the more materials will need to be poured into it. If they are purchased, you should estimate how feasible this process is from an economic point of view.
Butting with gravel
Do-it-yourself butting of a fence with crushed stone
The technology for butting fences is quite simple. You can do the backfill yourself, even without experience in construction work.
The work should be divided into three stages:
- Preparation (making a plan)
- Selecting Tools
- Butting
Next we will describe each in detail.
Preparatory work
Planning should begin before purchasing materials. This will help you correctly calculate their quantity, not overpay and not buy too little crushed stone.
Main stages of planning:
- Determining the perimeter of the fence It is important to study the territory; there should be no bumps or holes in it. If necessary, the area is leveled around the perimeter.
- Marking future columns The span length should be about 3 m (optimal - 2.5 m). If it is larger, the fence will sag and become deformed. It is recommended to place the posts closer to each other if you plan to have a high fence (more than 2 m). All supports must be on the same line. To do this, when marking, first install temporary supports at the four extreme points of the site. Then a rope is pulled between it (preferably slightly above ground level). The angles at turns should be 90°.
- Counting the number of pillars The perimeter of the fence is divided by the length of one span (2.5 m). To ensure that the distance between all posts is the same, the total length of the fence must be a multiple of the span size.
- Determining the depth and width of the hole On heaving and clayey soils, a hole under the pillars is dug to the freezing depth (for our region this is approximately 1.6 m). For all other soils, it is calculated so that the pillar is buried in the ground at 1/3 of its height. The diameter of the recess should be 20 cm larger than that of the pillar itself. Calculate the volume of the hole using the formula: multiply the squared radius by 3.14 (Pi) and the height. Then we multiply the resulting figure by the number of supports and the compaction coefficient and find out how much crushed stone is needed for heaping. If the pit is square, multiply the width by the length and the height to calculate the volume.
After planning, you can move on to preparing tools and purchasing materials.
Tools and consumables
When choosing tools, first of all you need to decide what you will use to dig holes for the posts. The simplest option is a garden shovel. But with its help you can only make a square hole of small depth. Therefore, we recommend using a drill.
There are hand-held garden augers and electric augers. The first allow you to make a hole with a diameter of up to 15 cm, the second - from 15 cm to 30 cm. An electric drill is expensive, there is no point in buying it for a one-time job. You can rent the device or use the services of specialists.
Other tools you will need:
- Tape measure for measuring the distance between posts
- Level for checking the correct installation of supports
- Rope
- Shovel for filling crushed stone
- Tamping device (electric vibrator, crowbar, log with handle and iron pad)
- Hammer for driving posts
Consumables you need to buy:
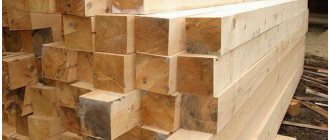
- Crushed stone fractions 20-40, 5-10, 5-20, 10-20
- Sand or screenings
- Fence posts
We will tell you further how to properly fill the base under fences with crushed stone.
Technology
Step-by-step instructions for butting a fence:
- We make a hole of the appropriate diameter and depth.
- Fill the bottom with a layer of 10-15 cm of coarse sand, screenings, 5-10 fine crushed stone or expanded clay. This is a drainage layer. You can make a mixture of sand, screenings or small crushed stone in a 1:1 ratio.
- We hammer the post into the base using a hammer. We first tie a level to it to monitor the position of the support.
- Pour the first layer of crushed stone 20-40 (10-15 cm high). We declinch with a fine fraction or screenings and fill it with water. We are doing compaction. Repeat the step until the hole is completely filled.
- The top layer is poured into a mound at the base of the pipe so that water does not flow into the hole.
If tamping is done correctly, the fence will be strong and stable.
You will learn further about the positive and negative aspects of backfilling.
Peculiarities
The main difference between butting and concreting is that the compacted pad is completely permeable to moisture. It is a drainage system at the base of the pillar, which allows the method to be used when constructing barriers in soils subject to frost heaving, that is, a change in volume during freezing.
As soon as the ambient temperature becomes negative, all the moisture in the soil begins to freeze. When water passes from a liquid to a solid state, its volume increases, that is, heaving occurs. This is a huge headache for builders. Butting allows you to neutralize this effect. Since a drainage layer is formed around the support and does not retain moisture, there is nothing to expand there.
Another characteristic feature is the plastic base, made by filling crushed stone (stones, gravel, etc.) with sand. The resulting buffer allows you to compensate for the pressure of the lower layers of the soil.
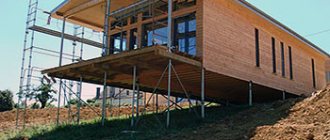
Installation technology
Butting is performed in the following sequence:
- The hole for the post is being prepared. The drilling depth is calculated as follows: at least 1/3 of the column height, but slightly below the soil freezing mark. For the Moscow region this is 1.3-1.6 m. The width of the recess should be 12 cm greater than the diameter of the support pipe. Using a shovel for this purpose will worsen the quality of work: a wide hole is difficult to compact well.
- For drainage, a cushion 10-15 cm high is formed at the bottom of the recess. Sand, crushed stone or expanded clay is used for this purpose. The material is compacted with a crowbar. This layer will remove moisture, preventing the accumulation of water.
- A support is installed on the drainage pad. If it is a hollow pipe, plugs are placed at its ends. The bottom plug is made wider than the diameter of the pipe to serve as an anchor.
- After this, filling the hole begins. To fill fence posts, crushed stone, gravel (or other stone) is poured in layers of 10-15 cm. Sand is added to each backfill to fill the voids between the fractions. Then the layer is watered and compacted using an electric vibrator. If you don’t have such equipment, you can make a tamper yourself from trimmed logs. The hole is filled with backfill with a slide so that water does not flow inside. This is where the bottling ends.
To guarantee strength, the last layer of crushed stone is filled with mortar, but this step is optional. It is also possible that the bedding does not reach the ground level by 15 cm. This gap is filled with concrete.
Butting can be done in other ways:
- A layer of concrete 30 cm high is poured into the bottom of the hole, then a post is inserted. The pouring mixture must be pierced with a metal rod to remove air bubbles - this gives the necessary shrinkage to the concrete. Then prepared stones are poured into the voids of the pit layer by layer, watered with water and compacted.
- In a hole at a level below the groundwater level, using a special drill or bayonet shovel with a narrow working blade, an expansion is made for the concrete heel. It increases the bearing capacity of the support and protects against the destructive effects of tangential forces when frozen soil thaws.
During butting, when installing the support, it is necessary to constantly monitor the position of the support - it should not deviate from the vertical. To do this, use a building level (or better yet, 2, placed mutually perpendicular). For convenience, the levels are attached to the support with tape. To ensure that the post does not change its position during installation, it is recommended to fix it with temporary spacers.
Correctly performed butting of supports is a guarantee of fencing durability.
Butting technology
The backfilling method looks like this:
Scheme for installing a pole in the ground with butting
- A well is dug. Its depth depends on the length of the rack and is 30% of the total height. The bottom of the recess should be located below the freezing level. In the central zone of Russia, as a rule, this value varies between 100-150 cm. The diameter of the well should exceed the cross-section of the support column by 120 mm. Digging holes with a shovel is inconvenient. Such wells will be much wider than the optimal value, which is extremely impractical. Firstly, the larger the hole, the lower the compaction density. Secondly, you will need to spend more backfill material.
- A drainage cushion of approximately 10-15 cm is placed at the bottom. Sand, crushed stone, and expanded clay are suitable for this. The backfill is compacted with any heavy object, be it a sledgehammer, a wooden pole, a thick handle or a crowbar.
- The stand is exposed. In cases where the support is a hollow pipe, it is necessary to first install a plug. It will prevent moisture from entering and give the pillar greater stability.
- The installation level is checked. If the vertical plane is level, backfilling of material begins.
- The components are poured in layers. Each layer, equal to 10-15 cm, is sprinkled with sand to fill the voids, spilled with water and compacted.
- The well is buried with a slide. This will prevent water from flowing inside. To give strength to the structure, the top of the backfill is concreted.
You can strengthen the exposed supports in one more way: the material is not filled to the end, leaving approximately 10-15 cm, where cement-sand mortar is poured flush with the ground surface.
Advantages and disadvantages of butting pillars
Butting is also called dry concreting. This method has been used for a long time, and it has not lost its relevance because it is simple and economical. Butting consists of the following: the part of the support located in the ground is sprinkled with crushed stone (fraction sizes - 20-40 mm) or other stone (expanded clay, gravel, broken brick, scrap concrete products). The backfill is spilled with water and carefully compacted to fill the voids in the hole.
Like any other method of installing poles, butting has disadvantages and advantages.
The main advantage of dry concreting is its versatility. With its help, wooden or concrete posts, plastic, asbestos, metal pipes or corners are installed. Butting is possible in any soil.
Thanks to the drainage cushion - an undeniable advantage of butting - there is no deformation of the soil near the column during freezing and thawing. There is no accumulation of moisture in voids, which is typical for heaving soils. Crushed stone or other material used for butting easily removes excess moisture, preventing the accumulation of water near the base of the support. Therefore, unlike concreting, butting fence posts is possible in clay soils.
In addition, the layer of stones creates a strong buffer zone, which absorbs the pressure of multidirectional heaving forces, preventing the support from being pushed out of the ground.
Compared to concreting, butting takes 3 times less time and is much cheaper. Backfilling of pillars can be done by one person.
Butting posts for fences and other fences does not have any significant drawbacks, except for one: although a post installed using the dry concreting method will last a long time, over time, due to the influence of winds and other loads, loosening of the structure cannot be ruled out. As a result, re-compaction is required.
Relative disadvantages include labor intensity - butting, compared to the method of driving in a support, requires a hole of greater depth. It is also necessary to take into account the cost of backfill materials.
Other methods
- Concrete solution is poured down the recess to a depth of approximately 30 cm. It is advisable to compact the pouring using reinforcement. Then the support is installed, leveled on a vertical plane and the material is also poured in layers, diluting and watering the sand.
- An expansion is made at the bottom of the well. To do this, use a drill or other available tool. This increases the area of the pillar's supporting base. This will increase the stability of the structure and weaken the impact of forces generated as a result of soil thawing.
When performing butting, one should not forget about the vertical position of the rack. Skewing must not be allowed, so during the process it is necessary to constantly check the level on the vertical plane. To facilitate the process, once the support is in the desired position, it is fixed with special spacers.
Compliance with installation technology guarantees a long service life of the fence.
Butting
Like any work, butting requires work. The installation of pillars begins with the preparation of holes.
Digging holes
Before you begin preparing holes for installing support pillars, you need to make markings indicating the location of the supports.
In the place where the support will stand, you need to drill a hole. Its depth should be 200-300 mm below the soil freezing level.
To dig a hole, it makes sense to use a mechanical device, such as a mechanical drill. The use of a shovel will lead to the expansion of the hole and compaction of crushed stone will be difficult.
How to choose crushed stone for pouring fence posts
Each type of crushed stone has its own characteristics. They are determined in the laboratory and prescribed in the accompanying certificate. The material requirements for backfilling fences are not too high. But it’s worth paying attention to a number of indicators.
The following characteristics are important here:
- View
- Fraction
- Flakiness
- Frost resistance
- Strength
- Bulk density
- Compaction factor
- Water absorption
- Radioactivity
To find out how each property affects the quality of backfill, read the next part of the article.
Almost all types of crushed stone are suitable for backfilling. When choosing, you should consider what load the fence posts will bear.
The load increases:
- For high fence heights
- When covering spans with heavy materials (forged gratings, reinforced concrete)
- For corner supports and posts near gates or gates
- When the fences are located on the leeward side
In these cases, it is important to choose a material with high strength.
Materials that are suitable:
For low fences with mesh, limestone is quite suitable.
Since crushed stone is poured in a heap near the pillars during backfilling, it is worth paying attention to its decorative properties. It can become an element of landscape design. Fillings made of gray granite, white marble, dark green serpentinite, and light gray gabbro look beautiful.
Fraction
Only certain fractions of crushed stone are suitable for pouring fences. Stones that are too large will compact poorly and put additional stress on the pillars. Small crushed stone (if used independently) will not hold the support.
The optimal option for backfilling is fraction 20-40 with crushed stone crushing 5-10, 5-20, 10-15 and 10-20. To fill the base, use screenings 0-5 and 0-10, coarse sand.
Flakiness
As we said in the previous paragraph, when backfilling foundations under a fence, the degree of compaction of the material is important. Only after compaction will the supports hold well and not warp. If there is a high content of irregularly shaped grains in the crushed stone, this will not be possible.
When purchasing, pay attention to the flakiness group. It indicates what percentage of needle-shaped or flat grains is contained in the material. Group I (5-10%) or II (10-15%) will be optimal. They compact better and reliably fix the supporting fence posts.
Frost resistance
Crushed stone has good water permeability; water does not accumulate in its thickness. But moisture can enter microcracks in the stone, and then freeze, expand and destroy the rock. The strength of the crushed stone then decreases, the backfill sags, and the supports warp. Therefore, for butting you need to choose a material with good frost resistance.
For fences, it is best to take crushed stone with F150-200 ratings. Then the backfill will withstand up to 200 cycles of freezing and thawing and will last for several decades. High frost resistance of materials made from igneous rocks (granite, diorite). It is slightly lower for limestone and marble, but their performance still meets the requirements.
Strength
Imagine that during the compaction process, crushed stone breaks down into small pieces. There is no need to talk about the quality of the backfill in this case. Very soon such a foundation will sag and the pillar will warp.
A similar situation arises if you use a material with low strength. For fences, it is recommended to take crushed stone with a crushability grade of at least M600, and even better – from M1000. Igneous varieties (granite, diorite, gabbro) and metamorphic (serpentinite, amphibolite) have excellent performance. But the indicators of limestone and marble are worth checking according to the certificate.
Bulk density
Bulk density is measured in kg/m3 or t/m3. It determines how much crushed stone will occupy when freely poured into the body of a car or a hole under a fence support before compaction. On average, for crushed stone of fraction 20-40 this figure is 1.5 t/m3.
Knowing the bulk density is important in order to correctly convert volume to weight or vice versa. This will help you correctly calculate the amount of material. They sell it in different ways - in cubes or tons. For fences, after calculating the total volume of the pits, you need to know exactly the number of cubes. To quickly convert kilograms to cubic meters, use our Calculator.
Read more about this indicator on the page Bulk density of bulk materials.
When purchasing and calculating the required amount of volume, the compaction factor should also be taken into account. We'll talk about it further.
Compaction factor
In order for the base under the fence posts to be strong, it must be compacted. Accordingly, the volume of crushed stone will decrease, and the mass required for backfilling will increase. To correctly calculate the amount of material required, you need to know its compaction coefficient.
READ ALSO: How to cut the grass near a fence
For crushed stone, it is customary to take into account the average compaction index of 1.3.
To calculate the required volume of material, you need:
- Find out the volume of the hole
- Multiply this volume by the number of wells
- Multiply the resulting number by the compaction factor
It is best to purchase 10-15% more material than was calculated. It’s better to have some extra crushed stone left and find another use for it than not have enough of it. The remainder can also be added when the soil around the fence posts settles a little.
Water absorption
The liquid penetrates the crushed stone through pores and small cracks. This leads to partial destruction of stones if it contains a lot of water-soluble salts. In addition, the frost resistance of the breed decreases. After all, ice has a larger volume than water, and therefore expands small cracks. As a result, the strength of the material is lost.
The higher the porosity of crushed stone, the greater its water absorption. The highest rates are found in limestone, dolomite, tuff, and shell rock. If you use such a stone for butting fences (especially in conditions of high humidity), over time it will lose strength, collapse, the base will shrink, and the posts will warp. In this case, you will have to carry out additional compaction, backfilling or completely replace the crushed stone.
Radioactivity
If you are going to build a fence near your house, you need to check the radioactivity of the material used. This primarily concerns granite, which can have a high natural radiation background. According to GOST, the indicator should not exceed 370 Bq/kg. Species with higher radioactivity can only be used for fencing outside residential areas (on country roads, along railroad tracks).
All the crushed stone that we sell has radioactivity levels that are several times lower than the established standards.