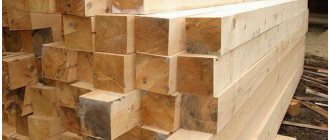
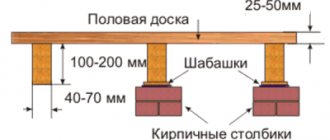
Wooden poles for canopy
This is the simplest and most affordable type of canopy supports, which you can install yourself even without special skills. Any wood will do, but it is durable and hard; it is optimal to give preference to deciduous trees.
The post can be solid wood, buried at the base in the ground, or combined - when the base of the post is stone, and only the top is wooden. In the first case, it is especially important that the material is well saturated with antiseptics that prevent rotting.
The installation of wooden poles for a canopy is suitable for a structure made of polycarbonate or boards.
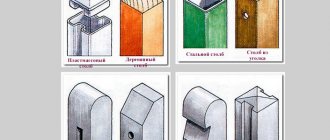
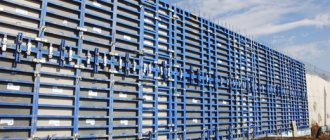
Canopy poles made of profiled pipe
Metal is a strong and durable material that can serve as a support for maintaining a canopy for many decades. Metal poles for a canopy are the most reliable and strong supports that are not that expensive.
Ordinary metal pipes of different diameters are usually used as racks; before digging into the ground, their lower part must be coated with anti-corrosion enamel, which extends the service life of the support, and polymer for waterproofing.
Canopy posts made from profile pipes are used in many cases:
- To obtain a reliable and strong frame for canopies made of polycarbonate, boards, metal profiles;
- For wet and water-saturated soils;
- For installation of a base for trusses;
- For installing a frame “forever”.
Metal poles (pipes) are more expensive than wooden ones, but they last much longer without the need for repairs, and are also more aesthetically pleasing and can withstand an unlimited number of colors.
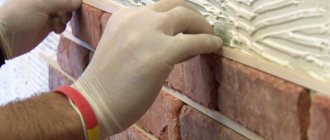
Installation of brick pillars for a canopy
Metal poles for a canopy are a common, but far from the only solution. Brick supports will look more interesting; they look elegant and beautiful. This is a fairly heavy material, so it will require a concrete foundation. Installation requires a lot of work, but it will give a good result.
Installation of the base and construction of pillars is carried out as follows:
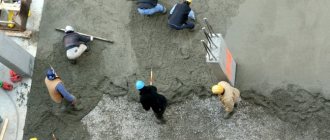
- The territory is marked out, the location of the pillars and their boundaries are distinguished with ropes. After this, you need to dig square holes under the pillars, the depth of which is 50 cm.
- A layer of sand is poured into the bottom of the holes, which must be well shed with water and compacted thoroughly. After this, reinforcement is placed in the pits, and formwork is installed along the edges. For the frame, reinforcing bars are laid at a distance of 7-10 cm, in addition, vertical reinforcement must be installed.
- The holes are filled with concrete; it needs to be given time to dry completely. After it gains strength, the formwork is dismantled, a waterproofing layer is laid, and you can proceed to the brickwork.
- You can use facing bricks for the pillars; it will be both durable and quite aesthetically pleasing. It is laid on a cement-sand mortar, to which builders recommend adding a small amount of liquid soap. For maximum masonry strength, it is advisable to reinforce each row with a special masonry mesh.
In order for the masonry to be strong, it is important that the seams are not located on top of each other. Depending on the required strength, you can build pillars of two, three or four bricks; the row patterns will be very easy.
How to align the poles for a canopy on the same line? If they are thick, you will have to pull two ropes on each row, which will outline the boundaries of the brick supports.
First, pegs are placed along the edges, then they are connected. According to the markings, holes are dug to the same depth. Both the masonry itself and the base protruding above the ground can be finished with various materials.
Brick supports
Brick posts look beautiful and solid, but they are the most expensive type of support and labor-intensive to install. Brick supports look good against the background of a facade or fence made of the same material under any canopy. Polycarbonate plays interestingly on the brick, allowing the sun's rays to pass through.
Red, white and silicate bricks are suitable for construction; the choice should be made based on the decorative features of the site.
This group also includes supports made of decorative stone.
Calculation of pillars
Before purchasing material and starting work, it is necessary to calculate the number of supports and their depth, and select the type of device for the underground part of the rack.
Calculation of the number of supports for a canopy
When determining the number of supports, you need to calculate the load on 1 pillar and correlate it with the permissible pitch of the pillars. On average, one metal pipe with a diameter of 80...100 mm can withstand a load of up to 250 kg. It includes:
- Weight of the roofing section (canopy);
- Self-weight of the pipe;
- Snow mass.
Usually a canopy is equipped for 1 car or a small area. Using the example of a 6x3 meter perimeter, you will need 8 supports:
- 4 in the corners;
- 2 on each side between the corner posts.
The average distance between supports is 2.0 meters, but more can be taken – 2.5 meters.
The same goes for stone racks. In this matter, it is also important to take into account the flexibility of the roofing so that it does not sag under the weight of snow. More than 2-2.5 meters between supports should not be taken without an additional roof beam.
Support depth
Installation of poles for a canopy is carried out in the ground. In order for the stand to stand level, it is necessary to take the correct depth for burying its base and the method of immersion and fixation in the ground. The post can be inserted into the ground in the following ways:
- 1) Driving in is suitable for metal supports under small canopies with light covering materials. Driving in is possible only on dense soils; in no case should you resort to this method on loams and heaving soils;
- 2) Concreting can increase the bearing capacity of a pillar on any soil. Metal poles are subjected to concreting, less often wood;
- 3) Butting. Essentially, this is digging a post, but using materials that compact the soil - crushed stone, gravel.
The depth is determined by the amount of soil freezing in the region. The pillar is placed at a depth below the table by 20-30 cm, do not forget about arranging a pillow of 10-15 cm.
Calculation of the number of pillars for a canopy
Before installing the main structural elements, it is necessary to draw up a project that will include the necessary requirements for the strength of the frame. The canopy must support the weight of the entire roofing system, which includes the truss, sheathing and decking. The average amount of precipitation in winter is also taken into account - snow lingering on the roof creates additional load on the supports.
The design of the canopy must take into account the future load
Most builders recommend using 8 pillars for a small structure measuring 6x3 m, arranged in 2 rows at a distance of 1.5 m from each other. The cross-section of the pipes should be from 80 to 100 cm with a length of 3.5-4.5 m. Each of these supports can withstand up to 250 kg.
When increasing the size of the final structure, you should take care of additional elements that increase its reliability. Increasing the overall width of the project to 6 meters or more requires the installation of a third row of posts in the middle to evenly distribute the weight of the roofing system. The absence of such supporting pillars can lead to the collapse of the entire structure.
How to install poles for a canopy
Canopy supports can be installed in a variety of ways. The choice depends on the material of the pillar, the type of soil and the expected load on the coating.
Installation of wooden poles
How to install wooden poles for a canopy:
- Bury the pillar. To do this, dig a hole, fill the bottom with a cushion of a mixture of sand and crushed stone. A prepared wooden stand, carefully treated to prevent rotting, is also lowered there. After this, the soil is backfilled and compacted. This method is suitable for organizing a temporary or light canopy.
- Attach the post to the existing columnar foundation. This is a gentle way to use wood studs. Plates are laid in advance into ready-made columnar foundations, to which wooden supports are subsequently attached.
Installation of metal poles
Pipe racks are made more often than others, which is why more installation methods have been invented for this material.
Clogging
You can drive metal poles into dense soils. This is a great way to save on installation work and get a reliable frame.
A pipe is installed in the marked place, a cap (a thick layer of cardboard) is put on and driving begins until dense soil is reached. Since there is no cushion of sand and crushed stone with this method, it is worth focusing on solid supporting layers. Excess length at the top can be trimmed. At the same time, the depth of the pillars for the canopy should not be less than 1.5 meters or ½ from the top of the pillar.
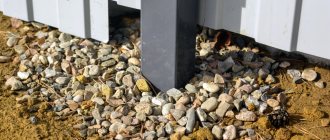
Butting poles for a canopy
This is a method similar to instillation. In the marked place, a hole is prepared with a depth below the freezing level of 0.3 meters. A sand-gravel mixture is poured onto the bottom and a post is installed. Next, the pit is filled layer by layer with a sand-gravel mixture, constantly adding water to compact it.
When there are 15-20 cm left to the top of the hole, concrete mortar is poured, which serves as reinforcement for support.
Advantages of the method:
- High efficiency with low financial and labor costs;
- Fast installation speed.
- The disadvantage is the small load-bearing capacity of the pillars.
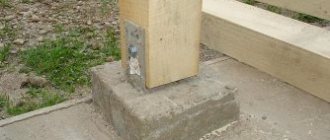
Concreting pillars for a canopy
To get a reliable and universal support, take metal pipes and bury them in the ground, using concreting at the base of the pillar. The method is suitable for use on moving and heaving soils, where it is difficult to reach dense layers and it is necessary to protect the stand from being pushed out when heaving water-saturated soil.
How to concrete pillars for a canopy:
- 1) Dig a hole to the calculated depth;
- 2) The bottom is covered with crushed stone-sand mixture and compacted;
- 3) A metal frame is installed to strengthen the “glass”;
- 4) Install the formwork;
- 5) Insert the pipe and fix it to the frame with metal fittings;
- 6) Concrete is poured.
How to concrete pillars for a canopy
If you are the owner of a private home, there is a high probability that there is a canopy on your property.
And if not, then sooner or later you will think about it. Sheds are built for different needs: a summer gazebo for leisure, a covered porch for a bathhouse, shelter for a car, etc. The purpose of the buildings seems to be different, but the construction technologies, plus or minus, are the same. And what is invariably the same for all cases is the supports of the structures. They will be discussed in today's article. To be more precise, we will discuss how to concrete the pillars for a canopy. The durability of the entire structure will depend on the quality of installation of supports, so this topic is relevant enough to discuss. So, greetings dear friends! Let's get started.
- 1 Types of supports
- 2 Installation methods
- 3 Arrangement of pillars
Installation of pillars
You cannot ignore the installation of brick pillars, which are also sometimes used to support awnings. To install such a support, a foundation is needed. More often it is a columnar structure.
- 1) Dig a hole measuring at least 50x50 centimeters;
- 2) A cushion of sand and crushed stone is placed at the bottom to compensate for loads from the soil;
- 3) Lay a thin layer of cement or masonry mortar to level the site. You can skip this step if you level the area well;
- 4) Now start laying the columns. To support a canopy, laying 1-1.5 bricks is enough.
When the underground part is ready, the side walls of the base are covered with roofing felt or coated with bitumen, then they are buried and the masonry is brought from above to the design mark.
When the racks are ready, installation work begins on installing the canopy ceiling.
- Landscape design
Material for canopy support posts
Home canopies can be made from various materials, but the most common are the following options:
- Tree. It is used to install lightweight structures; most often the roof of such a canopy is made of polycarbonate. Wooden supports can be quite reliable and durable if the wood is treated to protect it from rotting. One of the advantages is the ease of installation and assembly; wood is the easiest to work with.
- Metal supports are the most reliable frame option for installing a canopy. You can choose ordinary pipes as pillars: they can be painted, after which they will acquire a completely aesthetic appearance. They will become the basis for installing trusses to which the roofing material is attached.
- Brick. A not very common, but beautiful option is pillars built of brick. This is a very durable, albeit labor-intensive solution, and the posts will look just great. For construction, you can choose sand-lime brick of any shade.
In rare cases, pillar supports are built from stone and other durable materials. Such a canopy will play not only a practical, but also an aesthetic role.
Calculation of the number of supports for a canopy
How to mark poles for a canopy? Their number must be sufficient to withstand the weight of the trusses and roofing material, and in winter the structure will experience increased stress from wind and snow. Strength requirements depend on the climatic conditions in the region: the more snow falls, and the stronger the winds throughout the year, the more durable the structure must become.
On average, to install a canopy measuring 6x3 meters, you need 8 metal supports, the diameter of which ranges from 80 to 100 mm. They are arranged in 2 rows with 4 supports in each of them.
The canopy will have a high load-bearing capacity; two supports can withstand more than 250 kg of load. Uniform weight distribution will ensure the reliability and durability of the entire system.
The average height of a car canopy is 3 meters: with a lower height, the structure will be inconvenient to use, and with a higher height, rain and snow will get under the roof, which will make it ineffective. To install the supports, you will need to purchase pipes or timber 3.5 meters long.