Advantages and disadvantages of laminate
Despite the seemingly complex design, laying laminate flooring on a concrete screed is extremely easy: special locks are used to connect the panels, which do not require fastening to the floor. Connecting locks allow you not only to assemble the structure effortlessly, but also, if necessary, to disassemble it without damage.
Another positive quality of a laminated coating is that after laying the panels, they do not need to be further processed (painted, sanded, etc.). In addition, laminate is very good for cleaning: there are no cracks or gaps in its design, so there are simply no problem areas.
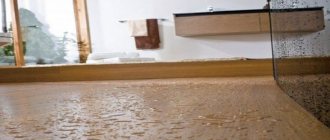
Of course, laminate flooring also has its disadvantages. The most noticeable of them is poor resistance to moisture: while the coating can survive a small amount of water, a large volume of water or prolonged contact with it can cause deformation and destruction of the laminate.
Another disadvantage is the fact that the fiberboard contained in the laminate resonates very well, as a result of which any sounds (from steps or objects falling on the floor) will be heard. This factor can be slightly reduced by using a soundproofing underlay under the laminate on the screed, but it will not be possible to completely get rid of the problem.
The secret of indelibility and heat resistance: the structure of the panel from the top to the bottom layer
Laminate marking.
- Corundum coating (powdery state of stones) coupled with resins with the absence of impurities dangerous to humans. Direct Pressure Laminate (DPL) is a special technology for applying a coating to laminate flooring tiles.
- A decorative material treated with resins that recreates the natural texture of stone or wood.
- The coating is complementary (there are no simple products) - it serves to enhance the impact resistance of the surface coating and its wear resistance.
- Compressed sawdust (HDF) - does not absorb moisture.
- The opposite side is impregnated with resins, preventing wetting and allowing the shape to be preserved.
Over 20 patterns include a palette of colors for laminated parquet panels of different series - from cherry color to maple. Laminate coating provides the opportunity to experiment with both color and shape. When using strips of different colors, laying the laminate can be done in a path. You can lay out decorative edging. Laying laminate flooring at an angle of 45 degrees looks very unique and unusual, but it will take a lot of work. Although the result compensates for all the efforts spent.
Related article: Small bedroom design, how to furnish a small bedroom
Conditions for laying laminate flooring
In order for the laying of the laminate on the screed to go smoothly, and in the future to avoid various types of problems, the following conditions must be met before installation:
- The air temperature in the room where installation work will be carried out should be in the region of 15-30 degrees Celsius, and humidity - from 40 to 70%.
- Before installation, the material must remain in the room for at least two days so that temperature changes in the dimensions of the panels do not interfere with their joining.
- The floor under the laminate must be level (a deviation of 2 mm per 1 m is allowed). The base can be created in any possible way, but unevenness on it is unacceptable (more details: “How to prepare a floor for laminate and what to consider”).
- Before laying the laminate on the screed, you need to clean the base from dust, dirt and debris. In addition, the base layer must be dry.
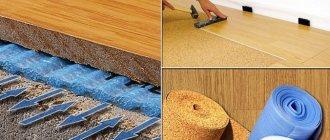
- Laminate panels are installed on a special lining that has heat and sound insulation properties. To protect the laminate floor from moisture and steam, a polyethylene film is used, which is spread under the substrate.
- Laminate flooring can only be installed using panels that do not have any flaws visible to the naked eye.
Preparatory stage of laying laminate flooring
So, you brought your chosen laminate flooring model home, but don’t rush to unpack it right away! Experts recommend leaving it in a well-ventilated area to acclimate for about 36-48 hours. At the same time, laminate cannot be laid in the bathroom, kitchen, or other rooms where there is high air humidity.
Before starting work on laying the flooring, you should check that all the necessary materials are available in the house. So, to lay the laminate you will need: a jigsaw (or a wood saw), a hammer, bars for tapping the laminate at the joints, wedges for spacers, with which you can adjust the width of the gaps on the walls, as well as a meter, a pencil and a backing board. Before laying the laminate on the screed, the entire surface area on which the flooring will be directly laid should be made clean, level and dry.
- Many experienced builders lay laminate flooring directly onto linoleum or other possible subflooring.
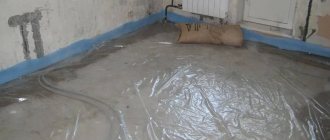
But this is only possible if the conditions of humidity and evenness of the selected surface are met. If you plan to install the flooring directly on a concrete base, we recommend that you place one layer of polyethylene film between the underlay level and the concrete floor screed, which will ensure absolute waterproofing.
Laminate laying technology
Laying should begin in such a way that straight rays fall along the joint. That is, by doing so we ensure that the seams on the floor are invisible. The laying strip must be held with the lock towards you. This advice no longer relates to installation technology, but to ensuring maximum simplicity in the process of assembling the flooring.
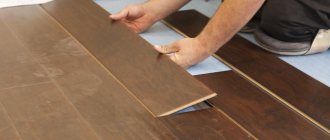
Once you have unpacked and correctly installed the laminate installation strips, you need to remember to install the spacer wedges. This is necessary in order to lay our first row of laminate flooring. In addition, when laying the covering, do not forget to leave small gaps of 1 - 2 cm between the strips. Moreover, this should not be done everywhere, but along the general perpendicular of the room. This operation allows you to prevent layering of one laying strip on another when increasing the size of the laminate. After all, over time it will adapt to new climatic conditions, and when the strips are tightly compressed between each other, the laminate will bend in an arc. For the same reasons, when fixing laminate flooring, builders do not use radical fasteners (like nails and bolts), because in the case of floor covering screed, a huge number of cracks and deflections can form. If such flaws occur in the work, the laminate should be removed and re-laid.
The second row of flooring is laid in a checkerboard pattern. This is done in order to optimize the load on the coating with a noticeable narrowing or widening of the laminate strips. Particular attention should be paid to the fact that all laminate strips of the second row will begin exactly in the middle of the boards located in the first row. Thus, the first panel of the second row should meet the first panel of the first row at an angle. Also remember that the total length of the first panel will only be half a board. Gradually continue building up the second row, but for now there is no need to fix the boards together on the short side.
After laying the second row of laminate strips, nail the first two boards in the first row together along the short sides. The same can then be done with all the boards in the second row. You should constantly ensure that the gap distance from the wall is not compromised and that the spacer wedges always remain in place. Thus, after completing the steps described above, you will receive a launch pad of 8 panels. Before laying the laminate further, you should make sure that there are no distortions or sagging in the first 2 rows. Based on the laid rows, you can safely continue laying the covering.
- In general, this step-by-step laying of strips is the essence of the work.
Installing skirting boards: a way to get rid of inaccuracies and gaps
Since the installation technology is already clear to you, and you have already heard about how to lay laminate flooring, let’s move on to the next important stage of work - installing skirting boards. Since the laminate by this time already has several layers and is pressed tightly to the floor, all that remains is to close all the inaccuracies and gaps on the walls of the room. This is why we use skirting boards.
It is especially worth noting the fact that if you use ventilation underlays under the floor covering, then the lower part of the baseboard must be secured to provide air access to the covering. Do not forget that the baseboards are attached not to the floor, but to the wall. When using the floating flooring installation method, the ideal option would be to leave a small air gap (up to 2 mm) between the covering and the covering slats.
Preparing for laminate installation
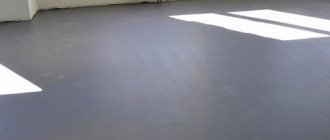
The first thing you need to do before laying a laminate floor is to create a level base, without flaws or differences. Further actions largely depend on the method used to level the base.
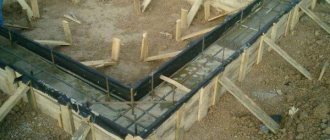
In any case, the screed must be intact and not damaged - in this case, the question of whether laminate flooring can be laid on a concrete screed disappears by itself (read: “How to make a floor screed under a laminate with your own hands”). Small differences and light cracks in the screed can be corrected by using a self-leveling mixture, which allows you to eliminate small unevenness.
To create a new screed, concrete or cement-sand mortar can be used - the laminate can be laid on any surface. To mix cement-sand mortar, it is necessary to maintain a ratio of 1:4 (cement - sand), and the concrete mortar is made from 5-7 parts of screenings to 1 part of cement. Read also: “How to lay laminate flooring on a concrete floor correctly.”
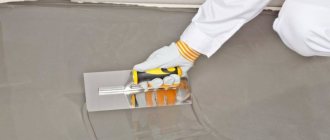
Before you begin directly pouring the solution, you need to set up beacons that will serve as guidelines when creating the base. For beacons, a metal profile is used, which is installed at a level with the future base. The distance between the profiles should be slightly less than the width of the rule.
The beacons are installed on the solution and dry within 24 hours, after which you can start pouring. The next day, the finished screed should be grouted, after which the base should be completely dry. The longer it takes for the floor screed to dry before laying the laminate, the better, because the slightest moisture has a negative effect on the laminate.
You can correct an old screed with differences not exceeding 2 cm using a self-leveling mixture. To do this, it is necessary to mark the required level on all walls and fill the floor to this level with a pre-prepared mixture, and the filling should be carried out in one go. It will be possible to lay laminate flooring on a concrete screed only after it has completely hardened.
Features of laminate installation
The technology does not provide for the use of coating outside or in rooms with high humidity. But laminate is perfectly suited for installation in rooms with underfloor heating systems. It will ensure uniform temperature distribution on the floor surface.
The simplicity of laying laminate flooring lies in the fact that there is no need to remove the previous covering from the floor.
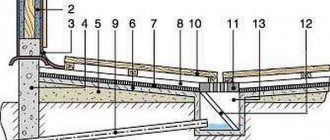
Laminate laying diagram for a warm water floor based on a concrete screed.
Laminate tiles can be placed on bases: fiberboard or chipboard, on tiles, on a wooden floor, linoleum, it is even possible to install the laminate on a screed.
Assembly of a laminated board does not take long. The technology is quite accessible to anyone who can handle a hammer. Naturally, you need to adhere to a clear sequence of work.
Installation of laminated panels
Correct installation of laminate flooring depends on several factors: careful preparation, quality materials and attention during work.
To achieve a good result, you need to act in order, performing actions according to the following algorithm:
- First you need to thoroughly remove the screed (it is best to use a construction vacuum cleaner). When the base is removed, a plastic film is laid on it, and on it - plywood prepared in advance on a screed under the laminate, used as a substrate, or more precisely, a base. It is also necessary to lay a substrate under the laminate, which is best not to be neglected. To ensure maximum tightness of the structure, the rows of material should be connected with adhesive tape.
- Immediately before installation, it is worth installing spacer wedges around the perimeter of the laminate, which will provide a gap between the wall and the coating. In addition, there should be a gap around any obstacles that extend beyond the plane of the base (communication networks, pipelines, etc.).
- Laminate flooring can be installed using glue and lock joints, but the technique is the same in both cases: the panels are inserted into each other and fit tightly. After this, the panels are laid on the floor. The joints between the panels should be treated with sealant to ensure maximum insulation.
- First of all, the side locks are connected, and only then the parts are inserted into a row. Laying usually begins from heating appliances. To ensure good laying of the material around the pipes, the panels are cut flush with them and a large hole is drilled. Assembling the panels continues using the same method, and linings are used to close the gaps.
- The last panel in a row must be adjusted to size, which usually requires cutting the panel in the longitudinal plane. This stage requires special accuracy: an incorrect measurement will cause the board to be included in the list of unusable ones. Installation of the last panel is carried out according to the usual method, but if desired, you can use a zigzag bracket. If any panel was damaged during installation, it can be tinted. If you're not sure whether laminate flooring can be painted, read on for more information on the subject.
- The final stage of installing laminate flooring is installing the baseboard. There are many mounting options: the plinth can be fixed with dowels, self-tapping screws or special fasteners. If necessary, you can select skirting boards with a built-in channel for laying the electrical cable.
Conclusion
Laminate is an excellent floor covering that has a number of positive qualities in its arsenal. If the question arises about whether it is possible to lay laminate flooring on a screed, you just need to clarify what condition the screed is in: if there are no defects or irregularities, the answer to the question will be positive, and then everything will depend on the quality of the work done on installing the laminated flooring.
Types of laminate underlays
Depending on your goals and financial capabilities, choose different types of substrates.
Cork backing
Cellulose-based bitumen-cork substrate
The cellulose layer is impregnated with bitumen and cork chips are poured onto it. Unlike cork substrate, bitumen-cork is not afraid of elevated temperatures and can boast a more attractive price.
Polyethylene foam backing
Polystyrene foam backing
Due to its high density, this type of substrate perfectly smooths out unevenness. It is characterized by excellent heat-insulating and sound-absorbing properties. But it’s not the best option when laying laminate flooring on a “warm floor” system. In terms of cost, this is an intermediate option, which in the price category is between cheap polyethylene and expensive cork substrates.
Polyurethane on foil
The best option if you are planning to lay laminate flooring on a heated floor. It has good performance characteristics and is reasonably priced.
The main types of substrates for laying under laminate
Recommendations
Laying laminate flooring on a concrete floor with a backing can begin from any wall. It is recommended to lay the material along the main daylight, i.e. facing away from the windows. In this case, the places where the side connections of the panels become less noticeable.
Before starting work, it is recommended to keep the material in the room being repaired without packaging for about a day. During this time, its temperature and humidity characteristics will level out.
The whole process is divided into several stages:
- Finishing surface preparation. Before spreading the lining, it is recommended to sweep the laying area again with a broom or vacuum it.
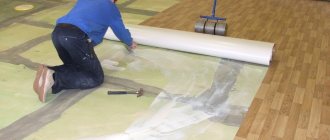
- The substrate is spread taking into account the width of the row along the entire length. There is no need to spread the backing more than is required for one row. Additionally, if necessary, you can secure the pieces of the substrate together with ordinary tape.
- Laying a row of laminate flooring. The entire row is assembled completely, then connected to the previous one. Depending on the type of lock: lay it straight and drive it through a block with a hammer, or assemble the entire row separately, insert it at an angle along the entire length into the lock of the previous row and straighten it. Straightening must be done carefully, having previously pushed the lock all the way along its entire length. When straightened, the gap between the plates should close neatly without a gap. If you overdo it, you can break the lock. The panel does not straighten with normal force, or a gap remains - bend it again and try to push the lock in further. Another option is that debris may get into the lock - take it out and clean it.
The entire row is assembled and locked into the lock along its entire length.
It is also possible to assemble the laminate individually, depending on the type of end lock.
Assembling the laminate one by one.
The rows are made with a shift between each other by about a third of the length. This so-called deck assembly procedure increases structural strength and service life. Also, with this layout, the end joints are less noticeable.
First row
Between the walls and the laminate, temporary gaskets with a thickness of 8–10 mm are installed every meter. If you do not install linings, then when connecting the next rows, the laminate may move, especially if you have to press with force. Usually, it is difficult to push in the outer sheets and the forces are sufficient to move the entire assembled floor. And with a small number of gaskets, even break the locking connections in some places.
If the wall has a large curvature (radial, semicircular wall), it is recommended to lay the laminate from the wall itself. In this case, a row of whole sheets is placed first, not close to the wall. The elements missing from the wall are measured, trimmed and installed in place one by one.
Connection method individually
Depending on the locks or if there are obstacles, it may be necessary to connect the panels not all side by side, but individually. In this case, a gasket must be installed between the end of the first panel near the wall and the wall.
The sheet is installed first with a side lock to the previous row. Then, using a hammer and a block, they connect the end to the previous panel of this row.
For the end connections of the last panels near the walls, they install not a block on the edge, but an S-shaped plate and hit it. In some cases, you can use a nail puller or a similar lever, resting it through the lining against the wall, with the other end against the edge of the panel (you can damage the wall).
Installation under obstacles
Installation difficulties arise if there are various obstacles (heating radiators, for example).
Installing laminate under an obstacle
In this case, it is necessary to cut off the protruding parts of the locks so that the panels can be freely connected. Before the final connection, glue must be applied to the cut areas.
Preparing the concrete base
How successful and high-quality the installation of laminate flooring on a concrete floor will be largely depends on the condition of the base. The finished surface for installing a new floor covering (in this case laminate) must be strictly horizontal, level, protected from moisture, and have good thermal insulation and sound insulation.
It happens that it is not possible to achieve a perfectly level base and there are small differences. We'll tell you how to lay laminate flooring on an uneven floor and compensate for defects in the material: https://pol-master.com/pol-pokritiya/laminat/ukladka-laminata-na-nerovnyj-pol.html.
If the old floors were previously dismantled, the surface must be leveled. Differences in base heights should not exceed 2 mm per square meter of surface. If they are more significant, then you can try to eliminate them in simple ways: by filling the holes or knocking down the protrusions. If this is not possible, then you should resort to installing a new floor screed.
Both a traditional concrete or cement screed is suitable, which, however, requires a long drying time, as well as more modern options, for example, self-leveling quick-hardening mixtures. The thickness of such coatings can be quite significant. They dry out quite quickly. Many manufacturers claim that within a few hours after pouring, such floors can be walked on. Don't delude yourself and rush. You may be able to walk, but there is no need to rush to lay the laminate flooring. Complete drying of such surfaces requires several days.
Next, you need to lay the waterproofing. The cheapest option, but not the best, to be honest, is a regular film laid overlapping and connected with tape. It is preferable to use special substrates made of extruded polystyrene foam or polyethylene foam, which also have noise-absorbing properties. Even more effective, and correspondingly more expensive, is a bitumen-cellulose substrate, which includes cork chips. When choosing this option, it is worth remembering that it is not compatible with heated floors and requires special “breathable” baseboards. Convenient polymer substrates have a self-adhesive base and are quite easy to install. You can do without a backing only if you are laying a four-layer laminate, since its bottom layer performs the same functions, but in this case it is better not to save money, but to lay a waterproofing material.
A few words about the material
1 – protective film, 2 – paper with a pattern, 3 – base, 4 – protection
This is important because it requires compliance with certain conditions during installation. Essentially, laminate is a multi-layer sandwich made of a surface protective film (acrylic or melamine), a pattern on paper and a layer or several layers of base with or without protection.
The top layer can have a relief texture and serves as the main outer protective layer: protection from moisture and abrasion.
The base is compressed and impregnated. It has specific locks along the edges for fastening the panels together. This is one of the weak points of laminate. Forces must be applied carefully to the protrusions of the locks. When hit directly, they crumble easily.
Almost all types of laminates at the junction of locks do not have good moisture resistance. We recommend wet cleaning rather than wet cleaning. Although some manufacturers claim that their products can be used even in rooms with high humidity (bathtub, swimming pool, sauna, etc.). Still, we would not recommend using laminate in them.
Panels are fragile to fracture, regardless of thickness and class. Denser and thicker plates withstand greater instantaneous force. But over time, if the floor is uneven or debris remains under the panels, this advantage will not matter - any panels burst and are pressed through (especially at the joints, forming gaps between the plates). Therefore it is important! Compliance with the requirements for surface preparation for laying laminate.
You should also choose the right laminate class depending on the room:
| Load class | Pictogram | Room type | Application intensity | Examples | Life time |
| 21 | Residential | Moderate (occasionally) | Bedrooms, guest rooms | 10 years | |
| 22 | Residential | Normal (for frequent use) | Living rooms, dining rooms | 10 years | |
| 23 | Residential | Intensive | Stairs, corridors, kitchens | 10-12 years | |
| 31 | Commercial | Moderate (occasionally) | Hotel rooms, offices | 10-15 years | |
| 32 | Commercial | Normal (for frequent use) | Receptions, shops | 15-20 years | |
| 33 | Commercial | Intensive | Shopping centers, schools | 20-30 years | |
| 34 | Commercial | Reinforced (especially difficult conditions) | Industrial facilities | Up to 40 years old |
Types of locks and connection methods
The technology for laying laminate flooring on a concrete floor does not depend on the type of locks and panel sizes. The material is laid sequentially in rows (with rare exceptions). Quite a lot of fastening locks have been developed and new types continue to appear. Divided into two types:
- Lock. The groove and tenon are connected by direct force. The tenon is directed into the groove straight, evenly, without tilting, and is driven inward with a sharp force (by strong pressure or impact). Full insertion is accompanied by a characteristic click (not for all species). This type of lock is typical at the ends;
- Click. The groove and tenon are connected at an angle of approximately 45º. After installing the tenon in the groove, the panel straightens and the lock snaps into place with a characteristic sound (there may or may not be a click). This is how the side edges of the panels are usually connected.
Note! The combination of locks for specific products can be completely different. To strengthen the connection and protect it from environmental factors, sometimes additional glue or sealant is applied.