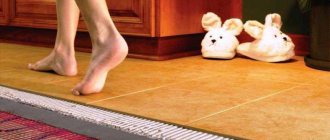
With the development of modern technologies and the increasing need to save energy resources, new space heating systems are becoming relevant. Warm floors have proven themselves to be one of the most effective ways to heat not only private houses and apartments, but also offices, hospitals, schools, and kindergartens. With the advent of laminate, which quickly conquered the market with its practicality and cost-effectiveness, heated floors began to be laid under this material. In this material we will look at the installation of electric heated floors on laminate in detail.
Advantages of heated floors
The high popularity of this technology is ensured by the following indicators:
- high level of efficiency. Heat transfer from the electric floor is carried out over the entire surface of the floor, which allows you to heat the room in a short time, and the thermostat in each room will allow you to control the required temperature;
- ease of installation and operation. The heated floor is laid directly under the screed on which the laminate is mounted, and the automatic control system minimizes human intervention in the process;
- the absence of radiators and pipes, which do not always have a positive effect on the appearance of the room, and also require constant monitoring of the water level and interfere with the placement of furniture;
- there is no need to obtain special permits, approval of plans by government agencies or other paperwork with officials. This is especially true for water heated floors and apartment buildings;
- fits perfectly with modern design solutions.
Thus, heated floors under laminate are one of the most popular and efficient heating systems in modern conditions.
How to choose a floor
One of the preferred materials is infrared film. Its additional advantage is its low thickness. This is true for rooms with low ceilings.
The recommended system power is no more than 130 watts per square meter, the limit for the first floors and balconies. For interfloor ceilings, 90 is enough.
A heating element
1. Cable electric heated floor under laminate.
When installing the system under a screed, you can choose this option: the screed compensates for unevenness. The advantages of this method:
- the cheapest;
- The width of the turns (and therefore the heat transfer) is chosen by the layer at his own discretion;
- The screed retains heat longer.
Minuses:
- energy intensity;
- thermal efficiency is lower than that of other types;
- the screed “eats up” the usable space.
2. Cable mats.
Pros:
- the cable thickness is small (about four millimeters);
- low power and energy consumption;
- dry installation of the coating on the substrate is possible.
Disadvantage: before the finishing coating, it is necessary to lay a leveling compound up to 8 millimeters thick and a substrate. This reduces thermal efficiency.
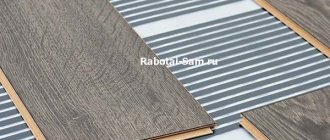
3. Electric film heated floor under laminate - the best option:
- easy installation, no screed required;
- thermal efficiency is the highest.
The same applies to aluminum-based mats.
Diagram of an electric heated floor under laminate.
Attention! A layer of foil heat insulator must be placed under film and aluminum heat-conducting mats. 4. Multilayer mats already include everything you need:
- polymer thermal insulation;
- reflective foil;
- cable;
- protective coating made of rubberized plastic.
This installation of electric heated floors under laminate is done without additional layers underneath. An exception is installation on the ground: in this case, a waterproofing film should be placed on the base. No underlay is required for laminate flooring.
Types of electric floor
To install an electric heated floor under a laminate, several technologies are used, which have their own strengths and weaknesses. Today, experts distinguish three types of electric flooring:
- Cable . It is considered the most durable and reliable type of heated floor. Single-core and two-core cables are used. Well suited for both dry and wet areas. Placed in a concrete screed. Disadvantages include high energy costs and the impossibility of installation if architectural features do not allow raising the floor for screeding.
- Mats . They are a heating cable placed between layers of aluminum sheet. The advantages of the technology include the presence of a protective screen that prevents electromagnetic radiation and is hermetically sealed from moisture. The disadvantages include high energy consumption and the need to lay screed.
- Film . It is capable of heating the laminate in a few minutes, does not require screeds for installation, and has low electricity consumption. The disadvantage is the impossibility of installation in damp rooms, since this type of heated floor does not have grounding.
Depending on the capabilities and technical features of the room, you can choose a heated floor to suit your individual conditions.
Types of heated electric floor
| Floor type | Material | pros | Minuses | How does it work |
| Cable | Cable | The most budget option, heats up quickly | Energy consumption | From electricity, heating evenly |
| Infrared | Film, heating elements | Heats up quickly, good for the body | Higher price | Powered by electricity, heats up evenly |
Types of heated electric floor
Now we will separately consider the installation of each type of heated floor with our own hands.
Which laminate is suitable?
In order for the heated floor to be as effective as possible, it is necessary to approach the choice of laminate with all responsibility. When purchasing this material, you should consider it:
- heat resistance coefficient. This indicator depends on the texture of the material. The higher the porosity, the better the thermal conductivity;
- maximum heating temperature. Experts do not recommend heating the laminate above 27-30 °C. This is due to the fact that when this material overheats, a substance harmful to human health is released - formaldehyde, and the coating itself is deformed;
- thickness. When choosing this parameter, you should remember not only about thermal conductivity (the thinner the better), but also about the operating characteristics (you will need to walk on it and install furniture). The most optimal laminate thickness for heated floors is 8 mm;
- Class. This characteristic has little effect on the efficiency of electric heated floors, but the long-term operation of the floor covering depends on it. Basically, the cost of laminate depends on its class (the higher the class, the higher the price);
- marking. The packaging of the laminate contains special markings indicating the possibility of using it for heated floors.
A properly selected laminate will guarantee good efficiency and long-term operation of the entire structure.
Are all underfloor heating systems suitable for laminate flooring?
If we take it in general, then all types of heating are suitable for such material. But there are nuances regarding the choice of materials, compliance with installation and operation instructions. Each option has its own characteristics.
Water
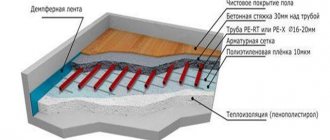
Laminate is a very demanding floor covering that does not tolerate sudden temperature changes and constant overheating. Therefore, a water heating system will only be relevant with autonomous heating, because with a centralized heating system the owner will not be able to control temperature conditions.
Water heating system
A water-heated floor is installed on a well-insulated base, otherwise there will be too much heat loss. Different materials are used for insulation; it is most convenient to take special mats with protrusions that help lay the pipe in the shape of a snail or spiral. On top of the insulation with pipes, a concrete screed with a thickness of at least 30 mm is required. On top of it you can already lay a substrate and a finishing layer in the form of a laminate.
Electric with heating cable
The cable type option is universal and can be used in different rooms. Additionally, the system is equipped with a temperature control function, the owner will be able to control the heating and set it in such a way that the coating is not damaged
Heating cable in finished rolls
As with the water circuit, you first need to lay down the insulation. You can use foil-coated materials that will reflect heat from the base. They also attach special profiles along which the electrical cable will be fixed. The maximum permissible distance between its loops is 30 cm; if this is observed, uniform heating is obtained. A screed is poured over the fixed cable and a lining is mounted.
It is important to make the screed correctly. It should level the surface, cover the wires, but not block the passage of heat
The optimal screed thickness is up to 30 mm. If it is thicker, then heating costs will increase significantly.
Application of cement-sand mortar
Infrared
Infrared floor heating technology goes well with a laminate finish. When arranging, you can do everything without pouring a screed; there is also no need to install thick insulation; even thin polyethylene foam will suffice. When the system operates, the coating quickly heats up to a set temperature, after which the infrared radiation “goes” further, heating other objects. Film heating is often used as an independent heating system.
IR film is easy to cut
Thin film options can also be used as a substrate. The intensity of the system after installation can be adjusted by setting any temperature conditions.
Cable installation
When installing a cable for a heated floor, you must go through several mandatory steps:
- pouring a rough screed, leveling the surface, sealing cracks and strengthening the base;
- laying insulation. For this process, foil thermal insulation is used, which is held together with special foil tape, but we do not recommend using it. It provides little benefit. It is better to use extruded foam. This stage will allow you to avoid heat loss in the future and save energy;
- designing a detailed cable layout plan. At the same time, we take into account the places where furniture and household appliances will be located, since the cable will not be laid there;
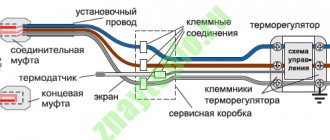
- cutting a groove in the wall for the cable outlet for the thermostat and floor temperature sensor;
- laying the cable with its fastening using reinforced mesh or metal plates;
- installation of cables according to a previously developed plan. It is important that the heating cables do not cross or touch each other. This oversight can lead to burnout of the heater or even ignition;
- the thermostat is installed at a distance of 40 cm from the floor, and the temperature sensor should be installed strictly between the turns of the cable;
- connecting the power cable, thermostat and temperature sensor to the distribution box. Checking cable resistance and testing the system in different modes;
- filling the screed. As a rule, the thickness of the layer is up to 5 cm, but it is worth remembering that the thicker the screed, the more electricity is needed to heat it. But on the other hand, a thick layer of concrete retains heat longer in a heated surface;
- installation of the laminate after the screed has completely dried.
Film heated floor installation
This method of additional heating of the room is the least labor-intensive, but requires careful attention and strict fulfillment of all requirements. When installing on a concrete floor, it is performed in the following order:
- inspection of the subfloor surface in order to identify and eliminate irregularities. If the grout of the screed was not thoroughly rubbed in during the drying process, it is recommended to make a leveling screed with a thickness of 4 - 10 mm. Make a groove to accommodate the temperature sensor cable and the system control panel cable. Install cables in a flexible plastic or metal jacket;
- vapor protection device made of polyethylene film. Its edges need to be placed on the walls to the height of the finished floor and secured with tape. The film is laid overlapping with an overlap of 10 - 15 cm, the joints also need to be taped;
- lay a heat-reflecting layer of tile materials Izolon or Penofol, glue the joints with construction tape;
- lay infrared film on the floor. In this case, it is necessary to take into account the location of furniture and powerful electrical appliances (floor-mounted air conditioner, electric fireplace, etc.). Installing a heater under these objects is pointless and may even be harmful. The temperature sensor is installed in accordance with the operating instructions for the device;
- connect the cable to the control panel;
- carry out a test run of the system, check the heating of all sections of the film heater;
- arrange a moisture barrier layer of polyethylene film;
- lay a laminate adapted for film heated floors.
To lay a heated floor in a medium-sized room, you will need no more than 1.5 - 2.0 hours of time; you can use it after the installation of the laminate has been completed. It is recommended to turn it on for the first time at the minimum setting; make adjustments to the setting as the surface warms up, taking into account that the maximum permissible temperature should correspond to that indicated on the laminate labeling, but should not exceed 30 degrees for sanitary reasons.
Film heated floors can also be installed on other bases. For example, it can be laid on a wooden floor, which in this case acts as a screed.
However, in this case, a thorough audit of its condition will be required, with replacement of the logs if necessary. You will need additional tightening of the boards with screws and high-quality sealing of all damage and cracks with putty. After it has completely hardened, sand the application area with sandpaper.
See also: Electric underfloor heating
Infrared heated floors are slightly more expensive, which can be offset by lower operating costs over approximately 2 years.
Film installation
Film installation has a number of features. This is due to its design and technical characteristics. There are several stages when installing film under laminate:
- preparatory. They include leveling the surface, and it is not necessary to fill the screed. If the base does not have obvious unevenness, it is enough to clean it from dirt and dust;
- isolation. The prepared surface should be covered with waterproofing and thermal insulation. It is important to know that the use of aluminum foil rolls for these purposes is strictly prohibited;
- laying heating material. First, you need to lay a heat-reflective film over the entire surface, fastening the individual pieces with tape. Then the infrared film is installed with parallel connection and connection. Copper strips are connected using contacts and insulated with bitumen fixative;
- testing. Connecting a network cable to the system, connecting a temperature sensor, testing in different modes;
- final. At this stage, the entire structure is covered with polyethylene, a substrate is placed and the laminate is assembled.