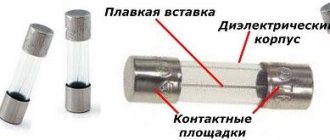
Destination pump. Removing unnecessary solder
When soldering computer printed circuit boards, there is a danger of expensive circuit failure due to one or two drops of molten tin getting there. Frozen solder particles can cause no less inconvenience. It is advisable to have a device that would promptly remove excess from the soldering area. Such a device is a tin pump.
Principle of operation
Industrial designs of desoldering pumps are vacuum action soldering pumps.
They are equipped with a manual drive that works like a regular suction cup. Desoldering pumps fall into two main categories: suction desoldering pumps and heated air pumps. Suction pumps are used to remove melted solder (and tin), leaving previously soldered terminals disconnected. The second type of desoldering pump pumps air hot enough to melt all the materials around a small surface where molten tin or solder is present. Soldering irons with tin pumps can be used both for soldering directly on site, and for desoldering with subsequent removal of drops of the melt before it solidifies (you can also use tweezers, although this is not so convenient).
Since the soldering process always produces harmful chemicals and fumes, some models of the devices in question are equipped with smoke extractors.
How to use a desoldering pump?
Let's look at this using the example of the best desoldering pumps of 2019.
- Model Endineer SS-02. The suction type desoldering pump is equipped with a heat-resistant silicone tip with high flexibility, which is connected to a small vacuum chamber. The presence of a soldering suction cup allows the nozzle to directly contact the soldering iron without the risk of damaging it. At the same time, the nozzle freely envelops the solder joint area. The Teflon tube, cut through the end, forms a secure fit over the molten solder. The tube can be changed periodically using the included repair kit. Allows you to carry out all operations with one hand.
- Model SeaLody. A universal desoldering pump that works on the “three in one” principle: in addition to the manual vacuum suction, there are also two wicks designed to remove solder and flux residues. In the latter case, oxygen-free pure copper wire is used, which ensures high-quality flux removal, especially in hard-to-reach places. Maintains a stable vacuum. The device is equipped with an aluminum frame, which allows it to be operated with one hand.
- Model Greenlee 1700. Equipped with a universal type tip, it operates on the principle of air heating. The clamping is carried out using a spring. To ensure uniform distribution of heat flow over the entire soldering surface, the desoldering pump is equipped with a copper mesh. The durable and rigid body prevents damage to the device in case of accidental contact with the melt. It is easy to control and comes with a spare spring and suction cups, but a replacement tip is not included.
- Model Wick & Desoldering Pump. The device is designed in the form of a gun and is designed to remove solder. Operated with one hand. The desoldering pump is equipped with a highly resistant suction cup and a copper solder braid. After heating the wick and solder, the soldering braid quickly absorbs the molten solder, leaving the work area completely clean. The design includes a non-slip sponge (made of a material with high heat capacity) and a nylon temperature-resistant nozzle.
- Model OMorc Desoldering Wick. The solder suction cup has a frame made of aluminum bronze and creates a high-pressure vacuum that can effectively remove solder from the circuit board. The soldering braid ensures the cleaning of solder residues on the soldering iron tip, which eliminates short circuits, especially in hard-to-reach places. To ensure stability, the suction cup has a plastic base.
How to make a desoldering pump?
A possible alternative to a solder desoldering pump is a thin copper braid that can be used to draw the solder out of the melt. When it hits the braid, it hardens. To do this, use the tip of the tip to press the braid onto the connection that needs to be soldered. The iron melts the solder, which will be drawn into the braid.
To do this, you will have to buy a small coil of copper braid. But you can do without it: strands of copper wire (for example, from a multi-core cable), made in the form of a loop, will reliably remove tin residues from the soldering zone. To remove flux residues, you can use a soldering wick - it is dipped into the flux, and then heated with a soldering iron.
How to use a desoldering pump?
Let's look at this using the example of the best desoldering pumps of 2019.
- Model Endineer SS-02. The suction type desoldering pump is equipped with a heat-resistant silicone tip with high flexibility, which is connected to a small vacuum chamber. The presence of a soldering suction cup allows the nozzle to directly contact the soldering iron without the risk of damaging it. At the same time, the nozzle freely envelops the solder joint area. The Teflon tube, cut through the end, forms a secure fit over the molten solder. The tube can be changed periodically using the included repair kit. Allows you to carry out all operations with one hand.
- Model SeaLody. A universal desoldering pump that works on the “three in one” principle: in addition to the manual vacuum suction, there are also two wicks designed to remove solder and flux residues. In the latter case, oxygen-free pure copper wire is used, which ensures high-quality flux removal, especially in hard-to-reach places. Maintains a stable vacuum. The device is equipped with an aluminum frame, which allows it to be operated with one hand.
- Model Greenlee 1700. Equipped with a universal type tip, it operates on the principle of air heating. The clamping is carried out using a spring. To ensure uniform distribution of heat flow over the entire soldering surface, the desoldering pump is equipped with a copper mesh. The durable and rigid body prevents damage to the device in case of accidental contact with the melt. It is easy to control and comes with a spare spring and suction cups, but a replacement tip is not included.
- Model Wick & Desoldering Pump. The device is designed in the form of a gun and is designed to remove solder. Operated with one hand. The desoldering pump is equipped with a highly resistant suction cup and a copper solder braid. After heating the wick and solder, the soldering braid quickly absorbs the molten solder, leaving the work area completely clean. The design includes a non-slip sponge (made of a material with high heat capacity) and a nylon temperature-resistant nozzle.
- Model OMorc Desoldering Wick. The solder suction cup has a frame made of aluminum bronze and creates a high-pressure vacuum that can effectively remove solder from the circuit board. The soldering braid ensures the cleaning of solder residues on the soldering iron tip, which eliminates short circuits, especially in hard-to-reach places. To ensure stability, the suction cup has a plastic base.
DIY electric desalination pump
Homemade solder suction.
Author: Alexander Davydov aka Kulibin Published 08/27/2010
Good time of day everyone. We will talk about a homemade tin pump. It all started when the stone came, familiarly bringing with him a photo of a desoldering device and an ancient Soviet 65-watt soldering iron, which he found somewhere in the deep recesses of his apartment or was inherited by him. Don’t let the size and power confuse you; as it turns out, once you get the hang of this monster, it’s quite convenient to use. And it’s quite easy to reduce the power of a soldering iron using conventional rectifier diodes by placing them in series on one of the soldering iron’s network wires. Of course, you can install a ready-made regulator (dimmer), or assemble it, but sometimes at the most necessary moment there are no necessary parts for this, and diodes can practically be torn out from anywhere + they do not heat up during operation, unlike resistors (this is how a diode melted on my Chinese 60 watt soldering iron for several years). Here is the original of the desoldering pump from which I later had to make a clone (a photo of this particular desoldering pump was brought to me by an acquaintance) SH-60 soldering iron, nichrome heater (220V, 40W), with desoldering pump Designed for desoldering components and removing soldering products Supplied with a V-1 tip with desalination pump Weight 330 g
Unfortunately, it is impossible to buy a ready-made copy of this type from us since we have not had a radio shop for a long time. (You can, of course, order it via the Internet) But the price of this soldering iron is quite high. So it was decided to try to create something similar myself, especially since such a thought had been in my mind for a long time. Parts list. Soldering iron 65 watt
Copper pipe 8mm DN (sometimes 6mm) was purchased at a store that sells copper plumbing fixtures (pipes, taps, bends)
Buy a mono tee (crimp) at a copper plumbing store, from refrigerator repair specialists, or at a gas filling station where gas equipment is installed on cars. It was at a gas station that I picked up this Italian tee (or rather, a friend who worked at a gas station simply gave it to me after hearing my story about why I was looking for such a tee.) Tees can be Italian, Belarusian or Chinese, the quality depends on the manufacturer. I got Italian.
Second life of the electric tin-suction!
This desoldering pump was purchased at a radio store…. And initially it was used for its intended purpose. Then the nozzle and the sealing ring of this tin pump burned out, which stands inside the handle as a seal to create vacuum thrust for the tin pump piston... After that, the tin pump stopped performing its direct function... But it was a pity to throw it away... And so it gathered dust until I came across the article https://easyelectronics.ru/trubchatoe-zhalo.html.
And so I wanted to make such a sting... Since sometimes you have to solder... But I didn’t have such a sting that I could drill it... Then the idea came to modernize and convert my desoldering pump into a soldering iron with a hollow tip... But how can I do this better?
So, let's start in order.
The desalination pump itself looks like this
The power cord is screwed to the handle of the desalination pump with electrical tape, just to prevent the wire from dangling.
Now remove the duct tape from the desoldering pump handle and unscrew the handle with the piston from the part where the heating element is located.
In the part where the heating element is,
There are also two sealing rings made of thermally resistant rubber and something else.
Over time, these seals failed... Letting air through and not allowing tin to be sucked in normally. Plus, over time, the nozzle of the desoldering pump burned out. Which also negatively affected the operation of this device... For this reason, it could no longer be used for its intended purpose. But at the same time, the heater and the desoldering nozzle were still alive. So, to extend the life of this device... We throw these gaskets out of this device and reassemble it to its original state... We won’t have to redo it much anymore...
Then we take the cheapest empty Chinese lighter,
And we take it apart
First stage
Second phase
In this case, we only need the brass nozzle from this lighter.
Although we must pay tribute to these disposable lighters... If desired, this is a waste-free testing ground for creativity. And in this lighter almost everything goes into use. But that’s not about that now.
We take this fitting, clean it from the rubber seal and the spring on it, and the part is ready for reuse and work with the desalination pump. Simply insert this fitting into the desoldering nozzle with the narrow side. And the entire tin suction turns into a soldering iron, which can be used to beautifully solder, like a soldering iron with a microwave tip...
This tip has a conical shape and due to this it is tightly inserted into the suction hole, there is also a side hole in this nozzle (you can see it in the photo if necessary, it can be enlarged) transverse, on one side, to make an outlet for air and excess solder and thickening , which prevents this nozzle from falling into the suction itself. In fact, the nozzle is immediately ready for use. The tip is tinned and ready to use.
For soldering, the channel is completely filled with solder and then simply quickly attach the tip to the protruding leads. A very strong surface tension is formed in the channel, so that the tip holds the excess solder very tightly, and only the minimum required amount is deposited on the part. It takes very little time to complete one leg.
In the same way, you can make a microwave type tip for soldering surface-mounted microcircuits.
The advantages of this modification of the suction are obvious:
There is no need to drill or redo anything.
We work with one suction, and in one movement it turns into a soldering iron. Provided that before the alteration, such a suction was of little use, after alteration, modification, this suction can still serve as a soldering iron for beautiful soldering.
The burnt-out nozzle is thrown away without pity and replaced with a similar one.
Availability of consumables
Unfortunately, now for technical reasons I cannot provide photos and videos of the soldering process with this device. Therefore, I had to take a similar photo taken in the same way from the DI HALT website..
And also two links from this site with similar articles. One of which was written by me earlier and provided specifically for the DI HALT website
And here it is presented again in a more expanded form. Good luck to all.
Methods for removing radio components from boards
Dismantling of radio components can be done using a classic soldering iron, when you apply a heating element to the part to be soldered and pry it off with a metalworking tool. But this technique does not require much explanation, so next we will analyze more complex work and ways to implement it at home.
Hairdryer
A soldering iron is a non-contact version of a soldering iron, which is no less effective at desoldering radio components. The advantages of this method are quite obvious, for example, when dismantling a microcircuit, you do not need to desolder each leg of the microcircuit. It is enough to heat a certain area on the printed circuit board with a stream of air, and all the solder will melt at the same time. Then the radio component is pryed off with a screwdriver or pulled out with tweezers.
The disadvantage of desoldering with a hair dryer is that the parts themselves heat up, which can subsequently lead to their failure. Therefore, if you decide to unsolder microcircuits, capacitors or transistors due to the general heating of the place where they are fixed, be sure to check their functionality after that.
To desolder radio components with a hairdryer, you must perform the following procedure:
- Fix the board in a stable position, keep in mind that you will have to use tweezers or a screwdriver on the reverse side. Radio amateurs often use special stands to fix the printed circuit board, so if you plan to do soldering often, you should get such a device.
Rice. 4. Card holder
- Start the soldering gun and heat up the contacts of the radio component being soldered. Do not hold the air flow at one point, especially if you are going to solder SMD radio components. Constant movement of the heating effect will avoid overheating and failure of SMD components. If necessary, heat the area several times until the solder shows signs of melting.
- When the tin becomes pliable, lift the SMD chip and separate it from the surface. If the entire part comes off piece by piece, pull it out carefully so as not to break the chip or tear off the legs.
DIY electric desalination pump
simple interesting DIY RADIO CIRCUIT
- ELVO SITES
- 2 SCHEMES
- TECHMAGY
- DIFFERENT
- ADD
- RADIO COMPONENTS
- QUESTION ANSWER
DIY electric desalination pump
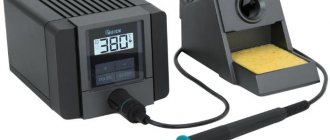
With a price of around 500 rubles, the desoldering iron has a power of 36 W and combines the design of a classic soldering iron and desoldering in one device. There are different models of similar devices on Aliexpress, but in my opinion, only this one deserves your attention.
This is due to the fact that, unlike other common models, the handle here does not get hot at all, and you can work comfortably for a long time. There is a more expensive model with a vibration compressor - it is expensive, heavy, noisy, and at the same time the quality of work and reliability leave much to be desired. Professional compressor models cost from 7,000 rubles and above and are used only in laboratories and expensive workshops.
As is my favorite habit, after unpacking the package, the first thing I do is inspect it and then disassemble the device to make sure it is assembled correctly and there are no faulty or damaged parts. A torn sealing rubber was found (the place where the tube transitions into plastic), I sealed it with supermoment, and coated all contact points with silicone grease for a better fit and sealing.
The device uses a 36 W nichrome heating element; you can order a spare one right away, although I think that the element should not burn out in the next 10 years, especially if you use a diode to lower the temperature.
The body of the electric desoldering pump is made of chromed metal, which burns on the very first day of use and the previously beautiful soldering iron begins to look “burnt.” Therefore, I completely disassembled the soldering iron and blued it with mineral oil so that the metal surface acquired a permanent black color.
If you would like to repeat my method of blackening metal, I provide a short guide. You will definitely need a gas hood or do it outside. Heat the metal until slightly red, then lower it into mineral oil. Next, heat it up again and begin to coat it, for example, with a cotton swab dipped in the same oil. This procedure must be done 10 times and you will see that the metal is covered with a durable black coating. It’s better to read more on the Internet; there are many ways of bluing.
This device costs around 500 rubles, you can order a desalting pump on Aliexpress here https://alibroker.ru/item/36W-Welding-Tool-Dual-Use-Solder-Sucker, spare heating elements are also available. The parcel arrived from China in a couple of weeks; lately I have noticed faster operation of our mail. For a more detailed review, watch the video below.
How to remove radio components from boards?
Failed electrical appliances do not have to be immediately sent for scrap, because individual electronic components from them can easily be useful for repairing or constructing various homemade products.
The only problem that novice electricians face is how to desolder radio components. Despite its apparent simplicity, this process requires special attention and the use of special devices that greatly simplify the soldering of radio components.
Tools we will need
Many of the tools may already be available to DIY radio enthusiasts. Otherwise, you will have to purchase them or make them yourself from scrap materials.
Therefore, before unsoldering the radio component, get the following devices:
- A soldering iron of the required power and design for heating the contacts of radio components . You can take a ready-made one, or you can make it yourself; the manufacturing process is described in detail in the following article: https://www.asutpp.ru/payalnik-svoimi-rukami.html
- Tweezers or clamp - used for manipulating radio components. Allows you to hold elements with tweezers, fix their position and provide additional heat removal when you try to desolder them.
- Tubular-shaped needles are sold ready-made, but if you don’t have any on hand, they can be replaced with a regular medical syringe needle, the main thing is that the inner diameter fits onto the stem of the radio component. In addition to needles, you can use tubes or sleeves; with their help, heated radio components are separated from the solder.
Rice. 1. Set of soldering needles
- Dismantling braid also acts as an auxiliary tool if you need to desolder those elements that have a large number of legs on the printed circuit board. You can either purchase a ready-made one or make it yourself.
Rice. 2: dismantling braid
- A desoldering pump is a device for removing solder from a mounting location, allowing you to quickly desolder a large number of radio components. Structurally, it includes a vacuum flask, a return spring and a piston driven by it. In addition to purchasing a factory model, you can make a desoldering pump yourself.
Rice.
3. Desoldering pump Inexperienced electricians may argue that so many tools for desoldering radio components will be too many. After all, soldering is performed using a regular soldering iron, but all of the above devices will help you solder the necessary elements quickly and accurately. This is especially true with large volumes of contact pins in the board. Now let's look at the practical application of each of the tools described above.
Methods for removing radio components from boards
Dismantling of radio components can be done using a classic soldering iron, when you apply a heating element to the part to be soldered and pry it off with a metalworking tool. But this technique does not require much explanation, so next we will analyze more complex work and ways to implement it at home.
Hairdryer
A soldering iron is a non-contact version of a soldering iron, which is no less effective at desoldering radio components. The advantages of this method are quite obvious, for example, when dismantling a microcircuit, you do not need to desolder each leg of the microcircuit. It is enough to heat a certain area on the printed circuit board with a stream of air, and all the solder will melt at the same time. Then the radio component is pryed off with a screwdriver or pulled out with tweezers.
The disadvantage of desoldering with a hair dryer is that the parts themselves heat up, which can subsequently lead to their failure. Therefore, if you decide to unsolder microcircuits, capacitors or transistors due to the general heating of the place where they are fixed, be sure to check their functionality after that.
To desolder radio components with a hairdryer, you must perform the following procedure:
Tools we will need
Many of the tools may already be available to DIY radio enthusiasts. Otherwise, you will have to purchase them or make them yourself from scrap materials.
Therefore, before unsoldering the radio component, get the following devices:
- A soldering iron of the required power and design for heating the contacts of radio components . You can take a ready-made one, or you can make it yourself; the manufacturing process is described in detail in the following article: https://www.asutpp.ru/payalnik-svoimi-rukami.html
- Tweezers or clamp - used for manipulating radio components. Allows you to hold elements with tweezers, fix their position and provide additional heat removal when you try to desolder them.
- Tubular-shaped needles are sold ready-made, but if you don’t have any on hand, they can be replaced with a regular medical syringe needle, the main thing is that the inner diameter fits onto the stem of the radio component. In addition to needles, you can use tubes or sleeves; with their help, heated radio components are separated from the solder.
Rice. 1. Set of soldering needles
- Dismantling braid also acts as an auxiliary tool if you need to desolder those elements that have a large number of legs on the printed circuit board. You can either purchase a ready-made one or make it yourself.
Rice. 2: dismantling braid
- A desoldering pump is a device for removing solder from a mounting location, allowing you to quickly desolder a large number of radio components. Structurally, it includes a vacuum flask, a return spring and a piston driven by it. In addition to purchasing a factory model, you can make a desoldering pump yourself.
Rice.
3. Desoldering pump Inexperienced electricians may argue that so many tools for desoldering radio components will be too many. After all, soldering is performed using a regular soldering iron, but all of the above devices will help you solder the necessary elements quickly and accurately. This is especially true with large volumes of contact pins in the board. Now let's look at the practical application of each of the tools described above.
Desoldering pumps, desoldering devices 41
- 1
- 2
- 3
- 20
- 40
- 60
Desoldering pumps are devices designed to remove solder from printed circuit boards. There are conventional and pneumatic ones.
The principle of their operation is as follows: first, the destin pump is charged (the lever is pressed all the way), and then by pressing the same button, the lever returns to its original position, creating low pressure, which causes the solder to be drawn inward. In other words, the tin pump is a “reverse” tin syringe.
It should be noted that for the most effective “suction” of solder, it is necessary to melt the contact pad well, but there are desoldering pumps that themselves perform this function (soldering irons with desoldering pump).
You can view and buy goods in our stores in the cities: Moscow, St. Petersburg, Belgorod, Vladimir, Volgograd, Vologda, Voronezh, Gomel, Ekaterinburg, Izhevsk, Kazan, Kaluga, Kemerovo, Krasnodar, Krasnoyarsk, Kursk, Lipetsk, Minsk, Naberezhnye Chelny, Nizhny Novgorod, Novosibirsk, Omsk, Orel, Perm, Pskov, Rostov-on-Don, Ryazan, Samara, Saransk, Saratov, Smolensk, Stavropol, Tver, Tomsk, Tula, Tyumen, Ufa, Chelyabinsk, Yaroslavl. Delivery of the order by mail, through the Pickpoint delivery system or through Svyaznoy / Euroset showrooms to the following cities: Tolyatti, Barnaul, Ulyanovsk, Irkutsk, Khabarovsk, Yaroslavl, Vladivostok, Makhachkala, Tomsk, Orenburg, Kemerovo, Novokuznetsk, Astrakhan, Penza, Lipetsk, Kirov, Cheboksary, Kaliningrad, Kursk, Ulan-Ude, Stavropol, Sochi, Ivanovo, Bryansk, Belgorod, Surgut, Vladimir, Nizhny Tagil, Arkhangelsk, Chita, Smolensk, Kurgan, Orel, Vladikavkaz, Grozny, Murmansk, Tambov, Petrozavodsk, Kostroma , Nizhnevartovsk, Novorossiysk, Yoshkar-Ola, etc.
You can buy products from the group “Desoldering pumps, devices for desoldering” wholesale and retail.
Desoldering Tool (Desoldering Tool)
Good day to all. Today's review will be devoted to a very simple, but quite useful little thing with the intriguing name of a desoldering pump, in other words, a tool for removing solder. It’s not that this thing is very necessary, but it can significantly make the life of any radio amateur (both beginner and already established) easier. Personally, I came to purchase it after I needed to desolder several elements. With those elements that had one or two adjacent contacts, there were no special problems, but the multi-contact chip significantly tired me - removing the solder from each leg so that it becomes free is not so easy. In general, this process took me a lot of time and effort, but everything could have been done much faster. After that incident, I began to think about purchasing a device that would be able to make the process of desoldering simple, straightforward and, most importantly, fast. It is for these purposes that the hero of today’s review is used - a tin pump. The place of purchase was eBay, since at that time it was the cheapest option that I could find. The parcel spent about a month in transit, if anyone is interested in its route from China to Belarus, you can see it here.
The parcel arrived in a regular plastic bag without any additional protection (although this is logical, there is nothing special to break here). The desalination pump itself is supplied in its original packaging, which is a plastic case with a cardboard back wall.
On the way, the packaging was significantly wrinkled, but this did not affect the instrument itself - it reached me safe and sound.
The destin pump itself is a kind of syringe, with the only difference being that it does not push the contents out of itself, but rather sucks it in. Its dimensions are not very small - the diameter is about 2 centimeters and the length is about 14 centimeters. Weight - 27 grams. I have no complaints about the quality of workmanship - all the elements were made normally, there were no cracks, scratches, chips, or any unpleasant smell, which is good news.
Conventionally, this tool can be divided into 2 main parts - a metal “flask” with a plastic spout through which tin gets inside, as well as a piston, thanks to which something like a vacuum is created inside the flask. The metal flask has a notch to reduce the sliding of the tool in the hand during work.
There is a spring installed inside that makes this whole system work.
And it works as follows: the piston is pressed inward and fixed in this position, then, when the solder is heated to a liquid state, the desoldering pump is placed on it with its nose and a button is pressed, which releases the piston. Thanks to the spring, the piston is sharply pushed out and a retracting force appears, which draws the solder inside the device. Then the device is disconnected and all the collected solder is poured either into a trash bin or into a jar for subsequent reuse.
Piston release button:
The device is simple, but despite this it is very effective. The weakest point is the o-ring on the piston.
It seems to me that over time, due to friction against the remains of tin that fall on the inner walls of the metal flask, it will become damaged and begin to let air through.
In principle, there is nothing else interesting in the design and appearance of this product. So you can test it in action. To carry out the experiment, an old non-working mouse was found and solder “buns” were hastily soldered onto the contacts. Live this whole mess looked like this:
We put the desalination pump into operating mode, two clicks and voila - the result:
As you can see, there is not a trace left of the solder. After disassembling the tool, you can find the assembled solder:
And this is what the piston looks like after completion of work:
Everything is leftover from solder, the same picture is on the inside of the metal flask. In order for our desalination pump to last for a long time, it is necessary to wipe it all down.
But words are words, and it seems to me that this process is better to see. Therefore, I present to your attention a short video:
The mouse board did not have a normal stop, so not everything was assembled during the first pass
As you can see, this desoldering pump, despite its meager cost, turned out to be a completely working and functional tool that copes with its task of removing solder without any problems. Of course, you can do it without it, but it will take longer and not be as beautiful. So if you not only solder new elements, but also unsolder old ones, then you can turn your attention to this little thing - it will definitely come in handy. Personally, I don’t regret this purchase at all.
Basically, that's all. Thank you for your attention and your time.