Types of siding
The most commonly used types of siding are metal, vinyl and wood.
The most popular is vinyl siding, which has good functional characteristics. It is not afraid of aggressive external environments and is quite durable. From an aesthetic point of view, it is also attractive and has a wide selection of colors and configurations.
Metal siding is made of steel or aluminum and then coated with a protective layer of polymer. This gives the product high strength, but at the same time makes it vulnerable to corrosion. Despite the heavy material used, the average weight of steel siding per square meter is about five kilograms, and aluminum siding is one and a half kilograms.
Wood siding is a fairly old cladding technology; all other types originated from it. Nowadays it is rarely used, since its characteristics are less attractive than others.
Necessary materials and equipment
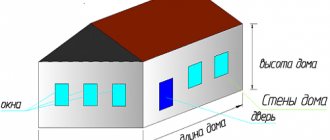
First you will need to purchase materials and acquire tools. To purchase the correct amount of facing material, you need to indicate to the manufacturer the parameters of the house: wall area, their length, roof configuration, number of windows. This will help the seller calculate the required trim pieces and number of panels. The external layout of the facade can make this task easier.
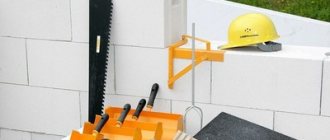
You should purchase the following equipment:
- Grinder or hacksaw;
- Tin scissors;
- Electric or regular screwdriver;
- Hammer;
- Tape measure for measurements;
- Square and level;
- Ladder or stepladder.
Sheathing features
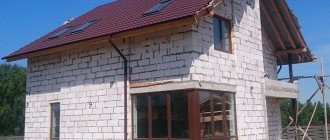
In order for the facade to look beautiful and presentable for a long time, you need to know how to siding a foam block house correctly, taking into account the characteristics of the material.
So:
- The screws should not be screwed in completely, but leave a small gap of 1 mm;
- A distance of about 40 mm should be left between the screws;
- The screws must be placed strictly in the center of the hole intended for them in the panel;
- Between all elements of the facing material you need to leave a small gap of 0.5 cm for thermal expansion;
- The holes should also be slightly wider than the bolts or screws.
Choosing the type of siding
There are two types of facing siding panels:
In order not to make a mistake in choosing a type of finishing material, you should study the main characteristics of each of them.
Finishing foam blocks with metal siding is a strong, durable fabric that is resistant to temperature and mechanical influences. Houses lined with metal panels acquire a rather attractive appearance and a special style, thanks to the wide color palette of the material. However, if you need to save a little money, you should pay attention to vinyl siding.
This type of finishing material has:
- longer service life than its metal counterpart,
- exhibits high resistance to fading,
- sold at a low price.
Vinyl siding on a foam block house is a beautiful and inexpensive siding option.
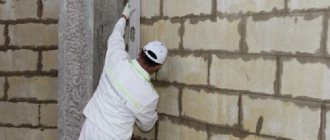
Preparation for sheathing
Before starting the cladding, it is necessary to prepare the facade, since cladding a house made of foam block with siding requires a clean and even surface of the walls.
Initially, dismantling work needs to be carried out. Remove all doors, grilles, trim and other irregularities.
Next, it is necessary to seal the cracks at the window and door joints and treat the facade of the house: clean the layers of dust and dirt, remove excess plaster and paint, prime the foam concrete with a deep penetration mixture.
Options for insulating facades and external walls
To insulate the walls of a house made of foam blocks, materials that are light in weight, have a low level of thermal conductivity, and are non-flammable are suitable. The facade of the house needs to be insulated from the outside. This will help preserve the usable area of the building, and also protect it from the formation of fungus and excess moisture. When the insulation is on the outside, all the condensation cannot penetrate into the building.
Wall insulation can be of the following types:
- thermal insulation of a single-layer structure, for example, a flat wall made of foam blocks or bricks;
- thermal insulation of a multilayer wall, here the insulation is located between the building blocks;
- thermal insulation of a wall that is covered with plaster or siding.
In order for the insulation to last longer than ten years, it is worth thermally insulating the structure with two types of materials. To insulate the walls of a house made of foam blocks, you can use penoplex, mineral wool, polystyrene foam, and polyurethane foam.
Penoplex
Penoplex or extruded polystyrene foam is used to insulate building structures. Penoplex has a low coefficient of thermal conductivity and vapor permeability, which indicates the ability to retain heat and remove moisture outside. Among the disadvantages of penoplex is its high flammability class, that is, rapid combustion near fire, which is accompanied by a pungent toxic odor. Penoplex is also a thin and brittle material. It may crack or break under mechanical stress. It has low chemical resistance to acetone, resins, kerosene, gasoline, and oil paints. Destroys upon contact with them. The service life of extruded polystyrene foam is 10-20 years.
Minvata
Depending on the composition, mineral wool can have a different structure, but, as a rule, a mixture of slag, stone and glass particles is used for insulation. The flexible and soft texture of the material allows it to be used for thermal insulation of pipes and cracks. Mineral wool does not burn, so you can insulate wooden structures and bathhouses. It has low thermal conductivity and vapor permeability, but water absorption is 35% of the volume. This means that with increased humidity, the material absorbs it and loses its ability to retain heat. Among the disadvantages of mineral wool is the presence of glass particles in the composition. They have a bad effect on human health, causing coughing and irritation of the mucous membranes. Therefore, in some countries the use of mineral wool is prohibited, for example, in Germany.
When installing mineral wool, you need to carefully seal the joints and seams; they are formed due to the softness of the material and may not be noticed. The service life of mineral wool is about 15 years.
Styrofoam
Polystyrene foam has a low thermal conductivity coefficient and water absorption is only 4%. Its properties are similar to polystyrene foam; it is also flammable and releases toxic substances. It is destroyed due to the influence of resins, gasoline and acetone, but is resistant to solutions of salts, bitumen and cement. The main disadvantage of polystyrene foam is its sensitivity to ultraviolet rays. Therefore, it must be covered with siding or plaster. The service life of foam plastic when insulating a house made of foam blocks is from 10 to 20 years.
Polyurethane foam
To insulate a house made of foam blocks from the outside, closed-cell polyurethane foam (PPU) is suitable. Its low thermal conductivity coefficient and water absorption rate of 5% make it possible to insulate residential and industrial buildings, roofs, and pipelines. Even a small layer of the substance is enough to provide seamless thermal insulation. Thanks to good adhesion, polyurethane foam is attached to vertical and horizontal surfaces. The flammability class of the material can be selected in accordance with requests: from G1 to G4.
Installation of polyurethane foam does not require dowels or glue. You will need equipment - an airless spraying installation. It will allow you to cover large areas in a few minutes. Depending on the operating conditions, polyurethane foam retains its thermal insulation properties for more than 30 years. When insulating a house made of PPU foam blocks, it is covered with siding, plaster or a curtain wall.
Installation of sheathing
It is not allowed to attach siding to bare walls, so you need to install metal sheathing or wooden slats. In the case of a house made of foam concrete, it is better to use a wooden frame. To ensure that the lathing is reliable, the wood should be treated with an antiseptic.
The installation of the sheathing begins with markings on the walls of the house. It is necessary to draw vertical and horizontal lines. Then measure the distance from the top edge of the base to its bottom and draw a horizontal line.
The accuracy of laying the panels depends on this line, so it should be applied using a level and tape measure.
The next stage is fastening the beams of the wooden frame. They are installed tightly pressed to the base, starting from the edges of the house. The gaps between them should be about 40 cm. These guides should not touch each other, as this will lead to disruption of air exchange and the appearance of mold.
To ensure protection of the facade from atmospheric phenomena, a special film is placed on the wall of the house, protected from moisture and wind.
Installation of material
Work on thermal insulation of building walls with mineral wool is best done using wooden blocks or galvanized metal profiles. Properly installed sheathing will allow you to perfectly level the wall surface. This will allow for high-quality fixation of the decorative finishing material (in our case, vinyl or acrylic siding).
Facade surface preparation
- The surface of the walls is thoroughly cleaned of protruding or hanging elements. When finishing an old log house, this could be old decorative finishing from boards, made once to protect the main facade and level the surface, followed by painting;
- Regardless of which building’s walls need to be insulated: old log or new timber, the surface must be treated with a special antiseptic. This will prevent the appearance of insects or fungal microorganisms in the wood. In addition, it is necessary to examine each crown for the absence of diseased areas susceptible to rotting. If such are detected, they must be immediately removed and replaced with uninfected ones.
Installation of sheathing
Using timber or a galvanized profile, a sheathing is made, which is necessary to secure the insulation inside it. It is recommended to make the distance between the guides 2-3 cm less than the width of the thermal insulation slabs, the average step is approximately 60 cm. Thus, you can quickly, and most importantly, correctly distribute and fix the mineral wool inside the resulting frame. The method of installing the sheathing under the siding depends on the material used for these purposes:
- The wooden beam is fixed to the surface of the facade using self-tapping screws of the appropriate size;
- The galvanized profile is attached to metal hangers that are firmly fixed to the surface of the walls and allow you to create a strong and even sheathing for the siding in a short period of time.
First, it is necessary to determine the extreme points of the guides. This can be done using a level, level or plumb line. The best way to do this is as follows: having visually determined the most protruding points on the surface of the wall outside the house, you need to set the two outer guides (right and left) plumb. By connecting the two upper and lower ends of the guides with a thread or fishing line, we obtain a plane along which it is necessary to align the subsequent profile or beam.
useful in work
Since siding is installed only horizontally, the sheathing must be designed vertically to the ground surface.
Fixing the insulation
Before you start working with mineral wool, you need to prepare personal protective equipment. These include:
- Long sleeves;
- tight pants below the ankle;
- gloves;
- respirator;
- protective glasses.
Despite the fact that mineral wool is considered safe for humans, as a result of tiny particles coming into contact with the skin, especially in hot weather, it can cause irritation.
Depending on the number of layers of material required to create high-quality thermal insulation for a log house, you can use five or ten centimeter slabs. As an option, for better insulation of a timber building, two layers of mineral wool can be fixed under the siding. The number of rows depends directly on the thickness of the walls of the house and the climatic and atmospheric conditions of the region in which it is located.
In order to correctly insulate the walls of a residential building from the outside, you need to correctly position the heat insulator on the surface of the facade, placing it under the sheathing. All slabs must be firmly fixed; this can be done using special disc-shaped dowels, or as they are popularly called “fungi”. This will not only secure the sheets, but also reduce the pressure on the lower rows of material.
Siding fastening
The siding is fixed using galvanized self-tapping screws into special grooves in the panels. If metal siding is chosen as cladding, then it is necessary to take into account the temperature compensation of the metal. To properly understand the installation of the material, you need to watch the proposed video lesson.
Installation of guide panels
First, a drainage system is installed along the designated line. It is quite rigid, so it will be easy to attach compared to a flexible starting strip. An initial guide profile is installed on top of the drainage system. Then, using self-tapping screws, the corner profiles are secured.
J-profiles are installed around doors and windows. Only near the windows the planks are installed so that the outside edge is slightly lower than the inside. The corners of these panels can be joined overlapping, one on top of the other, or cut at an angle of 45 degrees.
When installing H-profiles vertically, you need to think in advance about where to use the level. To avoid curvature and deflection of the planks, a gap of 0.5 cm should be left between them and the cornice. The cladding is completed by installing the final panel.
Tips for installing insulation
- If you plan to install vinyl siding, you should use galvanized screws and nails. This will protect the metal from rust and the structure will last longer.
- When choosing mineral wool, you should ask whether it is treated with a fire-retardant mixture.
- The joints of the insulator blocks must be sealed to avoid moisture ingress.
- If you plan to use mineral wool, it is better to install blocks on a vertical surface. They have a denser structure and therefore have better insulating qualities.
- Membranes are laid on polystyrene foam and mineral wool. If you do not do this, condensation will begin to accumulate in the house. An additional ventilation gap is created by the sheathing.
- Areas around windows and doorways require additional insulation. The insulator is also reinforced at the corners of the building.
When insulating walls, you need to pay special attention to windows. Source myprofnastil.ru
- To install the heat insulator, no leveling of the walls is required.
- The calculated amount of material should be increased by 5 - 7%, since some will have to be cut off during installation.
- To fix the insulator, dowels with disc-shaped caps are used. At least 5 dowels are used for each block.
Panel installation
After installing the system of guide elements, you can begin the last stage - installation of siding panels.
They are secured to each other using a lock, which should click when it hits the groove. The panels are fastened on top with self-tapping screws through 40 cm sections.
Watch the video:
Each panel should feel free in its place, moving slightly to the sides. So, panel by panel, all the facing material is installed, at the end of which the final strip is installed.
Installation procedure
- Start siding the house from the lowest point. Using a spirit level, strictly horizontally attach the starting profile to the lower beam of the sheathing.
- Then install vertical corner profiles of the required length along the edges of the wall. Attach them to the sheathing every quarter meter, moving from top to bottom.
- Next, proceed to installing the main panels and first of all measure their length. Cut one panel to this size (remember thermal expansion!). Bend the panel a little in the middle and insert its edges into the grooves of the corner profiles, and insert the lower part into the lock of the starting profile. After this, carefully pull the panel up a little and the lock will click into place.
- Attach the top ridge of the panel to the sheathing, making sure not to miss a single beam - otherwise the cladding may swell.
- Hook the lower part of the next panel onto the locking protrusion of the previous one, slightly lift it and attach it to the sheathing without any tension.
- Working from the bottom up and installing all other panels in the same way, cover the entire house with siding.
It is important to know! The holes for fastenings in the siding panels have an oblong shape. This was done so that the panel could freely shrink or expand in length as the temperature changes. The screws should be screwed into these holes exactly in the center, without pressing the caps tightly to the surface.