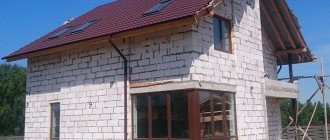
When building a house, the owners do not think that in the future there may be a need to increase the area of the building. To solve this problem, an extension is made to the house, in the construction of which foam blocks are often used. The strength of this material allows you to build a lightweight and reliable structure. A garage or living space attached to a building is always useful, which a home craftsman can easily build on his own. Let's take a closer look at how an extension is built from foam blocks to a house made from foam blocks. Let's look at the features of the technology.
Wall masonry
Before you start building walls, you need to check the horizontalness of the foundation.
The permissible height difference is 3 cm. If necessary, leveling should be done with cement mortar. The upper plane of the blocks laid in the wall must be horizontal. That is, not only the edges running along the wall must be horizontal, but also those across them. Horizontal control is carried out using a level. The position of the block is adjusted if necessary with a rubber hammer.
First row
The laying of the first row must be done with extreme precision - the accuracy of the construction of the entire house depends on this.
- Find the highest point of the foundation using a level. The first block is laid in the corner closest to this point
- Then blocks are installed in all other corners
- A mooring cord is stretched between the corner blocks along the outer edge of the wall. The first row is filled in using it
- If any unevenness in the masonry is formed, they are eliminated with a plane or sanding board. Dirt and dust are removed with a brush
Reinforcement
The reinforcement is laid on foam blocks after filling the first row, and then after laying every fourth row. A smoothly curved rod is placed in the corners.
- Using a grinder, grooves of 4x4 cm are made at a distance of at least 6 cm from the edge of the block
- The grooves are cleaned of dust and moistened with water.
- Cement mortar is placed in the groove to half the depth
- A rod moistened with water is laid
- The recess is completely filled with solution
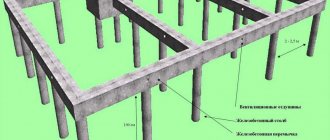
A monolithic belt is made at the floor level. It connects load-bearing walls along the entire perimeter and gives spatial rigidity to the entire structure.
Solution
For laying foam blocks the following can be used:
- Cement-sand mortar
- Cement-sand mortar with added lime
- Adhesive for wall blocks
The solution with lime does not set so quickly and has good plasticity.
Block cutting
Usually a row cannot be laid using only whole blocks. You have to supplement it with chopped ones.
You can cut blocks with a hand hacksaw. The cutting line is drawn with a pencil on two adjacent sides to ensure an accurate cut. The cut surface is leveled with a sanding board or plane. A smooth surface is necessary to ensure good adhesion between the solution and the block.
Load-bearing walls
After laying the first row, you need to wait 1-2 hours until the solution sets. Then the wall masonry continues.
- Corner blocks are laid and leveled
- The mooring is being stretched
- The row is filled with foam blocks
- Irregularities are removed with a plane or sanding board
The ligation of seams must be at least 10 cm. The minimum length of the outer blocks (corner, opening) is 11.5 cm.
Internal load-bearing walls are connected to external ones by bandaging.
Partitions
- The junction of the partition is indicated on the load-bearing wall
- At this point, flexible connections (anchors) made of stainless steel are inserted into the seam. One end is in the load-bearing wall, the other is in the seam of the partition
- Anchors are secured with nails
Anchors are inserted into the load-bearing wall through a row. It is allowed not to secure them with nails, but simply press them into the solution.
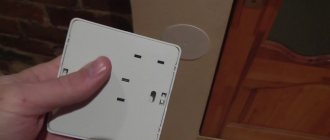
Door and window openings
You can buy factory-made lintels for ceilings, or they can be made from homemade hollow foam blocks, having a P-shaped cross-section.
- Mark the locations of the cuts on the foam block
- Having cut through the grooves, chop off the inner part with a construction hammer
- Hollow blocks in the shape of an inverted letter U are laid over the opening on wooden supports. These can be boards or beams. The supports can be nailed to the side walls of the opening
- 12-16 mm reinforcement is placed inside the cavity and concrete is poured. The supports remain until the concrete hardens.
You can lay foam blocks over the opening and on metal corners.
Consumables and tools
What supplies and tools will be needed to build the extension:
Container, shovel, mixer for mixing solutions (cement-sand, as well as glue).- Tools for marking (construction cord, rulers (square), tape measure, levels, pencil).
- Hacksaw for cutting blocks.
- Trowel for tile work (with teeth).
- Rubber hammer, foam concrete plane, brushes for moistening the concrete surface, trowel.
- Cement, sand, gravel (up to 15 mm), running water, plasticizers for preparing cement mortar, pouring the foundation and backfilling the sinuses.
- Wall chaser for making grooves.
- Dry construction adhesive.
- Reinforcement in the form of steel rods or reinforced mesh.
- Materials for formwork for lintels and the formation of a concrete ring.
When performing masonry work, it is important to correctly fill joints and apply mixtures. It is especially worth paying close attention to the laying of the first tier of blocks.
The amount of materials and necessary tools is determined at the preparation stage.
From old tires and willow for the dacha
It is also a fertile material for country crafts. Many gardeners decorate their beds beautifully. If you have a willow growing nearby, collect its branches, clear them of leaves and weave a basket, which will also become a vertical bed.
To do this you need to have:
- willow twigs;
- wooden stakes;
- axe;
- rope.
First, sharpen the stakes and drive them into the ground, placing them in a circle. Then, starting from the bottom, weave in the willow twigs in a checkerboard pattern. Secure the top row with string, add soil, and plant salad greens or flowers. A garden bed or flowerbed can also be made from old tires. Cut each one in half, paint it in different colors and arrange it in the shape of flower petals. Its core will be a solid tire.
The second photo shows how to make a chair from tires. Two of them will become its foundation. For the seat, use a metal mesh cut to fit the wheel. It needs to be attached to the tire with wire. Its back is made in almost the same way, but not the entire tire is taken for it, but its thin outer part is cut off.
Take a tire, cut off 2 halves on one side and the other. Secure these handles to the chair. All that remains is to paint it and put the country furniture, made with your own hands from old tires, in its place. She is not afraid of winds or precipitation. These tire chairs are practical and durable.
If you put the wheels on wooden or metal tripods, and cover the holes with a net in which you secure cellophane, then you can pour soil into it and plant beautiful flowers.
You can quickly make a coffee table from old tires. It is enough to place one on top of the other, attach round plywood and plexiglass on top. Cover the tires with your favorite color and, voila, a wonderful table made from old tires is ready.
If the topic of such creativity is close to you, you like to make country crafts using waste materials, then it will be useful for you to watch these videos:
For most people, a country house with a plot is not only a place where you can have a good rest, relax and relieve accumulated fatigue, but also space for creative inspiration. Every owner wants to transform and decorate their garden plot in any possible way. Some plant beautiful ones, others try to come up with an original one, others start making crafts or crafts, and others make crafts for the garden with their own hands. We will dwell on the latter in detail in this article. Let's find out the latest news, new products and the main trends of the summer season.
To create an original art object for your garden, you don’t have to run to the store to buy materials. You can make your new creations without them. Take a look around. After all, there is probably something in your household that you have not used for a long time for one reason or another.
A visual diagram of how to properly make a decorative well for a summer house with your own hands
First you need to decide for yourself what style you want to design your garden in. In the style of Provence, or Art Nouveau, or whatever you prefer. Taking into account the characteristic features of each direction, as well as your own preferences, you should begin to design and decorate it.
DIY garden crafts can be not only an aesthetic addition to your garden, but also have a functional component that can be useful on the farm.
Materials of natural origin will also help decorate your garden. Field boulders, river stones, tree trunks and stumps, clay, glass, etc. All this will add beauty and improve the habitat on your site.
The most important thing is the desire for perfection, which will help you create a unique and beautiful decor for your site
Stones for garden decoration
Large stones can simply decorate the garden
, and medium-sized stones will serve as excellent helpers in the garden. You need to take pebbles shaped like a certain fruit or vegetable, draw it on it and place it in the garden in accordance with the drawing. The garden and vegetable garden will immediately be filled with bright colors.
Rock Ladybugs - Design by Crafts by Amanda
Reinforcement and strengthening of foam block construction
In the hope that your project being built will not become cracked and will be strong, “reinforcement” of the walls is used.
Reinforcement allows you to divide the entire load of the supporting structure evenly. The reinforcing belt must be used for:
- door and window opening (top and bottom);
- in walls, with an interval between the floor components of more than 3 m;
- top rows of blocks;
- corner of the wall.
Well, in comparison with a wooden house, reinforcement is placed in each foam block wall along the entire perimeter.
For this purpose, special devices (wall chaser or grinder) are used to cut the appropriate recesses - grooves (their dimensions are 40 x 40 mm, to the very edge of the block there should be 60 mm). Fill these recesses with glue and place the rods.
In order to strengthen the openings, iron corners with a width of 50 or 100 millimeters are used, but the length must be calculated to be 60 centimeters greater than the opening itself.
By the way, they are mounted on both sides of the walls. When finishing such a house, keep in mind that the water vapor itself must escape freely, so it is unthinkable to use expanded polystyrene slabs plus sand-cement mortar for these purposes.
A suitable choice would be ventilated facades and the use of paints with vapor permeability quality.
How to build correctly: do-it-yourself installation technology
The step-by-step instructions for constructing an extension first consist of performing the preparatory work:
- Assess the condition of the house to which the structure will be installed.
- Determine the areas where communications and utility networks will pass.
- Make a project and have it approved by the architect's office, receiving an certifying document and making notes on the house plan.
- Mark the foundation that will be connected to the foundation of the main building in accordance with the drawing.
- Purchase the required amount of consumables and prepare tools.
- Prepare the soil, foundation pit, in accordance with regulatory construction rules, pour the foundation onto pre-installed metal reinforcement and backfill the sinuses. If the project includes iron piles, install them.
After the preparatory work and the completed foundation, the construction installation of foam blocks begins.
Necessary:
- Mark the installation of foam material.
- Prepare a sand-cement mortar, pour it under the markings, placing the first layer of blocks on it.
- Pay special attention to laying the corners, securely fixing them according to the plan, maintaining the level and tension of the cord along which the laying will be done.
- Prepare the adhesive solution according to the manufacturer's instructions.
- Perform installation by shifting each subsequent row by half the length of the block. Apply the glue with a notched trowel, spreading it evenly over the bottom surface.
- Carefully cut off the excess parts of the foam block with a hacksaw.
- After laying the lintels over the windows and doors, by pouring concrete into the installed formwork, the openings are blocked to continue further installation of the blocks.
- After the masonry is completed, an armored belt is formed along the plane of the walls at the end and the overlapping structure is assembled.
- After the work is completed, you can go over the cracks with sealant.
- To improve thermal insulation, a second layer of foam blocks is laid.
- In areas with high humidity, they are laid with waterproofing material.
- After the completed construction, you can already carry out finishing work.
Many craftsmen recommend using reinforcement with steel rods during the installation process. This will make the structure even stronger and more stable.
Features of construction for a wooden building
When building an extension to a wooden building:
- Determined by the method of docking and the level of pairing.
- The bases are rigidly fixed with reinforcing rods.
- An expansion seam is formed.
- perform foundation work.
- After installing the base, the blocks are laid according to the technology indicated above, so the laying rules are the same for all types of houses.
Correctly applied adhesive composition reliably connects the blocks and reduces the thickness of the seams.
Advantages of foam block houses
If you are thinking about what kind of house to choose, then first explore the advantages of the varieties you like.
Such a building material as foam block was invented in the previous century, but only in the last decade has humanity begun to enthusiastically use it in its own construction.
And all this only because we learned about its advantages:
- low price;
- high reliability;
- light weight;
- high sound insulation;
- good thermal insulation;
- environmental friendliness;
Based on all of the above, it is not forbidden to note such outstanding qualities that characterize buildings made of foam blocks:
- the total cost of construction is cheaper;
- reliability of design;
- the most affordable and simple foundation for a house;
- the need to use complex equipment and a large number of workers during construction is eliminated;
- speed of construction;
- Due to the ability of the foam block to accumulate heat, heating costs in the house will decrease significantly.
In addition, foam blocks have other distinctive features. In particular, in the summer, the houses will already be fresh and cozy. And in the country house there will be no excessive sounds at all, only silence and tranquility.
It is necessary to highlight the high fire resistance of the structure and the fact that the material does not emit any toxins harmful to guests.
The optimized level of moisture in the premises and the convenience of laying all communications within the same walls give a couple more advantages to this material.
Also, it is very easy to implement all sorts of ideas in the interior itself: arches, beams and other complex components. The material also provides a good basis for numerous finishing substances.
Which houses can be attached to?
An extension made of foam or polystyrene concrete blocks can be attached to a wooden, brick, block or frame house. There are no restrictions on the composition of the material.
The main requirement is that the existing structure should not be dilapidated, and its foundation should be strong enough. The attached structure creates additional load on the ground, this can cause unwanted settlement of the foundation of the old house and lead to its destruction.
The extension is carried out in two ways:
- On an independent basis. In heaving soils with high water levels, it is advisable to erect the building as a separate structure. This will help avoid cracks and deformations due to seasonal soil movements. The connecting seam between two structures is a small gap filled with waterproofing material.
- On a foundation rigidly connected to the base of the house with reinforcement. The structure is a monolithic mass on which the building with an extension rests. This option is suitable for slightly heaving soils with a water depth of at least 2-2.5 m.
Rigid fastening of foundations Source vendermicasa.org
See also: Catalog of companies that specialize in extensions to existing houses.
Construction of houses from foam blocks - selection and construction of the foundation
Various foundations are used for foam block buildings. The choice of the optimal option is determined by the following factors:
- depth of location of aquifers;
- freezing level;
- soil characteristics;
- load on the base.
When thinking about how to make a house out of foam concrete, many people prefer a strip foundation. This proven type of foundation is best suited for foam block buildings.
Among the advantages of building a house from foam concrete are the following qualities: environmental safety of the material
Construct the foundation for a foam block structure according to the following algorithm:
- Mark the outline of the building on the construction site.
- Remove vegetation, remove topsoil and grade the area.
- Dig a pit 60–80 cm deep, following the contour of the building.
- Fill the base of the trench with a sand-gravel mixture 20 cm thick.
- Assemble the formwork from panels or boards and secure the structure.
- Seal any gaps through which the solution may leak.
- Attach roofing felt to the inside of the formwork for waterproofing.
- Cut the rods to make the reinforcing mesh.
- Assemble the reinforcement cage and place it inside the formwork.
- Prepare concrete grade M400 and higher and pour it into the panel structure.
- Compact the concrete with a vibrator to release air bubbles.
- Lay polyethylene on the surface to prevent moisture evaporation.
- Do not load the concrete mass for four weeks.
- Disassemble the formwork after final hardening.
- Lay two rows of bricks, providing ventilation holes.
- Place steel mesh to reinforce the plinth masonry.
- Apply cement mortar in an even layer.
- Lay the second two courses of brickwork, check the horizontal position.
- Waterproof the base of the house with bitumen mastic or roofing felt.
You can do the work yourself by performing the indicated operations step by step.
Due to the fact that foam concrete is not heavy and bulky, a building can be built much faster than using other building materials
Important steps and sequence of actions
Preparatory stage - selection of foam blocks
The distinctive properties of this material lie in three main features:
- Firstly, it is softer than aerated concrete, therefore, it weighs less;
- Foam concrete is more resistant to moisture and is not afraid of dampness and mold. At the same time, an optimal microclimate is maintained in the house; the air is never too dry;
- Finally, the price of foam blocks is significantly lower than aerated concrete blocks.
The blocks are made from durable foam concrete, with the addition of sand, water and a special foam substance (the instructions for the batch will tell you in more detail about the properties). Among the advantages of the material are the same durability, good thermal insulation properties and sound insulation inherent in brick houses.
In addition, foam concrete is credited with exceptional environmental properties: it contains no allergenic or toxic substances to the body. Today, foam blocks are actively used not only in suburban housing construction, but also in the construction of municipal buildings, such as schools and hospitals.
Those who know how to build correctly with foam blocks note that the uniformity of the shape and size of the stones is not a problem. In cases where the block needs to be adjusted to size or given a special shape, it can be easily processed with a grinder or a special hand saw.
The porous structure of “concrete foam” allows air to pass through, making the walls of the house breathable no worse than wood. Finally, foam blocks are fire-resistant and do not crack when exposed to high temperatures, which is what regular concrete is susceptible to.
On the other hand, foam concrete also has a number of disadvantages, which include low mechanical strength: it is recommended to use foam concrete in the construction of low-rise buildings, as well as when laying foundations with walls made of frame structures. Having studied the advantages and disadvantages of the material, you can move on to answering the question of how to build from foam blocks.
Stage 1. Design and preparation for construction
The construction of any structure, be it a foam block house or a brick bathhouse, still requires the preparation of preliminary estimate and design documentation. It is in the project that the type and properties of the material must be indicated, as well as its consumption calculated.
It is necessary to carefully consider the layout of the rooms, remembering the load on the walls from the ceilings - it should not be excessive. The material consumption and the need to strengthen the foundation and load-bearing structures also depend on the design features of the house and the number of floors.
After drawing up and agreeing on the project, you should start purchasing materials.
Stage 2. Construction of the foundation
Typically, under foam concrete blocks, a strip foundation made of durable reinforced concrete is used, where concrete grades no lower than M150-M200 and steel reinforcement with a diameter of 12-14 mm are used:
- At the bottom of the prepared trench, lay a sand-crushed stone cushion with your own hands and compact it, pouring water;
- Next is laying the reinforcing mesh, since the reinforcement is usually laid in 2 layers, knitting using steel wire can be done directly in the pit;
- Prepare a concrete solution by adding sand and crushed stone to the cement in proportions of 1 to 3 to 5. The result should be a dough that lies in a heap and does not spread, and it must be constantly stirred by hand or in a concrete mixer;
- Formwork is prepared from boards into which concrete is poured. Tamping is performed using a manual or vibrating rammer;
- After the concrete has completely hardened (usually about 28 days), the formwork is removed and the laying of the foam block begins.
Foundation poured into formwork
Stage 3. Construction of walls
Before starting masonry, the surface of the foundation is covered with roofing felt. If work is carried out in winter, the hardening foundation must be covered with thermal insulation during the entire hardening period. A blind area is usually made along the outer line of the plinth, usually 1.5 m wide and 10-15 cm high.
The first row is placed with a jewelry level clarification. If the blocks have millimeter linear errors (up to 0.5 cm), they can be leveled using mortar. Next, with the help of a circular saw, grooves are made in the walls for the reinforcement: starting from the first row, the reinforcement is laid out every 4-5 rows and in the places of the ceilings.
When laying the last row, 2 cm is left before the ceiling, which is subsequently filled with plaster to reduce the load on the internal structures.
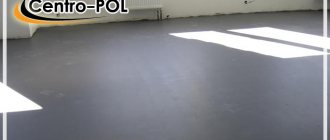
For exterior decoration of the walls of the house, you can use decorative plaster, siding, brick or composite slabs. It is not recommended to use polystyrene foam, which does not “breathe”; it is also better to use drywall inside.
Advantages and disadvantages of concrete blocks
Foam concrete blocks are produced from foamed concrete by molding from a semi-liquid solution or by cutting a hardened foam concrete mass. In addition to traditional cement, water and sand, the composition includes a foaming agent. Thanks to it, the structure of the material acquires porosity and lightness.
Foam concrete blocks are used in private construction for the construction of walls, partitions, and insulation of load-bearing structures.
The material has the following characteristics:
- Density from 300 to 1200 kg/m³. The most porous concrete is used for thermal insulation, the densest - for the construction of load-bearing structures.
- Light weight . Foam concrete is twice as light as brickwork.
- Low thermal conductivity . According to this indicator, it is close to wood.
- Dimensions of standard blocks are 200x200x600 mm or 200x300x600 mm, weight 11-22 kg. With such dimensions and weight, the laying of elements is carried out without the use of additional construction equipment and much faster than with brick.
Disadvantages include:
- Foam concrete is quite hydrophobic , i.e. absorbs moisture from the environment. This reduces its thermal insulation properties. Therefore, external walls must be protected with finishing.
An extension to the house is a good reason to update the decoration of the entire house Source kamtehnopark.ru
- Not very high frost resistance of the material - F15-F75. This means that it can withstand 15-75 freeze-thaw cycles without changing strength or destruction. For comparison, highly frost-resistant concrete is graded F300-F1000.
Varieties have been created based on foam concrete - gas silicate, polystyrene concrete, expanded clay concrete, wood concrete (chip concrete), fiber foam concrete. They have a porous structure, high thermal insulation properties, and sufficient mechanical strength. Rooms made from these materials have a favorable microclimate due to vapor permeability and environmental friendliness. They are easy to process with tools - sawing, drilling, attaching brackets.
Development stages
A general idea of the process of building a house from foam concrete blocks is given by the video:
Video: DIY foam block house
Variations of technology are possible, depending on local conditions and own capabilities. Foam concrete (aerated concrete) is a material that is very tolerant of fairly strong deviations from the approved rules for working with it, which largely explains its popularity. The purpose of this publication is to give the reader an idea of the technological aspects and operations that must be followed and performed accurately so that the house will stand, remaining warm and comfortable, for at least 70 years, provided that the local geology and soil mechanics may change significantly during this time. In general, according to the data collected to date, the durability of buildings made of foam concrete/aerated concrete can exceed 150 years without major repairs.
Construction of a house made of foam blocks (gas blocks) includes the following steps:
- Surveys at the site of future construction;
- Choosing the type of foundation;
- Determining the feasibility of building on your own;
- Selection of material for the supporting structure (box);
- Design;
- Zero cycle and laying the foundation;
- Selecting a wall laying scheme;
- Construction of the box, including load-bearing partitions and ceilings, see below;
- Construction of the roof crossbar (supporting structure);
- Roof decking;
- Technological break for box shrinkage;
- Exterior finishing (cladding);
- Installation of interior partitions;
- Installation of floors, including heat and sound insulation;
- Installation of windows and doors;
- Interior finishing, including flooring.
Features of frame house construction
Frame type construction is a structure based on a strong frame. The “skeleton” of a house is a bunch of vertical and horizontal elements assembled together. The wooden frame is sheathed on both sides , and thermal insulation material is placed in the cavity of the formed walls. This approach is characterized by a number of construction and operation features.
Benefits of technology
When determining whether frame or aerated concrete is better, you need to weigh the pros and cons of different construction methods. The main arguments in favor of frame housing construction are:
- Construction speed. Experienced specialists can build a small house in 3-4 months. At the same time, the frame does not shrink - you can immediately begin finishing work and operating the housing.
- Lightweight design. The materials are lightweight, which means the house does not require a deep foundation. The absence of a powerful foundation saves time and money.
- Variability of materials. In construction, you can use various insulation materials, arranging walls with small-format elements, OSB or DSP boards.
- Maintainability. The frame can be raised with jacks, the structure can be updated, or even moved to another place.
- Heat capacity of the building. The walls of the house retain heat well and provide quick heating of the living space.
Additional advantages include : unlimited architectural forms, all-season use and versatility of construction. Due to the lightness of the structure, the frame can be erected on loose and heaving soils.
Disadvantages of frames
Frame houses are often attributed to insufficient structural reliability. However, the experience of foreign countries proves the opposite. A well-assembled frame is superior to many buildings in terms of lightness and energy saving.
Real disadvantages of timber frame houses:
- Questionable environmental friendliness. Harmfulness depends on the quality of building materials. For example, if you don’t chase savings and replace OSB with DSP, the toxicity of the building will noticeably decrease.
- Low thermal stability . During temperature fluctuations, the walls do not absorb excess heat in hot weather, and in cold weather they do not release the accumulated thermal energy. At the same time, this property allows you to quickly heat and cool the house.
- The thermos effect. The lack of high-quality ventilation provokes an increase in humidity and the appearance of dampness inside the frame.
- Fire hazard. The wooden frame, along with insulation and clapboard cladding, is absolutely devoid of fire resistance. The problem can be solved if “heat-resistant” materials are used as much as possible in the design: fire-resistant gypsum boards, fireproof CSP boards, basalt wool.
Useful: Quick house construction: secrets and traps
Wall reinforcement
Garden houses made of foam blocks require additional strengthening - reinforcement.
Laying walls from foam blocks is the same procedure as laying other walls. In this case, it is necessary to reinforce the wall to give it additional stability and protection from cracks.
When reinforcing, you can use two options: using thin welded mesh or solid long metal rods.
If with the first option almost everything is clear and does not require explanation, then with the second there are a couple of principles. Double reinforcement should be used as shown in the picture above. In this case, two parallel grooves are cut to a depth equal to half the diameter of the reinforcing element.
Is it necessary to insulate a house made of foam blocks?
The foam block itself has low thermal conductivity - 0.2 - 0.4 W/m*ºK. This characteristic is several times lower than the thermal conductivity of sand-lime brick. Therefore, many beginners doubt the advisability of insulating a foam block house.
In fact, it is necessary to insulate foam concrete buildings for the following reasons:
Foam concrete has high vapor permeability. If you do not insulate the walls from the outside, the dew point will be located inside them, which will affect the durability of the entire house;
Due to its porous structure, aerated concrete has high vapor permeability
Insulation increases the energy efficiency of housing. Despite the low thermal conductivity of foam concrete, the energy efficiency of an uninsulated house cannot be compared with this indicator of insulated housing.
Therefore, the thermal insulation of a foam concrete house is not something worth saving on. The only thing is that you can do without insulation if the house is not planned to be used as a winter house. True, even a country house intended for temporary residence will still have to be finished on the outside, since exposure to moisture will ruin the walls over several seasons.
Important steps and sequence of actions
Preparatory stage - selection of foam blocks
The distinctive properties of this material lie in three main features:
- Firstly, it is softer than aerated concrete, therefore, it weighs less;
- Foam concrete is more resistant to moisture and is not afraid of dampness and mold. At the same time, an optimal microclimate is maintained in the house; the air is never too dry;
- Finally, the price of foam blocks is significantly lower than aerated concrete blocks.
The blocks are made from durable foam concrete, with the addition of sand, water and a special foam substance (the instructions for the batch will tell you in more detail about the properties). Among the advantages of the material are the same durability, good thermal insulation properties and sound insulation inherent in brick houses.
In addition, foam concrete is credited with exceptional environmental properties: it contains no allergenic or toxic substances to the body. Today, foam blocks are actively used not only in suburban housing construction, but also in the construction of municipal buildings, such as schools and hospitals.
House made of foam blocks with external finishing
Those who know how to build correctly with foam blocks note that the uniformity of the shape and size of the stones is not a problem. In cases where the block needs to be adjusted to size or given a special shape, it can be easily processed with a grinder or a special hand saw.
The porous structure of “concrete foam” allows air to pass through, making the walls of the house breathable no worse than wood. Finally, foam blocks are fire-resistant and do not crack when exposed to high temperatures, which is what regular concrete is susceptible to.
Adjustment to dimensions using a saw
On the other hand, foam concrete also has a number of disadvantages, which include low mechanical strength: it is recommended to use foam concrete in the construction of low-rise buildings, as well as when laying foundations with walls made of frame structures. Having studied the advantages and disadvantages of the material, you can move on to answering the question of how to build from foam blocks.
Stage 1. Design and preparation for construction
The construction of any structure, be it a foam block house or a brick bathhouse, still requires the preparation of preliminary estimate and design documentation. It is in the project that the type and properties of the material must be indicated, as well as its consumption calculated.
It is necessary to carefully consider the layout of the rooms, remembering the load on the walls from the ceilings - it should not be excessive. The material consumption and the need to strengthen the foundation and load-bearing structures also depend on the design features of the house and the number of floors.
After drawing up and agreeing on the project, you should start purchasing materials.
Project of a house with a garage
Stage 2. Construction of the foundation
Typically, under foam concrete blocks, a strip foundation made of durable reinforced concrete is used, where concrete grades no lower than M150-M200 and steel reinforcement with a diameter of 12-14 mm are used:
- At the bottom of the prepared trench, lay a sand-crushed stone cushion with your own hands and compact it, pouring water;
- Next is laying the reinforcing mesh, since the reinforcement is usually laid in 2 layers, knitting using steel wire can be done directly in the pit;
- Prepare a concrete solution by adding sand and crushed stone to the cement in proportions of 1 to 3 to 5. The result should be a dough that lies in a heap and does not spread, and it must be constantly stirred by hand or in a concrete mixer;
- Formwork is prepared from boards into which concrete is poured. Tamping is performed using a manual or vibrating rammer;
- After the concrete has completely hardened (usually about 28 days), the formwork is removed and the laying of the foam block begins.
Foundation poured into formwork
Stage 3. Construction of walls
Before starting masonry, the surface of the foundation is covered with roofing felt. If work is carried out in winter, the hardening foundation must be covered with thermal insulation during the entire hardening period. A blind area is usually made along the outer line of the plinth, usually 1.5 m wide and 10-15 cm high.
The first row is placed with a jewelry level clarification. If the blocks have millimeter linear errors (up to 0.5 cm), they can be leveled using mortar. Next, with the help of a circular saw, grooves are made in the walls for the reinforcement: starting from the first row, the reinforcement is laid out every 4-5 rows and in the places of the ceilings.
When laying the last row, 2 cm is left before the ceiling, which is subsequently filled with plaster to reduce the load on the internal structures.
Reinforcement of masonry rows
For exterior decoration of the walls of the house, you can use decorative plaster, siding, brick or composite slabs. It is not recommended to use polystyrene foam, which does not “breathe”; it is also better to use drywall inside.
Masonry wall with brick lining
Why is it better to choose foam blocks?
When space on the site allows, it is quite possible to add one or more rooms to increase the area of the building. It is better to entrust the construction to experts who will make calculations, carry out the project and all stages of construction work. All you have to do is choose the construction material. Among other options, foam concrete masonry has earned trust.
Like all cellular solutions, foam concrete consists of liquid (water) and dry components (sand and cement), as well as foaming agents of organic origin. The raw materials that are used according to the technology for the production of foam concrete blocks have the main difference from aerated concrete - environmental friendliness. This ensures the safety of the material for the construction of the building.
See also: Extension made of aerated blocks
The pores of the latter communicate with each other. This means that when it gets wet, moisture penetrates deep into the block and as the air temperature drops, the concrete masonry is gradually destroyed from the inside. The closed pores of foam concrete protect it from the destructive effects of moisture. Therefore, an extension to a house made of foam blocks can stand for some time without external cladding.
Making an extension from blocks is not difficult. The products are distinguished by their regular shape and are in many ways larger in size than bricks. By reducing the number and width of masonry joints, the structure is warmer.
What are the advantages of a block extension to a house?
Many people decide to make an extension from blocks to a building using foam concrete due to the mass of its useful properties. Here they are:
- Durability of concrete structure. This is due to the frost resistance of the material, due to the structure of the internal pores and the small thickness of the seam. A block building made from aerated concrete will last 5 times longer.
- The low cost of the material and its availability make it possible to use it both for the construction of residential buildings and ancillary buildings.
- To finish the facade of a concrete building, you can use a wide range of building materials.
- The low weight of cellular concrete products makes it easier to work with blocks. The process of transportation and handling is simplified, the construction stage of the building is accelerated. A large staff of workers and the use of special equipment are not required. Block construction does not place a serious load on the foundation, which significantly reduces the cost and simplifies the process on different soils.
See also: Finishing with facade panels - prices
One of the important qualities of cellular concrete is its fire resistance. You can safely attach an extension to a wooden house using cellular blocks - the structure will be absolutely safe.
Classification and purpose of foam blocks
To build an extension to a house from foam blocks, it is necessary to take into account the fact that they are classified according to their purpose.
The brand of the product speaks about its durability.
| Brand | Type by strength class | Purpose |
| D150 – D500 | V 0.5 – V 0.75 | This is a category of thermal insulating building blocks that cannot be used as load-bearing material. Low density ensures high thermal insulation properties of products and low weight. |
| D600 – D900 | B 1 – B 5 | Durable blocks with high thermal insulation properties. Can be used for building construction (from D800). |
| D1000 – D1200 | V 5 – V 12.5 | Durable but not warm, the blocks are not used often. If you make an extension to the house from such blocks, it will be cold. It will need to be insulated. |
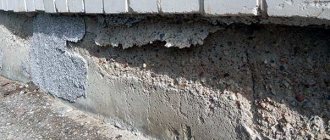
What mistakes can occur when installing foam concrete walls?
When laying blocks with your own hands, an inexperienced builder may make the following mistakes:
- Incorrect installation of the first row of products will lead to the need to lay a thick layer of adhesive mixture on subsequent rows; the supporting structure may shift vertically.
- Carrying out work in humid weather and freezing temperatures often causes wall destruction.
- Incorrect application of the mixture and incomplete filling of the joints. Such actions lead to loss of the wall’s thermal insulation qualities and loss of strength.
- Lack of preparatory work to clean surfaces from construction debris and dust. Poor quality connection of parts leads to cracks in the structure.
- The lack of reinforcement causes a general weakening of the wall.
Soil shrinkage will inevitably lead to the appearance of cracks on the surface of the supporting structure, so window and door openings must be reinforced. To prevent the occurrence of point loads from floor slabs in the upper structure, it is necessary to create an armored belt.