Why move the switch?
In real conditions, the need to move a light switch indoors may arise for various reasons:
- Inconvenient height position. The switch is too high for small children to reach. Or, on the contrary, the children have already grown up, and he is too low - he has to bend down.
- Access limitation. For example, he ended up behind a cabinet or bar counter.
- The desire to rearrange the furniture, and the switch turns out to be closed.
- Increased convenience. Ensuring that the light is turned on from another room or from several places, bringing the switch closer to the bed or chair, etc.
- Consequences of repair. A good reason is to combine several rooms. Moving, for example, the kitchen into the living room, dividing a large room into several rooms, reinstalling the front door, etc.
Finally, the desire to move the switch may arise simply to change the interior.
Perhaps the opportunity has arisen to install a new structure, but it does not fit in its original place.
Reasons for transfer
The main reason for moving it is the inconvenience of use when the switch interferes with the opening of the closet door or the bed blocks access to it. This can happen after rearranging furniture or renovating.
Sometimes people face a problem when, in order to turn on the light in the bedroom, they need to walk to the corridor. This arrangement is very impractical and inconvenient, so you need to move it or purchase a remote one.
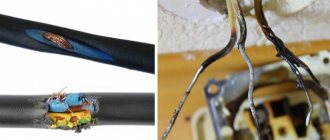
If placed low, there is a risk that a child will play with it. He may disassemble the switch, swallow small parts and suffer electrical injury.
Technical issues of the transfer
Before planning to work with the switch, you need to understand the principle of its installation. Electrical wiring runs from the entrance electrical panel to all rooms.
Moreover, the main wire runs near the ceiling, parallel to it. A standard circuit looks like this. A parallel line is led from the main wire to a lighting fixture (lamp, chandelier).
A tap on the switch is sequentially cut into the lighting circuit. All connections are made in a distribution (installation) box under the ceiling. Next, the wires are directed through the main channel to the place where it is convenient. Another distribution box is installed here, from which the chain descends vertically.
A switch is installed at the required height and connected to the supplied wires. The number of wires and connection diagram depend on the type of lighting device - a simple lamp or a chandelier with several switching options.
Transfer technology is different. It depends on the purpose of the move, the location of the new device and its type, as well as the design of the wall and the possibilities of laying electrical wiring.
Possible transfer options
- Changing the location of the switch only vertically (height). In this case, the existing electrical wiring coming from the junction box is used. It must be shortened (when lifting the switch) or lengthened (reducing the height to the switch).
- Changing the location in the horizontal direction. When moving to a distance of up to 1 m, it is allowed to connect the wires in the socket of the old switch, and route the channel for them to a new location along the wall in a horizontal direction. If you need to move the switch significantly away, you will have to install a new junction box. To do this, a channel under the ceiling is opened and a vertical outlet for the new switch is made in the right place.
- Transfer to the opposite side of the wall. In this case, the entire circuit must be replaced. In the distribution box of the lamp, the old wires are disconnected and new wires are connected. They are directed in the opposite direction parallel to the main wiring. A junction box is mounted in the desired location, and the circuit for the new switch is routed vertically downwards.
The most difficult option is to install a new lighting fixture, which was not previously provided for in the room design. You will have to complete the whole range of work.
This is the tapping of the main wiring to the lamp with the installation of the corresponding mounting box, inserting the circuit, leading it to the desired installation location, mounting the box and vertical tapping to the switch, installing and connecting it in a convenient place.
Preparing for the transfer
Before starting work on moving the circuit breaker, it is necessary to carry out preparatory measures:
- Determining a new installation location.
- Development of an electrical circuit transfer circuit. Selection of technology for carrying out work.
- Acquisition and preparation of necessary materials. To transfer, first of all, you will need a wire or cable with a core cross-section similar to the cross-section of the lamp wires. In addition, the material must be identical. When using aluminum, wires with a cross-section of 2.5 square meters will be required. mm, and for copper - 1.5 sq. mm. Terminal clamps are best suited for connection. You should prepare insulating tape in advance.
- Opening the wiring channel and identifying the wires to which the new circuit should be connected.
- Marking the installation points of the mounting box, switch and line for laying the wire (cable).
Any work with electrical installations requires compliance with safety rules. It is important to remember that moving and repairing the switch is possible only after the apartment has been completely de-energized at the entrance panel.
Transferring a circuit breaker without cutting
Quite often a situation arises when it is necessary to move a light switch, but often the repairs have already been made and it is necessary to make do with minimal damage, especially without chipping the walls.
Currently, there are two main ways to move a switch without making a groove in the wall. Each of which has its own advantages and disadvantages, now I will describe them, and you yourself will choose the most suitable option for yourself.
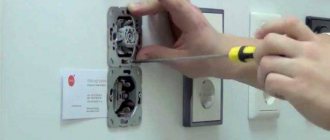
For greater clarity, I will describe the options using the following example:
This is an apartment in a new building, in which, on the wall left of the door, there is a two-button kitchen lighting switch. It must be moved to the opposite wall, because where it is made now, it is planned to install a refrigerator.
By the way, below, under the switch, you can see an external socket, which was specially laid along the baseboard for the refrigerator; I wrote about this in detail HERE.
Let's try to imagine how, without gating, we can move this switch to the opposite wall using the methods indicated.
Tools for work
Before starting work, you must prepare all the necessary tools:
- Preparing a groove for electrical wiring - a wall chaser or hammer drill, chisel, chisel, hammer.
- Making a nest - a hammer drill with a concrete crown of the required diameter.
- Repair, dismantling and installation - a Phillips screwdriver, a minus screwdriver with a narrow and wide tip, pliers.
- Laying and connecting wires - wire cutters, mounting knife.
- Control and measurements - tester or indicator screwdriver, tape measure, ruler.
- Sealing and finishing work - spatula for plastering and putty, sandpaper or grinding machine.
We should not forget that the work is carried out with the electricity turned off, which means a flashlight may come in handy. For work at height you will need a stepladder.
Replacing the old switch
The simplest job is to replace the old switch with a new one. It includes two operations - dismantling the old device and installing and connecting a new device. The order in which they are carried out depends on the type of device.
How to remove the old switch
The work is carried out in this order:
- Use a flathead screwdriver or knife to separate the key. Some models have an additional strap for pressing it, which must first be removed.
- The switch cover is removed by unscrewing the screw (sometimes two screws).
- The screws of the fastening tabs that secure the switch in the socket are loosened.
- The entire switch is removed from the socket.
- The supply wires are removed from the terminal clamps.
A two-key switch is removed in the same way as a single-key device is removed.
When disconnecting wires, it is recommended to mark their location in the terminals with a marker. This is necessary to maintain the usual order of turning on the light in the chandelier.
Some apartments still have old type switches. They have an outdated design, and the dismantling procedure is slightly different. In them the key cannot be removed, because The device cannot be disassembled.
Two screws are unscrewed (sometimes one, in the center), and the cover is removed. Next, loosen the screws of the mounting tabs and remove the switch. The ends of the wires are most often secured with screws. They are unscrewed with a flat screwdriver and the wires are released.
Installing a new switch
Work is carried out in reverse order:
- The ends of the wires are inserted into the holes of the terminal clamps and securely secured with screws. In two-gang switches, the markings applied during dismantling are taken into account. In single-key designs, the order in which the wires are connected does not matter.
- The switch is inserted as far as possible into the socket and aligned. Excess wires are carefully laid out in the socket. Fixation is ensured by two screws, with the help of which the body is wedged with side legs.
- Install the decorative cover using one or two screws.
- Pressing lightly with your hand, set the keys until a characteristic click appears.
After checking the operation of the mechanism, you can connect the electricity. Some modern switches may have an original design. The installation procedure is described in the instructions for the device.
How to move a switch to another location
After carrying out preparatory activities, moving the circuit breaker to a new location is carried out in a certain sequence. This will be discussed in detail below.
Removing and disconnecting the old switch
First of all, remove the cover of the distribution box and disconnect the old branch. Then the switch is removed and disconnected from the wires.
The wires themselves do not need to be removed from the channel if they are firmly sealed under the plaster.
The interfering ends are cut off so that the remains of the wiring remain inside the socket.
Drilling a new hole
It is carried out in the right place using a special tool. A hammer drill with a 65mm diameter bit is best suited. In this case, the tool is switched to drilling mode.
While working, it is recommended to moisten the area of the wall next to the hole. After reaching a depth of 5-6 cm, drilling stops, and all errors in the walls are corrected using a chisel and chisel.
Grooving a groove for wiring
When wiring is hidden, the wires from the junction box to the switch are laid in a vertical channel - a groove. It breaks through the wall using a special tool - a wall chaser (a small circular saw for concrete). You can make a channel with a hammer drill by setting it to crushing mode. The standard size of the groove is 2x2 or 2.5x2.5 cm.
The wires are connected to the electrical circuit in the junction box and carefully placed inside the groove. The ends are brought into the switch socket with a reserve (length 5-8 cm). Next, the channel is puttied and the surface is carefully leveled.
Installing and caulking the installation box
To securely secure the switch in the socket, a plastic mounting box is installed in the drilled hole. You can use a standard socket box.
Wires are inserted inside the box. Next, it is fixed using the side legs.
Finally, the box is covered with alabaster or plaster, which ensures its secure fixation in the wall.
Fastening and connecting the switch in a new location
Installation and fixation of the switch is carried out in the manner described above. A noticeable defect remains at the location of the old device.
What to do with an old hole
The easiest way is to remove the old wiring box. It is turned upside down and plastered, and the surface of the wall is carefully leveled. Another option is to fill the hole with polyurethane foam and then plaster it.
Method No. 1: Installing a wireless switch
In this case, you don’t need to bother at all with laying new wiring, chiselling walls and finding the right tool. You just need to get a basic set of a wireless light switch and a remote control - find out more about them using the nooLite system as an example.
Thanks to wireless solutions, the scheme of actions is noticeably simplified:
- The nooLite wireless switch will switch the load - that is, room lighting. This miniature power unit can be installed directly in the glass of a chandelier, behind a suspended ceiling, in a socket box, or in place of an old switch in the wall.
- As a remote control, we use the nooLite remote control, which works in tandem with the power unit and transmits on-off commands to it. These modules can be attached to any surface with double-sided tape without the need to drill into the wall, and the range of action reaches 50 meters. They pressed the button and instantly received the result at the other end of the room or corridor.
- All that remains is to install the plug in place of the old switch - and voila, you're done!
Using a cable channel
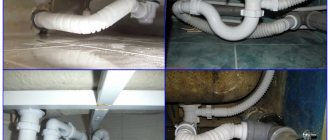
Relocating the switch with laying the wiring in the grooves provides for subsequent repairs of the wall covering. If the apartment has undergone a new renovation and you don’t want to damage the walls, then open wiring is done. It is also necessary on wooden walls where grooves are not allowed. Plastic cable channels are used for it.
From the junction box to the switch socket, the base of the cable channel is vertically fixed to the wall surface in a new location. Fastening is provided with dowels. The wires are neatly placed in the cavity of the base, and a plastic cover is installed on top.
This connection method has one drawback - the channel is noticeable on the wall and somewhat spoils the interior. However, it can be selected by color, which will help smooth out the impression somewhat.
Using the Remote Light Switch
The most effective and simple way to move a light switch without cutting at all, literally in 10 minutes, to almost any convenient point in an apartment or room, and in addition, if necessary, change the control circuit, is to use a remote light switch.
Currently, there are many different options for remote lighting control systems - from a simple remote control to complex multi-mode systems with a radio switch identical to a regular one.
Their main drawback is the cost of the kits themselves, which, if you use advanced models, will turn out to be somewhat higher than the installation of external wiring; in addition, some inconvenience is caused by the need to change the batteries of the remote control or remote switch every few years.
Otherwise, using remote lighting control kits is the best option if you need to move the switch without gating and even without any difficulties at all. See for yourself how easy it is to do:
1. The contact closes in the old switch, which needs to be moved. You can do this physically - by connecting the wires, or you can simply turn on the key.
2. A miniature control unit is placed at the installation location of the lamp, in this case a chandelier, and connected to the chandelier. If you don't have a niche in this area, like we do, it hides in the base of the chandelier.
3. The remote switch is programmed and installed in the desired location, often simply glued to the wall with double-sided tape.
4. EVERYTHING. At this point, the installation is complete, you can immediately use the switch. In addition, you can make several switches for this chandelier or change its operating mode and much more, depending on the model of the kit and its capabilities.
You can find out more about connecting a dual-mode remote control kit HERE. The method of transferring the switch is described there, with detailed step-by-step instructions, a connection diagram and everything that is necessary for successful installation.
If you know any other ways to move a light switch simply, without cutting at all, be sure to write in the comments to the article. In addition, leave any questions you have about moving switches there, I will try to help promptly.
Source
Switch repair
It is not always necessary to replace a switch if it is not working well. It is possible that you just need to do some minor repairs.
The following signs indicate its necessity: the light does not turn on or off when a key is pressed, a cracking sound is heard after switching on, the lamps in the lamp often burn out, the light blinks, the switch heats up.
Required tools and materials
To carry out repairs, it is enough to have the following tool:
- screwdrivers (minus and Phillips, different sizes);
- pliers;
- wire cutters;
- tester;
- indicator screwdriver;
- sanding paper;
- needle file
How to disassemble a switch
Work begins with disassembling the switch. The procedure is performed in the previously described manner.
Cleaning contacts
The most common cause of malfunction is burnt contacts. You can easily clean them yourself. Rough cleaning is achieved with a flat screwdriver and knife. For fine work you will need sanding paper. Everything must be done carefully so as not to damage the spring mechanism and plastic parts.
Other possible problems and solutions
Other causes of problems can be identified:
- Poor contact in the clamp. The ends of the wires are removed from the terminal block and bitten off at a distance of 10-15 mm. The wires are then stripped again and re-secured.
- Poor quality clamp screws. They do not provide reliable fastening of the wire. Perhaps the length is not enough. You can try replacing the screws or increasing the diameter of the wire by bending or tinning it.
How to assemble a switch
If plastic parts break and the housing melts, it is not advisable to carry out repairs. It is much easier to replace the old switch with a new one.
Assembly or replacement is carried out according to the method described above.
Safety precautions
When moving or repairing a switch, remember that this is an electrical device operating at a voltage of 220 V, which is dangerous for humans. All work should be carried out only after turning off the electricity in the input panel.
The absence of voltage should be checked with an indicator screwdriver or tester. It is necessary to completely exclude inclusion by another person who is not aware of the work being carried out.
General rules for such events should also be provided. All tools must be the correct size and in good working order. The workplace must be cleared of foreign objects.
Control devices must first be checked for functionality.
The need to move the switch to a new location can be caused by various reasons. The work can be easily done with your own hands if you have the necessary tools and know the basic rules.
It is important to comply with safety requirements and exercise maximum care and attention. Modern switches are easy to install, but you must act strictly in accordance with the instructions.