Nowadays, in most cases, various screeds are prepared to level the base for the subsequent laying of finishing floor coverings. If several decades ago only concrete or cement-sand mortars were used for such purposes, today the list of materials and technologies that can be chosen to create a floor base is much wider. What types of screeds exist now? The answer to this question, as well as recommendations on which of the available technologies is better to choose in specific options, will be found in this article.
What should the screed be like?
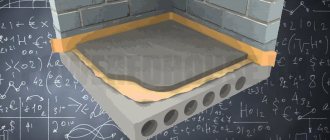
Laying screed is the most common option for insulating and leveling the subfloor. Modern flooring materials, or rather their laying technologies, impose certain requirements on the surface on which it is planned to lay the flooring. The screed must meet the following standards:
- the surface must be horizontal, flat and smooth (curvature of 0.2 mm per linear meter is allowed);
- the base of the floor must be strong;
- the screed must be thermally insulated;
- Waterproofing should be created if necessary.
Achieving a result that meets the requirements is done in various ways, that is, using various types of technologies.
Types of screeds
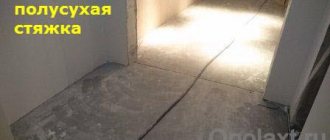
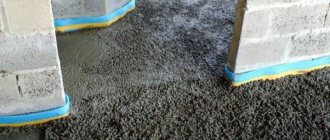
An example of a semi-dry screed with expansion joints
In addition to classic cement mortars, which are also called wet, the following types of screeds are used today:
- semi-dry;
- dry;
- self-leveling.
The ultimate goals of all methods of leveling the subfloor are approximately the same, but the technologies differ, sometimes greatly. Types of screeds differ not only in the methods of their construction, but also in the final characteristics. The prepared bases differ in the following parameters:
- strength;
- weather resistance (the ability to maintain quality under the influence of moisture and temperature factors);
- surface quality;
- thermal conductivity.
Also, all types of screeds differ in the complexity of the installation process and the final cost of the complex material plus labor. Next, we will consider the peculiarities of creating each type of floor base, and the area of their priority application.
Types of screeds
Before deciding which floor screed is best, it is worth noting what leveling floor screeds are generally available. There are three types of them:
- Wet.
- Semi-dry.
- Dry.
All these types of screeds pursue the same goals, but are arranged differently. The result is different technical characteristics of the base. The resulting base for laying floor coverings is evaluated according to the following parameters:
- strength;
- resistance to sudden temperature changes and precipitation;
- thermal conductivity;
- a qualitative indicator of surface evenness.
Attention! The functional purpose of screeds is different: when installing warm water floors, the finishing coating should conduct heat well, and the rough coating, on the contrary, should block its loss.
What types of wet screeds are there?
An example of a concrete mortar containing crushed stone.
Cement-based liquid mortars also come in two types:
- concrete;
- cement-sand mixtures.
The second type of material for installing floor screeds differs from the first in that it does not contain coarse filler, crushed stone. Otherwise, the solutions are similar, but depending on the purpose, the proportions of fillers and binder components may vary.
Concrete is the most versatile material for constructing floor subfloors. It can be used inside and outside buildings, making rough and finishing screeds. For large-scale capital construction, concrete is indispensable and it is unlikely that an alternative will appear soon. This is due to the following advantages of the material:
- the ability to produce industrially in large volumes and deliver it to the site in finished form;
- concrete, due to its consistency, can be mechanically supplied in unlimited quantities to buildings of any height;
- pouring occurs very quickly with an uninterrupted supply of material;
- concrete is the cheapest solution, which plays an important role in large volumes of pouring;
- The concrete pouring layer is practically unlimited, which makes it possible to level the surface of any degree of curvature.
By changing the proportions of cement and fillers, you can prepare a concrete mixture of different grades, which is used depending on the expected operational loads. In this way, by reducing the percentage of cement, the material is made even cheaper. Classic concrete is also used in private construction. This is the material of choice when creating rough subfloors, both on a concrete slab and on the ground.
How to make a semi-dry floor screed with your own hands?
With the proper skill of the contractor, using concrete mortar it is quite possible to create a finishing screed with a surface that does not require additional leveling. However, now they prefer to use other materials for finishing layers, which will be discussed later. Concrete mortar is used to create the finishing surface in technical rooms and for outdoor work.
An example of a cement-sand mortar.
The classic mortar also has a number of disadvantages, which is why in many cases other materials are preferred to it:
- the need for reinforcement;
- long ripening;
- significant shrinkage and tendency to cracking;
- the need to control the moisture content of concrete during its maturation;
- the complexity of preparing concrete yourself;
- the difficulty of high-quality surface leveling;
- the need in many cases to additionally strengthen the top layer of the screed;
- cannot be poured in a thin layer (minimum 4 cm).
In addition, the concrete base of the floor is heavy and too thermally conductive, therefore it places a large load on the floor and in many cases requires insulation.
In some cases, concrete is replaced with a cement-sand mixture. It is better when you need to make a relatively thin layer of screed. However, a solution containing only sand as a filler requires a higher percentage of cement, is less durable, and therefore is used only inside residential premises, where there is little load on the floor surface.
Now the use of so-called lightweight concrete, which differs from the classic composition, is gaining popularity. Instead of heavy crushed stone, granules or expanded polystyrene foam are used as filler. This material is less durable, therefore it is only suitable for installing internal screeds, but it is better in that it provides insulation at the same time as leveling the base of the floor.
Important! Lightweight concrete based on polystyrene foam has a density of only 200-250 kg/m3. A ten-centimeter layer of polystyrene concrete will provide reliable thermal insulation of the floor in any region. In this case, the load on the floor is minimal.
Wet solutions also include ready-packed mixtures. They are used in the same way as other liquid cement compositions, but they form a more even surface and do not require reinforcement (they contain reinforcing fibers). The use of such materials is more expensive. They are best used for small-thick fills (up to 5 cm) when screeding is necessary in limited areas. For larger-scale work, it is better to use the following type of floor screed.
How to choose a floor screed
Floor screed can be dry, semi-dry or wet, depending on the percentage of water in the building mixture used. It is necessary to select the type of screed taking into account the following factors:
- Availability of equipment for installation.
- Base load.
- Speed and complexity of installation.
- Time required for shrinkage and drying.
- Cost of materials and work [1].
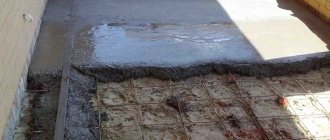
To install the screed, you will need to clean the base, seal the cracks in it, and lay waterproofing. In the case of wet and semi-dry screed, in order to lighten the load on the floor slab, a layer of expanded clay is often poured before pouring. To obtain a horizontal surface, “beacons” are used - special guides along which the required level of the working mixture is determined and leveled, removing excess and smoothing it.
To better understand which type of floor screed to choose, let's look at their main characteristics.
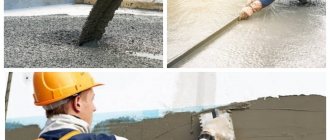
Wet floor screed
Wet screed [2] is the pouring of a prepared base with a cement mixture, most often cement-sand mortar (sand concrete). Sand concrete is the most versatile material; it is used in large-scale capital construction.
Advantages of wet screed:
- The cheapest material for arranging screeds.
- Low cost.
- Can be used to create a finishing surface in technical rooms.
- Suitable for rooms with high humidity.
- High grade strength M150.
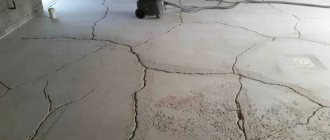
Disadvantages of wet screed:
- Reinforcement mesh required.
- Shrinkage takes 28–30 days, and there is a possibility of cracking.
- It is necessary to control the moisture content of the screed during shrinkage.
- It is quite difficult and time-consuming to prepare the solution yourself, as is leveling the surface.
- Heavy weight, high floor load.
- It is necessary to use self-leveling mixtures (self-leveling floor) after laying the screed.
- The need for floor insulation.
The mixture for wet screed can be made in production or directly on construction using a concrete mixer. It is necessary to take into account that each room has only one day for arranging the screed. In this case, there will be no seams and, as a result, no cracks.
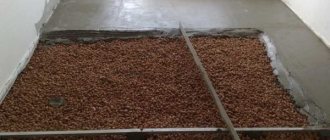
Dry floor screed
This screed consists of a lightweight bulk material (expanded clay, perlite, vermiculite), on top of which sheets of plasterboard, chipboard or plywood are placed on metal profiles in one or two layers. The joints of the sheets are glued.
Advantages:
- Simple, fast and clean installation, accessible to DIYers.
- The mixture is immediately ready for use.
- Does not require expensive professional equipment.
- Provides high sound insulation.
- Does not require drying or shrinkage.
- Due to the absence of water in the working mixture, it can be easily installed in the cold season, as it is not subject to freezing.
Flaws:
- Mold formation under the floor covering at the slightest water leakage.
- Not suitable for unheated and damp rooms, basements and basements.
- The cost is 2–2.5 times higher than that of a wet screed [3].
Professional builders often say that, in addition to moisture, the main enemy of dry screed is amateurs. If the backfill is poorly compacted, it shrinks and the top sheets stick to the profiles. This leads to deformation of the floor. The sheets must be supported over their entire area so that the load is evenly distributed.
Combines the advantages of wet and dry screed. The working material is a wet crumbly cement-sand mixture with plasticizers and additives. To mix it and supply it to the room, mobile mortar pumps (pneumatic blowers) are used. The finished surface is processed with a trowelling and grinding machine [5].
To prevent the semi-dry screed from cracking, immediately after grouting the surface, so-called shrinkage joints are cut to a depth of 1/3 of the thickness of the screed. They should be smooth and have no branches. Before laying the topcoat, they are sealed with sealant. With increased mechanical load on the screed, the seams can be reinforced with metal corners [6].
You can walk on such a screed within 12 hours after installation. It is also ready for laying flooring earlier than wet:
- tiles - after 72 hours;
- linoleum - after 12–14 days;
- carpet - after 14–20 days;
- parquet, laminate - after 20–25 days.
In industrial premises, as a final finish, semi-dry screed can be impregnated with special strengthening solutions or filled with the so-called self-leveling floor [7].
Advantages of semi-dry screed:
- It sets quickly, gives slight shrinkage, and is not prone to cracking.
- Instead of reinforcing mesh, fiber fiber is used, which is already part of the mixture.
- Universal, suitable for use in residential and industrial construction.
- Does not create a large load on the floors.
- Has high grade strength.
Flaws:
- Installation requires special equipment and a professional team.
The turnkey cost is low, just like a wet screed.
Let's summarize [8]
For clarity, we have summarized the data on different screeds in a small table.
Table 1. Characteristics of different types of screeds
| Characteristic | Screed type | ||
| Dry | Wet | Semi-dry | |
| Drying and shrinkage | Not required | 28–30 days | 1–2 hours |
| Appearance of cracks | — | Maybe | Hardly ever |
| Minimum permissible room temperature | Any | Not lower than 5°C | Not lower than 5°C [9] |
| Possibility of pedestrian load | Immediately after installing the protective sheets | 72 hours after installation | 12 hours after installation |
| Flooring installation | The day after installation, when the glue dries | 28–30 days after installation | 3–25 days after installation |
| Laying area per day per team (max.) | 100 sq.m [10] | 50 sq.m | 250 sq.m [11] |
| Price | From 1000 rub./sq.m., excluding work | From 450 RUR/sq.m turnkey | From 450 RUR/sq.m turnkey |
The cost of the screed may vary depending on parameters such as the total installation area, the thickness of the screed, the number of floors and location of the object, the need for reinforcement with metal mesh, and the individual characteristics of the object. In the cold season, wet and semi-dry screed may require additional measures against freezing of the mixture, which will also increase the cost of work.
So, the best option in terms of price, time and quality at the moment is a semi-dry screed. Dry screed can be recommended for renovations in small apartments. In large-scale construction, when there is a large margin of time before the start of operation of the house, the price parameter is important, and the solution can be purchased in large quantities at the factory; wet screed is the main option for arranging floors.
So which screed is better to choose? It is quite difficult to answer this question unambiguously, because there are significant differences in the installation method and type of material. In reality, each option has its own advantages and disadvantages, and is used for a specific situation. Therefore, when choosing, it is advisable to proceed from the following factors:
- Type of room and operating conditions.
- The presence or absence of significant defects in the foundation.
- Financial expenses.
- Complete drying time.
- Requires experience and special tools.
Thus, the screed is selected for a specific room, taking into account the characteristics of the structure itself and all factors that may affect its use.
Many of the readers have probably mixed homemade mortar more than once, so you can be convinced of the advantages of building mixtures by comparing them with cement-sand mortar:
- The price of mixtures varies greatly, but you can always find the ideal option for yourself, suitable in price and quality;
- Ready-made mixtures for floor screed are easy to use, which is manifested, first of all, in the ease of mixing;
- Another distinctive property is the additional strength of the resulting coating, which is achieved thanks to additional impurities in the composition;
- One of the most significant advantages is the drying speed of the solution from dry mixtures. The fastest drying mortars can harden within 2 hours after application, while hand-mixed concrete and sand will take several weeks to dry.
Dry floor screed is selected according to the following parameters:
- Compressive and bending strength - the more, the better.
- Adhesion - the higher, the less chance of the screed detaching from the base.
- Curing time after pouring in hours.
- Consumption based on kilograms per square meter of filling with a layer of 1 mm.
- The composition of the screed is gypsum or cement, as well as the presence of additives.
- Cement brand and grain size in millimeters.
- Pot life is the time it takes for the solution to set in an open container.
You also need to look at the purpose of the composition (the proportions of the solution depend on it) and the type of work (internal or external). The color is usually grey.
- Application area. Cement-sand compositions are resistant to various negative influences. Therefore, most of them can be used for work inside and outside buildings. But the degree of frost resistance is often limited to -30...-35°C, which limits their area of use to the northern regions. Some mixtures have predominantly waterproof properties; such products are ideal for bathrooms and toilets. It is recommended to buy the most environmentally friendly screeds for finishing bedrooms and children's rooms.
- Layer thickness. Each manufacturer indicates the optimal thickness of one layer of screed. If you just need to level the floor slab, you can use thin-layer mixtures (10-100 mm). But when it is necessary to hide pipelines or a heated floor in a screed, then a composition with a maximum coating thickness of up to 250-300 mm is required.
- Drying time. In some rooms, you need to do more than just quickly level the floor. It must dry instantly so that the coating can be walked on. One of these rooms is the bathroom. For such cases, it is better to choose a composition with a drying time of 3-4 hours. At the stage of building a house, you can wait a few days. But it takes longer for the screed to fully gain strength; usually, finishing can be continued only after 3-28 days.
- Screed weight. Some load-bearing structures are not able to withstand the additional load from the concrete pavement. In this case, you should take a closer look at ultra-light compositions in which foam glass plays the role of filler.
- Sound and heat insulation. Some manufacturers add fillers to the screed, which give the coating sound and heat insulating properties. Despite the higher cost of the material, purchasing it can become more economically profitable.
- Viability of the solution. When large areas need to be filled with ready-made mortar, an indicator of the screed such as the viability of the mixture will be important. In small rooms you can do it in 30-40 minutes, but in production sites this time increases to several hours.
- Mixture consumption. Having concentrated on the cost of the screed, you should also find out about the material consumption. Often, cheap compounds are consumed in large quantities, and subsequently also shrink. Therefore, purchasing more expensive material may ultimately become a more profitable option.
Semi-dry mixtures
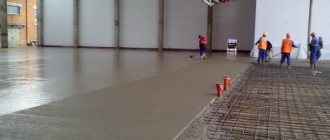
For large areas, a machine method of installing a semi-dry screed is used.
This is, in fact, a slightly modified sand-cement mixture. It has a limited water content, which is why the working substance is moistened but crumbly. The lack of moisture is compensated by the addition of plasticizers and some other additives, which enhance the astringent properties of cement. Thanks to this, the strength of the finished base is higher than when using conventional concrete.
Leveling with semi-dry mixtures is now used everywhere. On large areas, the machine method of screeding is used, when almost all work processes are mechanized. On a small scale, a manual method of making screeds using semi-dry mixtures is used.
Working with such materials is done somewhat differently. The semi-dry mixture is laid in layers and compacted. When the level of the backfilled layer exceeds the horizontal line indicated by the beacons, the excess is removed by the rule and smoothed over with it. After a short time (1-2 hours), you can carefully walk on the screed. At this moment, the final smoothing of the surface is done with a metal trowel.
Garage floor screed
Compared with the wet method, the semi-dry method has a number of advantages:
- setting and final crystallization occur much faster;
- the laid layer is much denser, devoid of voids;
- there is no need to reinforce the material;
- There is very little shrinkage during ripening;
- the surface is stronger and does not require topping;
- the screed is flat, smooth, suitable for laying any floor covering;
- the cost of material and labor is almost identical to these indicators of the wet pouring method.
No disadvantages have yet been identified with the semi-dry method of screeding, so this technology can be called the best from the consumer’s point of view. However, building material manufacturers are developing new methods in an attempt to further optimize the process of creating a base for laying floor coverings. One of these technologies is the creation of a surface without the use of water.
Semi-dry
The mixture of semi-dry screed is evenly distributed throughout the room
The percentage composition of the components of a semi-dry screed is similar to those from which a wet screed is made.
However, the mixture differs in its moisture content. Based on the name, the amount of water in this case needs to be added by half.
As an example, we can give a composition for making a mixture in proportions of 1 to 3, respectively, cement and sand. For this you will need only 24 - 26 liters.
After the material is distributed, it is compacted
Semi-dry screed is performed as follows. The composition is evenly distributed over the previously designated area. Laying occurs in several layers, where each is compacted.
Having reached the desired level, indicated by the beacons, the excess is removed by the rule. Walking on the surface is allowed after 2-3 hours. At this time, you need to perform final leveling and smoothing of the base with a metallic brush.
Related article: How to build a garage for a car on your own
To draw a conclusion which floor screed is best suited in your situation, you need to take into account some features of the semi-dry mixture before the wet manufacturing method. First of all, we can highlight the period during which the compositions mentioned above harden. In addition, there are several other distinctive features:
- High density semi-dry method.
- No reinforcement required.
- Shrinkage occurs during the drying process.
- This screed is much easier to install; installation of a finishing layer is allowed, on which a decorative coating is laid immediately after complete drying and hardening. For instructions on installing semi-dry screeds, watch this video:
The disadvantages of the semi-dry method of pouring screed relate only to the large weight of the structure and the impossibility of installation in a thin layer. No others have been identified at this time.
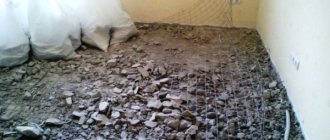
Dry screed
This technology, which was first developed by Knauf specialists, is completely different from the usual perception of the process of installing a floor subfloor. This method of creating a base involves laying gypsum fiber boards on a previously leveled and compacted backfill. The sequence of work is as follows.
- Special slats are installed on the rough screed or floor slab in one plane. They serve as beacons.
- A layer of fine expanded clay is poured between the slats and carefully leveled to create a flat surface.
- Gypsum fiber plates with connecting elements are laid on the leveled bedding, which serves as a support cushion. The slabs are glued together and additionally fastened with self-tapping screws, forming a continuous hard surface on which any finishing flooring materials can be immediately laid.
An example of laying a dry screed along beacons.
A semi-dry screed turns out to be somewhat more expensive when compared with the technologies described above. The advantages of this screed method are the following:
- there is no technological break associated with the need to dry the surface, which is necessary with other methods, which greatly speeds up the work as a whole;
- laying slabs is not complicated and less labor-intensive;
- the surface turns out the way it should be, that is, it does not require additional leveling or strengthening.
However, there is a significant drawback in this method. The fact is that gypsum fiber board, which is the top layer of dry screed, is afraid of moisture. Therefore, in rooms with high humidity, such a base for floor coverings will not be suitable. Dry screeds are good for living rooms and office spaces. For damp places it is better to choose a cement-containing mixture.
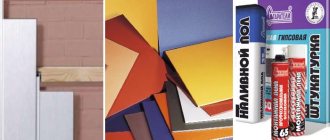
Types of self-leveling floors and their differences
In general, self-leveling floors are divided into two types: dry mixtures and polymer self-leveling floors. Dry mixes are compositions using sand and cement with the addition of polymers. Such mixtures are usually called screed mixtures due to the fact that they are used for leveling or repairing floors. Usually they are not “final” coverings, but serve as the basis for floor coverings such as linoleum, parquet, laminate and the like. The first type of self-leveling floors is dry mixtures.
The second type, that is, polymer floors, are compositions based on polymer binders (epoxy, polyurethane and others). This type of self-leveling floor already serves as a final coating. They can be used with various decorative effects, such as glitter, and are highly durable.
Self-leveling solutions
Such materials are sold in the form of packaged dry mixtures from which a working solution is prepared. The purpose of self-leveling mortars is to create a thin leveling layer on the concrete surface. The working mixture is poured onto the prepared surface and distributed over it. Due to its properties, the solution self-levels, that is, it forms an even horizontal plane. Thanks to special additives, this material quickly sets and becomes suitable for laying finishing floor coverings.
Important! It makes sense to choose such a material to create a flat surface only in cases where you need to bring an existing screed to an ideal state. The cost of self-leveling solutions, frankly, is quite high, so it is very expensive to form thick layers with such material.
Types of bases
Ready-made floor screeds can be made from cement or gypsum, and their characteristics vary accordingly. If you don’t know how to choose a mixture for floor screed, evaluate the disadvantages and advantages of each base.
The cement mixture is ideal in cases where a heated floor will be laid, or when heating cables will be laid in it. It contains additives that increase its strength characteristics.
Read here! The importance of timely replacement of filters for compressors
The disadvantage is the need to make a thick layer of screed, otherwise cracks or other surface defects may occur. After hardening, it is necessary to treat the surface to remove small protrusions.
Gypsum screed compositions are characterized by greater strength of the finished floor. Thanks to this, the layer thickness can be significantly reduced.
The positive aspects of gypsum include the absence of dust, excellent heat and sound insulation and environmental friendliness of the material. The negative aspects include poor transfer of contact with moisture. Because of this, it becomes undesirable to use gypsum floors on open surfaces and in rooms with high humidity.