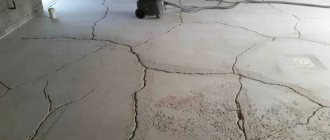
Building a house is a long-term process and includes a huge number of works in various directions. This includes the construction of walls, the construction of roofs, and a host of other types of work. One of the required stages is the rough screed. It is necessary to create a primary base, on which the finishing screed or finishing coating will then be laid. A rough floor screed does not require special qualifications of the builder, but, nevertheless, involves a large number of works associated with its creation. What types of screeds are there? What materials are needed for the job? We will answer all these questions later in the article.
Rough screed reinforced on the ground
Floor pie on the ground
Creating smooth floors in a new home is not the easiest thing. And it is the construction of a rough screed that is the main step on the way to a level base suitable for laying various types of coatings. It ensures the reliability of the base and its strength. This is a rather labor-intensive and time-consuming process, but at the same time it is financially quite economical.
Making a subfloor in a private house
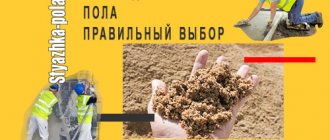
As a rule, laying the rough screed on the first floors is done directly on the ground. And most often, ordinary concrete mixture made from sand and cement is used as the base material.
Rough screed
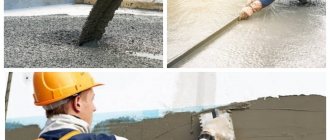
Floor screed mortar
However, the process of creating a rough screed cannot be called completely simple. The fact is that it involves laying several layers of different materials and several preparatory stages:
- soil preparation - it must be thoroughly compacted;
- laying sand and gravel mixture;
- flooring waterproofing material, insulation;
- installation of the rough screed itself;
- installation of finishing material.
Thus, the floor consists of several layers. And this design has its own name - floor pie. It may also contain a reinforcing layer. Reinforcement is necessary to increase the strength of the screed.
Footing for floors on the ground
Expert opinion
Afanasyev E.V.
Chief editor of the pol-exp.com project Engineer.
A rough screed can only be installed on dry soil. It will not be possible to create a full-fledged one in damp conditions, as problems with waterproofing may arise. Also, a rough screed can only be installed if groundwater is at least 4 m below the surface.
Installation of rough screed in a private house
Also, during the installation of the rough screed, a floor heating system and other communications can be installed inside, if necessary according to the house construction project.
In general, a concrete floor on the ground in private construction is probably the most acceptable option for creating a foundation. It is often installed inside garages, on terraces, verandas, in warehouse premises and others.
Concrete floor in garage
On a note! Most often, concrete floors on a soil base are installed where there is no severe cold in winter, that is, in the middle or southern zone of the Russian Federation. In cold regions, it is recommended to use wood to create the subfloor.
This type of foundation appeared in the country relatively recently, during a period when there was a shortage of wood building material. Previously, low-rise construction was carried out without the use of concrete mixtures - houses were built on a wooden foundation, which attracted rodents and other pests/parasites. However, now it is quite difficult to find a wooden base - creating a concrete floor is both cheaper and easier.
In the photo - crushed stone bedding
Technology for installing concrete floors on the ground
We make the floor after completing the construction of the walls and arranging the roof/floor. The actual work on constructing the structure in question on the ground consists of several technological stages, the sequence of which is given below.
Thickness of concrete floor layers
Scheme of a concrete floor made directly on the ground
First we need to set the zero level of the future floor. To do this we do the following:
- step back 100 cm from the bottom of the doorway and place a mark on the adjacent wall;
- we transfer similar marks along all the walls of the room and connect the points with a solid, straight line;
- measure 1 m down from the line and lay a new solid line. It will be the zero level. By moving this line to the required distance, we can set the required thickness of the concrete floor. For greater convenience, we drive nails into the corners of the room, guided by the marked line, and stretch a strong rope between them.
Zero level marking
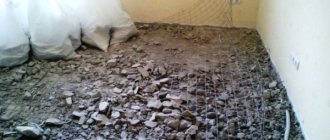
We move on to the stage of preliminary soil preparation. First we need to get rid of construction waste if there is any. Next we remove the top ball of soil. Traditionally, the multilayer structure of the concrete floor has a thickness of about 30-35 cm. We dig until the distance between the previously laid zero level line and the bottom of the pit reaches the specified value.
After this, we need to compact and level the surface. The best tool for this job is a special vibrating plate for compacting soil. If there is no such thing, we take a simple log, nail strong handles on top of it, nail a board underneath and use the resulting device to compact the soil.
Tamping tool
vibrating plate
Hand digging is never perfectly accurate. If the depth of the pit is greater than the required thickness of the future concrete structure, fill the difference with a layer of sand and compact it thoroughly.
In the photo - a log rammer
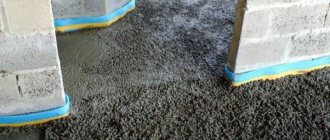
We fill in a 5-10 cm layer of gravel. We spill the backfill with water and compact it thoroughly. For greater convenience, we can first drive several rows of scraps of reinforcement or other similar material of the required length into the ground - this will make it easier for us to ensure the required backfill height. It is important that the trimmings are strictly level. After arranging each planned layer, the pegs can be removed.
The photo shows a gravel bed and reinforcement
Place about a 10cm layer of sand on top of the gravel. The pegs from the previous stage will help us control the thickness of the backfill. To carry out this activity, it is not necessary to use sifted material - even gully sand with minor impurities will do. We also compact the sand thoroughly.
Sand compaction
Place a layer of crushed stone on top of the sand. A material with a fraction of 4-5 cm is optimal. We compact the crushed stone. Pour a thin layer of sand on top, carefully level it and compact it thoroughly. If we find crushed stone with sharp protruding edges, we remove it or rearrange it so that there are no sharp corners throughout the entire plane.
Surface waterproofing
To protect concrete from the harmful effects of moisture, we use a special waterproofing membrane or ordinary polyethylene film. A material with a thickness of 200 microns is optimal. The work is carried out in an extremely simple sequence: we lay the film over the base, bringing its edges a couple of centimeters above the zero level indicated in the previous stages, lay the insulation sheets directly with a 10-15-centimeter overlap, and fix the joints with tape.
The structure can be insulated using a wide variety of materials, here is just a short list:
- expanded clay;
- mineral wool slabs;
- Styrofoam;
- rolled isolon, etc.
We lay the selected material, following the provisions of the appropriate technology, and proceed to further work.
Laying insulation
Reinforcing frame
We lay the reinforcing frame on pre-installed supports having a height of about 20-30 mm.
At the same stage, communications are laid
insulation
Example of beacon installation
Correct pouring of concrete mixture to the zero level is impossible without the use of guides. We do the following:
- We mark the surface into several equal areas no more than 200 cm wide and divide them using guides. To make them, you can use timber, boards, metal profiles or even pipes. The main thing is that the guides are laid strictly at one level, corresponding to the previously completed markings;
- we attach the guides to the floor using cement-lime mortar or other suitable method;
Beacon installation diagram - We install formwork for pouring concrete between the guides. As a result, the so-called “cards”, each of which will need to be filled with concrete in the future. Thanks to the “maps”, the pouring process will be simpler and more correct - the performer will be able to maintain the zero level, thereby creating a flat surface. The formwork itself is traditionally made of boards or moisture-resistant plywood sheets.
READ MORE: How to attach balusters to a staircase with your own hands: to the string, steps, floor
Before pouring, be sure to treat the wooden elements with special oil. Thanks to this, in the future we will be able to remove the boards from the solution without any difficulty.
A concrete mixer will speed up the process of preparing the solution
Preparing the mixture
We fill the previously created “maps” with concrete mortar. If possible, we try to fill the entire mass at once - this way we will get the most durable monolithic structure. If there is no opportunity or desire to order ready-made concrete, we make it ourselves.
cement M400 500
Pouring concrete along beacons (option without maps)
To do this, we will need a concrete mixer or a large suitable container for manual mixing, cement (we use material grades M400-500), a shovel, crushed stone, sand. We work according to the following recipe: 1 share of cement, 2 shares of sand, 4 shares of crushed stone and about 0.5 shares of water (may vary, we will guide you as you work). Thoroughly mix the ingredients until a homogeneous mixture and proceed to further work.
Leveling concrete using the rule
It is most convenient to pour from the corner opposite to the front door - in this case you will not have to walk on concrete. Fill several cards in 1, maximum 2 steps, level the solution and stretch the mixture. If you have a special vibrator, use it to compact the mixture.
Formwork around pipelines
Having filled out several “cards”, we begin to level the base. The two-meter (or longer) rule will help us with this. We install the tool on the previously mounted guides and pull it towards ourselves. This way we get rid of excess concrete.
We take out the guides and formwork from the processed “cards” (specialists usually do this a day after pouring, some do it earlier, we focus on the situation). In a similar sequence, fill the entire site with concrete. After this, cover the base with plastic wrap and leave it to gain strength for a month. During the drying process, the concrete structure must be regularly moistened with water to prevent it from cracking.
The concrete floor on the ground is ready
Finally, all we have to do is fill the screed. To do this, we use a special self-leveling mixture - the most convenient option, the arrangement of which does not require special knowledge and effort.
The leveling mixture will eliminate minor surface imperfections and allow you to obtain a perfectly level base. We traditionally start working from the corner opposite to the entrance to the room.
finishing mixture
Universal self-leveling floor OSNOVIT MASTLINE T-48
We prepare the solution according to the manufacturer's instructions, pour it onto the floor and distribute it evenly over the surface using a long rule or other suitable tool. We specify the drying time of the mixture in the instructions, usually it is 2-3 days.
Fill
The concrete floor on the ground is ready. All we have to do is lay the selected floor covering. Thanks to a properly arranged, level base, the finish will look beautiful and last as long as possible.
Now you know everything about installing a concrete floor on the ground and will be able to carry out the necessary measures yourself. You just need to follow the guide and everything will definitely work out.
Good luck!
The construction of a concrete floor is realized using the following technological operations:
- pouring a reinforced concrete slab of appropriate thickness, or compacting the soil, installing a sand-crushed stone cushion;
- reinforcement in one layer;
- pouring concrete along guides, class not lower than B22.5. The guides are arranged using an optical level. Leveling is carried out using an aluminum rule (5-7 m). Without guides they work on liquid beacons using a vibrating screed. The screed is compacted using deep vibrators;
- Grouting is carried out using concrete troweling machines when the base gains strength and can withstand the weight of a person and equipment. During the operation, the film formed as a result of hardening of the solution is removed. Work is carried out 3-6 hours after laying the solution at a temperature not lower than 20 degrees;
- second grouting and smoothing with the blades of a trowel to a mirror shine;
- distribution of care products using rollers;
- filling the seams with sealing profile materials.
Main advantages
If we consider the main advantages of creating a floor on the ground, we can identify the following.
- Simplicity of all work. Overall, creating a floor cake with the right approach only takes a few hours.
- High strength and resistance to deformation will ensure a long service life of the floor finish.
- This base has good thermal, hydro and sound insulation properties. Such a floor will not freeze critically even in cold weather, which will keep the house warm and cozy.
- One of the factors is economy. Arranging a rough screed is not as expensive as it might seem at first glance.
Subfloor on concrete floor
Thanks to all these advantages, many future home owners choose a concrete subfloor as a base, rather than one created from any other materials.
Final leveling of the concrete floor
Waterproofing a concrete floor on the ground
When installing a concrete floor, the same three base layers of the “pie” are required.
However, it requires a serious approach. This is due to the contradiction between the structure of soil and concrete: the first is mobile, and the second is monolithic. It is necessary to take into account and combine both of these factors; usually two possible methods are used.
The sequence in the first option is as follows:
- Behind the sandy part, another of fine gravel is laid. As a rough screed, the gravel is poured with a thin layer of cement and sand solution. The maximum height difference for every 2 m is 3 mm. Next, roll material is laid - two layers. More often, roofing felt or roofing felt is used for this. The joints are insulated with a gas burner.
Waterproofing materials must be free of toppings.
- After laying the thermal insulation, a finishing screed is performed.
In the second option, the first hydrobarrier is created using a polyethylene film laid on top of the sand. All joints must be insulated with tape or other impermeable adhesive-based material.
Even minimal damage is enough for the film to cease to serve as an insulator.
Next, a rough screed made from a standard cement-sand composition is laid. Its thickness is limited to 50-70 mm. Waterproofing is laid on the subfloor.
Any roll material is suitable for it - be it a membrane or roofing felt. Then, in order, thermal insulation and finishing screed. If groundwater is located on the surface, it makes sense to additionally waterproof the ground.
© 2021 prestigpol.ru
- Date: 08/26/2015Rating: 12
Waterproofing the soil base is a job that requires care and responsibility. Such floors can be installed when the soil on the site is dry, there is no groundwater or it lies deep.
It is also necessary to take into account the level of precipitation observed in the construction area. The waterproofing of the floor on the ground itself does not take much time, but concrete pouring is carried out along with it. It already takes almost a month to dry.
An example of a common mistake during construction: a leaky joint between the waterproofing of the floor on the ground and the horizontal waterproofing of the foundation wall.
The advantages of such floors are:
- Lack of work on laying large and massive slabs and beams. The floor is simply poured with concrete. The resulting surface is high quality and durable.
Scheme for applying liquid rubber.
Of the minuses, it should be noted that the soil requires careful preparation. You can’t just start working on land if it’s not brought into compliance with all the requirements. Laying a concrete floor on the ground can be done using various methods, but the most acceptable of them remains the following:
- The soil base is thoroughly compacted, after which a layer of sand bedding is made. The second layer is expanded clay or crushed stone of small and medium fractions. The floor is directly waterproofed. After this, a rough concrete screed is laid. A layer of vapor barrier material is added. A heat insulator is installed. Reinforcement and finishing concrete are carried out. screed. The selected floor covering is laid, but only after the concrete has completely dried.
This course of work is considered optimal. Even without much experience, you can make such a floor with your own hands, without resorting to the services of specialists.
Types of rough screed
Rough screed, like regular screed, can be of different types. It all depends on the installation technology and materials used. It can be performed using both dry and wet methods.
A dry floor screed is a kind of multi-layer cake, where the layers are vapor barrier (or waterproofing) material, expanded clay or sand, which acts as a dry “cushion”, as well as any leveling material such as chipboard, OSB, plywood or gypsum fiber, depending on the wishes of the future owner Houses. Often the material can be laid not in one, but in two layers, with individual sheets fastened with self-tapping screws.
Backfilling dry screed along beacons
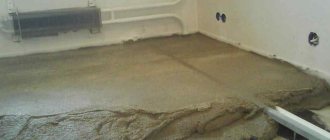
A wet screed is made on the basis of a cement-sand mixture, which will be poured on top of previously laid other layers and carefully leveled. A waterproofing layer and insulation can be laid under it, and a sand cushion is mandatory.
Wet floor screed
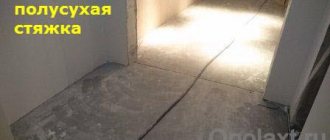
On a note! There is also a semi-dry screed. If in the previous version the mixture during preparation and use will resemble the consistency of sour cream, then in the version with a semi-dry screed it will look like wet sand.
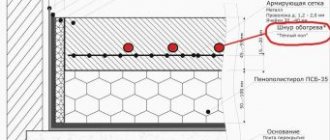
Semi-dry screed over heated floor
Nuances of reinforcement of concrete floors
For concrete floor structures that will bear high and ultra-high loads, it is better to choose metal reinforcement. The diameter of the rod is determined depending on operating conditions and loads. In practice this is 6-12 mm. The most common cell size is 10*10, 20*20 mm.
The reinforcing mesh can be tied into a single system using knitting wire or welding. Both options work successfully in ground screeds. Current standards allow the installation of mesh in two layers. The cost of reinforcement depends on the mesh size, material consumption, and rod diameter.
READ MORE: Installation of beacons for floor screed
Ready-made wire mesh is available in sheets and rolls. The base is wire of class VR-1 and d 2-6 mm. The material is suitable for constructing rough screeds under moderate load conditions. Cell sizes can vary between 50*50 – 200*200 mm.
Principles of working with metal reinforcing mesh:
- Regardless of the technology used, the mesh must be placed in the thickness of the concrete. This will protect the steel from corrosion;
- the base is cleaned of peeling, dirt, dust;
- discovered cracks must be expanded, dust-free, treated with primer and sealed with repair mortar;
- the base is primed in 2-3 working approaches;
- hydro- and soundproofing flooring is carried out with gluing of overlaps and going onto the walls;
- markings are made using a level;
- the reinforcing mesh is laid on supports so that the material is in the body of the concrete, observing an overlap of one cell;
- the joints are tied with knitting wire;
- Beacons are mounted on top of the reinforcement layer using metal U-shaped profiles;
- a solution is laid out between the beacons, and alignment is carried out using the rule;
- When the concrete has set, the guides are dismantled and the resulting voids are filled with mortar.
The screed is protected by a covering material and is protected for 5-7 days
Features of reinforcement with plastic mesh
If the concrete structure is installed on floor slabs and too high loads are not expected, it makes sense to turn to plastic reinforcing mesh. This is the optimal solution for strengthening screeds up to 80 mm thick, including when implementing self-leveling systems and heated floors.
The advantages of such materials are much lower weight compared to steel and high elasticity. Plastic is capable of stretching, which helps maintain the integrity of the structure during shrinkage processes.
The material is sold in rolls at an affordable price (from 120 rubles/sq.m.). You can count on convenient transportation, installation, cutting. Plastic is not subject to corrosion and is resistant to aggressive environments. The reinforcement technology is identical to the previous one.
Features of the use of fiberglass materials
Only fiberglass that has been treated with a special impregnation works with concrete. This prevents the destruction of the material in an alkaline environment, which is typical for cement mortars. The most common reinforcing meshes are woven on the basis of aluminoborsilicate glass.
If we talk about the advantages, they are identical to their polypropylene counterparts. The scope of application is the same as that of plastic mesh. Fiberglass is an easy to transport, lightweight, elastic material, but it does not withstand high temperatures (maximum 200 degrees) and is unsuitable for areas with an increased risk of fire.
Features of volumetric reinforcement
The basis of such reinforcement is a mixture of fibrous materials. It can be polypropylene, metal, basalt, fiberglass. The material is introduced into the concrete formulation during the preparation of the solution. After the screed gains strength, a monolithic coating is formed that is minimally susceptible to cracking.
The choice of material type is based on the purpose of the screed. Thus, lightweight structures require polypropylene and fiberglass. For higher loads, it makes sense to pay attention to metal varieties. If the structure will be used in difficult conditions or in the open air, basalt fiber is used.
When mixing the solution, the fiber is poured at the stage of mixing the dry components, after which mixing with water is carried out. The composition is laid out on the base and aligned along the guides. Volumetric reinforcement is easily combined with traditional reinforcement.
Schemes of the rough screed device
Depending on the level at which the groundwater lies, as well as depending on the ground level and the position of the screed relative to the foundation, several types are distinguished.
Table. Types of arrangement of rough screed.
| Type of screed | Description |
| Screed below ground level | This method is used if it is planned to arrange food storage rooms or warehouses under the floor. In this case, the screed is located below the ground level, adjacent to the foundation. |
| Screed at ground level | Can be used both in industrial construction and in the construction of residential low-rise buildings. The screed is located at ground level and adjacent to the strip foundation. |
| Screed above ground level | In this case, the screed is mounted above the foundation level; it is most effective and advisable to use it in places where groundwater lies quite close to the surface, in areas where the risk of floods and streams is high. |
In general, there is no universal scheme for arranging a screed - depending on the design of the house, it can be carried out in any of the above options. However, it is important to accurately design the location and level of doorways before construction begins, so that you do not have to correct mistakes later.
Three-layer screed
Foundation preparation process
All work on arranging a rough screed begins with careful preparation of the soil base. To begin with, it is important to identify the highest and lowest points, taking into account the level of the soil and the evenness of its surface. A laser level will help determine their values. This procedure is necessary in order to evaluate for yourself the entire scope of work, as well as determine how much building materials may be required.
It is also important to pay attention to thoroughly compacting the soil. To do this, you can use special construction equipment - for example, a roller or vibrator. The procedure is necessary so that in the future the soil does not sag significantly and this does not lead to cracking of the rough screed, which will undoubtedly negatively affect the finishing floor covering.
Pneumatic rammer for soil compaction
After the soil has been thoroughly compacted, a sand and gravel cushion is laid. It can also be made of clean, washed and river sand. The thickness of this layer should not be more than 60 cm. In the latter case, a layer of gravel or expanded clay is also poured on top, which will make it possible to create a more durable base.
Attention! Before the soil is compacted, it is important to cut off the entire fertile layer, if any. It can be found in a more worthy use than burial under the house. The soil layer is removed approximately 35 cm.
It is also recommended to fill the pillow not all at once, but in layers - for example, 20 cm each. In this case, each layer is well compacted separately. The procedure will make the base as dense as possible. Before compacting, the pillow is moistened with water. The thickness of the expanded clay layer can be at least 10 cm. This layer is also compacted separately.
Expanded clay backfill
Prices for popular models of electric vibratory rammers
electric vibrating rammer
Layer of rough screed and waterproofing
Another important step when creating a rough screed is its waterproofing. If it is neglected, then the moisture seeping from the soil will “undermine” the concrete screed and as a result the foundation will become unusable and collapse, or at least will last for a very short period of time.
For waterproofing rough screeds, roll materials are usually used - others will be ineffective in this case. The ideal option is to use rolled bitumen material or a waterproofing membrane. Less commonly, but still used, dense polyethylene. The material must be laid in one large piece. If it is necessary to form joints (in the case of large areas), then they are carefully sealed - soldered or taped with construction tape so that water has no chance of penetrating to the base.
Waterproofing the floor before screed
Attention! The waterproofing material should not have defects - holes, otherwise it will not fulfill its role.
It is important to lay the waterproofing material in such a way that it extends 15-20 cm onto the walls. If necessary, after laying the finishing screed, the excess can be cut off. If the waterproofing material cannot be laid for some reason, then the final screed must be treated with coating materials that can resist moisture and retain it.
Coating waterproofing
Construction of a floor on the ground. The groundwater level should be no closer than 2 m to the floor pie
Concrete floor on the ground
| Fig.4. Floor construction on the ground.1 - Concrete preparation; 2 - Hydro-gas insulation; 3 and 4 - Thermal insulation; 5 - Floor screed with a "warm floor" system; 6 and 7 - Finish floor; 8 - Separating edge layer. |
Floors on the ground are a multi-layer structure, Fig. 4. Let's go through these layers from bottom to top:
- A material is placed on the soil cushion that prevents moisture contained in freshly laid concrete from filtering into the soil (for example, a plastic film with a thickness of at least 0.15 mm). The film is applied to the walls.
- Along the perimeter of the walls of the room, to the total height of all layers of the floor, a separating edge layer of strips 20 - 30 mm thick, cut from insulation boards, is fixed.
- Then a monolithic concrete preparation of the floor with a thickness of 50-80 mm is arranged. from lean concrete class B7.5-B10 to a crushed stone fraction of 5-20 mm. This is a technological layer intended for gluing waterproofing. The radius of concrete contact with the walls is 50-80 mm. Concrete preparation can be reinforced with steel or fiberglass mesh. The mesh is laid in the lower part of the slab with a protective layer of concrete of at least 30 mm. To reinforce concrete bases, steel fiber with a length of 50-80 mm and a diameter of 0.3-1 mm can also be used. During hardening, the concrete is covered with film or watered. Read: “Composition and preparation of lean concrete class B10”
- Welded waterproofing is glued onto the hardened concrete floor preparation. Or two layers of rolled waterproofing or roofing material on a bitumen basis are laid on mastic with each layer placed on the wall. The rolls are rolled out and joined with an overlap of 10 cm. Waterproofing is a barrier to moisture and also serves as protection against the penetration of ground gases into the house. The floor waterproofing layer must be combined with a similar wall waterproofing layer. Butt joints of film or roll materials must be sealed.
- Thermal insulation slabs are laid on the hydro-gas insulation layer. Extruded polystyrene foam will probably be the best option for insulating floors on the ground. Foam plastic with a minimum density of PSB35 (residential premises) and PSB50 for heavy loads (garage) is also used. Polystyrene foam breaks down over time upon contact with bitumen and alkali (these are all cement-sand mortars). Therefore, before laying foam plastic on a polymer-bitumen coating, one layer of polyethylene film should be laid with an overlap of sheets of 100-150 mm. The thickness of the insulation layer is determined by thermal engineering calculations.
- An underlying layer (for example, a polyethylene film with a thickness of at least 0.15 mm) is laid on the thermal insulation layer, which creates a barrier to the moisture contained in the freshly laid concrete floor screed.
- Then a monolithic reinforced screed with a “warm floor” system (or without a system) is laid. When heating floors, it is necessary to provide expansion joints in the screed. The monolithic screed must be at least 60 mm thick. made from concrete of class not lower than B12.5 or from a mortar based on cement or gypsum binder with a compressive strength of at least 15 MPa (M150 kgf/cm2). The screed is reinforced with welded steel mesh. The mesh is placed at the bottom of the layer. Read: “How to properly make a concrete floor screed.” To more thoroughly level the surface of a concrete screed, especially if the finished floor is made of laminate or linoleum, a self-leveling solution of factory-made dry mixes with a thickness of at least 3 cm is applied on top of the concrete layer.
- The finished floor is installed on the screed.
This is a classic ground floor. Based on it, various design options are possible - both in design and in the materials used, both with and without insulation.
Option - concrete floor on the ground without concrete preparation
Using modern building materials, a concrete floor on the ground is often made without a layer of concrete preparation. A layer of concrete preparation is needed as a basis for gluing roll waterproofing on a paper or fabric base impregnated with a polymer-bitumen composition.
In floors without concrete preparation, a more durable polymer membrane specially designed for this purpose, a film 0.4 - 2 mm thick, is used as waterproofing, which is laid directly on the ground pad.
If slabs made of extruded polystyrene foam with profiled joints are used to construct a thermal insulation layer, then such slabs can be laid directly on the ground backfill. In this case, the polymer waterproofing film is laid on top of the insulation layer.
It should be noted that in residential premises floor insulation is mandatory.
Effective thermal insulation material
| Photo | Name | Rating | Price | |
| #1 | Extruded polystyrene foam | ⭐ 99 / 100 | More details | |
| #2 | Penolast | ⭐ 97 / 100 | More details | |
| #3 | Expanded clay | ⭐ 96 / 100 | More details | |
| #4 | Basalt wool | ⭐ 80 / 100 | More details |
In order to make the floors as warm as possible, it is important not to skip the thermal insulation stage. Expanded clay, basalt wool, and polystyrene foam are used as materials that help retain heat. Laying the material is simple - slabs or layers of any of them are mounted end-to-end, without gaps, on a surface insulated from water. In this way, it will be possible to obtain a base that maximally retains the heat that tends to leave the house.
Attention! After laying the insulation material, it is recommended to lay another layer of waterproofing. This will allow you to fill the screed evenly and protect the insulation as much as possible from getting wet in the event of flooding. Wet insulation often loses most of its properties.
Using polystyrene foam for floor insulation
Extruded polystyrene foam
The most convenient and simplest option is polystyrene foam. In addition to its thermal insulation functions, it makes floors stronger. It is obtained by mixing granulated polystyrene and a special foaming agent at high temperatures and created pressure, followed by extrusion from the extruder.
Extruded polystyrene foam
pros
- good thermal insulation;
- low water absorption rate;
- low vapor permeability;
- durability;
- ease of installation.
Minuses
- high price;
- flammable material.
Penoplex for floors
Styrofoam
Polystyrene foam can also be used as insulation. In this case, PSB50 grade material is used for garages and warehouses, and PSB35 is used for residential premises.
Brands and characteristics of foam
It is important to protect polystyrene foam from contact with cement, which can destroy the material. To do this, the foam must be covered with plastic film.
pros
- low cost;
- good thermal insulation;
- light weight;
- long service life;
- is not a medium for the development of microorganisms and fungi;
- ease of installation.
Minuses
- subject to mechanical damage;
- when burning, releases toxic substances;
- hygroscopic;
- afraid of sunlight;
- we love rodents;
- unstable to solvents.
Styrofoam
Expanded clay
This material consists of small granules with low mass, which is achieved thanks to the ubiquitous pores. Expanded clay is a heat insulator that meets environmental standards.
Expanded clay
pros
- environmentally friendly material;
- good heat and sound insulation properties;
- light weight;
- resistant to fire;
- long service life;
- easy installation.
Minuses
- a thick layer of insulation “eats” the height of the room.
expanded clay
Basalt wool
Basalt insulation (or rock wool) is an insulation based on ordinary mineral wool, but basalt rock is used as a filler.
Basalt wool
pros
- environmentally friendly material;
- excellent thermal insulation properties;
- non-flammability;
- durability;
- resistance to rodents and insects;
- easy installation.
Minuses
- tends to absorb moisture, which is why waterproofing measures must be carried out especially carefully.
stone wool
Reinforcement
Reinforcement is an additional strengthening of the rough screed by laying a reinforcing mesh in it. This material, created from metal rods or plastic, can significantly strengthen the base and allow it to withstand maximum loads. The mesh is laid on top of the previously installed layers on small supports, so that when pouring the screed, it appears to be inside the cement-sand mixture, and not under it. If the mesh has not been raised, it will not perform its functions of strengthening the base. The approximate height of raising the mesh level is about 2-3 cm. It is recommended to use a mesh with a cell size of no more than 10x10 cm. The smaller the cell size, the stronger the base will be, this is especially true for plastic mesh, which is also often used in construction.
Reinforcement and laying of damper tape around the perimeter of the floor
How to reinforce a floor screed
Fiber fiber for concrete screed - replaces metal mesh reinforcement
Calculator for calculating the amount of ingredients of a mortar for floor screed
Go to calculations
Technique for installing a concrete foundation on soil
Before laying the rough screed begins, it is important to ensure that you acquire all the necessary materials and tools. It can be:
- expanded clay and sand;
- cement mixture;
- slats for lighthouses;
- waterproofing and insulating materials;
- rule;
- building level;
- spatulas;
- container for mixing the mixture;
- construction mixer;
- shovel;
- reinforcement mesh.
Instructions for making a rough floor screed on the ground.
Step 1. The soil base is thoroughly leveled. The top fertile layer of soil is removed, the remaining one is brought to a horizontal state.
Ground leveling
Step 2. The base is compacted. The procedure can be carried out manually or using special equipment. The main thing is that the soil is compacted as much as possible.
Soil compaction
Step 3. A sand and gravel cushion is created on the soil surface, which is also carefully compacted. After this, a layer of waterproofing is laid. In this case, dense polyethylene is used. A reinforcing mesh is laid on top of it with an overlap of 2 cells.
Laying reinforcing mesh over polyethylene film
Step 4. Beacons are installed. They are necessary in order to bring the screed to a perfectly flat horizontal level as conveniently and accurately as possible. The beacons are installed at a distance of approximately 50 cm from each other and fixed.
Examples of installing screed beacons
Two mistakes at once: the reinforcement lies on the floor surface, and the beacons are installed on gypsum mortar
Usually securing is done using small piles of mortar, but they can be secured in other ways. Beacons must be strictly level.
Installation of beacons
Attention! The distance between beacons should not be greater than the length of the rule. It is by laying on them that the rule will move and level the building mixture.
Step 5. A damper tape must be glued along the perimeter of the walls, which will act as a kind of compensator in the event of thermal expansion of the screed and will not allow the base to crack.
Laying damper tape around the perimeter
Step 6. Mix a solution of cement, sand and water using a construction mixer. Next, the solution begins to be laid out on the previously prepared layers.
The prepared solution is laid out
Step 7. Before the mortar completely covers the reinforcing mesh, it is raised slightly above the waterproofing layer by using small supports or piles of mortar.
The reinforcing mesh is raised
Step 8. The solution is evenly distributed over the waterproofing layer and mesh.
Solution distribution
Step 9. Using a rule laid on two adjacent beacons, the solution is leveled, if necessary, its excess is removed, and the shortage is replenished.
Leveling the solution using the rule
Step 10. The entire base is poured in the same way. After the cement mortar has set a little, its evenness is checked using a building level.
Checking the evenness of the base
The screed will dry for about 28 days
Important! The drying time for the screed is 28 days. Until this time has expired, no further work can be carried out.
Now the screed should dry well. During the first days, it is recommended to moisten it with water so that it does not dry out and cover it with polyethylene. It is then dried under natural environmental conditions.
Screed technology
In order for the future screed to be as reliable and durable as possible, it is necessary to follow the technology for laying each layer and adhere to the established proportions.
Preparation
At the preparation stage, it is necessary to get rid of the fertile part of the soil that cannot be compacted. You also need to remove the roots of plants located along the perimeter of the tape.
The depth of soil removal is determined by calculations. Next, the base is compacted, where a sand-crushed stone cushion will be formed. Thanks to high-quality compaction, it is possible to achieve the correct geometry of the base without shrinkage of the building.
READ MORE: Floor leveling beacons: types and installation rules
First of all, you need to lay out a layer of sand 10-15 cm thick and tamp it with a vibrating plate. Then the soil is spilled with water from a hose with a sprayer and compacted again, changing the location of the movements of the vibrating plate.
To compact the base of the sand and crushed stone layers, you can use a homemade tool: take a wooden beam with a cross-section of 20x20 cm and a height of 1.5 m or a metal pipe with a piece of channel (20x30 cm) at the bottom. A sand mixture is placed in the pipe, which makes the device heavy.
After waiting for the compacted base to dry, you can proceed to filling and compacting sand.
Footing
Before pouring the main concrete mixture, it is recommended to apply a footing. There are different options for its manufacture: compacted crushed stone, which is shed with bitumen, or a rough screed. In the first case, the surface is additionally covered with a waterproofing layer, which gives it the appearance of a trough. But regardless of the method used to install the footing, its task is as follows:
- Uniform distribution of the mixture over a flat surface contributes to economical consumption of material.
- Carrying out work on marking, installing beacons and assembling structures on a level base will become faster and more convenient.
- The footing provides effective waterproofing, preventing water from leaking out of the solution. This solution promotes proper drying and further hardening of the screed without the appearance of deformations and cracks.
- If groundwater lies high, the footing will prevent moisture from entering the floor structure.
It is customary to use available concrete as a material for arranging the footing. For insulation, use two layers of thick film or roofing felt.
To implement high-quality concrete footings, you must adhere to the following recommendations:
- Since the layer of crushed stone insulation from cement laitance is placed on crushed stone, you need to move over it with the utmost care to prevent the film from breaking.
- Installation of dense polyethylene should be done in 2 overlapping layers with an allowance of about 10 cm, gluing the joints with tape.
- The materials used must have a high degree of water and vapor barrier.
- The installation procedure involves placing the edges of the canvases along the perimeter of the building onto the base walls by 10-15 cm.
If the area has loose soil and the groundwater level is high enough, the thickness of the footing is increased by placing roofing material or film on compacted sand.
To get a flat surface, it is recommended to fix beacons, which will be used to level the mixture according to the rule. The screed is created using traditional technology - by pouring and stretching a mortar made from crushed stone, cement, sand and water. When the screed is dry, it needs to be coated with bitumen.
Roll material
When arranging a concrete base for a floor, roll materials are often introduced, which provide a high degree of waterproofing.
- Cardboard - roofing felt, rubemast.
- Polyester.
- Fiberglass.
- Fiberglass.
Bitumen is often used as a good insulating layer on a strip foundation with floors on the ground. The material is characterized by increased waterproofing properties and prevents the penetration of groundwater into the layers of the floor covering.
If the soil layer is loose and unstable, a permanent foundation will be needed. When figuring out how to make it yourself, you need to adhere to the following recommendations:
- First of all, the highest point of groundwater is determined - the footing should be made to this level.
- Using a shovel, you need to level and level the soil.
- Sand is placed at the bottom of the recess and distributed evenly.
- A film or roofing felt is placed on top.
- Using thin reinforcement, you need to arrange a “cage” with cells 60x60 cm.
- For more convenient stretching of the mixture, beacons are installed.
- Next, cement, sand, crushed stone and water are mixed until a uniform consistency is obtained.
- After this, the solution is poured and then distributed over the working area.
- After waiting for the solution to dry, it is covered with bitumen.
Waterproofing
Having completed the installation of the concrete base, you should begin laying the waterproofing material - film or roofing felt. The second option is placed overlapping with an allowance width of 3 to 5 cm. To achieve sealing of the joints, it is recommended to use a hair dryer. The places where the waterproofing adheres to the walls need special attention.
For effective waterproofing, roofing felt is laid in two layers.
Thermal insulation
When installing the floor on a strip foundation, it is necessary to ensure the presence of high-quality thermal insulation. In most cases, extruded polystyrene foam is used in its quality. With a thickness of 5 cm, it has the same thermal insulation properties as expanded clay with a thickness of 70 cm. The material also has a zero water absorption coefficient and high strength characteristics.
To insulate the screed, it is customary to lay 3 cm thick polystyrene foam in 2 layers - with its help, effective protection against the appearance of cold bridges will be obtained, and the degree of thermal insulation will be improved. The joints between the plates are glued using tape.
An indispensable step in arranging a floor on a strip foundation is the installation of a damper and reinforcing layer. It involves fixing a damper tape 15-20 cm wide to the walls of the building. The lower part is attached to the insulation using tape.
As the screed dries, it will begin to increase in size, and the damper layer will prevent the appearance of cracks and displacement of the heat-insulating layer.
To implement the reinforcement, a metal mesh with 10x10 cells is used, placed on special supports. It is important to make sure that it is 1-2 cm above the insulating layer.
Finishing screed
To make temporary beacons, metal profiles are used, fixed in cement mortar with gypsum additives. The guides are located in the same plane, and the pouring and leveling of cement is carried out taking into account the markings on the walls.
For the screed to dry completely, you need to wait 28-30 days. During this time, do not remove the plastic film, but do not spill the surface of the screed with water. After completion of the screed arrangement, it is leveled with self-leveling compounds.
The organization of a dry screed involves the installation of guide profiles. The first one is installed near the wall, and the rest are installed at a distance of 1.5 m from each other. The profiles must be secured parallel to each other. If they are higher, you will need to place planks or pieces of slab under them. The supports under the profiles are placed at a distance of 70 cm.
When starting to lay sheets, you first need to pay attention to the space near the door. During the hardening stage of the screed, it is better not to walk on it, but to move around the perimeter, you should place sections from the slabs.
The sequence of actions when arranging a dry screed includes the following steps:
- To place the first sheets evenly, you will need to trim the folds.
- The role of a waterproofing material can be performed by polyethylene film or moisture-resistant plywood.
- After completing the installation of the dry screed, the beacons must be removed. Otherwise, they will harden firmly in the cement composition.