What is the minimum layer of floor screed that can be used?
The concrete surface, which is called a screed, serves as the basis for the final finishing of the floor in apartments and houses, both old and recently built. To make your own flooring, you need to find out what building materials you need to purchase and in what quantity. You should also determine how many cm the floor screed should be.
How to properly screed a garage floor
A screed is a leveling layer on top of a floor slab made of sand concrete, self-leveling floor or gypsum fiber board panels on top of expanded clay chips (dry). Dry screed is not designed for intense loads from the weight of the car, so it is not used in garages.
To save the construction budget, the floor screed in the garage is made from a cement-sand mixture using a wet or semi-dry method over the floor on the ground. If the budget is sufficient, a self-leveling floor screed can be used to serve as a finishing coating.
Wet screed technology for garage
Before screeding the floor in the garage using these technologies, it is necessary to achieve a rational combination of quality and finishing budget. In principle, for a garage there are several options for economical screed depending on the floor/floor design:
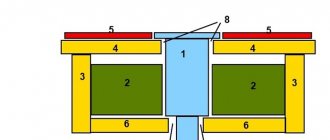
- the room does not have a cellar - a floor on the ground is the cheapest; a screed is needed for leveling before laying the floor covering (tiles, porcelain stoneware); A garage without a cellar and an inspection hole.
- the ceiling of the cellar is located 0.5 - 1 m below the ground surface - a layer of soil is necessary for thermal insulation of the cellar in an unheated room, the technology is similar to the previous case (nowadays, instead of a layer of soil, extruded high-density polystyrene foam is often used); The cellar is covered at a depth of 0.7 m .
- the cellar is covered with slabs at the zero level - used only in heated garages, you can use a wet, semi-dry leveling screed or a self-leveling self-leveling floor; The cellar floor slab serves as the garage floor.
Primary requirements
The screed layer in the entire floor structure performs a certain list of functions. With the help of this layer, the dynamic and static strength of the flooring is ensured, and also creates a smooth surface necessary for high-quality laying of tiles, laminate or linoleum. The screed allows you to evenly distribute the load on those layers of the floor that are located under it, thereby extending their service life. With the help of a screed, they not only level the floor, but also create slopes provided for by the renovation project.
The screed in a living space must be strong enough to withstand the physical stress that occurs as a result of arranging furniture and moving people living in it around the room. The screed layer must be equally dense over the entire floor; any voids inside it, as well as chips and cracks, are not allowed. If the room is not specifically designed to have a floor with a slope at a certain degree, then in standard cases the surface after pouring should be horizontally flat with a maximum slope of 0.2%.
The thickness of the screed has a direct relationship with the service life and strength of the floor structure. There is no specific figure indicating the optimal thickness of the subfloor. The thickness of the fill depends on the room in which the renovation is being carried out, what loads the floor is intended for, and what type of soil is used as the base. Both the choice of screed thickness and the choice of cement brand for pouring it, the use or absence of reinforcing elements during the work depend on these indicators.
Most common mistakes
Self-leveling mixtures, when used correctly, provide excellent preparation of floor surfaces. We will list a few of the most common mistakes; this knowledge will help you avoid annoying mistakes.
- Wrong choice of mixture.
Some craftsmen inattentively read or misunderstand the manufacturer's instructions. You need to know that there are no universal materials for all types of coatings; manufacturers produce a wide range of products, each with its own specific application. It is strictly not recommended to use gypsum-based mixtures under piece parquet or linoleum. A wide range allows you to choose a self-leveling mixture for any type of coating and base - Negligence in preparing the foundation.
Grease stains, dust, paint residues, unused putties or cement-sand mortars can cause the mixture to peel off. Especially often, cement laitance that appears after pouring foundations with liquid concrete is not removed from the surface, and it has very low adhesion values. Surface preparation is important - Applying the mixture without primer.
Unfortunately, such an elementary mistake occurs quite often. It must be remembered that the primer performs several functions: it increases adhesion, binds dust and reduces the rate of moisture absorption. The leveling mixture is thin; if water is quickly removed, chemical reactions cannot occur under favorable conditions. As a result, there is a sharp decrease in physical strength indicators. Primer of the base is a must when leveling the floor - Work alone.
The technology for working with mixtures provides for quick coverage of the entire area. The master should work with the floor, and his assistant should prepare a new portion of the mixture as it is used. Otherwise, the solution will lose its fluidity, the floor will not be leveled properly, and a sharp boundary will remain between the old and new composition. With a large amount of work, you can’t do without an assistant - Topcoats are not taken into account.
Not only the magnitude, but also the nature of the forces on the surface largely depends on them. For example, glued boards evenly distribute point loads over a large area, but linoleum does not have this property. One more nuance. Ceramic tiles are laid on cement adhesive, and it only requires a base of the same material. When choosing a leveling mixture, you need to take into account the type of finishing coating - There are no technological breaks between different operations.
Many people believe that if the surface is hard, work can continue. This is a big mistake; the next stage of installing coatings can only begin after the mixture has completely hardened. Finishing work can only begin after the base has completely dried. - Conditions have not been created for the normal course of solidification processes.
The rooms have drafts, high temperatures, and some areas are heated by the sun's rays. When drying the floor, it is necessary to exclude drafts and uneven heating of the surface
Always follow professional recommendations; there is no need to invent new technologies. Scientists worked on the development of each material for a long period of time, conducting various laboratory tests with changing conditions and technologies. Recommendations are written only after a thorough study of the issue.
Possible defects in floor leveling due to technology violations
Deep penetration primer
READ MORE: Glue for plywood on screed than to glue on a concrete floor
Optimal screed thickness
How thick the floor screed should be, its type, and the required mixture composition depend on the following factors:
- the presence of unevenness and differences in height of the base base;
- what exactly the mixture is poured onto (on the floor slab, on the insulation layer or on the pipes - in the case of a heated floor);
- what kind of coating the surface is being prepared for;
- characteristics of the room (floor load, humidity, temperature, etc.).
Basic base
The more significant the unevenness and height difference, the thicker the layer of mortar is needed. For minor defects, the minimum thickness of the floor screed will be 20 mm. If you have to deal with large differences (more than 60 mm), then there is no need to talk about the minimum thickness. In this case, it makes sense to make a solution from a mixture of coarse sand, cement and water; its height will vary from 100 to 150 mm.
Thin floor screed on a concrete base
The screed performs the function of uniformly distributing vibrations and loads that arise during operation. A smooth surface is of great aesthetic and functional importance when laying the finishing coating.
When performing repair work, you need to correctly calculate the dimensions of the base, in particular, the minimum thickness of the floor screed should be more than 2 cm, and the maximum should not exceed 7 cm. Let’s consider the principle by which the thickness of the cement-sand screed is calculated, its functions and do-it-yourself installation .
What to consider when calculating layer thickness
It is important to find a middle ground and make the screed neither thin nor thick
The height of the screed affects the performance characteristics of the floor. Too small a layer thickness will not provide sufficient sound insulation, heat conservation and strength.
Excessive thickness will create additional load on the slab, which can lead to an emergency condition. For the durability of the coating and rational consumption of materials, the optimal thickness of the concrete screed must be correctly calculated.
What you need to pay attention to when calculating:
- Functional purpose of the room.
- Materials used for installation of the subfloor. If the concrete base is poured onto a thermal insulation layer, its thickness must be at least 4 cm.
- Condition of the slab. If it is located on a slope or has differences in height, then you will have to make a thicker layer. If the height differences are small, the screed must be at least 2 cm, and it is poured using reinforced mesh to prevent cracking of the base.
- The finishing coating that will be laid after the screed is installed.
- If a warm floor is installed, in this case the thickness depends on the type of heating elements used.
When pouring a cement screed, you do not need to be guided by the principle “the thicker the better.” If the screed is mounted on a wooden base or ground, its thickness should be 4-5 cm.
If a warm floor with water heating is poured, then the screed is poured 3 cm above the pipes.
Disadvantages of a thick base
During the work, it should be taken into account that a layer that is too thick has disadvantages:
- high consumption of materials;
- an increase in the thickness of the floor leads to a decrease in the height of the room and an increase in additional load on the slab;
- long drying of the floor screed.
The thicker the concrete layer, the greater its expansion coefficient when exposed to high temperatures. If the correct thickness of the expansion joint is not provided, the concrete base will put pressure on the walls as it expands, which will eventually lead to their deformation. When constructing a screed without the use of reinforced elements, the thickness of the concrete should be from 4 to 7 cm.
Types of screeds
The type of screed is selected depending on the factors described above. To make a choice, consider the characteristics of all types of subfloors.
Types and characteristics of screeds in the table:
No. Type of screed Characteristics
| 1 | Concrete | It is used to level the slab, filled with a solution of 1 part cement and 3 parts sand. Add the dry ingredients to the water and mix well. Dries in 28-30 days. |
| 2 | Using self-leveling mixture | They are used for differences in height up to 3 cm; the advantage is ease of installation and drying of the base within 3-5 days. |
| 3 | Floating base | It is called so because the concrete layer is laid on the heat-insulating material through a layer of polyethylene film and has no adhesion to the slab. Thermal insulation is laid on a flat base to avoid cracking of the insulation. |
| 4 | Dry screed | It is used when there are differences in height of 3-5 cm, if the slab cannot be loaded, it performs the function of thermal insulation, and is mounted using expanded clay, on which we lay leveling materials. |
| 5 | Concrete screed poured onto a layer of expanded clay | Significantly increases heat retention and reduces the load on the stove. |
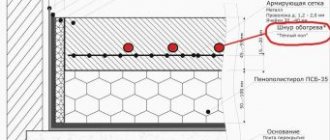
When installing any type of base along the entire perimeter of the room, you need to stick a damper tape on the wall, which serves as an expansion joint when the screed expands/narrows.
The thickness of the tape should be equal to the thickness of the base from the slab to the finishing coating.
Do-it-yourself concrete screed installation
When installing any type of base, the first step is to prepare the base and calculate its thickness.
Preparing the stove
Large cracks are widened, the edges are cleaned and filled with concrete.
Preparation of the base is mandatory when installing the screed. This procedure includes several stages:
- We remove all peeling building materials from the ceiling and inspect for defects.
- We widen cracks more than 1 mm wide using a grinder, clean their edges from exfoliated concrete, remove dust, moisten them generously, and fill them with cement-sand mortar.
- After the cement has dried, remove construction dust from the coating using a powerful vacuum cleaner (the presence of dust significantly reduces the adhesion of materials).
- We cover the surface with two layers of primer with an application interval of 4 hours.
- Along the perimeter of the room we glue a damper tape to the walls, which serves as an expansion joint when the cement mortar expands during drying and will protect the neighbors below from water leakage during installation work.
Why can't you make a screed that is too thin?
You can save on materials for the screed by making it as thin as possible, but you need to keep in mind a few important points:
- Too small a layer as a result of rapid evaporation of moisture can lead to cracking or poor adhesion to the base.
- A thin screed can be damaged if massive objects fall on the floor.
- Insufficient fill thickness when installing heated floors will not be able to ensure high-quality heat distribution.
Tip: you can reduce the thickness of the screed without loss of quality by adding plasticizers to the solution. For these purposes, you can use tile adhesive, PVA, detergents and lime.
Leveling the floor with a thin-layer semi-dry screed
Thin-layer floor screed is an uncompromising technology for leveling large (and not only) differences with the ability to reach “zero” at the top point of the base. This is a contact type of floor.
The essence of a thin-layer screed is that the cement-sand mortar is glued to the base with adhesive mixtures - this makes it possible to make ultra-thin screeds with a thickness of 1 mm (it all depends on the fraction of aggregate and sand).
Thin-layer screed technology allows the use of cheaper materials than when pouring ready-made self-leveling mixtures. At the same time, the resulting quality and alignment accuracy are much higher.
The content of the article:
Acceptable dimensions for different types of screed
Based on the thickness of the screed, rough coatings are conventionally divided into:
- Thin - from 2 to 7 cm.
- Thick – from 7 to 15 cm.
Layers less than 2 centimeters are usually made from self-leveling compounds and are not classified as screeds, but as self-leveling floors. And a thickness of more than 15 centimeters is more of a concrete floor with reinforcement.
Design features of screeds for heated floors
Features of arranging a thin floor screed
Thin screeds are used in rooms where there will not be strong point loads when using the floor. Usually these are kitchens, living rooms, bedrooms and other living rooms. Here a layer of 20–50 mm will be sufficient. For corridors and bathrooms, 50–70 mm are already recommended.
Such screeds are poured and leveled literally in one day. Then you still have to wait several days for the concrete to set. But the work itself of preparing the base and mixing the solution, as well as pouring the mixture, is carried out as quickly as possible.
Step-by-step instructions for applying the mixture
The difference in height of the base is up to 10 mm, old ceramic tiles are installed on the floor. The apartment is in Khrushchev, the tiles were laid very firmly at the construction plant, it is difficult to knock them down with a hammer drill. In this regard, it was decided to level the surface with a self-leveling mixture without dismantling the old coating.
Cement-based finishing mixture
To carry out the work, you need to prepare a special mixer or an ordinary drill with an attachment, a wide spatula, a needle roller, a container for the solution (it is recommended to have a large plastic container for one batch at once for the entire area of the room). The zero point is found using a bubble level, the floor is primed with a roller and brushes. We have already mentioned above how important primer is; be sure to carry out this operation.
Tools and kneading container
Due to the fact that the floor in the bathroom is higher than the floor in the corridor, the leveling should be made as thin as possible; at the highest point the thickness will be approximately one millimeter. Leveling the plane in the traditional way using beacons requires not only serious construction experience, but also a lot of time; it is much easier and faster to solve problems with the help of a self-leveling mixture.
Leveling will be done on ceramic tiles
Step 1. Determine the required amount of material. This is done in several stages.
- Find the highest point of the floor in the room; in our case, it is located at the threshold. Measure the difference in relation to the lowest point, our difference is 10 mm. Such a large difference indicates the extremely poor quality of construction work. For indoors, the average layer of the mixture will be 5 mm.
- On the bag there is a table of technical characteristics, including the consumption of this material per square meter with a filling thickness of 1 mm. In our case, this parameter must be multiplied by five.
- Determine the area of the room in square meters and multiply this value by the material consumption for a thickness of five millimeters.
First you need to determine the height of the differences and the average thickness of the fill layer
The information on the packaging will help you determine the total consumption of the mixture.
Step 2. If there are doubts about the strength of adhesion, and the surface of the ceramic tiles is quite smooth, then use a grinder with a diamond blade to cut lines; there should be a grid on the floor with a pitch of approximately 5–10 cm or strips. They can only be done on the smoothest areas; the work is very dusty and noisy, keep this in mind.
To enhance adhesion strength, you can make notches with a grinder
Step 3: Prepare the base. Use a metal spatula to remove any remaining building materials and vacuum the floor. Seal any cracks in the walls around the entire perimeter of the room.
All cracks along the perimeter of the floor must be carefully sealed.
Step 4. Prime the floor, use a deep penetration primer, it has improved performance characteristics. Carefully read the manufacturer's instructions before purchasing a primer; not all of them are universal; you must be careful in the selection process.
The next step is applying primer
Side made of plasterboard and polyurethane foam
Work with a roller, or use a brush in hard-to-reach places. If in some areas the primer is absorbed too quickly, then you need to do two layers - it takes a little time, but the quality increases noticeably.
Step 5. Prepare the working mixture, read the instructions carefully. The amount of solution depends on the size of the room.
When kneading, it is important to follow the proportions specified by the manufacturer.
Do not allow bubbles to appear; removing them takes quite a long time. In addition, there is a high probability that some voids will remain, and this negatively affects the quality. It's better to stir a few minutes longer than to fix problems later and risk quality.
Mix only with a mixer, not by hand.
Water is always poured into the container first, and only then the dry ingredient is gradually added. If the amount of water is slightly more than normal, then the viscosity decreases and the floor is better leveled. But it takes longer to harden and the strength of the base decreases. The decision must be made on site, taking into account the finishing material, maximum loads, time, etc.
The mixture should be homogeneous, with a minimum number of bubbles
Step 6: Start pouring the mixture from the farthest corner of the bathroom. The height of the jet is no more than 20 cm; too high a pouring speed creates bubbles, and this has negative consequences. Try to roughly adjust the thickness of the poured solution by eye, taking into account the difference in height of the base.
Filling begins from the corner farthest from the door
Experienced craftsmen use hammer drills to level the mixture on concrete bases. Place the tip of the chisel on the plate and turn on the tool - vibration appears, which greatly helps the leveling process. But you can’t do this for a long time; the composition can stratify into different fractions, which will worsen its performance.
A spatula is used to distribute the solution over the floor
At the final stage, the entire surface must be rolled with a needle roller.
You can continue work on installing floor coverings only after the self-leveling mixture has completely hardened. The specific time depends on the brand of material and is indicated in the manufacturer's instructions.
Construction mixer
To effectively use the selected mixture, you need to properly prepare the base, mix and pour the resulting composition. You need to act carefully, because even experienced craftsmen sometimes make mistakes. Therefore, follow the step-by-step instructions below.
What is self-leveling floor
Step 1. Dust and debris are removed from the base, all large cracks are sealed. The condition of the floor is assessed. If a large tubercle is found on it, it can be removed using a hammer drill or chisel. This is simpler and cheaper than increasing the thickness of the filling layer.
Construction waste removal
A laser level will help determine the size of the unevenness, but this can be done faster and more accurately using a long bubble level. When using a laser device in many places in the room, you will have to take measurements with a tape measure, and you will need to determine the highest point (at least by eye) and measure it. The minimum thickness of the self-leveling floor will depend on this indicator.
Using a laser level, floor unevenness is determined
If you are using a bubble level, just look at the gaps between the bottom of it and the floor, laying the device along the walls and diagonally. Everything will take just a few moments.
READ MORE: GVL for floors - do-it-yourself installation technology
Step 2. Calculate how much mixture is needed, buy it, check if all the necessary equipment is available.
Beginners are advised to purchase DIY materials
Don't forget to make a reserve of the mixture (about 10%). After all, it will not be possible to calculate the volume of work extremely accurately, and during the pouring, unforeseen expenses may arise.
Checking the foundation for strength
Lines should not have fringe
Step 3. The floor is treated with a primer. It is recommended to check the quality of the primer mixture first. You need to work carefully, without missing anything.
Applying primer
Step 4. Next, damper tape is glued around the perimeter of the room, which is necessary to dampen changes in linear dimensions that occur during temperature changes.
Damper tape is installed along the edges of the walls
Step 5. Prepare the composition of the self-leveling floor. It is important to strictly follow the manufacturer's instructions without making any changes, otherwise the result will be disastrous.
The packaging must contain detailed instructions for use
Mixing components
It is recommended to work in a respirator, since mixing dry components will generate a lot of dust.
Rules for mixing the mixture
Re-stirring
Step 6. Filling begins from the far corner of the room. The composition needs to be “helped” with a squeegee, and then with a special needle roller. The latter is necessary not only for leveling, but also for removing air bubbles. It is important that the length of the spikes on the roller is at least 10-30 mm greater than the thickness of the layer. Do not move the roller too quickly, otherwise new bubbles may appear; slow movements will not ensure the elimination of old ones.
Floor pouring begins
The mixture is rolled with a needle roller
This type of roller cannot be used
Installation with thermal floors and pipe communications
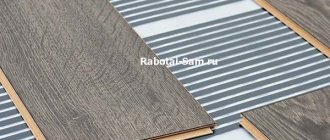
There are two thickness values for the screed, inside of which the “warm floor” liquid heating structure is located.
- The total thickness is 70-80 mm.
- The minimum thickness of the floor screed located on top of the pipes is 30 mm.
When constructing a covering for heated floors, you can use a standard cement-sand composition or ready-made building mixtures of a similar recipe. The minimum thickness of 30 mm is compensated by load distribution - the top layer is not isolated from the overall structure, so there are no problems with surface strength.
In cases where floor leveling or achieving high strength requires the formation of a mortar layer greater than 100 mm, an individual heat transfer analysis is carried out. This is true for the location of pipes without reference to the upper level of the floor surface. If you do the installation so that the finishing layer is 30 mm, no additional calculations are required.
Water heating under the screed
An incorrectly selected screed thickness can lead to very disastrous consequences, such as:
- failure of the floor covering
- cracking of too thin layer of screed
- the layer is too thick, when installing heated floors it will take a long time to warm up
On many construction forums you can find reviews about the mountain - craftsmen whose work guarantees you the dismantling of new floors and financial losses. Therefore, it is better to do all the work yourself, following all the recommendations.
Thin floor screed on a concrete base. DIY concrete floor screed
Screed is the most effective and reliable way to level floors and give them heat and sound insulation properties. A screed is the top layer of the floor that bears the load. It is on this that the finishing coatings are subsequently laid (in some cases, the screed itself can serve as the finishing layer). But how thick should the floor screed be for it to perform its functions and not crack over time? What materials are best to use and how to install it correctly? Let's figure it out.
Functional purpose of the screed
Why is this layer on the floor necessary? It performs several functions:
- Leveling the base level, filling all uneven areas and potholes.
- Improving the strength of the floor, giving it plasticity and elasticity.
- Uniform distribution of load from heavy objects: aquariums, cabinets, cabinets, etc.
The screed should be strong, but not overload the surface
Put forward requirements for a quality foundation:
- compressive strength of at least 15 MPa (will not burst under load);
- absence of visible cracks, chips, sagging and peeling;
- equal density throughout the entire volume;
- the slope should not be more than 5 mm per 2 square meters.
Scope of work
In order to fill the yard with concrete, you will need to perform the following steps sequentially:
- excavation;
- installation of a drainage system;
- installation of formwork;
- waterproofing;
- reinforcement;
- installation of beacons;
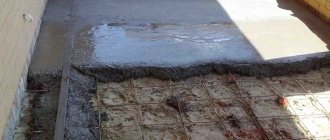
- pouring concrete;
- processing during concrete hardening.
Each step is important and cannot be skipped. Since it is possible to fill the yard with concrete only if the work technology is fully followed, which will ensure a high-quality, durable and beautiful coating.
The main stages of concreting a path or yard.
These works have some specific nuances, since they directly depend on the topography of your site and the type of soil. If the soil in the yard is not fertile and you still have to import black soil, then all excavation work comes down to marking the yard with your own hands, leveling the surface and adding a thin layer of crushed stone.
It is necessary to remove the layer of earth so that the surface of the concrete is at the same level as the surface of the earth, i.e. by 20-25 cm.
And if the base is clay, then you don’t have to add crushed stone. It is best to remove a good fertile layer and transfer it to flower beds and beds, where it will be completely useful.
What to make a screed from?
Previously, cement-sand mixtures were used to construct screeds. Nowadays, dry ready-mixes are increasingly used, since they are superior to classic ones in all respects. They allow you to create a layer no more than 2 mm thick; special plasticizers and additives are added to them for quick hardening and self-leveling, but they are more expensive than just sand and cement.
Therefore, you need to understand what you want to get in the end. If you need to level a crooked floor with strong differences in heights or pour a rough foundation on the ground, then it will be cheaper to use a classic mixture of sand and cement.
But it cannot be used as a finishing coating - it has no appearance, is very dusty and wears out quickly during use.
Dry mixtures have high strength, they can be used as a final coating, they do not generate dust and do not wear out. But pouring them into a layer thicker than 10 centimeters will be quite expensive - a 50 kilogram bag is enough to raise the level of the floor screed by 10 mm on an area of 2.5 square meters. To save money, you can do the following: pour a thick layer of cement, and cover it with a thin layer of high-quality screed on top.
The task of the screed is to level the base
Dry mixtures are usually sold in bags of 25 and 50 kilograms (some manufacturers produce 30 kilogram bags). As a rule, the greater the weight, the cheaper, so if you need a large volume of mixture, then buy bags of the largest possible weight. And don’t save money - choose mixtures from time-tested manufacturers. They are guaranteed to serve you for the entire prescribed period.
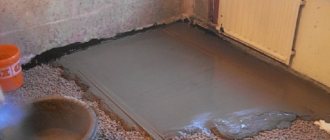
Pouring the floor
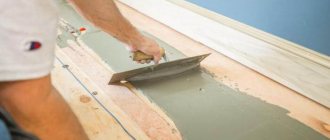
Before pouring the screed, the floor must be cleared of debris, after which it is recommended to treat the surface with a primer.
Pouring the floor
Next, you can proceed to the installation procedure:
- first you need to apply marks around the perimeter of the room, which will help you navigate in observing the maximum level when pouring the solution;
- the mixture is diluted with water in a previously prepared container in accordance with the proportions indicated on the package. To do this, pour the composition into water while stirring with a mixer;
- the finished liquid is poured onto the floor surface;
- The poured mixture must be leveled with a needle roller. This will ensure the release of air from the thickness of the solution, due to which it will harden faster.
READ MORE: Laying paving slabs on sand with your own hands: technology
The advisability of using a self-leveling mixture is a controversial issue. On the one hand, there is simplified installation and a reduction in work completion time, and on the other hand, the high cost of the material.
Sometimes even wooden floors that have minor defects are leveled using special mixtures (provided the coating is sufficiently durable, of course). In this case, before starting pouring, you need to dismantle the baseboards, remove the old paint, and hammer in any protruding nails. Where there were baseboards, you need to lay small planks that will protect the gaps between the walls and the floor from getting the leveling mixture. It is also important that all cracks and joints are sealed with wood putty. Then the boards are primed and covered with waterproofing material.