Self-leveling floors are valued for their quality and high wear resistance. This is a durable coating that can really not only make the floor smooth, but also beautiful. But in order for such floors to last for many years and look truly presentable, it is important to fill them correctly. In this case, one of the important aspects of the pouring process is the correct preparation of the base. It’s interesting that you can make a self-leveling floor on a wooden base, and not just on a solid concrete one. What installation features are important to consider in this case?
Self-leveling floor on a wooden base
Types and features of self-leveling bases
Self-leveling floors are made from special polymer mixtures, which, when hardened, can become a strong, neat and even base if installed correctly. The mixtures used to create them may contain cement, gypsum, various fillers, as well as a number of modifying additives that give the floors certain properties - for example, strength, ability to resist impacts, speed of mixture hardening, etc.
What is self-leveling floor
They are valued for the following advantages:
- high level of wear resistance;
- large selection of colors;
- environmental friendliness;
- excellent moisture-proofing properties;
- antistatic;
- durability;
- seamless – floors of this type can be poured throughout the entire apartment without a single joint;
- resistance to a number of mechanical influences, as well as to the effects of almost all existing chemicals.
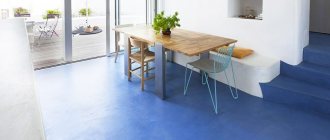
Self-leveling floors have many advantages
Self-leveling floors must be poured onto a properly prepared base. And many doubt whether they can be installed on top of wooden floors. It turns out that it is possible. It is only important to properly prepare such a foundation. It is also important to choose the right type of mixture for filling.
Types of self-leveling floors
Table. Types of mixtures for filling.
| Mixture type | Characteristic |
| Epoxy | This mixture makes good floors that are completely resistant to water. They are usually installed in rooms where the humidity level is high. This floor can be poured onto a wooden base. |
| Polyurethane | One of the most durable floors with respect to severe long-term impacts. Excellent for installation in high-traffic areas. |
| Methyl methacrylate | This mixture is intended for creating foundations in rooms without heating. Perfect for those where there is no heating in winter. |
| Epoxy-urethane | Durable floors that are highly resistant to a wide range of influences. An alternative option to polyurethane flooring. |
Self-leveling polymer floor
On a note! Compositions for filling floors can be either two-component or one-component. In the first case, you can create floors with a beautiful pattern, and mixtures of the second type are used to create a base for other materials such as tiles, stone, etc.
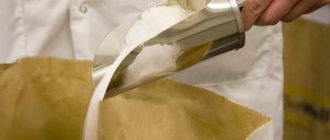
Mixtures for self-leveling floors
Prices for self-leveling floors "Starateli"
self-leveling floors prospectors
Filling the self-leveling floor
Installing a self-leveling coating on boards or plywood is not difficult:
- First, prepare the solution as prescribed in the instructions on the package, thoroughly stirring the composition until a homogeneous consistency is formed.
- The finished solution is poured onto the wooden floor, starting from the far corner of the room near the door.
- Next, the solution is leveled with a spatula until the desired layer thickness is achieved. For wooden flooring, it is recommended to make a layer of the mixture at least 5 millimeters thick.
- The resulting bubbles are removed using a needle roller.
- Do not wait more than ten minutes between batches of solution, otherwise visible joints will appear.
- Those places where the strips of solution are connected are well rolled with a roller.
- After the surface of the wooden base is completely filled with mortar, wait ten to fifteen minutes and then cover the entire surface with film so that dust does not settle on the filled floor.
- After complete hardening, you can apply a finishing coating, which is a special varnish.
As you can see, pouring a self-leveling floor with your own hands is not difficult, you will see this once again by watching the video:
Average score of ratings is more than 0
Share link
Comments There are no comments yet, but you could be the first...
Choosing a mixture for filling
Usually, on each package with a mixture for making a self-leveling base, its purpose is indicated. That is, for example, some are suitable for creating floors on a concrete base, while others can be used on a wooden base. Most often, mixtures containing gypsum and cement are excellent for these purposes.
Self-leveling floors "Starateli"
Important! Do not confuse mixtures for filling the floor with compositions intended for leveling the surface. Such compositions are poured in a thin layer of just a few millimeters. To fill a floor on a wooden base, the thickness of the poured layer should be greater.
To choose the right mixture for pouring a wooden floor, it is important to carefully study the instructions.
Self-leveling floor on wooden floor
Preparing tools
If you are wondering whether self-leveling floors can be applied to a wooden floor, then the answer will be clear. Such work is carried out quite often today. It is important to properly prepare the surface and ensure that you have the appropriate tools. To dismantle the skirting boards you will need wooden wedges, a nail puller and a chisel, but to process wood you need to prepare a sanding machine and a grinding device. You can finally prepare the surface using coarse sandpaper; an industrial vacuum cleaner will allow you to clean the base. To apply the primer to the surface, you will need a brush or roller. Quite often these tools are used in tandem, since not all hard-to-reach places can be treated with a roller. The most effective way to distribute the polymer coating is with a short-nap roller and a flat brush. The craftsman will need a spatula and a squeegee. You can mix the solution for installing a self-leveling floor using a construction mixer or a drill. It is best to pour a self-leveling floor on a wooden base while wearing special clothing, wearing safety glasses, a respirator and gloves. To move on the surface you will need special soles with spikes. This will allow the master to move around the freshly laid layer.
What will you need?
To make a self-leveling floor yourself, you may need certain tools. The list of things to buy or rent includes:
- the mixture itself;
- wide spatula equipped with a long handle;
- a construction mixer or a regular drill with a special attachment;
- a needle roller, which is used to remove air bubbles from the poured mixture;
Needle roller
- construction level of any type - necessary to evaluate the final result;
- damper tape;
- means for grinding (sanding machine, sandpaper, etc.);
- waterproofing materials (at least thick polyethylene film);
- construction vacuum cleaner;
Construction vacuum cleaner
- hammer, nails, nail puller;
- a sealing mixture that can be used to eliminate gaps between floor boards or sheets of plywood. Can be replaced with putty.
Calculator for calculating dry mortar for self-leveling floors
Go to calculations
Important! When working with liquid mixtures, it is best to wear clothes that you don’t mind. You should also buy special paint shoes, in which you can walk on the flooded floor while leveling it. Paint shoes are special shoes equipped with needle soles. Having walked through the freshly poured mixture in these “slippers”, you don’t have to worry about it spoiling.
Paintshoes
Requirements for the rough foundation
Self-leveling floors are created on a base that does not have cracks and crevices that allow the mixture to leak. If such cracks occur, the consumption of building materials will increase significantly, which will increase repair costs. In addition, there is a high risk that the base will turn out to be of poor quality. That is why it is important to carefully prepare for flooring work.
So, first of all, you need to carefully inspect the wooden base to determine the extent of the work and find out whether the floor needs repairing. It is important to evaluate whether there are cracks and drying out, whether the boards are holding well, and whether they are suitable for further use. Poorly adhering boards must be secured with nails.
First, the wooden floor is inspected
Attention! Wooden boards affected by mold or mildew must be replaced. They will not last long, and they have a negative impact on human health. There cannot be such boards at the base of the floor.
If wooden floors are in more or less decent condition, then it is quite possible to use them for pouring a self-leveling base. Repairs are easier and cheaper to do yourself. By the way, there is no point in repairing a parquet floor that is in poor condition. The easiest way is to completely dismantle it.
Wood floor repair
On a note! When performing work on pouring the foundation, builders recommend focusing on the normative document SP 29.13330.2011 (updated edition of SNiP 2.03.13-88; click on the link to open the PDF file in a new window).
SP 29.13330.2011
Preparing the base for pouring mortar
Options and schemes for self-leveling floors.
How high the quality of the coating will be largely depends on the most important stage during which the base is prepared. Failure to follow the step-by-step, competent technology for producing self-leveling floors will lead to cracking of the coating, it may begin to deteriorate, peeling will be observed, occurring before its service life. Only a reliable base, made with high quality, can become a quality guarantee for the long-term operation of the floor covering.
Sometimes a self-leveling floor is installed directly on an antique wooden floor. In this regard, the wood must be sanded using sandpaper to obtain a rough structure. Treated boards must be painted with a special primer. If the first layer is not very strong and monolithic, it is necessary to apply several more layers. The surface of the wood should be free of grease, varnish and oil stains.
At the next stage, it is necessary to remove the installed baseboards and fill in any cracks in the floor with bars. Wooden floors need to be cleaned very thoroughly using a scraper. When performing such an operation, you need to pay a lot of attention to the existing inter-board joints and expose all existing cracks. Using a vacuum cleaner, it is necessary to thoroughly clean the surface of the self-leveling floor and degrease it using cleaning powder.
After this, the well-treated cracks must be sealed using mortar and the surface leveled. Then lines are drawn along the entire perimeter of the room, the length of which is less than the length of the room. Screws are placed along each line, maintaining a step of 30 cm. Using a laser level, the highest point on the surface of the self-leveling floor is found.
The screws must be screwed in at the same level.
Moreover, they need to be screwed into the ends at an angle of 90 degrees along previously drawn lines. Place several pieces of alabaster near each screw.
Related article: How to determine the quality of entrance doors?
The next step will be laying the beacons that are required for the self-leveling floor. They are installed directly on the screws. There should be no subsidence of the beacons; if this happens, they need to be cemented.
Preparing for pouring
Proper preparation of the base is the key to ensuring that the self-leveling floor will be beautiful and last a long time. First of all, it needs to be repaired if the base needs repairing. That is, old boards are replaced with new ones, all loose elements are fixed. Next, it is important to seal all sorts of cracks to prevent leakage of the potting mixture. A sealant is perfect for these purposes, and you can also use putty. The main thing is not to miss a single crack.
Wooden floors need to be properly prepared
Grease stains, if any, are best removed with a solvent - they can prevent good adhesion of the mixture to the base. All paint is also removed. It can be removed using a special remover or sanding.
Advice! To maximize adhesion to the substrate, it is recommended to sand the floors using a sander. It is recommended to rent professional equipment - it is more reliable and will also significantly speed up the work due to its high level of productivity. Using a sander will also remove small irregularities and bumps.
Floor sanding
Floors ready for pouring should not creak, wobble or have other defects. In some cases, it is generally recommended to lay a base of plywood sheets on top. The thickness of the sheets must be at least 14 mm. You can also add chalk chips between sheets of plywood to prevent squeaking in the future. By the way, the baseboards must be removed before pouring the mixture, and the nails or screws must be recessed into the floor surface.
In some cases, you can pour a self-leveling floor directly onto a wooden base, but experts strongly recommend not to neglect the creation of a cement screed. This will allow you to achieve the best effect.
Cement screed recommended by experts
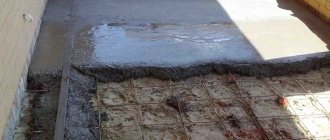
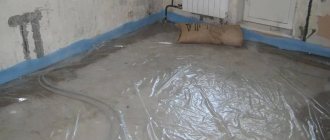
Preparing the floor for pouring the self-leveling mixture also includes thoroughly cleaning it of debris and creating waterproofing. You can use plastic film, but liquid mixtures to create a waterproof layer are also a good option. Any waterproofing material should extend approximately 10-12 cm onto the walls.
It is recommended to glue damper tape along the walls, and in the case of preliminary production of the screed, this is mandatory. The thickness of the damper tape or isolon, cut into narrow strips and used for the same purpose, should be 1-2 mm. The damper tape is necessary to protect the screed and bulk mixture from possible cracking and deformation in the event of thermal expansion.
Damper tape
Requirements for floor waterproofing
To protect the wood from moisture from the solution, which will lead to swelling and deterioration of the material, waterproofing measures must be taken. It is important to correctly form the separating waterproofing layer and securely fix it.
They use film, roofing felt, coating and other types of waterproofing to choose from. All these materials will prevent rotting of the wood under the self-leveling floor and will prevent it from drawing moisture out of the solution.
Sheet and roll insulation is laid over the entire surface, extending onto the wall by 10-15 cm and with the strips overlapping each other by 8-12 cm. The perimeter over the waterproofing is covered with damper tape or 2 mm thick insulation, cut into strips.
Installation of a self-leveling floor on a wooden base
Let's look at how the process of creating a self-leveling base on a wooden floor occurs.
Step 1. The floors are carefully prepared taking into account the recommendations given in the section above. Next, you need to coat the base with a special primer. To do this, use a brush or roller. It is important to apply the primer so that the boards are completely covered with it.
Primer preparation
Primer application
Step 2. Damper tape is glued along the wall. It can be purchased on an adhesive base, or attached with double-sided tape. The tape is pasted along the perimeter of the entire room.
Damper tape is glued around the perimeter
The process of gluing tape
Step 3. After this, the mixture is kneaded. It must be done strictly according to the instructions given on the package. The mixture is mixed until smooth using a construction mixer or drill with a special attachment. The composition hardens quickly, so it cannot be prepared in advance - only immediately before pouring.
Adding water
Mixture preparation process
Mixing components
Step 4. Then the mixture is left alone for 3 minutes and again actively mixed with a construction mixer.
Re-stirring
Step 5. You can start pouring the mixture. It just pours out onto the base. It is recommended to start pouring from the far corner of the room. The mixture is very fluid and can be spread quite easily over the base.
Filling starts from the far corner
Step 6. Spread the mixture over the base using a notched trowel or squeegee. The mixture will partially reach the desired level of evenness on its own due to its fluidity and the laws of physics.
Distribution of the mixture by floor
Step 7. After the mixture has been poured over the entire base, it is rolled with a needle roller. This procedure is performed in order to remove any air bubbles from the mixture that may have entered it during the mixing and pouring process. You can move around the poured mixture only with paint shoes.
The mixture is rolled with a needle roller
Step 8. After this, wait the recommended time for the mixture to dry. Typically, self-leveling floors dry fairly quickly. The drying time will depend on the thickness of the layer, but in any case the approximate time should be indicated on the packaging.
The self-leveling floor dries quickly enough
Video - Self-leveling floors on plywood
Self-leveling polymer floor technology
In itself, the technology of pouring a self-leveling mixture onto an ordinary plank floor is no fundamentally different from a similar procedure where concrete serves as the base. The differences lie only in the initial preparatory stage, which we discussed above in sufficient detail.
Before pouring a polymer floor, you should very carefully read the instructions for preparing the solution, which are on the package. The solution must be prepared in strict accordance with it.
Scheme for pouring a self-leveling floor onto a wooden surface
Take the dry mixture from the bag and pour it into a container convenient for mixing. A plastic bucket from water-based paint can work very well. The amount of water required according to the instructions is poured into the powder and mixed with a construction mixer or a drill with a special attachment. Stir the mixture until a homogeneous mass is formed. Then, the finished solution is laid out on a prepared wooden base. They begin to do this from the farthest corner of the room, gradually moving towards the door.
The poured mass is leveled as it progresses using a spatula to obtain a layer no more than 5 mm thick. This is the optimal size in case of a wooden base. Final leveling and removal of air bubbles is done using a rubber needle roller. At the same time, you can move around the room using spiked shoes.
Needle rubber roller
Self-leveling polymer flooring mixture hardens very quickly, so batches must be prepared quickly. The intervals between their fillings should be no more than 10 minutes. It is advisable to fill such a floor together, using two containers. While one person prepares the mixture, the second person pours and levels the previous batch. The joints between pouring batches should be rolled more carefully with a roller if you are making the floor alone and cannot ensure a continuous process.
15 minutes after the room is completely filled, the entire surface must be covered with film. This is required to prevent dust from settling on the floor, ruining the quality of the glossy surface. When the self-leveling floor is completely dry and can be walked on, it becomes possible to apply the finishing coating. This can be a polymer for three-dimensional floors, varnish, or traditional flooring options.
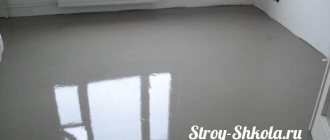
Finished self-leveling floor, varnished
If you need a screed...
In some cases, before pouring the self-leveling floor, it is necessary to install a cement screed. In fact, this will be pouring not onto the self-leveling floor, but onto the screed, but, nevertheless, sometimes it is necessary. Yes, and experts still recommend pre-fabricating it. How to make a screed on wooden floors? Let's consider one of the options.
Step 1. To begin, the wooden floors are prepared in the same way as described above. It can also be covered with plywood.
First, the wooden floor needs to be prepared
Step 2. Next, the base is coated with mastic or roll waterproofing material can be used.
Base waterproofing
Step 3. After this, a layer of high-density polystyrene foam is laid. Damper tape is also glued around the perimeter of the wall.
Insulation laid
Step 4. Next, all seams between individual polystyrene foam elements are sealed with polyurethane foam. After drying, its remnants and protruding elements are cut off.
The seams are covered with polyurethane foam
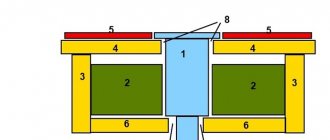
Step 5. Then a layer of reinforcing mesh is installed. The individual canvases are laid overlapping each other in approximately 1-2 squares and connected to each other using clamps. It is important to place small bars under the mesh bars, which will lift it above the base - this is necessary so that after pouring the screed, the mesh will be inside the concrete layer, and not under it. Also, if necessary, if the room is large, beacons are installed along which the screed layer will be leveled. Beacons must be installed at the same level. Metal slats mounted on small cement islands can be used as beacons.
Laying reinforcing mesh
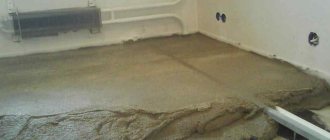
Step 6. After this, the cement mixture for the screed is prepared. You can make it yourself, or you can buy a ready-made one in a store, designed for pouring screed. The mixture is poured onto the base, after which it is leveled along the beacons using the rule. It is important to achieve an even horizontal line. When the screed has set a little, the beacons are removed, and the voids formed after this are filled with a cement mixture. The screed takes 28 days to dry. It cannot be used at this time. But in a few days it will be possible to move along it, but with caution.
Cement mixture poured
Self-leveling flooring on a wooden base is a reality, not a myth. This option is quite possible if the base was prepared correctly and no mistakes were made when pouring the floors.
Secrets of using finishing mixtures
A self-leveling floor on a wooden floor will look very good if the rough base does not have rough relief flaws.
It is advisable to exclude them, since the thickness of the laid layer does not exceed 5 millimeters. Even though the bumps and depressions can be smoothed out by a leveling compound, there is a strong argument for eliminating the defects. Self-leveling floors will harden unevenly, and the strength indicator will vary.
It is also important to choose the right dry composition, the ingredients of which will determine the purpose of the future floor. For example, if the mixture contains cement as a binder, then this composition is suitable for pouring floors in bathrooms, kitchens, showers and bathrooms. If we are talking about mixtures with gypsum in the composition, then such a floor is best used for rooms with dry and low humidity levels, where the self-leveling floor will demonstrate all its positive qualities.
A wooden surface can also be used for a base in which a heating system will be present. In this case, you should choose a leveling mass that has increased elasticity. It will expand and contract during operation without cracking.