For what purpose and where is it used?
This is a relatively new material, which is consumable and consists of tapes of different thicknesses and heights, made of elastic materials that easily compress under load and restore their shape in its absence. The raw material for production is foamed polyethylene, in closed cells of which there is air.
To understand how the tape works, you can do a simple experiment. If you squeeze it with your fingers, the air bubbles are flattened, the material becomes thinner, but returns to its original size when the pressure is released.
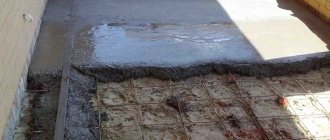
After which it becomes clear why the damper tape is needed. Its main function in the structure of a concrete floor is to compensate for the linear expansion of the screed, preventing its deformation in case of hard contact with the walls. As the slab expands, it presses not on the wall, but on an elastic gasket installed between them and filling the gap between the contacting planes.
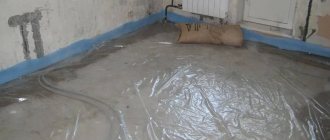
Shock-absorbing tape when installing a floating screed Source i2.wp.com
However, the use of such a layer makes sense only if the screed is floating, that is, not connected to the base and mounted on waterproofing (waterproof film) or thermal insulation (insulation boards). If it is laid on a stable base and does not have a heating system, the damper will be useless.
But there are other tasks that can be achieved using this material. When deciding whether a damper tape is needed for a floor screed, you should also remember these:
- Compensation for periodic expansion of heated screeds from a heated floor system.
When the system is running, the plate expands in proportion to the heating force, and when it is turned off, it contracts. Periodically occurring pressure on the walls can ruin the external finish and cause stress and deformation in the structure itself.
On a note! When installing heated floors along external walls, it is better to install strips of insulation. This will not only compensate for temperature changes, but also reduce heat loss.
Diagram of a heated water floor Source pol-inform.ru
- Creating a gap between rooms with different thermal circuits.
In adjacent rooms, different temperatures of the heated floor are often set. Accordingly, it is necessary to arrange a thermal gap between them.
Such a compensator is mounted in a doorway Source eurosantehnik.ru
- Reduced vibration noise.
Another important point why damper tape is needed when screeding is to improve sound insulation between rooms. It dampens vibration and impact noise and prevents its transmission through supporting structures. This is especially true in high-rise buildings, townhouses and country houses with several apartments.
On a note! There is a special type of damper tapes - vibration damping tapes. They are made from rubber, caoutchouc, and other materials and are glued to metal profiles, which are the basis of the frame for interior partitions and wall cladding.
- Reduced cracking when fresh screed matures.
During the drying process, concrete loses moisture and “breaks” with the appearance of cracks. This problem is solved by reinforcing the screed and isolating it from the walls with an elastic gasket. It is laid around the perimeter, as well as in the body of the screed, if its linear dimensions on any side exceed 6-8 meters or the total area of the screed is more than 20 sq.m.
Separating the screed with a compression tape reduces the formation of shrinkage cracks Source chudopol.ru
- Construction of a technological gap between screed sectors poured at time intervals.
When a fresh screed comes into direct contact with a previously poured screed that has already gained strength, uncontrolled stresses arise that affect the strength of the coating. They are compensated by laying a buffer layer between adjacent sectors.
Summarizing the above, such a gasket must be done in the case of a floating screed or heated concrete screed. If we answer the question whether a damper tape is needed when pouring a self-leveling floor, then it will be positive only if there is a thick layer of leveling mixture or when it is installed on top of a heated floor. Simple thin-layer coatings up to 10 mm high do not need an edge around the perimeter of the walls.
When installing thin-layer self-leveling coatings, a buffer layer is not needed Source i.ytimg.com
All other cases are considered individually, the choice remains at the discretion of the home owner.
Recommendations from professionals
Experienced experts give some tips on how to fill a garage floor. It is also important when the work is carried out. The best time is spring and autumn. In winter, concreting is not carried out at all, since the concrete will not harden, but will freeze. In summer, moisture will evaporate rapidly and cracks may appear in the base body.
To prepare concrete with your own hands, you should purchase cement grade M400 or M500. To mix the solution, take dry sand and clean water. If imported concrete is used, then delivery should be organized after preparation. Concreting is done with compaction so that there are no air bubbles left in the mass. Only properly laid concrete will ensure the durability of the foundation.
A truly working legal way to save money. Everyone needs to know this!
Laying thermal insulation is necessary if the garage is used in winter and is heated. The best insulation is extruded polystyrene boards. They do not absorb moisture and do not accept mold. Reinforcement of concrete screeds is mandatory, since during repairs shock loads are possible, and the reinforcement must be able to withstand the forces.
The floor is made with a slight slope towards the gate so that the snow stuck to the wheels can melt and drain without creating a puddle. After hardening, the top layer of concreting is treated by rubbing in additives to give hardness to the coating. Such mixtures are sold in hardware stores and are called topping systems. The composition includes plasticizers, pigments and fillers. Solutions are rubbed into the surface of the base using a special device.
The concrete garage floor coating is neutral to petroleum products and solvents and is not destroyed by acids. Therefore, using it in the garage is considered correct.
The cost of turnkey concreting with the involvement of specialists can cost the garage owner approximately 30,000 to 40,000 rubles, depending on the concrete floor laying scheme. Prices increase if excavation, base preparation or mixing is required by hand.
Self-production will not only reduce the cost of work, but will also create a more powerful base. To calculate the amount of building materials you will need to know the area to be poured. The total thickness of the concrete multiplied by the floor area will determine the volume of the solution in cubic meters. The need for the constituent ingredients is calculated based on the proportions. To prepare a concrete cube M350 you will need:
- cement M500 – 220 kg;
- crushed stone, gravel – 0.75 m3;
- sand – 0.75 m3;
- reinforcement – 50 or 100 kg depending on the number of layers of reinforcement.
We recommend: Underlay for linoleum on a wooden floor
Transport costs should be taken into account. It is easy to calculate the cost of flooring if you know the consumption. You need to find out the price of the material in the region and multiply it by the required volume.
The cost of the finished mixture with delivery is calculated based on plant prices and transportation costs. Its price is 4 times more expensive than a self-made one. The mortar unit pays rent, labor of workers, managers and must operate at a profit.
Pouring a floor with hiring a crew, receiving ready-made concrete mix with delivery will cost 500 - 2500 rubles per square meter. Work done independently, with the involvement of helpers or specialists at some stages, can be completed, saving half the cost.
What are damper tapes?
Kinds
The material is distinguished according to several characteristics:
- According to the structure of polyethylene – cross-linked and non-cross-linked.
Sewn material is more expensive, but of better quality - it is more elastic and reliable. When uncrosslinked, the cell walls tear under heavy load.
- Depending on the installation location, the tape can be edge or intercircuit.
Edge screeds are mounted along the edges of the screed to be poured along the walls and have a flat or L-shaped shape. Intercircuit tapes are designed for making expansion joints in large-area screeds and between adjacent heating circuits. They are shaped like an inverted T, making it easy to secure the strips to the base without side support.
- According to the installation method.
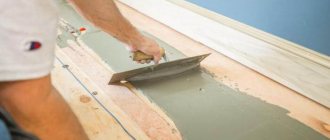
The simplest type of tape is ordinary flat strips, which are simply pressed against the walls with mortar or pre-attached with improvised means. Strips with adhesive applied to the reverse side simplify the task of attaching the damper tape to the wall. The sticky layer of self-adhesive is protected by paper, which can be easily removed before installation.
Installation of tape with adhesive strip Source pol-exp.com
Both standard and self-adhesive strips can have a “skirt” - this is an outlet made of non-foamed polyethylene on one side. During installation, the tape with the “skirt” straightened out on the floor takes the shape of an inverted letter G. The resulting angle prevents the solution from leaking into the junction of the floor and walls, which increases the functionality of the buffer.
- By the presence of cuts.
Such products are often provided with small cuts along the entire length at several levels. They make it easier to remove excess material protruding above the surface of the finished coating.
The cuts allow you to tear off excess at the desired height Source pol-exp.com
What is it and why is it needed
Hardened cement-sand mortar has one unpleasant property - it expands under the influence of temperature and humidity. The screed also has it. It “breathes” both in height and width. In this case, the linear dimensions in length/width vary within 0.5 mm per 1 m 2, but not more than 1.0 cm in total.
But even an expansion of 2-3 mm is enough for the screed to either collapse itself or damage the wall. A layer of material that can dampen (extinguish) the breathing of cement stone saves from the destructive consequences.
Definition
The word damper came into the Russian language from Germany. There “Dämpfer” - muffler, shock absorber, from the verb “dämpfen” - to muffle. Therefore, in a general sense, a damper device is understood as anything capable of preventing vibrations that occur in machines, devices, systems or structures during their operation.
Taken in a narrow sense, a damper tape (sometimes called edge or compensation tape) is a specially made strip of elastic material that can compensate for the linear expansion of concrete and other building materials under the influence of moisture and temperature.
If this definition is translated into a simple language understandable to a non-specialist, then the tape should be understood as a voluminous, plastic material that can compress when the screed expands and recover when its size decreases, while constantly maintaining some gap between the wall and the expanding cement stone.
Functions
The main task of the damper tape is to ensure free expansion of the screed. Those. A plastic strip of material several millimeters thick, fixed along the perimeter of the walls, creates a technological compensation gap that allows maintaining the integrity of the surface layer of the poured base for the finishing floor covering.
In addition to the main function, there are a number of auxiliary tasks that are no less important for apartment owners:
- creation in certain areas of a restrictive barrier for the solution, a kind of formwork;
- organization of additional hydro- and thermal protection at the joints between the floor and walls;
- strengthening sound insulation in the most vulnerable areas of the house that transmit structural noise;
- absorption of microvibration of walls due to mechanisms operating in the building, such as forced ventilation or an elevator - are not transmitted to the floor, but through it to a person;
- In some cases, leveling the walls and the base of the floor, at the joints between them, under the screed.
Video description
What can happen if you do not leave gaps along the walls when laying laminate, watch in the video:
The excess part of the strip protruding above the plane of the final coating is cut to its level or left behind the baseboard.
The thickness of the buffer layer is selected in accordance with the linear dimensions of the screed. When installing it in standard residential premises and garages, shock absorbers with a thickness of 6-10 mm are usually used.
The material is sold in rolls of various lengths from 10 to 150 meters. You can easily calculate the length you need by adding up the perimeter of all the walls and the length of the expansion joints in rooms with screed.
To get a rough idea of the price order, check out this table:
Parameters of damper tapes from different manufacturers Source i.ibb.co
Installation of heated floors using damper tape
So, we come to the most exciting question - how to install a heated floor in your home using damper tape? The answer is simple - just like the usual one, but at one of the installation stages it is necessary to lay the material along the wall. This will be discussed in detail below in the instructions.
For now, it is important to find out what needs to be done before installing the tape
Making a heated floor using damper tape
Preparatory work before installation
The preparatory stage before installing a heated floor using damper tape includes the following steps.
- Wall treatment. They must be plastered and puttied in advance, if this work has not yet been carried out. The fact is that during installation of the damper tape it is glued directly to the wall. Then it will be inconvenient to carry out this work.
- Installation of door slopes, installation of windows. It is also necessary to carry out this part of the work before laying the damper tape so that construction debris does not interfere with working with the screed.
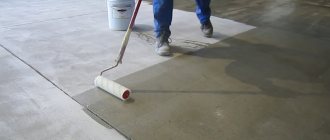
- Preparing the subfloor. All damage to it must be repaired; if necessary, the surface must be pre-grinded.
- Laying waterproofing. This type of work is also carried out before installing the damper tape.
Preparing to install heated floors
The main stages of installing a heated floor using damper tape
Step 1. After all the preparatory work, the first step is to lay the compensation tape. It is mounted along all the walls of the room being renovated. If the tape has a sticky layer, it immediately sticks to the walls. The “skirt,” if there is one, is laid and straightened on the floor along the wall. The tape is mounted so that in the end the level of the concrete screed is slightly below the upper border of the tape. At the end of the work, its remains are cut off or simply covered with a plinth.
Laying damper tape
Laying process
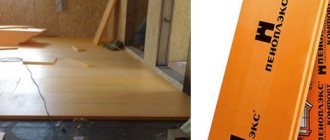
Step 2. Next, thermal insulation boards are laid. They should be located close to the wall and damper tape and connected tightly to each other.
Laying thermal insulation boards
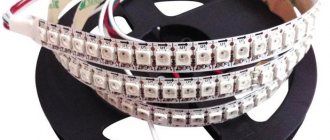
Step 3. Heat distribution plates are laid. They have notches that allow you to separate them with your hands if necessary. The plates are easily fixed on thermal insulation boards. Laying step – 2 cm.
Installation of heat distribution plates
Installation process
Another photo of the process
Step 4. Plastic pipes for the coolant (16 mm in diameter) are laid in the grooves of the plates. Laying starts from the supply manifold and is carried out according to the scheme - first along the outer walls of the room with a laying step of 150 mm, then in a snake with a step of 200 mm.
Laying plastic pipes
Snake laying
Step 5. A waterproofing film is laid on top of the laid pipe system.
Next, waterproofing is installed
Step 6. Sheets of gypsum fiber are placed on top. After this, the finishing floor covering is laid.
Installation of gypsum fiber sheets
Also, a concrete screed can be poured directly on top of the heating system - without laying gypsum fiber. Usually this is a cement-sand mortar with the addition of a plasticizer. The latter is necessary to ensure that the mixture is plastic but dense. Thanks to the plasticizer, the floor surface will be smoother.
Do not also forget about installing a temperature sensor. It will record the floor heating temperature and transmit its readings to the thermostat. Installation is carried out before pouring the screed.
Installation of a warm water floor
Installation features
The developer may have a question about how to attach the damper tape and when to do it. Installation is carried out before pouring the screed, but after installing the waterproofing. As a rule, film and any other waterproofing on the sides is lifted and placed on the walls, in which case the buffer tape is installed on top of it.
The installation method depends on the type of product. If it has an adhesive layer, everything is simple: place the roll with the sticky side to the wall and, gradually unrolling it and removing the protective layer, glue the strip to the base, slightly pulling it so as not to falsify. If there is a film release (“skirt”), it is spread on the floor, folded at the corners into a triangle.
Installation of L-shaped tape Source o-builder.ru
Having finished gluing one roll, the second is mounted overlapping, starting the beginning of the second strip 5 cm from the end of the first.
If there is no adhesive strip, you first need to determine the front and back sides. The reverse side is usually smoother and shiny, and it is pressed against the wall.
Rigid fastening is not necessary - the strip can simply be pressed with the solution during its installation. But this is very inconvenient: you have to constantly make sure that it does not fall or bend under the screed, otherwise the whole point of why the damper tape is needed is lost.
Therefore, choose one of the most convenient fixation methods:
- shoot with a stapler, the staples of which easily fit into the wooden base;
- drill the dowel with nails;
- glued with double-sided tape, liquid nails or other adhesive.
Pouring a concrete floor in a garage
The grade of concrete for the garage floor is M250. Its characteristics are more than sufficient in terms of strength and frost resistance. Due to the large thickness of the slab, even a small garage requires a large volume of mortar. Let's estimate: for a small garage measuring 4 * 6 m with a concrete floor thickness, you will need 4 m * 6 m * 0.1 m = 2.4 cubic meters. Taking into account the fact that a slope is needed, this will be all 3 cubes. If you do it yourself in one day, you need to use two concrete mixers - one will not cope. It will take a decent team to do the job.
It takes a large team to mix concrete in a concrete mixer.
There should be one person on each concrete mixer. This is provided that all the components are right there and they will also load them into the pear. If components need to be transported, it’s two more people. Plus, two must transport concrete to the place where it is laid and one must level it. It turns out to be quite a brigade. You will have to work with this composition all day. Even if the helpers are free, they need to be fed and watered. It is unlikely that this arrangement will help save a significant amount of money compared to ordering ready-mixed concrete from a factory. Unless you work with one hand, filling the floor in parts. This is also possible, but it can lead to cracks at the joints of floor sections poured on the same day. You can reduce the chance of such cracks if you remove the cement laitance that forms on the surface with a metal brush.
If you decide to order concrete in a mixer, it is worth installing a receiving tray that will direct the flow of concrete to the center of the garage. From the center it is already easy to distribute it to all corners, and then stretch it using the rule. To facilitate leveling of concrete and increase its grade, immediately after preliminary spreading, the concrete is treated with a submersible concrete vibrator. In this case, air bubbles immediately come out, the concrete becomes more fluid and fills all the cavities. Beacons will be needed only for orientation, and perhaps partial alignment.
We recommend: Cement-based self-leveling floor
What materials can be replaced
Having figured out what a damper tape is and what it is needed for, many developers are thinking about replacing it with other materials with similar characteristics and saving money. This solution seems especially attractive if, after building a house, there is a lot of unused insulation, laminate underlay, linoleum scraps, etc. left.
In principle, such a replacement is possible, but it will not be complete:
- Foam plastic, after compression under load, is not able to fully restore its shape, as a result of which a gap remains between the vertical surface and the screed.
- Linoleum is generally not a sufficiently elastic material.
- Laminate backing, isolon and penofol, like the original buffer tape, are made from polyethylene foam. But they usually have a lower density and do not have good soundproofing properties.
Penofol and isolon are an affordable analogue of damper tape Source opt-299062.ssl.1c-bitrix-cdn.ru
- Wooden slats, which were previously widely used to make expansion joints, are also poor shock absorbers, and they are also susceptible to destruction from moisture, mold and other external influences.
To get a strip of the required width, it needs to be cut from the roll. This can be done in a variety of ways. The longest way to cut is with scissors. It is much faster and more accurate to cut with a sharp stationery knife on a flat and hard surface, made along a guide. To do this, roll out the roll on the floor or on a board, place a guide rail at a selected distance from the edge and guide it with the tip of a knife along it.
To speed up the process, the material can be folded in several layers.
If you need to cut strips of great length (and for a medium-sized house they may require several hundred meters), it is better to roll the material into a tight roll and cut it with a hacksaw according to the markings.
Preparing the base
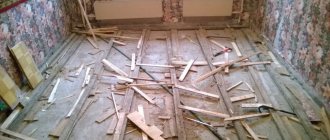
The concrete floor in the garage is made on the ground. But more often than not, the soil itself is not a reliable and dense enough foundation, so a foundation is required - a cushion of crushed stone and sand. Preliminary and mandatory work - removal of the fertile layer, down to clean soil. The fertile layer removes organic matter and most of the microorganisms, while clean soil contains a minimal amount of them.
The first stage of installing a concrete floor in a garage is removing the fertile layer
Zero level mark
As a result, you get a pit of some depth. Crushed stone and sand will be poured into it, but in order to understand whether its depth is sufficient or excessive, you need to decide on the “zero” level of the floor. It is convenient if the floor is level with the gate threshold. Often they do it just below the threshold, but then they will have to somehow drain the water, and it will definitely be there, if not in spring-autumn, in winter, from melted snow, for sure.
Mark the zero floor level along the perimeter of the walls. The most convenient way to do this is with the help of a plane builder (electronic level or level). Turn on the device to display the horizontal plane, set it at the desired level and draw along the beam.
It's easier to work with a laser level
If you don't have a laser level, use a water level. It’s not so convenient: you have to move the mark many times across all four walls. These marks are connected by a straight line; instead of a ruler, you can use a bubble level, at the same time you can check whether all the marks have been placed correctly.
The water level will have to transfer marks to all walls
Calculation of the thickness of ASG layers
As a result of this work, we have a foundation pit and a zero floor level. Now you can calculate how thick the layers are needed to reach the desired height. You need to start from the following dimensions:
- the optimal thickness of the concrete floor in the garage (if there is a passenger car or lighter vehicle) is 10 cm;
- the thickness of the crushed stone layer is at least 10 cm;
- sand - at least 5 cm;
In total, it turns out that the pit should be no shallower than 25 cm deep. And this does not take into account the floor covering. If you simply treat the concrete floor with impregnation or paint, then no additional centimeters are required; for any other coating, add the required thickness.
Structure of a concrete floor in a garage
Having received a specific figure, you can plan the amount of sand and crushed stone. If the layers turn out to be very large, you can add soil to the bottom and compact it (but not the fertile layer). If the depth of the pit is not enough, we remove some more rock.
You can put marks on the walls of the garage, which will help you control the thickness of the layers. If the width of the garage is small - 2 meters or so - these marks are enough. If the garage is wider, you need to put a few more stakes in the middle and mark them too. It is clear that all marks must lie in the same plane. This is again convenient to do using a level. Another way is to take a flat plank or board and apply it to the marked marks. Place a level on top of the bar/board. If everything is set correctly, the bubble will be in the middle.
If you are planning to make a hole in the garage, now is the time to dig a pit for it. If the pit has brick walls, you can immediately pour a concrete floor in it. While you are pouring concrete under the garage, it will gain the required strength and you can lay out the walls. They can be driven out after filling the floor with a cushion of crushed stone and sand.
Materials for backfill
For a normal concrete floor in a garage, it is better to use crushed stone rather than gravel. Gravel, with its rounded edges, you will never compact to the required degree. And if the foundation under the concrete is unstable, even a thick reinforced slab will burst. That’s why we import crushed stone, medium and fine fraction. Average 60-70%, the rest - small.
The cushion consists of compacted crushed stone and sand
There are no special requirements for the quality of sand for pillows. It is important that it is free of clay inclusions, but it can (and should) be sifted before laying.
Making a pillow for a concrete floor
The first step is to level the bottom of the pit. We remove uneven surfaces, fill in depressions, and raise the level to the horizon. Do not think that the concrete floor in the garage can be damaged. It can be done, but then the slab will crack and you will have to redo it.
Now we take a vibrating platform (you can rent it) or a manual tamper and compact the soil. Along the way, once again leveling the plane. When the soil is compacted, crushed stone can be poured. They don’t fill the entire volume at once - it’s normal not to compact 10 cm. The maximum layer is 5 cm, but 3-4 is better. We fill in the required part, distribute it, level it (with a rake) until it reaches approximately the same thickness. We take a tamper or vibrating plate and tamp it.
It is better to compact with a vibrating plate
This compaction of crushed stone when installing a concrete floor in a garage is very important - a certain amount of crushed stone is driven into the ground. As a result, it becomes even more dense, the load-bearing capacity increases, and the possibility of subsidence is eliminated. Tamping is considered sufficient if you step on the surface and leave no traces. In the same way, all portions of crushed stone are compacted, bringing them to the required thickness.
Sand is poured onto the compacted crushed stone. It is also divided into parts of 2-3 cm. The peculiarity of compacting sand: it must be moistened, they also say - spilled. The wet sand is compacted, again focusing on the layers.
We recommend: Which parquet is better to choose for an apartment
Now you can start forcing out the walls of the pit, if there is one. They are brought to the level with the finished floor or even slightly higher - so that you can wash the car right in the garage without fear of water getting into it.
Briefly about the main thing
Now you know what a damper tape for floor screed is, what it is needed for, what it is made from and what functions it performs. Its main purpose is to compensate for the movements of a floating concrete screed or self-leveling floor, and to serve as a shock absorber between them and adjacent surfaces. The material is sold in the form of rolls of different thicknesses and widths, fixed along the bottom of the walls or separates screed sectors with different heating circuits. Mounted using an adhesive layer or mechanical fasteners. You can replace the tape with similar materials cut into strips - isolon, penofol, laminate backing.
Ratings 0