How to properly mix leveling compounds
How to properly mix leveling compounds
If the mixture is diluted incorrectly, no amount of tricks will help make a high-quality coating. The main mistake beginners make is adding more water than indicated in the instructions. A more liquid composition spreads faster, but the strength and durability of the floor is reduced several times. In addition, peeling, cracks, and other defects may appear on the coating.
To properly prepare the solution, you will need water with a temperature of at least +10 degrees, a convenient container for mixing, a drill with an attachment and a dry mixture. Strictly adhering to the specified proportions, pour the mixture into water and mix for 3-4 minutes with a mixer attachment. Then leave the solution for 3 minutes to ripen and mix again for a minute. The result should be a homogeneous mass without lumps, liquid enough to spread without additional leveling. If the technology is followed, the filling process will not cause difficulties, and the mixture consumption will not exceed the calculated one.
| Name | Drying time | Layer thickness | Consumption kg/m2 | Price RUR/kg |
| Horizon universal | 3-7 days | 2-100 mm | 3-4 | 236/20 |
| BOLARS | 4 hours | 2-100 mm | 3-4 | 239/20 |
| Vetonit 3000 | 4 hours | 1-5 mm | 1,5 | 622/25 |
| Palafloor-303 | 4-6 hours | 2-100 mm | 1,4-1,6 | 308/20 |
| GLIMS-S-Level | 24 hours | 2-5 mm | 3 | 478/20 |
| Perfecta Multilayer | 2-3 hours | 2-200 mm | 7-14 | 312/20 |
| xton | 3-4 hours | 6-100 mm | 14-16 | 256/20 |
| Name. Short description | Packaging kg | Consumption kg/mm/m2 | Price | Strength MPa | Layer thickness in mm |
| ALFAPOL VP - finishing self-leveling self-leveling floor M200 F200 Pk5 W12 on a cement base | 25 | 1,75 | 375-471 | 20 | 2-40 |
| REAL Floor leveler, High-quality dry cement-based mortar | 25 | 1,7 | 360 | 20 | 2-80 |
| Bergauf BODEN ZEMENT MEDIUM, self-leveling floor for the final leveling of horizontal surfaces, ideal for further installation of any floor coverings (ceramic tiles, parquet, carpet, linoleum) | 25 | 2 | 289-324 | 20 | 6-60 |
| Forbo Eurobond 915, fast-hardening self-leveling floor, low shrinkage, self-leveling, quick-drying. Suitable for heated floors. For indoor use, incl. in damp areas. Withstands the load from furniture on casters. | 25 | 1,7 | 405 | 20 | 3-50 |
| Petromix PS, for leveling floors on concrete and other hard substrates in dry, damp and damp areas. Serves as a base for floor coverings (parquet, ceramic tiles, textile carpets, plastic coverings, linoleum, etc.) | 25 | 1,5 | 441-471 | 25 | 2-30 |
| The foundation will be T-42 Nipline, a self-leveling, high-strength, moisture-resistant, non-shrinking leveler on a cement-sand base using special chemical additives. | 25 | 1,7 | 342-433 | 25 | 3-30 |
| Ceresit CN 178, for the manufacture of screeds operating under conditions of low and moderate mechanical loads, incl. with constant exposure to moisture (in residential and public premises, on exploited roofs, balconies, terraces, open areas, etc.), during external and internal work, in civil and industrial construction. | 25 | 2 | 370 | 35 | 5-80 |
| Vetonit 4100 cement-based mixture for leveling concrete floors indoors | 25 | 1,6 | 520-537 | 20 | 2-30 |
| vetonit 4150, suitable for quickly leveling concrete floors and creating screeds in residential buildings, offices and public buildings. It is used for repairs and new construction under various types of floor coverings. Used in “Warm Floor” designs | 25 | 1,6 | 520-550 | 20 | 2-30 |
| Berghauf BODEN ZEMENT FINAL, self-leveling cement-based flooring for perfectly smooth surfaces. For rooms with normal and high humidity (bathroom). | 25 | 1,8 | 435-490 | 20 | 0,5-5 |
Types of mixtures for floor screed
A screed is needed to level the floor recesses. The leveling mixture is available in the following versions:
- The leveling screed is used on substrates with large differences in unevenness. The product is poured onto the prepared floors in a layer of no more than 100 mm. The subfloor can be a cement screed.
- The self-leveling mixture contains plasticizers that make it plastic and viscous. During the filling procedure, all irregularities, cracks, and depressions are filled with the composition. The screed dries much faster than other floor leveling products.
- The classic rough version is a mixture based on cement, sand and other fillers that increase the strength of the material.
What does self-leveling floor consist of? Basic components:
- The binder is Portland cement or gypsum. After mixing with water, the solution is gradually transformed into a strong, impact-resistant and durable cement or gypsum stone. This material perfectly withstands long-term loads of compression, abrasion, etc.
- Mineral fillers - washed quartz sand of the required fraction, expanded clay gravel, fly ash, etc. This component forms a kind of “skeleton” of the layer, improves the strength properties of the self-leveling floor, fills the volume, reducing the shrinkage coefficient of the cement mortar.
- Various additives that give the mixture certain properties. They can be divided into 2 groups:
- Polymer additives - modifiers, plasticizers, stabilizers, inhibitors, redispersions and many others. Up to 15 different additives can be combined in one product;
- Mineral and organic components. For example, fiber or glass fiber is introduced into the product for reinforcement. To slow down the curing reactions - tartaric or citric acid, to increase the workability coefficient - carbonates.
The composition of the bulk mixture depends on the type of material. Available:
- Cement compositions containing exclusively white or gray cement (Portland cement) grade M300-M500.
- Cement-gypsum or gypsum-cement mixtures that combine two types of binders: cement powder and hemihydrate gypsum grade G3-G7. Less commonly – anhydrite (only in expensive products). The percentage depends on which element is listed first in the material name.
- Gypsum fast-hardening self-leveling floors. Of course, the basic component in the product is building gypsum.
The next component is mineral fillers. If quartz sand is used, it must be river or alluvial material, carefully sifted and cleared of foreign inclusions. In professional terminology - fractionated.
Washed river sand, fractionated.
For lightweight mixtures, fillers with low specific gravity are used. They can be used to make floors in rooms with weak or old load-bearing structures. Most often these are crushed expanded clay, perlite and other similar substances.
And finally, the last group is additives. As a rule, manufacturers do not use complex formulations because it is impossible to predict the exact reaction of all elements in the bulk composition. The minimum set is plasticizers, modifiers, water retainers, defoamers, adhesives, hardening retarders.
Kinds
All materials for self-leveling floors are divided into two large subgroups:
The first group is produced on the basis of cement. This material can be used in the bathroom, in the living room, as well as in rooms with any humidity level. The thickness of the cement layer is allowed from 2 to 5 cm. Such floors are more expensive than gypsum floors, but stronger and more wear-resistant. The dry mixture is diluted with water according to the instructions.
There are also special levelers with polymerizing binder additives.
Epoxy-polyurethane self-leveling mixtures have the properties of both epoxy and polyurethane floors. This material works great under extreme loads, for example, in the subway, at train stations, at airports.
Cement-acrylic floors are suitable for swimming pools, baths, corridors, and halls due to their rough surface. These mixtures contain acrylic.
Fast-hardening floors, methyl methacrylate. This flooring is applied in a layer of any thickness, it very quickly gains design strength and dries. This material is indispensable when you need to do everything very quickly and smoothly. When pouring it smells very strongly, but the smell quickly dissipates.
Restoring composition for wooden floors. This solution contains a special additive in the form of fibers, which adheres perfectly to the wooden base.
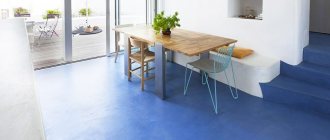
Transparent polymer floors consisting of a polymer and a hardener. The liquid solution is poured onto a perfectly flat plastered and puttied base. Patterned floors are installed in two layers, the top layer being transparent. Three-dimensional banner film, shells, colored sand and other decorative elements are laid between the layers.
These floors look amazing and are used as a finishing coating in homes, apartments, hotels, restaurants, art galleries - wherever an interesting and original floor design is needed. This is a real decoration for any interior.
Depending on the granularity of the additives, leveling compounds are divided into rough and finishing:
- Coarse mixtures contain components of larger fractions, such as sand, crushed stone, ground granite, expanded clay. Therefore, the surface of the layer is uneven. High density prevents the solution from spreading over the surface, which is why it must be leveled according to the rule. Such levelers are used to fill chips, holes, differences in height, and deep cracks in rough foundations. The permissible fill thickness varies from 1 to 8 cm.
- Finishing compositions have a finer structure and have significant fluidity and plasticity. The finishing layer is thinner, it evens out only minor differences in height and penetrates perfectly into all cracks and voids. After hardening, the surface of such a floor becomes absolutely smooth and even.
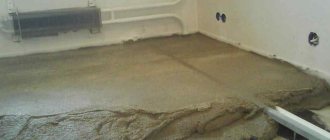
Technology of applying screed from self-leveling mortar
To achieve good results, you need to know how to properly prepare the base for leveling. On concrete floors, where there is always dust, you should clean them using a vacuum cleaner or a damp broom. Remove all broken pieces and fill defects. Patches may take time to dry, so preparation should be done before leveling the floor with self-leveling compound.
The prepared floor should be primed with compounds intended for concrete and compatible with self-leveling floor materials (for example, PRIM-S). Prepare tools and everything that may be required for work:
- container for mixing the solution;
- buckets for delivering the mixture to the workplace;
- drill with a “mixer” attachment - very convenient for mixing water and dry ingredients;
- putty knife;
- a roller with a needle surface to remove air from the mixture;
- ready-made composition based on cement or gypsum.
When preparing the solution, you need to remember that the hardening time of the mixture is relatively short (20-60 minutes). You need to mix enough liquid screed to be able to use it within the time period indicated for a specific brand of composition on the packaging.
It is important to ensure good ventilation of the room, but without drafts. Some formulations contain methyl methacrylate, epoxy resins and other substances whose vapors may be harmful to humans if inhaled. It is not recommended to fill the floor with self-leveling mortar if the room temperature is below +5°C.
Mixing and applying the solution
Pour water into the container in the amount indicated on the packaging of the existing mixture. Self-leveling floor screed should be poured into the liquid evenly. During the filling process, it is best to start mixing immediately. Having finished filling and kneading the mass well, you need to leave it for 5 minutes. After this, quickly mix the composition again and begin applying the composition to the ceiling.
Filling the floor with a self-leveling mixture begins from the far corner. The mixture must be carried in buckets, pouring it onto the floor with a quick, confident movement. It is convenient to lay the mortar in narrow strips, helping to penetrate into the corners with a construction spatula. The composition spreads independently in a layer of 2-20 mm. Immediately after pouring, each strip must be rolled with a needle roller, removing air bubbles from the mixture.
The floor leveled in this way will be ready for further work in 3-14 days. The drying time of the screed depends on the thickness of the layer and is usually indicated on the packaging of the specific composition. At this time, it is advisable to maintain the temperature in the room in the range of +10... +25°C and a constant humidity of about 60% so that the floor screed dries evenly and does not crack.
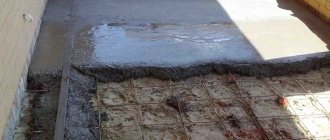
How to fill a self-leveling floor
The screed installation in the room begins with the recesses that are present on the concrete base. When performing installation work, it is necessary to start from a minimum layer of the mixture of 5 millimeters; with a smaller thickness, the floor will begin to crack when drying. It is also not advisable to make a layer that is too thick, which will affect the height of the room. This is especially true for rooms with low ceilings.
The levelers are poured onto the base so that one puddle touches the other. Another option for screeding is to fill it in strips of 40-50 centimeters. The mixture is first leveled using a wide metal spatula, then additionally passed with a needle roller with the required ridge depth. The needles help regulate the thickness of the leveler.
The final self-leveling self-leveling floor quickly sets and hardens, so installation work must be carried out as quickly as possible. To obtain a perfectly leveled, homogeneous surface, the mixture is poured in one pass. The mixture is independently distributed over the base surface, fills cracks and chips, and is straightened in the desired direction.
If you have a large room, it will not be possible to cover the entire surface in one pass. In this case, the mixture is distributed in zebra stripes at some distance from each other. In this case, each plot should have a width of no more than 5 meters. Follow the manufacturer's recommended thickness of the solution, which will speed up its hardening time. The top layer of a thick screed will harden quickly, but a liquid mass will remain in the middle.
After laying the strips, they are passed over the leveler with a needle roller. This tool allows you to compact the mixture and release small air bubbles. They roll along and across the coating, after which the surface is further leveled with a spatula. This treatment allows you to obtain a reliable and durable base for the subsequent installation of the finishing floor covering.
Note! The hardening period of the mixture depends on its constituent components and binder. Such material can harden from several days to several weeks.
The drying speed of the mixture is influenced by the following factors:
- leveler brand;
- thickness of the solution;
- temperature and humidity in the room.
Manufacturers do not recommend walking on newly laid pavement. After such an influence, the surface is deformed, and shoe marks remain on it. After the mixture has completely hardened, you can begin laying porcelain tiles or other types of flooring.
To obtain a perfectly smooth, high-quality base surface indoors, you must adhere to the following tips:
- Ventilate the room before starting to lay the screed. This procedure will help reduce air humidity; excess moisture has a bad effect on the quality of the mixture. The ventilation procedure is carried out immediately before work. It is not recommended to do this after installing the floor; drafts in the room can lead to the formation of cracks on the surface of the leveler. Doors, windows and vents in the room must be closed until the solution dries completely.
- Do not use warm water to prepare the working mixture. The increased temperature of the liquid will promote rapid hardening of the material. Many builders believe that the solution spreads better over the surface if the amount of water is slightly larger than indicated in the manufacturer's instructions. On the one hand, this statement is true, but with an increased amount of liquid, the quality indicators of the screed are lost.
Important! Pay attention to proper care of newly laid screed. Spray water over the surface to ensure uniform drying of the layer.
What are self-leveling floors?
The self-leveling floor is used to create a perfectly flat base surface, on which carpet, laminate, parquet or other decorative covering is subsequently laid. They are made from special building mixtures that correct floor defects such as cracks, differences and unevenness. After combining with water, the composition quickly hardens, so the process of installing the self-leveling floor does not take much time.
Self-leveling floor
This design is preferred for its undoubted advantages over analogues, such as:
- saving budget and time on leveling the base. To prevent leaks, you only need to seal the joints of the floor, walls, and cracks;
- a simple and quick process for preparing the composition for filling the floor. Manufacturers usually place instructions on how to prepare the solution on the packaging;
- no need to use special equipment. To evenly distribute the composition, you only need a rule, in the absence of which you can use a spatula for self-leveling floors (squeegees) and beacon markers.
Types of self-leveling floor
self-leveling floor prospectors
How to make a self-leveling floor with your own hands
It is not for nothing that pourable self-leveling compounds are considered the most complex mixtures that are sensitive to the quality of raw materials. Any component can affect spreadability, shrinkage, sedimentation (stratification) and other parameters.
No enterprise or plant will ever announce the exact recipe for the mixture. Technologists and laboratory staff literally select a unique composition, milligram by milligram, research is carried out for years. Therefore, this information is a trade secret.
On the websites of manufacturers of polymer additives you can find the so-called basic formulations of dry construction mixtures. For example, on the group page the following composition of the self-leveling floor is given:
| Self-leveling floor with Agitan P 803 | Raw materials Gr. |
| Portland cement | 15,00 |
| Fly ash | 5,00 |
| Ca carbonate fine fraction | 6,00 |
| Quartz sand 0.1-0.4 mm = F 34 | 50,00 |
| Larger Ca carbonate fraction | 18,00 |
| Vinnapas 5023 L (5011 L) | 2,00 |
| Peramin SMF-20 (plasticizer) | 1,00 |
| Agitan P 803 (antifoam) | 0,5-0,9 |
| Methylcellulose Tylose H 300 P2 | 0,03-0,1 |
| Amount of water for mixing: about 180 ml. per 1 kg of dry mixture |
It seems simple - mix and you're done. But there are many pitfalls here. What kind of Portland cement exactly? Brand, class, type, impurities, degree of hardening, grinding, material density?
Next, fly ash - how exactly will it react with additives? How will it affect the granulometry of the mixture, how much will it increase the setting time of this or that type of cement? By what percentage will frost resistance decrease?
Fly ash is one of the components of a self-leveling floor.
Calcium carbonate (chalk) promotes workability, but it also requires more water. And in case of overdose, as is known, the cement mortar delaminates or a large amount of ettringite is formed. As a result, the floor quickly cracks and swells. Isn’t it more logical to replace it with a more “healthy” supplement?!
Polymer additives also raise questions. Are they needed in liquid or dry form? In what order should I knead, etc.
Similar information can be found on the website of ZAO EUROCHEM-1
| Mineral components | Cement screed for primary leveling of floors | Self-leveling self-leveling floors based on Portland cement | Self-leveling gypsum-based self-leveling floors | |
| Portland cement M500 D0 | 30,0 | 18,5 | 40,0 | — |
| Aluminous cement (Fondu Lafarge 40% Al2O3) | — | 11,5 | — | — |
| Fly ash | — | — | 7,8 | — |
| Hemihydrate gypsum CaSO4´0.5 H2O | — | 6,5 | — | 43,0 |
| Limestone CaCO3 or quartz flour 10-20 microns | — | 19,4 | 10,0 | 10,0 |
| Quartz sand 0.1-0.4 mm | 20,0 | 40,7 | 35,2 | 42,0 |
| Quartz or limestone sand 0.4-2.0 mm | 39,0 | — | — | — |
| Crushed stone 2-8 mm | 10,0 | — | — | — |
| Supplements | ||||
| Redispersible copolymer powder Neolith P 5000 | — | 2,00 | 2,50 | 2,50 |
| Cellulose ethers Mecellose FMC 60150 | 0,02 | — | 0,05 | 0,05 |
| Stabilizer Starvis 3003 F | — | 0,02 | — | — |
| Superplasticizer Melment F 10 | 0.83 | — | — | — |
| Superplasticizer Melment F 15 G | — | — | — | 1,00 |
| Hyperplasticizers Melflux 1641 F or 2651 F | — | 0,20 | 0,15 | — |
| Shrinkage compensator Hibidan P or Metolat P 861 | — | 0,68 | — | — |
| Antifoam agent Agitan P 803 or Defomex AP 122 | 0,1 | 0,20 | 0,30 | 0,1 |
| Lithium carbonate | — | 0,10 | — | — |
| Wine acid | — | 0,20 | — | 0.15 |
| PAN fiber Ricem 2.5 dtex 4 mm | 0,05 | — | — | — |
| Expansion additive Denka CSA 20 | — | — | 4,00 | — |
| Total: | 100 | 100 | 100 | 100 |
| Water: | 23,0 | 20,0 | 22,0 | 18,5 |
The recipe of 15-21 components is impressive. But this still needs to be found and purchased, and not in industrial, but in small packaging. The focus is on the large wholesale buyer of materials, not the retail buyer. And the cost of polymers is considerable. Therefore, manufacturers always try to choose the recipe in such a way as to reduce the cost of the final product as much as possible.
Construction polymer additives in cans.
Some readers may point out that in individual regulations (GOSTs and SNiPs) you can find approximate formulas and calculation methods. According to the technologists themselves, these documents contain errors, and serious ones at that. For example, GOST 5802-86 incorrectly calculates the water-holding capacity. The error can be up to 20%. Equally important is the equipment.
Thus, it becomes clear that making a self-leveling floor at home is not just difficult - IMPOSSIBLE! To do this, you need to be at least an experienced technologist or, at the very least, an “ace” in concrete and cement science.
Preparing the floor surface for screed
The self-leveling floor is quite unpretentious in terms of the quality of the base. But there is an exception - the moisture content of the base. Water vapor that passes through the fill destroys the polymer films. As a result, the coating may begin to crumble. Therefore, it is very important to create reliable waterproofing before filling. Preparing the base includes the following steps:
- Sealing cracks;
- Primer;
- Waterproofing;
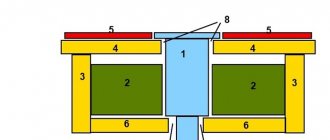
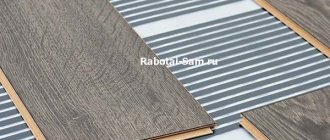
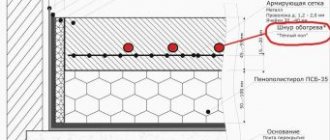
- Thermal insulation and mesh laying;
Small cracks can be repaired in the usual way.
Sealing cracks
You can learn how to seal such cracks in any construction video.
If the cracks are too large, you should first check whether the coating is completely destroyed. If such a process occurs, then leveling is not worth the effort, because the house is in disrepair. If there is no destruction, then when sealing cracks, perpendicular cuts are created to them. With their help, technological seams are made that can reduce the load. Waterproofing will be necessary in all cases.
Waterproofing
The self-leveling floor should breathe only around the perimeter. So you will need any special material, for example, waterproofing. Before you start laying down the film, you need to tape off the corners. They are covered with polystyrene foam tape.
If you decide to create a self-leveling floor on a wooden surface, then first you should check the surface for play. To do this, you can use a homemade plumb line. The device must be placed in the center of the room. The nose of the load should almost reach the floor. After this, you need to walk around the room and track the deviations of the load. The size of the game can be defined as the height of the suspension in relation to the width or length of the room.
The limit is 1.2 mm per 1 m.
If the deviation is greater, then the flooring needs to be removed, rather than laying a new one in its place. If the flooring is stable and of high quality, then you need to seal the cracks. This can be done using wood putty. After this, you will need to carry out waterproofing.
A little about the types of self-leveling compounds
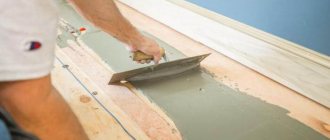
The technology for working with self-leveling floors is simple. The composition is sold in ready-to-use form; it is enough to dilute it with water to the consistency recommended by the manufacturer. After thorough mixing, the semi-liquid mixture is poured onto the floor, stretched with a squeegee and passed with a needle roller to remove the smallest air bubbles. All that remains is to wait for the composition to harden.
Mixtures showing different characteristics designed to solve specific problems can be purchased on the market. For example:
- polyurethane mixtures consist of a polymer, a hardener and special additives, are characterized by high fluidity, and can be used with acrylic dyes. Designed to create a finishing coating;
- compositions based on epoxy group resins also contain a main substance, a hardener and additives. After drying, this floor forms a durable glassy surface that is resistant to aggressive chemicals. A separate group of compounds forms a transparent layer, therefore it is used for artistic floors, including 3D floors;
- Methyl methacrylate mixtures are characterized by the highest setting speed; as a finishing coating of small thickness, they work as a means of strengthening the surface, giving it chemical resistance. The composition is absorbed into concrete, forming a strong and wear-resistant material.
Other groups of compositions contain polymer and cement. They differ in complex characteristics, depending on the components they contain. But all of the listed self-leveling floors are quite expensive and using them for rough or preliminary leveling is ineffective.
Rating of self-leveling floors
When choosing a leveler, it is necessary to take into account the purpose of the mixture. So rough compounds are ideal for screeding. Such materials are used for preliminary leveling of the surface of the base; they are applied in a layer of 5-6 millimeters. The finishing solution is used to finalize the floor. The material is applied in a layer of 4 millimeters after the bottom screed has dried. This floor can be decorated with any pattern or ornament; it is used as a base for laying linoleum or laminate. Quick-hardening mixtures are necessary for carrying out work on preliminary leveling of the base in a short time. The thickness of the layer depends on the differences in the heights of the base.
Interesting article on the topic: Characteristics of polymer self-leveling floor
The most popular self-leveling mixtures on the modern construction market are:
- The Starateli brand is used for screeding in dry rooms, for example, in the hallway or bedroom. Gypsum is added to the composition, it has good mobility. Hardening begins 40 minutes from the moment of application to the surface. Prospectors are suitable for working in large rooms with the possibility of mechanically filling the floor.
- Hercules brand mortar is characterized by high wear resistance and ease of installation. The cost of material is up to $8 per bag weighing 25 kilograms. The composition is suitable for installation in any room, regardless of the humidity level.
- Self-leveling mixture Eunice is made on a cement base. This means that this material can be successfully used in rooms with any temperature and humidity conditions. The solution is characterized by rapid hardening; such a floor can be walked on within 3 hours from the moment of installation. Eunice is ideal for hard and durable bases such as a concrete slab, cement-sand screed or gypsum coating.
- Ceresit solutions are intended for finishing the base surface. Such mixtures are laid in any room in a layer of 3 to 15 millimeters. Used for concrete bases and cement-sand screed. Ceresite self-leveling flooring is considered an ideal base for laying flooring made of linoleum, laminate or ceramic tiles.
- Volma mixture is suitable for installation in a toilet, bathroom, kitchen or any other living space. This solution has good mobility and a long setting period. You can walk on the floor within 6 hours from the moment of pouring. Laying of the floor covering begins 7-9 days after the completion of the base installation process.
- Levelers Horizon is one of the many levelers of the Eunice brand. The polymer composition is used to install a screed under a “warm floor” heating system or to pre-level the base before installing the selected floor covering. The material is characterized by high strength and durability, allowing you to work with any height differences. Horizon is on sale for roughing work and finishing coatings.
Filling a self-leveling self-leveling floor with your own hands is quite simple. First you need to calculate the amount of work and select the required type of mixture in the required quantity. It is recommended that two people fill the floor, one mixes the solution, the other levels it using a needle roller and a metal spatula. Follow the tips given in the article, and you will receive a reliable, high-quality and beautiful base for the subsequent installation of flooring.
Preparing the base for pouring
The first step is to completely empty the room of furniture, clean the floors of dust and other small debris. If you have wooden floors and, for example, laminate on top, then it must be removed.
If you want to pour self-leveling mixture onto floor slabs, they must also be thoroughly cleaned of dust and other debris. Before pouring screed in an apartment, many people measure the strength of the floors with special tools. In principle, there is no need to do this, since a screed made from self-leveling mixtures will weigh several times less than a cement screed and will also be several times thinner.
Repairing the floor in an apartment: working with screed and joists
Be sure to check the floor for moisture if you live in your own home and your ceiling is practically on the ground. This is done using a piece of 2x2 film, which is laid on the floor and after 24 hours, see whether there is perspiration on it or not.
Check your foundation for cracks, depressions, and potholes. All this must be calculated when purchasing self-leveling mixtures. Otherwise, it will be a shame if you don’t have enough of it when doing work.
If you have heated floors, whether electric or water heated floors, all pipes must be placed on the floor using silicone. If it is a warm water floor, then fill it with water before pouring and also grip it to the floor with silicone. Otherwise, all communications may emerge when pouring self-leveling mixtures.