Basic information about tinning
The process consists of preparing the surface of the tip and applying a thin layer of molten solder to its surface. When soldering, it is impossible to do without this technological operation. This is done to allow the transfer of solder to the parts being connected.
When exposed to high temperatures in air, the working tip of the tool becomes covered with an oxide film, which prevents the molten solder from sticking. Then the question arises: how to properly tin an electric soldering iron?
Initially, you need to remove the oxidized layer from the working area. For this, depending on the material of the tip and its condition, various abrasives are used. Sometimes, in addition to cleaning, you have to level the working surface.
At the next stage, the treated areas are coated with molten solder. Flux is used to protect against re-oxidation. Tinning is necessary to ensure good adhesion of the molten solder. Its transfer to the elements being connected is possible only with a tin-plated tool.
Soldering iron tinning
What is soldering iron tinning? This is when solder is applied to the soldering iron tip, which covers the copper base of the tip so that it does not burn during operation of the soldering iron and is capable of releasing solder.
Copper tips
Tinning should only be done if the tip is copper.
Before heating, copper tips are cleaned either with a file or emery to remove old oxides and burnt surfaces.
Next, the copper tip of the soldering iron is dipped into solder with the addition of rosin (or flux) and thus the soldering iron is tinned and becomes suitable for use.
Unburnt eternal stings
If you have an “eternal tip” with a coating, there is no need to tin it like a copper one.
The main thing is to handle it correctly, clean it on time and not make gross mistakes.
Although copper tips have better thermal conductivity, over time they begin to lose their shape and burn out. But “eternal tips” have a coating that protects the metal base of the tip from deformation and burnout.
The advantages of an eternal sting are obvious, but not all even experienced radio amateurs want to work with them.
This happens because the “eternal sting” cannot be looked after in the same way as a copper one.
What not to do with eternal stings
For example, it is strictly forbidden to clean unburnt tips from carbon deposits with needle files or sandpaper.
Yes, you will partially remove carbon deposits from air and old solder, but you will damage the tip coating. And over time, it will accept solder worse, or even become completely covered with black oxides.
How to prepare a soldering iron for use
So, in order to properly prepare a soldering iron with an eternal tip, you need a sponge to remove solder.
Or a cotton rag moistened with water will do.
Ordinary cotton wool, rolled into a ball, will also work. It removes solder well. And this is all that is needed if there is little carbon deposits on the soldering iron.
Plug in the soldering iron or station and wait until the tip heats up.
By the way, the soldering temperature should not be higher than 300 °C.
If there is old solder on the tip, remove it with a damp sponge or rag.
Moreover, it doesn’t take long to clean, but quickly, in just a couple of movements. And immediately apply fresh solder to the clean tip.
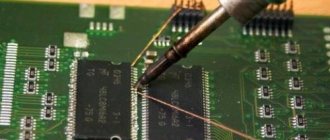
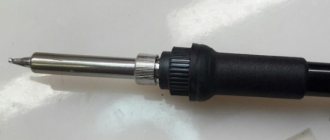
The haste is due to the fact that the surface of the tip is quickly covered with oxides due to air under the influence of the high temperature of the heater. In the photo you can see a small black dot on the surface of the sting.
These are the first oxides that will gradually turn into large black spots to which the solder will not stick.
Therefore, do not hesitate and immediately add solder to the soldering iron.
If you use a new tip, it will immediately begin to burn, so immediately add fresh solder to the tip.
Why sharpen your soldering iron tip?
Sharpening must be done for three reasons:
- giving the required shape;
- leveling the working surface;
- removing a layer of scale and oxides.
It is necessary to connect parts of various shapes and sizes by soldering. Each master prepares a tool for specific working conditions. In some cases, the tip is sharpened “to a cone”; in others, the tip is made into a pointed shape, like a chisel.
For reference! Modern soldering stations are equipped with replaceable rods, the working surfaces of which have different sizes and shapes.
Soldering iron “tip”
During operation, the tip of the tool wears out, metal erosion occurs, and recesses form in the working area. This can be eliminated by sharpening.
Another reason for sharpening is the formation of a layer of scale. Under the influence of high temperature from the flux, dark deposits appear on the rod, which make it difficult for the tin to stick.
There is another technique for giving the desired shape - binding. Using a hammer, the desired tip of the tip is formed and the metal is compacted. Subsequently, the working area is cleaned with a file.
Soldering iron tip sharpening tools
When figuring out how to sharpen a soldering iron tip, start with the tools that are useful for the task. Among the main ones:
- file;
- sandpaper;
- coal or pencil.
Files for sharpening
When people don't know how to properly sharpen a soldering iron tip, they often think that it is a difficult process. In fact, this is not so, because the main difficulty lies not in the availability of special tools or the use of special technologies, but in the precision of manual work. A minimal set of tools is enough for this.
Soldering iron preparation and maintenance
Homemade soldering tools require maintenance. During operation, its tip burns out, irregularities are formed, which should be periodically eliminated.
How to properly prepare and tin the tip of a new soldering iron
New soldering iron
You won’t be able to perform soldering right away with the tool you just purchased. It must first be prepared for work. Before tinning the tip of a new soldering iron, you need to perform a number of sequential actions:
- Remove packaging and inspect the device.
- Give the tip of the rod the required shape (forging or filing).
- Place the soldering iron on the stand.
- Plug in and heat the tip until a reddish-yellow hue appears. This achieves burning of the preservative composition and oxides on the outer surface.
- Scrape off any carbon deposits that have formed.
Only after this can the working area be tinning using one of the methods described below.
Be careful! The heating temperature of the soldering iron reaches more than 200 degrees. Touching it with unprotected skin will result in burns.
Service
Due to constant heating, the working rod becomes covered with scale. This impairs heat transfer from the heating element. Descaling sequence:
- The rod is pulled out of the cold soldering iron.
- Use fine-grained sandpaper to remove the resulting loose layer.
- Tilt the hole down and lightly tap the heating part to release the slag.
- Install the working rod into the soldering iron.
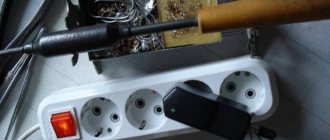
The tool is powered from a 220 V electrical network using a cord with a plug. Before work, be sure to check their condition. A broken wire or poor contact leads to interruptions in operation or complete failure.
Attention! Careless contact of a heated tool with the power cord destroys the insulation, which can lead to a short circuit or injury to the operator.
Tinning materials
Materials for tinning
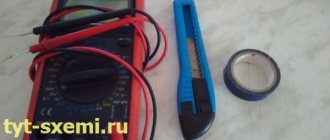
The set for tinning is small and consists of the available materials:
- solder (tin and its alloys with lead, silver or other metals);
- flux (pine rosin, ammonium chloride (ammonia), zinc chloride, solutions of hydrochloric or hydrofluoric acids);
- abrasive (finely notched file, sandpaper);
- sponge (metal, viscose, for washing dishes);
- wooden block.
Note! The flux is selected depending on the material of the parts to be joined. You cannot solder electronic components using acids. And for galvanized iron parts it is better to use zinc chloride, ethyl alcohol, and ammonium chloride.
Features of the working body of the soldering iron
When soldering, the parts being connected, flux and solder are heated from the tip of an electric soldering iron. For most devices, it is made of copper, a metal with good thermal conductivity. This material is easily processed and changes shape. Molten solder sticks well to pure copper. But the emerging oxides reduce adhesion. Therefore, there is a need to remove them periodically.
Depending on the desired heating temperature, the thickness of the working element and the power of the tool are selected. If you need to solder large parts, use a soldering iron with a thick rod. To install small elements of microcircuits, you will need a low-power device with a thin tip.
Electronics for everyone
I often come across statements on the Internet in various forums like “I can’t work with an eternal tip, it doesn’t take solder - the copper soldering tip is foreign” or “An eternal tip is good, but only if it’s from a cool company, everything else sucks.” And in that spirit.
I have been using exclusively a fireproof tip for several years now, at first as part of the ST-96
, then I switched to the
ZD-929C
, which I’ve been using for three years now without any complaints. And I will no longer voluntarily switch to a traditional copper soldering iron. Well, what the hell, clean it, tin it, sharpen it, I forgot like a bad dream. Nevertheless, there is a problem and not everyone knows how to solve it.
Text version Main problem:
The tip does not take solder, that is, the solder melts, but the tip does not wet. And either it does not stick to it, or it lies on it in a lump. In connection with this feature, even a myth arose that fireproof (eternal, nickel-plated, whatever they were called) tips are used only for soldering with direct solder supply - that is, solder is supplied to the soldering point in the form of a thin wire, and the soldering iron only melts it and it does not need to be wetted with solder. Nothing like this! For the classic method “soldering iron to solder - soldering iron to board”, an eternal tip is also great.
Of course, feed soldering is convenient, and with some skill it turns out very quickly and efficiently, but it requires two free hands - to hold the soldering iron and hold the wire. And who will keep the payment? There are all kinds of holders, of course, but they are not very convenient. Although tabletop yews are very good.
So what's the problem? The problem here is that the tip coating oxidizes very quickly at high temperatures and ceases to be wetted. The optimal temperature at which soldering is comfortable and the tip does not oxidize is about 250-300 degrees (for ordinary 60/40 solder, lead-free solder does not count - this is a separate problem), and a regular soldering iron, without adjustment, sometimes heats up to 350-400 degrees.
Conclusion - we need to lower the temperature. There are a lot of options here, but the simplest one is to turn on the solder via Dimmer. A dimmer is a knob for smoothly switching on lights in an apartment. Sold in stores that sell all sorts of sockets, light bulbs, lamps and other lighting electrics. It costs 200-300 rubles at most.
In order for the tip to be wetted, it must be tinned again. But simply poking into the solder will not achieve the effect - the solder does not wet the tip! With flux, the effect is also not great. I found a way to do it quickly and efficiently.
- We take a piece of cotton fabric, I took a stub from a terry towel. We wet it generously and squeeze it out so that it is moist, but not flowing.
- Next we need rosin. The most ordinary rosin, for 10 rubles a jar.
- A little solder. It’s better to use solder in a lump, about the size of a drop.
- We throw the solder into a jar of rosin. Let it lie there for now.
Now we need to act quickly.
- First, we vigorously rustle the hot sting on a wet rag several times, so that all the primary oxide is scraped off the sting. From all sides.
- And then, until a new oxide appears on the tip, we poke it into the rosin and begin to melt our solder in the rosin. The goal is for the solder to melt and begin to sink.
- In this case, rosin dissolves the last oxides from the tip, and liquid solder immediately tins them.
All! Carefully wipe the sting on the same rag and you can continue working. The main thing is that the temperature in the future should not be higher than 300 degrees, otherwise all the work is in vain - the tip will burn again and will no longer be wetted.
And finally, let me remind you once again that such stings love gentle handling. They should not be scratched or sanded with a file or sandpaper. Only with a wet rag or viscose sponge. A sponge or rag can be soaked in regular medical glycerin and then it will always be wet.
On my main tip, which has made God knows how many thousands of rations, sometimes works around the clock and was bought for 30 rubles at a flea market, for several years now there has not been even a hint of signs of wear. Only the external decorative coating was saturated with flux and turned yellow, but these are minor things.
Z.Y.
My favorite
ST-96 (ST-95A)
unfortunately has practically disappeared from sale. I don’t know where you can buy it now. I’m looking for an adequate analogue in terms of price/quality, so that I have something to recommend in the future.
How to tin a soldering iron tip
The tool must be serviced before each soldering. It is necessary to ensure that the working surface is covered with a thin layer of solder. The sequence of actions depends on the device of the instrument.
Copper tip tinning
Before tinning a soldering iron with a copper rod, it should be inspected. A thick layer of carbon deposits is removed with sandpaper. The material of the tip is soft, so there is no need to be zealous. Close attention is paid to the sharpened part. It should be completely clean and smooth.
After cleaning, the instrument warms up. To prevent the metal from oxidizing in air, the tip is dipped in rosin and then brought to the solder. The alloy adheres well to the cleaned surface and a small drop is collected. The tip of the working body is dipped into rosin several more times to evenly distribute the solder.
Excess liquid alloy is removed on a piece of cardboard coated with flux or a damp sponge. An ideally tinned soldering iron should have a thin layer of tin on the working surface. To make soldering easier, I use wire with rosin. The tinning process using this material is simplified. It is enough to bring the tip to the wire and the solder and flux will evenly cover the surface.
Attention! The recommendations described here apply only to instruments with a copper shaft.
Treatment of a ceramic working body with abrasives will lead to its damage and loss of performance properties.
How to tin an electric soldering iron while working
After some time of soldering, the tool again begins to pick up solder poorly. Therefore, it must be maintained during operation. Various materials are used for this.
Wooden block to help
Wooden block
An ordinary rough block made of coniferous wood will help to quickly remove scale that has appeared. First, a small amount of flux is poured (poured) onto its surface and a piece of solder is placed. If cleaning is necessary, the working surface of the tip is pressed against the block and a reciprocating movement is made, while simultaneously picking up tin.
In a metal sponge
Metal sponge
A regular wire scouring pad also makes tinning easier when soldering. But this method requires some preparation. For convenience, a metal sponge is placed in a glass. Its lower part is coated with thick flux. When the tip moves along the wires, scale is removed. And if you take a little solder and immerse it inside the sponge, you will get tin. This method is suitable for tinning and soldering irons with ceramic or nickel plated tips.
In rosin
This method is suitable for an old soldering iron with a soft copper tip. After cleaning with a file or sandpaper, the hot material instantly oxidizes. In this case, you will have to tin directly in rosin. To do this, use auxiliary objects made of copper or its alloys: a piece of cable braid or a small thin plate. Pieces of rosin and solder are placed on top. The sting is rubbed until the flux and tin melt.
Classic way
In this case, you will need refractory solder. Its advantage is slower evaporation from the working surface. Execution sequence:
- prepare a wooden block, put solder on it;
- clean one edge of the tip with a file (emery);
- dip in rosin;
- press and move along the block several times, grabbing the solder;
- repeat everything for the second face.
When a wet desoldering sponge won't do the trick
A sponge or rag moistened with water will not help remove carbon deposits from an eternal sting. These surfaces and water, on the contrary, worsen the situation.
Remember an important rule - the soldering iron tip should always be with solder . There is only one exception - when you need to remove excess solder from a board or part. For example, for high-quality use of copper braiding, you need a clean tip without solder.
There should always be solder on the soldering iron. It protects the surface of the tip from oxides while you are not using the soldering iron and are busy with something else. When you need a soldering iron and fresh solder, you simply clean the tip from the old oxidized solder with slag on a sponge or rag moistened with water, and take fresh solder.
If, nevertheless, there is a large deposit on the tip, due to which the surf is not taken, then this deposit can be removed in three ways.
Copper or metal thin shavings
Metal shavings simultaneously remove solder from the surface of the tip and erase the carbon layer. Copper shavings, which are sold at radio stores, work best, but a household metal sponge will also work.
The difference between them is in chip size and quality. Copper shavings remove solder better and gently remove oxides from the tip.
The shavings are very easy to use. It is enough to dip the tip into the shavings and run it several times over the entire area. The oxides and solder will remain there.
Swimming in solder and flux
You can burn off the oxides with a large amount of solder. It is necessary to “bath” the tip in a large amount of solder and flux. In the airless space inside the solder, the oxides will burn and the surface of the tip will be cleaned.
Twist several rods of solder into one ball and add flux or soldering acid.
Now dip your soldering iron into this lump and bathe it in it. And do all this on a wooden board or an unnecessary board so that the temperature does not leave the soldering iron and helps remove oxides.
After a couple of minutes, clean the sting with a sponge.
If oxides remain, repeat the procedure again.
Activators for stings
This method will be needed when everything else fails and nothing else can remove the oxides. If you still need a sting, you can try a sting activator. It is sold in online stores for radio amateurs or on AliExpress.
It is enough to dip the tip into the activators, and it will be clean again. (instructions may vary) But do not abuse this. Activators emit a lot of harmful substances, and why use it constantly when a metal sponge perfectly removes small oxides.
Preparing the tip of a modern soldering iron
In addition to copper, new soldering iron models use other materials. The tips are made of ceramic, nickel-plated, as well as several metals. The last sample has a steel core inside, followed by a layer of copper, which is coated with nickel, and the working area is silver-plated.
Preparing for operation of a specific model should be carried out according to the manufacturer's recommendations. Such tools cannot be sharpened or treated with abrasives. The tip is wiped with a cotton rag and immediately immersed in flux, adding solder.
How to prepare a fireproof tip
For soldering devices, sets of non-burning tips are produced, which are covered with a thin protective layer. Such kits of domestic or Chinese production are more often found on sale. They do not need to be sharpened periodically, since there are rods of various shapes.
Unburnt tip
Attention! These tools should not be overheated, hit or treated with abrasives, as this will destroy the coating. They can be wiped with a cloth or a special sponge.
Tinning sequence:
- prepare a piece of wet cotton cloth (towel), rosin and solder;
- warm up the soldering iron;
- rub the working part of the tip firmly on the fabric;
- quickly dip the tip of the tip into rosin and solder;
- achieve uniform spreading of tin;
- Take out the soldering iron and rub it on the cloth again.
There is nothing complicated in preparing the working tip of a soldering iron. The choice of actions and their sequence depend on the material of the tool. The methods described in the article will allow you to quickly perform tinning and prevent rapid wear of the tip. You shouldn’t be upset if you don’t succeed in tinning and soldering the first time. In the process of work, each master will acquire the necessary skills.
How to tin a tip with a metal sponge?
Sometimes it happens that the soldering iron tip does not tin, even if the processing is carried out for quite a long time. The use of a metal sponge can significantly change the situation. Both ordinary household options and professional sponges are suitable for this. In branded soldering stations you can find special devices for dry tip cleaning, which are made like a steel sponge.
Using a metal sponge to tinning the tip
"Note!
This is a really reliable and fast way of tinning.”
When choosing ways to tin a soldering iron tip at home, you don’t have to use just the sponge itself, which may be quite enough, but add improvements. If you smear it in a thick flux, for example, in soldering lard, the effect will be more significant. You can apply a piece of solder to the tip itself when it warms up, this will help clean it and tin it at the same time. This method is suitable for such types of stings as:
- Copper;
- Nickel;
- Ceramic.
"Important!
You shouldn’t press the sponge very carefully when tinning, since with such actions it is very difficult to damage the soldering iron, and it is quite possible to leave unworked areas, so it is better to do the processing with force.”
How to tin a sting in rosin?
Tinning the soldering iron tip with rosin
Methods for tinning a soldering iron tip without rosin may be simpler, but using this material you can work even with old tools that used soft copper to produce the tip. The main problem here is the rapid oxidation of the material, so that after cleaning the master will not even be able to quickly bring the soldering iron to the place of work before everything has oxidized again. The only way to do this is to tinning directly in rosin. This requires placing a piece of steel wire or some similar object under the tool. You need to rub the tip until the flux melts. It is advisable to use solder at this time.