The tip of a conventional resistive soldering iron is heated by an electric current that flows through a nichrome spiral wound around the rod capsule. Disadvantages of this process: low efficiency, local heating, and as a result, high energy consumption.
Ceramic soldering irons are more advanced, but they are susceptible to sudden temperature changes. An induction soldering station works on a completely different principle. The tip heats up quickly, and heating adjustment is as simple as possible.
Principle of operation
The main difference between an induction soldering iron and a conventional one is the heating element, or rather, its complete absence.
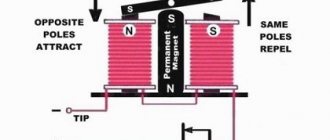
Heating of the tool occurs due to the occurrence of eddy induction currents under the influence of an alternating magnetic field. The design of an induction soldering iron includes a coil into which the tip rod of the device is inserted.
When current is applied to the coil, a magnetic field is generated in it. It acts on the soldering iron tip, where induction currents are formed, heating the rod itself.
In this case, the soldering iron tip heats up evenly, because the induction current acts on it along its entire length. The service life of such a tool increases, and its efficiency increases.
Initially, induction soldering stations were produced with a frequency of 470 kHz, but today there are models that supply voltages of 13 MHz and higher. Warming up occurs literally in a second.
Heating control principle
You can control the heating process in two ways:
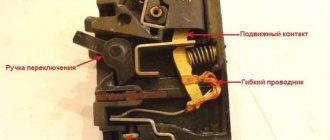
- By installing a temperature sensor on the tip and connecting it to the digital control unit. This method of temperature stabilization is used in almost all inexpensive induction soldering stations, for example: Quick 203H or Yihua 900H (shown in Figure 2).
Digital station Yihua 900H - By changing the composition of the ferromagnetic alloy covering the tip. This principle is based on the fact that at a certain temperature (Curie point), ferromagnets lose their properties, as a result of which the soldering iron stops heating. This method of temperature stabilization was patented by Metcal under the name SmartHeat®, which literally translates as “smart heating”. Used in Metcal, OKI, ERSA, Weller, etc. models.
Figure 3. Model PS 900, can be used for both lead-free and conventional soldering
Each of the methods presented above has its own advantages and disadvantages. Stations with a temperature sensor are significantly cheaper, which makes them accessible not only to professionals, but also to amateurs. The accuracy and reliability of such equipment directly depend on the digital control unit.
The second method of temperature stabilization is carried out by installing cartridge tips with a certain Curie point - it is more reliable. But SmartHeat® stations have two significant drawbacks:
- High cost; not every professional can afford to buy such equipment. But the new generation of budget models is more affordable.
- When changing the soldering mode, it is necessary to install the appropriate cartridge-tip, which, as a rule, is not included in the package and is not cheap.
Cartridge tips
Heating adjustment
The core of an induction soldering iron is made of copper (not a magnetic material), and the back of it is coated with a ferromagnetic material (an alloy of iron and nickel). The front part serves as a sting, the core itself is called a cartridge.
The heating of the copper tip is adjusted as follows:
- when an alternating voltage, and therefore a field, is applied, Foucault currents are generated in the coating, which heat the material;
- heat is transferred to copper;
- as soon as the coating temperature reaches the Curie point, the magnetic properties disappear and heating stops;
- during operation with an induction soldering iron, the copper tip transfers heat to the part and cools, and the ferromagnetic coating also cools;
- as soon as the coating cools, the magnetic properties return and heating immediately resumes.
We can say that automatic temperature control occurs, and with high accuracy.
The maximum heating of an induction soldering iron depends on the properties of the magnetic alloy and core. This control is called smart heat.
You can change the temperature for specific soldering conditions by installing a temperature sensor that is connected to the station control unit, or by changing the cartridges (core with tip) that are inserted into the handle of the induction soldering iron.
The first option is cheaper than the second, so today it is used not only by professionals. But the second method is more accurate and reliable.
Short review
Let's start with a station with a Quick 203H digital control unit (its photo is shown in the figure below).
Appearance of the QUICK 203Н station
The original model of this station costs between $220-$240, a Chinese analogue can be found at half the price (when choosing, pay attention to the package, it can be supplied without a soldering iron). Works great with SMD radio components and lead-containing solder.
Video: review and operation in real conditions of the QUICK 203Н station
Negative points: massive elements and lead-free solder require a long time to warm up.
Characteristics:
- The power declared by the manufacturer is 90W.
- Operating temperature from 200C° to 420C°.
- A voltage of 36V with a frequency of 400kHz is supplied to the induction coil.
- Stabilization of the established thermal regime is carried out with an error of 2C°.
- Heating to an operating temperature of 350C° takes no more than 25 seconds.
The digital control unit allows you to set 10 temperature profiles, set a power-on password lock, perform calibration, and set a delay time for turning on the sleep mode and turning off the device.
Those who purchased a Chinese analogue of the device are advised to immediately worry about purchasing the original tip, since what is included in the kit is more decorative than working.
Now let's look at the PS-900 station operating using SmartHeat® technology (its appearance is shown in Figure 3). This is the most affordable model from the OKI line, its estimated cost is about $250.
Characteristics:
- Minimum power 5W, maximum – 60W (automatically adjusted).
- The inductor operates at a frequency of 470 kHz.
- Power consumption – 90W.
- Supply voltage from 90 to 240V.
Peculiarities:
- Since the temperature regime is set by a cartridge nozzle, the control unit panel is simplified to the minimum; it only has a power button.
- It is possible to replace the standard inductor with a diameter of 7.5 mm with a less powerful five-millimeter one of 35 W. This makes it possible to perform delicate soldering using microtips.
- The soldering iron automatically turns on when removed from the stand and turns off when installed back.
- It is necessary to separately purchase a set of cartridge tips for various soldering modes.
As a comparison, we present the main characteristics of one of the top-level models - MX-5241 (see Figure 6). It is necessary to immediately warn that in the hands of an amateur such an instrument will become an expensive toy, nothing more.
Figure 6. MX-5241 – equipment for professionals
Characteristics:
- Output power range from 5 to 80W (automatically adjusted).
- The operating frequency of the inductor is 13.56 MHz.
- Power consumption – 125W.
- Supply voltage from 90 to 240V.
Two independent channels allow you to simultaneously use thermal tweezers and a soldering iron.
Thanks to the instantaneous power indicator, selecting the required tip cartridge is greatly simplified.
The cost of this “miracle tool” is more than $1200.
DIY assembly
The question of whether it is possible to make an induction soldering iron with your own hands is mainly theoretical. From a practical point of view, this is unjustified even from a purely price point of view.
It’s just that any Chinese soldering station will cost the same as a DIY one. And the conversation about a homemade design will mainly concern the control unit. Why do you need to buy an induction soldering iron?
As for the actual manufacture of the tool itself, it can be made from scrap materials. True, such an induction soldering iron will be low-power.
You will need a 5-10 Ohm resistor, copper wire and a ferrite bead to make the coil, as well as wires to supply electric current.
First of all, use a multimeter to check the resistance of the resistor. Then remove the cover from one side. Now you need steel wire.
For example, you can use a paper clip for this. It is unrolled and one end is tinned. The other end is wrapped around the resistor in the place where the cover was removed.
Next, you need a piece of PCB, which is also tinned on both sides. Its size is selected so that it fits freely into the future reel body. Now the textolite plate is soldered to a wire from a paper clip and a wire from a resistor.
Next, a coil is assembled - a copper wire is wound onto a bead, and wires with a plug are connected to the ends of the bead. A tinned textolite plate is inserted into the prepared coil. All connections are soldered.
All that remains is to wrap electrical tape around the coil, insert a thick copper wire into the open resistor, and insert the coil itself into the prepared housing. For example, it could be an aluminum tube.
Please note that the copper wire must fit into the resistor with interference so that the tip of the induction soldering iron does not move in its body.
And the last thing is to wrap the entire body of the device with insulating tape. Here is a simple diagram for assembling a homemade induction soldering iron. Of course, they cannot solder large workpieces, but for a small microcircuit it is just right.
Choice
Actually, the selection process consists of determining the area of application of the station. The budget model PS-900 is perfect for industrial hand soldering and for those who plan to engage in radio electronics at a professional level.
Induction models with a digital control unit are more suitable for amateurs, since setting the required thermal mode is much easier than selecting a cartridge tip with the corresponding Curie point.
Please note that inexpensive induction devices are not manufactured with a hot air gun. If it becomes necessary for work, the hot air station can be purchased separately.
Features of devices
Among the features of induction soldering irons, we should note a thin, replaceable cartridge, on which the heating temperature of the tip largely depends.
It is a thin tube, which, in combination with the lightweight body of the device, makes it possible to sit for a long time during the soldering process.
The hand does not get tired, which means that the accuracy of the tip and solder supply does not change, there are no leaks of excess material, and the speed of operations increases. There is no complex electronic circuit, the degree of heating is adjusted automatically.
In all respects, an induction soldering iron is more advanced than traditional soldering devices. Although it is not yet widespread enough, this design can be classified as a new generation of technology.