Screwdriver device
This mechanism consists of the following parts:
- DC motor. It has the shape of a cylinder; instead of an excitation winding, the housing contains permanent magnets. This simplifies the design and provides sufficient torque at low speeds. The drive (sun) gear of the planetary gearbox is mounted on the electric motor shaft;
- Reversible speed controller. The adjustment circuit is assembled on a PWM controller and a field-effect transistor. Reversing is carried out by switching the polarity of the power connection to the motor brushes;
- Planetary reductor. Made in a separate building. It got its name because of its resemblance to the solar system. Consists of a ring gear, a central (sun) gear, satellites and a carrier. The ring gear transmits force through the spring-loaded balls of the load regulator. There are models with two-speed gearboxes. Increased speed is activated when using the device as a drill;
- Rotation force limitation mechanism. Serves to limit the force when tightening screws. Transmits torque through balls pressed by an adjustable spring;
- Removable battery. Consists of individual elements in one housing. The voltage in different models ranges from 9 to 18 volts.
Methods for restoring the functionality of a screwdriver
If the batteries fail to work, it is necessary to look for ways to solve the problem. Possible paths are as follows:
- purchase new battery packs. Often the price for such products is not much less than what you would have to pay to buy a new tool. Therefore, they buy an expensive professional screwdriver;
- buy the batteries yourself. Disassemble the battery pack and solder it again. This option is a little cheaper than the previous one, but helps restore functionality;
- Converting a cordless screwdriver to a corded one. Typically costs are low. The problem of purchasing new electricity storage devices disappears forever.
Easy tool restoration
The main advantage of a cordless screwdriver is its mobility. These tools use a lithium-ion battery, which is protected from overload and complete discharge. In addition, there is protection against overcharging in the form of a separate circuit built into the element itself. The main power source (primary) is 220 V, and the battery is also recharged.
Depending on the model of the screwdriver, the battery receives a charging voltage from 14 V to 21 V. The battery output produces a supply voltage from 12 to 18 V. This type of battery lasts a long time, but if the tool is not used for a long time, the built-in discharge protection will not help battery cells: discharge occurs constantly.
To increase service life, it is necessary to constantly discharge and charge the battery. If for some reason it was not possible to “keep track” of the tool, a specific battery element often fails. There are basic ways to solve this problem:
- Replace the battery with a new one.
- Buy a new tool.
- Convert a mains-powered screwdriver.
When replacing the battery, please note that a new one is quite difficult to find. The tools are made in such a way that it is difficult to find spare parts for them. It is not profitable for a company to produce its product with high repairability, since it needs income from the purchase of products. You can only find a new battery at dealers. In addition, another option is possible: disassemble the battery and replace the faulty battery.
When purchasing a new tool, the user tends to buy a model of a higher quality, forgetting about the rules for using lithium-ion batteries. Basic rules that will help preserve the service life of the tool for a long time:
- When purchasing in winter, it is strictly forbidden to “launch” the tool immediately. You need to wait about an hour until it “warms up” to room temperature.
- Place the battery on charge.
- Perform the battery charging and discharging cycle about 3 times.
If none of the options for solving the problem are suitable, you need to start converting the screwdriver to a network one with your own hands. It's easy to do. There are many simple and complex ways. Changing the tool model has several positive aspects:
- There is no need to recharge the battery.
- The load on the mechanical part is reduced.
- Lots of power supply options.
- Increasing the quality characteristics of the product.
In addition, it is possible to maintain mobility by converting the charger into a block version for charging almost any battery.
Why remake a cordless screwdriver?
Why remake a screwdriver and when does the need arise?
If you are reading this article, you have probably already appreciated all the convenience of this tool. Without unnecessary wiring and at any time, you can use it even in the most inaccessible places, until the battery runs out. This is the first drawback of the screwdriver. The cheaper the tool, the faster its battery will exhaust its charging cycles.
Here is the second drawback. And you must understand that the manufacturer saves just as much as you do, and there is nothing unusual about it. Buying a new battery in terms of costs is practically no different from buying a screwdriver, but there is a way out, and now we will look at options for converting a screwdriver from battery to mains power.
There are several ways to convert a screwdriver from a cordless one to a mains one:
- using a laptop charger;
- using a PC power supply;
- using a car battery;
- using a power supply from halogen lamps;
- using a Chinese 24V power supply board.
Advantages and disadvantages of remodeling
Converting a screwdriver into a network model has a number of advantages. Among the main advantages are the following:
- no need to periodically recharge the device;
- the power of the tool will not deteriorate due to a weak battery;
- no need to change batteries.
However, this rework also has its drawbacks. The main disadvantage is that such a tool is more difficult to use in hard-to-reach places. You will have to buy a special extension cord.
Basis for remodeling
The price of ready-made power supplies in online stores or regular hardware departments is very high. There is no point in buying them for that amount, but there is a better solution to this problem.
Important! A power supply from a computer will come in handy - such products are very powerful and almost everyone has them. Often they lie idle.
Buying a device won’t break your wallet either, because a used 300-500 W item can be bought very cheaply. It is important that the block is functional, and its appearance does not matter.
What are the advantages of remodeling?
The power of a cordless screwdriver competes well with its mains counterparts, but only as long as its batteries are charged at a sufficient level. When the battery runs out, it needs to be recharged from the network. This factor is the first disadvantage of this power tool.
The second disadvantage is the limited number of recharge cycles. Moreover, the cheaper the battery pack, the faster its service life is exhausted. Purchasing a new battery is almost comparable in price to purchasing an entire power tool. It also makes no sense to buy a new battery to replace the old one if the cordless screwdriver itself is outdated and rarely used. It would be more practical to adapt the power tool to power supply from a 220 V network.
Making changes will make it possible to further operate this tool with a minimum level of financial investment. The created modification will have all the advantages of network devices:
- there will be no need for periodic charging;
- the power of the power tool (torque) will not drop during operation;
- There is no need to worry about proper storage of equipment during long non-working periods: just put it in a case in a dry place.
These advantages, as well as low costs, compensate for the inconvenience associated with the presence of a cord.
To turn a cordless screwdriver into a network one, you need a power supply unit (PSU), which can be placed in two ways: in the form of an external power supply or mounted inside an old battery case.
It should be taken into account that the cord from the external power supply to the power tool must, according to Ohm's law, have a larger cross-section than directly from the 220V network.
For the practical implementation of any option, you will need the following set of tools and materials:
- screwdrivers with different tips;
- screwdrivers with different tips;
- pliers;
- wire cutters;
- soldering iron with soldering kit;
- insulating tape;
- wiring to jumpers, taken, for example, from a multi-core cable;
- multimeter;
- knife.
How much power does the power supply need and how much does the screwdriver consume from the power supply?
Calculating the required power of the power supply is not difficult - you need to multiply the current consumed by the electric motor of the tool by the voltage. For example, the tool is powered by a battery with a voltage of 12 volts. The current that the electric motor needs to operate is 10 amperes. We get 120 watts. But this is the minimum value.
To ensure normal operation under loads, for example, when driving a screw into hard wood, the power supply must be selected with a margin of 30-40%. Otherwise, the screwdriver will not be able to work normally under load or the power supply will fail.
The current strength, depending on the model, can be 7-10 A for household screwdrivers and 30-40 A for professional models. The battery voltage can be 12 V, 14 V, 18 V depending on the specific model.
Important! The current required by a screwdriver to operate depends on the load. At idle, the current is minimal and increases significantly during startup or when tightening a screw.
The required voltage, power and battery capacity parameters are usually indicated on the label of the tool itself or in the technical documentation for it.
If the operating voltage of the instrument is 12 V, the number of options for choosing a power source increases, for example, you can connect it to a computer power supply. It is quite possible to purchase an old one with a power of 300 W for a low price. In addition, the output power is sufficient with reserve. The advantages of this option include: ease of modification, as well as the fact that a computer power supply with a power of 300 W or more is relatively easy to find.
The block parameters are indicated on a sticker located on the wall. For example, it states that a voltage of 220 v is supplied to the input, a current of 25 A is supplied to the output of 12 v. We get a power of 300 W.
If desired, you can use the following as a 12 V power source from the mains:
- LED driver;
- electronic transformer for powering low voltage halogen lamps;
- car battery charger.
If the instrument is designed to be powered at a different voltage, say 14 V or 18 V, there are few options for choosing a power supply. For a tool operating on a voltage of 14 V and having a maximum current of up to 25A, a universal power supply unit AIDA BSh 14 PRO is available for sale. There is also an 18 V power supply, designed for current up to 20 A, AIDA BSh-18 PRO.
It is not recommended to consider using the original included charger or power supplies for laptops. Such power supplies are not able to supply the current required for normal operation of the tool.
You can make your own power supply for the required voltage. But this requires certain knowledge of electronics. A diagram of such a power supply can be viewed here. There are power supply circuits that can be mounted instead of batteries.
When connecting power from the charger to the screwdriver, you must use a wire with a cross-section larger than 2.5 mm². Otherwise, the wire will become very hot, which can lead to melting of the insulation and a short circuit.
The level of voltage loss also depends on the length of the wire. The longer the wire, the correspondingly greater the losses. If you choose the wrong wire length, it may turn out that the screwdriver “does not pull”, it cannot be used to tighten a screw into hard wood, etc.
The quality of the wire connection also affects the voltage loss. Wires connected by twisting will have a high transition resistance, which will significantly affect voltage losses.
Important! Do not connect the screwdriver to the power source with a wire having a small cross-sectional area. This threatens failure of the tool itself and a fire.
Homemade power supply
It is necessary to start making a homemade power supply if you have knowledge in the field of radio engineering. It is necessary to prepare parts and tools in advance and fully concentrate on the work, during which the radio element may fail or suffer electric shock (supply voltage 220 V).
The simplest scheme
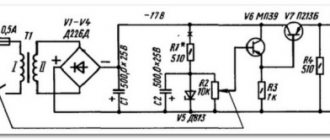
During manufacturing, it is necessary to prepare a housing for mounting radio components, a tool, a piece of getinax, wire and radio components. Then proceed with assembly according to diagram 1.
Scheme 1 – Simple 12 or 18 volt power supply.
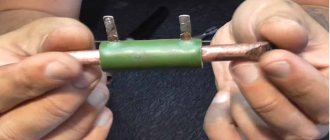
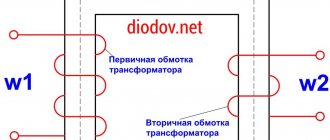
Almost any transformer with the following parameters is suitable: power 250..300 W, secondary voltage 24..30 V, and current rated from 15 A and above. The diode bridge is assembled from powerful diodes (selected from a reference book). After assembly, it is necessary to check the supply voltage: if it is higher than the required value, then you need to reduce the voltage of winding II (reducing the number of turns). At low voltage, wind the secondary with a wire of the same cross-section. After assembly, install it in the housing.
Provided that the screwdriver is not powerful enough, you can install it directly in the battery compartment. If the power supply is assembled separately, it is recommended to provide cooling, because during engine startup the rated current increases by 7 times. As a result of this increase, a load is placed on the power supply unit, and it begins to heat up. Heating occurs due to insufficient power from the power supply. After the power supply is ready, you need to check the screwdriver: run it several times and make sure that the radio elements do not heat up. When using a converted screwdriver, you must adhere to the basic requirements:
- It is necessary to give the tool time to cool down after every 20..30 minutes of operation.
- Do not work at high heights or do it carefully (the BP may fall and, as a result, loss of balance and injury).
- Monitor the condition of the power cable; it should not be pinched (this can lead to a short circuit, which is fraught with negative consequences for the tool and people).
Thus, if the screwdriver battery outputs 18 V or 12 V, it is not at all necessary to buy a new battery or screwdriver. It all depends on the scope of use of the tool: if you need to move the tool, you should replace the battery or purchase a new screwdriver. In the case where mobility does not play a special role, you need to convert it to power from the network. By following simple recommendations and observing safety regulations, you can not only increase the likelihood of extending the service life, but also reduce the risk of injury.
Converting a screwdriver to power from a 220V network
If the battery fails and it cannot be repaired, the only way out is to convert the cordless screwdriver into a mains one.
Power supplies 24 and 12 Volt. In this case, the power of the power supply must exceed the power of the engine, taking into account possible overloads at the moment of completion of tightening. It is not indicated in the device passport, but this parameter is written on the body of the electric motor, or it can be calculated by connecting the device to a constant voltage source through an ammeter. For a 70W motor, a 120W power supply is sufficient.
Important! The charger's power is insufficient to operate it. When converting a cordless screwdriver into a mains-powered one for 220 volts, you must use a different power supply.
How to connect a screwdriver directly to a laptop charger
This method requires minimal technical knowledge from you. If there is a need to convert a screwdriver into a network one, an unnecessary laptop charger can help you, since it has similar characteristics and can easily be found in any home. First you need to look at the output voltage of the charger. 12-19V chargers are suitable.
It is important to check the voltage and current of the charger
The battery pack will need to be modified; to do this, you need to disassemble it and remove the failed batteries.
- Take a laptop charger.
- Cut off the connector and strip the wires of insulation.
- Take the bare wires and solder them. If this is not possible, tape them with electrical tape.
- Make a hole in the body for the wire and assemble the structure.
We use an external power supply from the computer
So, you will need an AT format power supply. It is likely that you will find one at home, but you can easily purchase an old working power supply at any radio market. Its cost is unlikely to be high. It is very important to remember that a power supply with a power of 300–350 W and a current in a 12 V circuit of at least 16 A is suitable.
An “AT” type computer unit will power a screwdriver. In this regard, the same “AT” format power supply unit, which is located in the case of any desktop computer, is good because the power is always honestly indicated on it. Such power supplies always have a power button, as well as a fan for cooling, and an overload protection system.
The modification steps are as follows:
- Unscrew the power supply housing. Under the case you will see a fan, a board and many wires that go from the board to the connectors.
- It is necessary to remove the power-on protection. To do this, you need to find the green wire on the large square connector.
- Connect the green wire to any black wire from the same connector. For convenience, you can cut it shorter and leave it inside the case. Alternatively, you can use a jumper made from a small piece of wire.
Next we need a smaller connector (MOLEX), with it we need to do the following:
Connector contacts: yellow wire +12 V, red wire: +5 V, black - ground
- Cut off unnecessary wires, leaving yellow and black.
- Using a piece of wire as an extension cord so that the power supply can be in a convenient place during operation, solder it to the yellow and black wires
- We attach the other end of the wire to the terminals of the empty battery compartment, as in the previous instructions.
Homemade power supply
A homemade screwdriver power supply, connected to a 220-volt network, will consist of a battery at the input of a diode bridge, a rectifier and a capacitor filter.
You will need a transformer with a power of 160 W or more. The voltage on the second winding should be from 20 to 24 V, the current strength should be more than 15 A. The diode bridge consists of diodes corresponding to the current strength on the secondary winding. A capacitor should be mounted at the output of the rectifier, its capacitance will be from 2000 μF, the voltage will be from 25 V or more. All of the above is attached to the getinaks board; it should be secured in the body of the old battery, from which all unnecessary elements have been removed.
The option of such a rework can be chosen when there is a sufficient set of knowledge and experience in working with parts. Before you begin, it is better to study additional theoretical materials, find the necessary parts and see how they fit into the existing case.
It would be rational to place such a power supply in the housing of the original battery from the screwdriver. You will need to make sure that it is not sealed, because the power elements should not be allowed to overheat during operation.
How much power will the PSU need?
People who decide to learn how to make a screwdriver from the network will have to deal with the required power of the power supply.
Pulse
To connect the instrument to the network, a switching power supply is often used. Calculating its power is quite simple. Most often, rechargeable models operate on batteries with a voltage of 12 V. Based on this, it turns out that during operation the device consumes at least 120 watts.
It is recommended to choose a power supply with a power reserve of about 20-30%. This way the screwdriver will be able to work normally even under maximum loads.
Transformer
Since the operating voltage of most screwdrivers is 12 V, choosing a transformer power source is quite easy. You can power an electric tool using any model with a power of about 200-300 W.
How to place a power supply in a case - 3 different possibilities
The mains power supply for the screwdriver can be placed in the battery case or in the handle. Possible options:
- any power supply unit suitable in terms of characteristics and size;
- Chinese 24 V power supply;
- homemade.
A power supply with the required parameters is selected on the radio market. At home, you should carefully remove it from the case and place it in your screwdriver, securely fastening all the components. If the wires are short, lengthen them so that they do not touch metal parts. Place the transformer and the board separately. For better cooling, install additional radiators on microcircuits. It would also be a good idea to have holes in the housing to allow air to circulate and heat to be removed during operation.
Converting a cordless screwdriver to a corded one
In a radio parts store we buy a 24 V power supply, current 9 A. Screwdrivers operate on 12 or 18 Volts, so the task is to reduce the voltage to the required level. To perform such work, minimal knowledge of radio engineering is required. The output voltage is maintained by resistor R10 with a nominal value of 2320 Ohms. Instead, you should install a 10 kOhm trimmer resistor. How to configure the power supply is described below:
- remove the constant resistor;
- set the resistance of the trimming resistor to 2300 Ohms on the device;
- solder the tuning resistor in place of the constant one;
- With the power supply turned on, adjust the voltage.
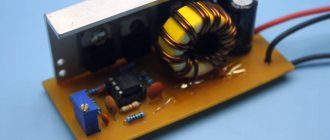
The design of a homemade power supply will be based on a 60 W Feron or Taschibra electronic transformer. You can buy them at an electrical supply store and they are designed for halogen lamps. They do not require any modification. By diverting the secondary winding from the midpoint, it was possible to use two Schottky diodes instead of the usual four. The operation of the power supply is controlled by the HL1 LED. The diagram shows all the necessary details.
Transformer T1 winds itself. A non-scarce ferrite ring NM2000 with dimensions 28×16×9 is used. Before winding, the corners are cleaned with a file, and the ring is wrapped with FUM tape. The completed unit is mounted on an aluminum plate 3 mm thick or more, placed in the battery housing. It also serves as a common wire.
Using a car battery
The principle of such a modification is no different from the method using charging from a laptop. Thanks to the current trends towards compact pulse charging, linear analog devices with manual control can be purchased on the car market at a very attractive price. If the voltage on the battery changes smoothly, then it will fit absolutely any screwdriver, and the modification of such a tool is carried out as follows:
- To connect a screwdriver to a car battery, you should use inexpensive wires with a small cross-section; car cigarette lighter wires are suitable.
- On all sides of each wire, cut off the so-called “crocodiles”, and at the free end, strip the wire of insulation by 2-3 cm.
Cut the clamps and strip the wires - Next, connect the wires. To attach the wires to the terminals, you need to bend the stripped part in half, and then thread them inside the terminals to create a kind of hook.
Bend the wires with a hook to connect to the terminals - For more reliable fixation, tighten all connections with plastic clamps or solder them. Don't forget about the polarity, usually the "crocodiles" are marked.
- The next step is assembly; everything needs to be insulated. To begin with, it is better to wrap each connection in such a way that no metal parts protrude, and then wrap everything together, the terminals should not touch.
Inverter welding machine
You can also power the screwdriver through an inverter welding machine. Installing a secondary coil of the transformer will add voltage, which will thus become sufficient to ensure the operation of the screwdriver motor. First, you will need to measure the current and voltage parameters at the output of the welder, then compare these indicators with those indicated for the screwdriver.
power unit
We will not consider purchasing any units or transformers, and if we do buy it, it will be a new battery! We will consider using what we have on hand. I’ll say right away that the charger from the same screwdriver is only suitable for drilling overripe bananas, its power is too low.
Ideally, a step-down, powerful 12 V transformer, for example from a computer uninterruptible power supply, would be suitable. The power of such a transformer is usually 350-500 watts. But I didn’t have such a transformer, but I had a lot of computer power supplies. I am sure that if someone has various electronic junk, ATX computers are definitely lying around in it.
The computer ATX unit is quite suitable for a screwdriver; the load capacity on the +12 volt bus allows you to remove currents of 10-20 amperes. I would like to dispel a small myth - it will not be possible to stuff the unit into the battery housing of a screwdriver, the ATX board is too large. You will have to make a separate case for the block or leave it in its original metal case. The disadvantage of the original case is sensitivity to dust, and even the smallest repair requires a lot of dust.
How to power a screwdriver while maintaining its autonomy
If the master works in a building that does not have electricity, and the batteries have already deteriorated, there are ways to power the screwdriver:
Replacing old elements
Attention! When replacing batteries, pay attention to the correct polarity of connecting the elements.
Open the battery housing.
You need to open the battery case
It is necessary to solder the new batteries together and assemble the battery
Attention! The converted battery should only be charged with a specially selected charger.
Types of battery cells
These devices use elements of different types and voltages, each of which has its own advantages and disadvantages.
The most common are nickel-cadmium (Ni – Cd) with a voltage of 1.2V.
Advantages:
- low price;
- stored in a discharged state.
Flaws:
- have a memory effect;
- high self-discharge;
- small capacity;
- small number of charge/discharge cycles.
More advanced nickel-metal hydride (Ni-MH) voltages are 1.2V.
Advantages:
- less memory effect and self-discharge;
- large capacity and number of charge/discharge cycles.
Flaws:
- higher price;
- do not tolerate low temperatures and storage in a discharged state.
The most advanced lithium-ion (Li-Ion) voltage 3.6V.
Advantages:
- no memory effect;
- very low self-discharge current;
- high specific capacity, allowing to reduce the weight and dimensions of the device;
- the number of charge/discharge cycles is many times higher than other types of batteries.
Flaws:
- high price;
- loss of capacity three years after manufacture.
Fault prevention
Batteries are made of several elements put together, which do not fail simultaneously, but in parts. To determine the broken part of the battery, it is necessary to fully charge it and allow it to work at full power until discharged. After that, disassemble and measure the voltage of each individual element.
Parts on which the voltage will be absent or inferior to other elements must be completely replaced. Repairs are carried out using a soldering tool. All battery cells are soldered together with the same wire strip that originally connected the parts.
General recommendations
All of the above methods include one step that unites them - disassembling the power module housing. If the frame is secured with bolts, then this is not a problem; fastening with glue requires carefully opening the seam by tapping the gap with a hammer and inserting a knife into it.
When installing, observe the direction of the voltage - it should not be applied to the battery. Therefore, the module is mounted parallel to the power contacts, and a diode illuminator with a certain power is built into the positive line.
Summary: to the question “can a screwdriver work from a charger” there is a positive answer, and several solutions, but caution, some scientific knowledge and dexterity are required.
Charger MAKITA 193864-0, 7.2V-14.4V Ni-Cd, Ni-Mh green Price: 1750 P
Charger for tool MILWAUKEE 7.2V-24V Ni-Cd, Ni-Mh black Price: 3530 P
Charger for BOSCH tool 7.2V-24V Ni-Cd, Ni-Mhblack Price: 3570 P
Charger for DEWALT tool 7.2V-18V Ni-Cd, Ni-Mh black Price: 3570 P
The absence or complete breakdown of a screwdriver's charger stops all planned work. But, using ingenuity and some available tools, the question arose about t...
A screwdriver with an autonomous power supply is definitely one of the best inventions of mankind, and it makes life much easier for almost all people...