Method No. 1: From a PEV resistor
For such a soldering iron, you will need an old ceramic insulated resistor, which will be used as a heating element. You can use a resistor from old electrical equipment; the required parameters are calculated using the formula: P = U2 / R,
Where P is the power of the soldering iron;
U – supply voltage;
R is the ohmic resistance of the resistor.
This homemade soldering iron is designed to operate on low voltage of 12 or 24 V, which should be taken into account when calculating the power of the device. Thanks to this, it can be powered both from a step-down power supply and from a car battery. If necessary, you can select a resistor for a 220 V supply voltage, but in this example we will consider a low-voltage option.
In addition to the PEV resistor, for manufacturing you will need pieces of textolite, getinax or dry wood for the insulating handle, the main thing is that they can withstand high temperatures. Two copper rods of different diameters for making a heat sink and a soldering tip. Connecting wires or factory 12V power supply. You will also need elements for fixing, a file, a jigsaw, a drill, a tap, a drill.
The soldering iron manufacturing process consists of the following steps:
- A copper rod is selected for the current collector, which should fit tightly into the internal hole of the resistor. The quality of heat transfer from the heater to the soldering iron tip will depend on the density.
Rice. 1: fits tightly into the hole - For the sting, a copper rod or wire of smaller diameter is selected. Sharpen the edge of the rod to obtain the desired shape; the shape of a flat-head screwdriver is considered the most convenient for beginners.
- Drill holes on both sides and cut threads into them with a tap - one for the fixing bolt with a washer, the second for the copper tip.
- Insert the heat sink into the resistor and measure the depth of the location, make a mark on the surface. At the mark, make a radial groove using a file - a retaining ring will be inserted into it, which can be made from a spring or washer.
- At one end of the copper wire for the soldering iron tip, cut a thread and screw it into the heat sink.
Rice. 2: screw into the heat sink - Assemble the entire structure together, secure both copper rods with threaded connections and a retaining ring.
- Strip the ends of the power supply from insulation, if necessary, remove it and the plug will no longer be needed.
- Secure the ends of the copper wires from the power supply to the contacts of the resistor. To do this, use a bolted connection, be sure to tighten the nuts tightly to get good contact.
- Using a jigsaw, cut out a handle from the old board; in this example, it will consist of two halves, between which there is an electrical cord. You can also cut a groove for wires in it.
Rice. 3: Place the power cord into the handle - Assemble the handle - secure the halves with bolts or rivets.
The cordless soldering iron is ready, it can be used for soldering microcircuits, electrical contacts of automotive wiring, etc. If you don't have a ceramic resistor at hand, you can make a soldering iron from nichrome wire.
Method No. 2: From nichrome thread
Unlike the previous method of making an electric soldering iron, here you will make your own heating element from a piece of nichrome wire. It should be noted that you can select the desired diameter using tabulated values of the resistivity of nichrome per meter of length, or experimentally.
The second option is the simplest, since, having a wire with a diameter of, say, 0.5 mm, you can stretch it onto a piece of dry wood and, by connecting the power supply, observe the speed and amount of heating by color changes.
Rice. 4: determination of heating experimentally
If desired, you can lengthen or shorten the heated section by moving the crocodile - this will allow you to select the optimal heating temperature due to the length that is most suitable for your soldering iron.
In addition to nichrome thread, you will need:
- An oblong piece of wood with a rounded shape to fit comfortably in your hand.
- Electric drill and drills of various diameters for drilling holes.
- Copper wire for making a thick or thin tip, the diameter is selected individually in each situation.
- Alabaster with water for fixing copper wire - the volume is quite small, so you will have enough leftovers from the repair; there is no need to purchase a new bag.
- Connecting copper wires for connecting the heating element to the power cord. They are selected in accordance with the rating of the current flowing through them.
- Insulation materials – electrical tape, heat shrink, fiberglass insulation.
- 12V power supply to make a mini soldering iron.
- Bench tool, stationery knife, etc.
In this example, we will look at the procedure for making a low-voltage 12V soldering iron. To do this, follow the following algorithm:
- Drill two blind holes in the end of the wooden piece - one of them will house the tip, and the other will house the power connector.
Rice. 5: drill holes in the ends - At the level of the end of the end hole for the power connector, drill holes of a smaller diameter on both sides. It is better to place them at an angle, since then you will need to run the power wires through them.
Rice. 6: Drill holes on the sides - From the drilled holes for the output of electrical conductors to the hole for installing the heating rod, cut recesses and place the wires from the connector in them.
Rice. 7: Place the wires from the connector - Cut a blank for the tip from thick copper wire, about 2.5 mm in diameter.
- Using the alabaster mixture, install the heating rod for the soldering iron into the hole and wait until the solution dries to a dense state. Typically this only takes a couple of minutes.
Rice. 8: fix the tip - Place a piece of fiberglass insulation on the rod and secure it by twisting copper wires.
- Wrap a heating coil around the fiberglass tube and attach it to the terminals.
Rice. 9: Wind the nichrome wire
Insulate exposed conductors and connections using heat shrink.
- Connect the soldering iron power wires and insulate them with electrical tape.
The miniature soldering iron is ready and can be used for soldering wires, SMD elements, etc.
Rice. 10: ready-made miniature soldering iron
Instant heating soldering iron
Viewers of the Aka Kasyan channel have long been interested in a mini soldering iron with instant heating. In this issue, the master showed how to make and how such a device works.
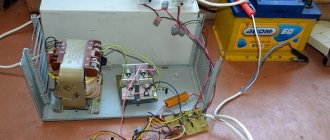
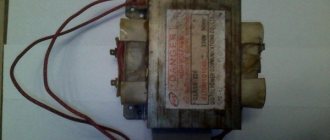
There is a step-down mains power supply. The secondary winding of the transformer is closed by a sting. It is made of thinner wire than the winding itself. During a short circuit, the tip will heat up. For this device, old 60-watt electronic transformer boards were useful. I disassembled it into parts and developed a compact board. I assembled the block on a new board. It is advisable to check all components, even if they are new. It is convenient to do this using a transistor tester. Everything you need for it can be bought cheaply in this Chinese store.
Power transistors are reinforced on the track side. You can use keys such as 1303, 13005 or 13007. The latter can be taken from a computer power supply. To make the instant soldering iron compact and convenient, we had to abandon the standard core that was on the electronic transformer board. While searching for the right solution, I came across an old laptop power adapter. The power cable of such adapters has a kind of interference filter in the form of a ferrite barrel. This is a torus that has exactly the required overall dimensions for the intended purpose. The master took the primary winding from the original transformer, which was on the board and wound it around this core.
Browse products for inventors. Link to the store.
It is not advisable to make winding on a bare frame. The craftsman did not have suitable insulating material at hand, and the work was carried out in a hurry. As a result, about 6 hours were spent on complete assembly, taking into account the design and etching of the board.
The secondary winding contains only one turn. Winding with double wire 3.5 millimeters. Despite the fact that the wire has varnish insulation, it is advisable to use additional one. It’s better to use a fiberglass tube, or heat shrink in extreme cases.
The transformer was attached to the board using epoxy resin. The diagram of an instant soldering iron is in front of you.
DIY electronics in a Chinese store.
Everything is standard. Push-pull network self-oscillator, diode bridge designed for a current of 1 ampere. Transistors need a heat sink. The housings must be insulated from the radiator.
The final assembly and assembled unit must be tested. We must not forget about safety measures. Be sure to connect the network lamp as shown in the figure.
Once you are sure that everything is working properly, the lamp can be removed.
It is advisable to make the body from a solid heat-resistant insulating material. Ebonite or fiberglass. Particularly high temperatures do not form inside the case, so you can limit yourself to plastic. A chewing gum box will do. In some places of the case it is necessary to drill holes. This ensures natural cooling of the circuit. The tip holder is made of conveniently sized mounting terminals. Tip from an industrial soldering iron. The material is presumably stainless steel. It is permissible to use copper wire bent in a similar way. During the initial instant heating of the tip, the device can consume up to 80 watts from the network, despite the fact that the power of the power supply is 50-60 watts. After proper heating, the soldering iron tip will consume power of about 35-40 watts maximum.
The diameter of the wire for the tip in the case of using copper is from 1 to 2 millimeters. The soldering iron is activated by pressing a button. The button must be designed for mains voltage and a minimum current of 1 ampere. It turned out quite comfortable, light, compact. It is ready to work within 8-10 seconds after switching on. You can make a narrow, elongated board, then the soldering iron will become thinner and more comfortable to hold in your hand and take advantage of instant heating.
Method No. 3 Powerful pulse soldering iron
This soldering iron is not suitable for a beginner, since its creation requires basic knowledge of electrical engineering and skills in reading electrical circuits. The basis for the manufacture of this unit is a switching power supply from halogen lamps. It would be good to get a diagram of this device; in the example under consideration, it looks like this, although it could be any other, depending on the model of the soldering iron block:
Rice. 11: power supply diagram for a pulse soldering iron
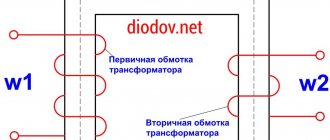
The principle of operation of a pulse soldering iron is to short-circuit the secondary winding of transformer T2 to obtain maximum heating of the tip. For this, a homemade winding with one turn and a short of thinner wire under the tip is used.
To make a soldering iron, you will need a block from a halogen lamp, a body (in this case, a gun from a children's toy is used), copper wire with a diameter of 6 mm and a wire with a diameter of 1 mm, ceramic fuses, bolts for fixing the parts of the soldering iron, a button and a power cord with a plug. The tools you will need are pliers, a screwdriver, a tap and a hacksaw.
The manufacturing process of a pulse soldering iron consists of the following steps:
- Remove the cover from the power supply from the halogen lamp, being careful not to damage the internal elements, solder points and parts.
Rice. 12: Remove the cover from the power supply - From the transformer, remove the low-voltage winding, represented by several turns of copper wire.
Rice. 13: Remove the low voltage winding - Try the board into the prepared case and determine the most advantageous placement method. Please note that the heating element will get very hot, so it is better not to leave any elements under it; it is safer to move them further away by dividing the board.
- Carefully divide the board into two parts; for the safety of the parts, you can remove them while cutting, if you have at least some kind of soldering iron on hand. Otherwise you will have to be extremely careful.
Rice. 14: Trim the board - Connect the button and power cord to the board.
- Thread a 6mm thick copper wire into the coil with the high-voltage winding of the transformer and bend it around the coil using pliers, as shown in the figure.
Rice. 15: Thread the copper wire into the coil - Place parts of the ceramic fuse jacket onto the leads of the heating element; they should protect the plastic body of the soldering iron from high temperatures.
Rice. 16: Put on pieces of ceramic shirt - Flatten the ends of the heater and make holes using a tap for the fixing bolts.
Rice. 17: Cut the thread - Short-circuit the heat sink with copper wire with a diameter of 1 mm. If, when turned on for the first time, this conductor overheats and burns out due to the tip temperature being too high, it will need to be replaced with a thicker one of 1.5 or 2 mm. If the heating is weak, install a thinner wire of 0.5 mm.
You now have one of the most powerful soldering irons operating from a 220V network - it can easily solder parts with powerful legs, connect power circuit contacts, etc.
Rice. 18: ready pulse soldering iron
But this soldering iron cannot be called disposable, since it is assembled purposefully and requires serious effort to create. It is also advisable to have at least some kind of working soldering iron when making it, this will greatly simplify the work of separating the board.
A more detailed article about making a pulse soldering iron:
How to make your own ultra-fast heating soldering iron
Such a soldering iron can be made from a step-down mains power supply, in which the tip will be connected to the secondary winding of the transformer, creating a short circuit. And as a result, the tip will heat up. The wire for making the tip will have a smaller diameter than the wire of the secondary winding of the transformer.
Old 50-60 W electronic transformers were taken as materials for making the soldering iron.
All the parts were extracted from them, from which a new unit was assembled on a specially designed compact printed circuit board.
For power transistors, installation is provided on the side of the board tracks. Wrenches such as MJE13003, MJE13005 or MJE13007 are suitable for assembly. The latter can be removed from the computer's power supply.
For convenience and compactness, the standard transformer core on the board was replaced with a ferrite barrel, which served as a noise filter on the wire of the old laptop power adapter. This core was the perfect size for the future soldering iron.
It is unknown what the magnetic permeability of this core is, and winding calculations have not been carried out. The wire from the primary winding of the transformer on the board was wound onto a new barrel-shaped core.
Winding is not recommended on a bare core. There was simply no suitable material for insulation during assembly of the soldering iron.
The secondary winding has only one turn and is made of wire with a diameter of 3.5 mm, folded in half. Despite the presence of varnish insulation on this wire, it should be additionally insulated. It is recommended to use a fiberglass tube. But there was only an ordinary heat-shrink tube at hand.
The resulting transformer was glued to the board using epoxy. This is to ensure that nothing is loose inside.
The diode bridge at the input of the power supply is designed for 1 A current. Transistors require a heat sink. Their housings must be insulated from radiators.
Before final assembly, it is necessary to test the soldering iron, not forgetting about safety measures. To do this, you need to connect a small network lamp as shown in the picture:
After checking, if everything works properly, the lamp can be removed from the circuit.
As a body, it is better to use something made of thermal insulation material, for example, ebonite or fiberglass. But you can get by with plastic, since there should not be any significant increase in temperature inside. But you definitely need to make holes for natural ventilation.
Clamps from the mounting terminals were suitable as holders for the soldering iron tip.
The tip itself is taken from an industrial soldering iron of a similar type. It looks like it is made of stainless steel, but you can also use copper wire. It will work without problems.
When the tip heats up, the device consumes up to 80 W of power, even though the power of the unit does not exceed 50-60 W. After warming up, power consumption decreases to 35-40 W. For a copper tip, the wire diameter should be 1-2 mm. The device is turned on by pressing a button. It is not recommended to use a button like the one in the example.
It is necessary to use a button rated for 220 V and a current of 1 A.
The resulting soldering iron is very light and compact. The readiness time is only a few seconds from the moment of switching on. Quite a valuable thing.
In order to make the soldering iron more familiar and convenient for your hands, you can make a board that has a narrow shape and is slightly longer. It all depends on your desire.
Author: AKA KASYAN