The failure of household appliances is often associated with the failure of a microcircuit (chip). In order not to overpay for expensive repairs at a service center, a burnt-out chip can almost always be replaced at home. To do this, you need a soldering iron for microcircuits - an installation tool that is used to desolder a failed chip and micro-solder the leads of a new microcircuit to the contact pads of a printed circuit board. Soldering microcircuits with your own hands is much easier than it seems, the main thing is to choose a good soldering iron.
Soldering iron for microcircuits - how to choose the right one
All electric soldering irons that can be found in a store or on the Internet differ in their characteristics. To answer the question of how to choose a soldering iron for soldering microcircuits, you need to determine its main parameters:
- · Power. For micro-soldering of microcircuit pins, it is enough to choose a soldering iron with a power of 20 to 35 W. More powerful soldering irons may cause components to overheat.
- · Dimensions and weight. The best thing is a small soldering iron that fits comfortably in your hand. The soldering iron is always held in the fingers, like a ballpoint pen, so it should be miniature and light. You should not buy massive soldering irons with wooden handles - they cannot be properly grasped in your hand. It is not recommended to purchase pistol-shaped soldering irons - they are difficult to solder parts on printed circuit boards.
- · Design. When choosing, you need to pay attention to the material of the handle (it should be comfortable, non-slip, and not rub calluses), the design of the electrical cord (the cable must be double insulated, with a wire cross-section of at least 2.5 mm, elastic so that it does not interfere when working).
- · Availability of a temperature controller (thermostat). To ensure high-quality soldering, the temperature of the soldering iron tip should be from 260 to 300 °C, not higher. If there is no built-in controller, it is better to choose a soldering iron with a power supply of 12 V or 36 V. According to reviews from radio amateurs, Taiwanese 220 V soldering irons are the worst at controlling temperature - they overheat, which is why it is not possible to solder the microcircuit properly. As a way out, the soldering iron is turned on through a power regulator, which you can purchase or make yourself.
- · Shape and type of sting. The best choice is a soldering iron with interchangeable tips. For soldering planar microcircuits, a tip with a diameter of 2 mm with a cut of 45° is best suited, which is convenient for soldering legs with “wave solder”. Thin conical nozzles are convenient for soldering microcircuits with pin terminals in metallized holes on the board. Soldering tips must have a special coating that prevents the appearance of carbon deposits. You should not use ordinary copper attachments - they quickly burn, oxidize, and need to be cleaned periodically.
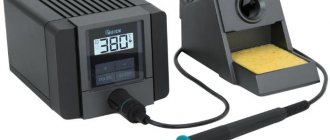
- · Availability of a soldering station. A soldering station is a separate unit with a controller and temperature regulator, to which a soldering iron and other elements (hair dryer, thermal tweezers) are connected via a connector. The station is used mainly for professional or permanent soldering work; for one-time repairs at home, its cost is too high (from 3 thousand rubles).
On video: How to choose a soldering iron, advantages and disadvantages of certain models.
Characteristics
Technical characteristics that you should pay attention to when choosing a tool:
- Power. In the case of soldering irons for circuits, the power value should not exceed 10 W. This parameter affects the performance and safety of electrical elements. This approach is used when installing a circuit. If elements are being removed from the board and their safety is not important, then a high power value will facilitate the process.
Important! Powerful devices can only be used by experienced radio amateurs who are able to perform work accurately and quickly without causing overheating of the elements.
Devices of various power
- The voltage required to operate. High voltage from the network, equal to 220 V, can also damage parts. For this reason, the soldering iron is connected through a step-down transformer, which, depending on the model, produces either 12 or 36 V. When choosing a product, it is best to take a kit that already includes a transformer or power supply, so as not to purchase it separately.
- The thickness of the tip also plays an important role. For conventional instruments it is about 5 mm. For micro-soldering tools, a value of up to 3 mm is considered normal. Replacement tips are most often sold separately, but there are kits that also include them.
Various soldering iron attachments
- The presence of a thermostat allows you to choose a comfortable temperature regime for each type of installation. This reduces the risk of element damage and also makes the work process more convenient and efficient. Typically, more expensive models are equipped with a thermostat.
You may be interested in: Types, design and principle of operation of a slider rheostat
Heaters of various types
Additional accessories and materials
To perform soldering of radio components and microcircuits, the following set of devices is required:
- · Soldering iron holder. It looks like a stand with a spiral into which a soldering iron is placed in between solderings.
- · Sponge. Used for wiping soldering iron tips from solder. Metal shavings are often used to wipe the tip.
- · Antistatic wrist strap and mat. Necessary when performing any operations with microcircuits, so as not to damage them with static electricity. The bracelet must be grounded. During soldering, the printed circuit board must be placed on a grounded antistatic mat made of special rubber.
- · Special syringe for solder suction. It is needed to clean the holes in the board from solder residues after dismantling the chip. Instead of a syringe, you can use a medical or sewing needle with a diameter of 1 mm. The sharp tip of the needle needs to be cut off.
- · Tweezers. Needed to hold the radio component during soldering.
- · Magnifier. It is better to choose special radio mounting magnifications with a magnification of 5 to 10 times for soldering small radio components and fine-pitch microcircuits.
- · Brush or cotton swab - for wiping solder joints from flux.
- · Medical syringe for applying flux to soldering areas. The following materials are used for soldering:
- · Solder. It is best to use special solder for soldering microcircuits in the form of a thin wire of 0.5-1 mm - it is very convenient to bring it to the soldering site.
- · Flux. This is a special liquid that is applied to the contact pads and legs of the microcircuit to increase the spreadability and wettability of the solder. Flux facilitates soldering and removes oxide film from the terminals of radio components. A solution of rosin in ethyl alcohol is usually used as a flux.
- · Ethyl alcohol or refined gasoline. After soldering, be sure to remove any remaining flux with a brush dipped in ethyl alcohol or gasoline.
- · Acetone or varnish remover. Used to remove varnish from varnished printed circuit boards before desoldering a failed chip.
- · Metal braid (braided shielded wire). Used to remove excess solder from the legs of the microcircuit.
At home
Soldering microcircuits at home may be required to repair complex household appliances and computer motherboards.
As a rule, to solder the legs of the microcircuit, use a soldering iron or soldering gun.
Working with a soldering iron is carried out using regular solder or solder paste.
Recently, lead-free solder with a higher melting point has become increasingly used for soldering. This is necessary to reduce the harmful effects of lead on the body.
What equipment will be required?
To solder microcircuits, in addition to the soldering equipment itself, you will need some other equipment.
If the microcircuit is new and made in a BGA package, then the solder is already applied to the legs in the form of small balls. Hence the name - Ball Grid Array, which means an array of balls. These enclosures are designed for surface mounting. This means that the part is installed on the board, and each leg is soldered to the contact pads with a quick, precise action.
If the microcircuit has already been used in another device and is used as used spare parts, it is necessary to perform a reballing. Reballing is the process of restoring the solder balls on the legs. Sometimes it is also used in the case of a blade - loss of contact of the legs with the contact patches.
To carry out reballing, you will need a stencil - a plate of refractory material with holes located in accordance with the location of the microcircuit pins. There are ready-made universal stencils for several of the most common types of microcircuits.
Solder paste and flux
For proper soldering of microcircuits, certain conditions must be met. If the work is carried out with a soldering iron, then its tip should be well tinned.
For this, flux is used - a substance that dissolves the oxide film and protects the tip from oxidation before being coated with solder during soldering of the microcircuit.
The most common flux is pine rosin in a solid, crystalline form. But to solder a microcircuit, such a flux is not suitable. Its legs and contact spots are treated with liquid flux. You can make it yourself by dissolving rosin in alcohol or acid, or you can buy it ready-made.
In this case, it is more convenient to use solder in the form of filler wire. Sometimes it may contain powdered rosin flux inside. You can purchase a ready-made soldering kit for soldering microcircuits, which includes rosin, liquid flux with a brush, and several types of solder.
When reballing, solder paste is used, which is a base of viscous material that contains tiny balls of solder and flux. This paste is applied in a thin layer to the legs of the microcircuit from the back of the stencil. After this, the paste is heated with a hairdryer or infrared soldering iron until the solder and rosin melt. After hardening, they form balls on the legs of the microcircuit.
How to desolder a radio element
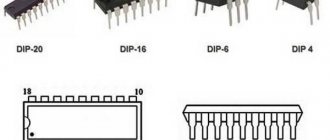
There are two types of microcircuit pins: - pin pins of the chip are soldered into the holes of the board on its reverse side (DIP - chips); - planar leads (SOIC - chips) are soldered to the pads on the side where the microcircuit is located.
Soldering DIP chips
- Sequence of actions for desoldering:
- Remove varnish from the chip solder areas with a brush or cotton swab dipped in acetone or remover (in the case of a varnished board).
- Remove any remaining solvent and varnish with a brush dipped in ethyl alcohol.
- Heat the soldering iron to operating temperature.
- Touch the soldering iron tip to the first leg of the chip (on the back of the board) until the solder completely melts.
- Remove melted solder with a suction syringe. When using a needle instead of a syringe, place the needle on the leg of the chip and, turning the needle around its axis, lower it all the way into the hole.
- After completely removing the solder from the hole, start desoldering the leads from the next hole.
- Remove the microcircuit after all pins have been completely unsoldered.
On video: How to properly desolder a DIP chip
Dismantling planar chips
The sequence of actions for desoldering SOIC - chips that are not glued to the board:
- Remove varnish (if any) from the legs of the microcircuit with acetone or remover. After removing the varnish, clean the board from any remaining varnish with ethyl alcohol.
- Apply liquid flux to the soldered leads on all sides of the chip.
- Solder (short circuit) all the legs of the chip on each side, passing the tip along all the pins of the chip and dispersing the solder along the legs. There should be a lot of solder applied to the legs so that after removing the soldering iron, the solder continues to be in a molten state.
- Run the soldering iron over all sealed sides of the chip, ensuring the solder melts on all sides, then remove the chip with tweezers.
- To unsolder a microcircuit glued to the board, you need to unsolder each pin of the microcircuit one by one, lifting it with tweezers above the contact pad. After unsoldering all the legs, remove the microcircuit mechanically (with a knife), being careful not to damage the board.
On video: How to dismantle a planar microcircuit
Soldering iron for soldering microcircuits
Soldering is an integral part of IC equipment repair and creation.
This is a rather complex process that requires special equipment, since it involves working with fairly small parts. A soldering iron for microcircuits is noticeably different from the one needed for soldering wires. Its dimensions are noticeably smaller than large models for ordinary operations, and the tip also has a fine sharpening. There may be options with special types of sharpening, which are designed primarily for desoldering. An electric soldering iron for microcircuits is a necessary tool for a repairman and radio equipment enthusiast. Models can be in different price segments with different characteristics. In any case, it will be a hand tool that will allow you to apply a thin layer of solder and heat the parts to solder and desolder them from the circuit. Many varieties are narrow-profile and intended for one type of work.
Soldering microcircuits with a soldering iron
How to solder a chip
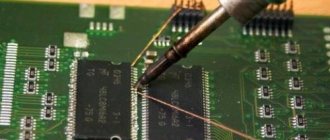
When soldering a microcircuit, you need to avoid overheating the chip - touching each leg with the soldering iron tip during soldering is allowed for no more than three seconds, after which you need to cool the soldering area and touch the soldering iron tip again (if re-soldering is necessary). Before soldering, the chip leads need to be tinned - apply a thin film of solder to them to improve solderability to the contact pad. To do this, the legs of the chip are generously moistened with flux (not reaching the body 2 - 3 mm) and the tip of a soldering iron with solder is passed over them. A properly tinned terminal has a smooth, shiny surface without icicles or solder sagging.
Soldering microcircuits with pins
Soldering should be done in the following order: 1. Install the chip into the holes on the board. 2. Apply flux to the pins of the microcircuit on the back side of the board. 3. Solder each pin of the chip into a hole on the back of the board. 4. Remove any remaining flux.
Installation of SOIC chips
It is convenient to solder SOIC chips using a “wave of solder”. The method is based on the capillary effect, under the influence of which liquid solder flows between the lead and the metallized area, wetting them and forming a drop.
Soldering microcircuits with a “wave solder” using a soldering iron is carried out in the following sequence:
1. Tin the contact pads and apply flux to them. 2. Install the chip on the board, align the legs with the board pads and solder one corner pin (any). 3. Solder the second corner pin to the metallized pad, located diagonally on the chip opposite the first soldered leg. At the same time, make sure that the remaining pins of the microcircuit are aligned with their metallized pads. 4. Apply flux to all pins of the chip. 5. Pass the tip over the pins on each side of the chip several times to disperse the solder across the pins. 6. If solder bridges have formed between adjacent terminals, remove the excess using metal braid. It should be placed on top of the jumper and heated with a soldering iron tip. Excess solder will be absorbed into the braid. Then run the soldering iron tip across the leads again.
ATTENTION: When soldering with “wave solder”, liquid flux must be applied to the soldering areas in excess to ensure wettability of the board pads.
On video: Soldering a SOIC chip
Minimum set of tools for work
Before starting to connect complex elements, a novice DIYer should become familiar with the basics of conventional soldering. As a rule, it is done using a simple electric soldering iron with a copper tip, called a tip.
In addition, for any soldering a minimum set of materials is required:
Tools and materials for soldering.
- Solder. An alloy of tin and lead, characterized by high fusible properties and used for attaching elements to the motherboard or each other. In the recent past, pure tin was used for solder, but today such material is unreasonably expensive. In addition, the strength characteristics of the lead-tin alloy are in no way inferior to pure metal. In specialized shopping centers you can purchase different types of solder that have standard or improved properties.
- Flux. The use of fluxes facilitates the soldering process and prevents oxidation of the metal of the soldered elements. Today, the most popular material used as a flux is purified wood resin - rosin. In stores you can find special compounds designed for soldering specific metals. Thus, when soldering nickel, stainless steels and aluminum, a substance made from rosin and acid can be used.
You can start working only when all soldering tools have been assembled.
Homemade soldering iron
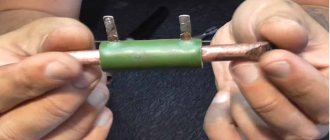
To make a small soldering iron for microcircuits with your own hands, you need to prepare the following materials: · a domestic resistor in a metal case MLT-0.5 of any value (heating element); · copper wire with a diameter of 1-2 mm, a length of 20-30 mm (tip); · steel wire from a straightened paper clip (holder); · ballpoint pen body; · a strip of double-sided foil PCB with a width along the inner diameter of the handle and a length of 40 - 50 mm. You can cut out any suitable section with two wide contacts on top and bottom from an unnecessary printed circuit board; · power supply for 1 - 2 amperes with adjustable output voltage.
Make a homemade soldering iron in the following sequence:
1. Cut off one lead of the resistor, drill out the cup at the place where the lead is attached to the internal hole in the housing. 2. Strip the cup on the side of the remote output to bare metal. 3. Cut one end of the copper wire (sting) at an angle of 45°, insert the drilled hole at the other end. 4. Tin the steel wire along its entire length, tin the stripped resistor cup. 5. Wrap the steel wire around the resistor cup for 1-2 turns and solder it to the cup. Solder both ends of the wire to the pad on one side of the board. Solder the second terminal of the resistor to the contact pad on the other side of the board. 6. Solder the wires going to the power supply to the contact pads. 7. Install the board with the heating element into the ballpoint pen body, pass the wires through the pen body and connect to the power supply. 8. Check the operation of the soldering iron. An electric current passing through a circuit formed by a steel wire and a resistor will generate heat at the point of greatest resistance - at the resistor (heating element). The tip of a homemade soldering iron will heat up from the resistor body.
The best soldering irons
You can choose your own good tool for different price categories and purposes.
Professional
A representative of powerful professional soldering irons for soldering microcircuits on the market is the Zubr 55301-200 model. High power can be both a plus (for experienced craftsmen) and a minus for beginners, who can damage the microcircuit.
The main positive aspects include:
- The presence of a coating on the tip made of a special composition, which promotes high quality soldering, as well as protection of the tip itself, which increases its service life.
- The device is universal: it is suitable for connecting powerful wires and small radio components.
- Comfortable operation: comfortable handle and practical switch directly on it.
- Built-in grounding channel, ensuring safety in case of insulation damage. Static is also removed from the device.
- High-quality materials used to manufacture the device.
Soldering iron Zubr 55301-200
For small soldering
Another model from this manufacturer is used exclusively for small jobs - Zubr 55402-100. Among the advantages they note:
- Low power of the tool. This makes it ideal for beginners when performing IC repairs.
- A specially shaped handle made of two components ensures comfort and safety.
- Availability of a special stand for a soldering iron.
- Ground wire for greater safety.
- The tip of the device ensures comfortable performance of the most delicate work.
Device Zubr 55402-100
Budget
The cheapest option would be to buy the CXG E60WT. This is a fairly compact soldering iron with a length of about 22 cm and a weight of 165 grams. This soldering iron has a ceramic heater in its design.
Device model CXG E60WT
How to desolder a microcircuit from a board with a soldering iron without damaging it
Such work requires care and extreme accuracy. If we are talking about a soldering station, then everything is a little simpler. But now it’s worth understanding how to do similar work with a regular soldering iron, using available tools. This is why we will provide step-by-step instructions and an algorithm of actions, explaining everything with photo examples.
| Photo example | Action to be performed |
| For example, let’s take a computer RAM board, from which you need to unsolder the chip indicated by the arrow. To do this you will need a regular soldering iron and thin steel wire. | |
| You need to slide this same wire under the legs for the entire length. Accuracy is required here, but haste in such actions is completely out of place | |
| Next, you need to fix the end of the wire anywhere on the board. Due to the fact that our board is already faulty and is shown only as an example, we will attach the wire directly to the contact terminals. It is worth understanding that if you only need to replace the microcircuit, then at this stage you should think about where to secure the broach. Although there is nothing stopping you from cleaning the terminal after finishing work | |
| Now, while tightening the wire, you need to carefully warm up the contacts one by one. A strong tension is not needed here, otherwise the wire may break. In this case, you just need to replace it, and then continue the same actions | |
| This is what the board looks like after the broach has gone through all the legs. | |
| Now you need to check if there is any solder left on the bottom. To do this, repeat the entire procedure and re-stretch the wire | |
| If it gets caught somewhere, you need to heat that place with a soldering iron and pull it out | |
| By carefully prying the microcircuit with a screwdriver, you can make sure that the hot-melt adhesive has also come off the printed circuit board. | |
| Repeat the entire procedure for the second row of legs | |
| After the microcircuit is removed, remove excess solder with a soldering iron tip | |
| This is what the place to solder a new microcircuit looks like |
Important information! Under no circumstances should overheating of the printed circuit board itself or the microcircuit be allowed if it is planned to be used in the future. This can result in wasted time and failure of the microprocessor.
But not only a soldering iron can do such work. There is also such a device as a soldering hair dryer. This is exactly what we will talk about now.
Read also: Wood burner device
What can a soldering iron be useful for?
There are many areas of application for this high-tech device. Here is a partial list of tasks, in which you will probably find your own recurring problems.
- Soldering wires and repairing electrical extension cords;
- Soldering and replacement of radio components in household appliances;
- Repair of lamps and LED lamps;
- Repair of thin-walled metal pipe connections;
- Repair of leaky metal tanks and containers;
- Quickly burns holes in plastic;
- Cutting off excess parts in plastic parts and housings;
- And so on.
It might be interesting➡ How to connect an ammeter to an AC or DC circuit
As can be seen from this list, there is always a use for a soldering iron, as long as your hands are fairly straight. And in some cases, the simplest and most inexpensive soldering iron will do, as long as the power is sufficient, for example, 60 W.
It is perfect for soldering wires. But for “electronic” tasks it is better not to overdo it with power, because The tracks on the boards do not like too high temperatures and easily peel off, and the radio components themselves fail. Below we will tell you which soldering iron to choose for soldering radio components. When choosing a soldering iron, you should decide for what purpose you need this electric tool.
What tools and materials will be needed during the work?
The tools you will need are a soldering iron, the varieties of which we have already become familiar with. To carry out soldering work, in addition to a soldering iron, you will need the following materials:
- Solders
- Rosin
- Fluxes
If the device is not equipped with a stand, then one should be made. To prepare the tool for work, you will need to use a file. If you decide to understand the question of how to solder correctly with a soldering iron, then first we will find out what rosin and fluxes are, and what they are needed for.
Where to buy a hair dryer for soldering microcircuits and what it is
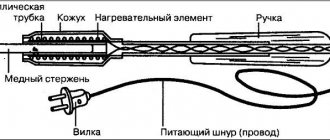
It is not difficult to purchase such equipment these days. Of course, the prices for soldering hair dryers are quite high. In addition, if a person is not familiar with such equipment, then he will not be able to work with it - special skills are required here. Although professionals say that learning this is not too difficult, and this hair dryer is quite convenient to use.
This is what a hair dryer for soldering microcircuits looks like - you can’t handle it without experience
In fact, the principle of its operation is similar to the functions of a construction hair dryer. The only differences are special thin attachments on the nozzle and the temperature, which can reach 800 0 C. However, we will not dwell on such equipment in too much detail. It is only necessary to mention that, if desired, it is possible to make such a soldering hair dryer with your own hands. However, this is already a topic for another article, which will definitely appear on the pages of our website (if anyone is interested in it, please write in the comments). Well, now let’s look at the main differences between pulsed soldering irons and conventional ones.
The main difference is, of course, the operating principle. The fact is that the pulse soldering iron is heated using the secondary winding of the transformer. In simple terms, this is a burner that everyone has known since childhood. Of course, different powers are used here, but the operating principle is similar. Well, if you pay attention to the high cost of such devices (we mean high-quality devices) or the low quality of ubiquitous Chinese manufacturers (where would we be without them?), then it becomes clear that the best option would be to make such a pulse soldering iron with your own hands. For those who are interested, we will definitely discuss such homemade products in the following articles. And now it makes sense to pay attention to the cost of soldering irons for soldering microcircuits on Russian shelves.
| electrical appliance | Make and model | Power consumption, W | Average, rub. |
| Pulse soldering iron |
| 100 | 750 |
| Pulse soldering iron |
| 100 | 1580 |
| Soldering Station |
| 80 | 3500 |
| Soldering Station |
| 80 | 49000 |
As you can understand, the price range is quite wide. But today there are quite a few reviews on this or that equipment, which means it’s unlikely to be possible to get a complete picture of the price-quality ratio. But even if the chip is small enough that working with a regular soldering iron seems impossible, there is a way to remove it without purchasing expensive equipment.
Important advice! If you wrap copper wire with a cross-section of 4 mm (in a spiral along the entire length) around the thick tip of a regular soldering iron, leaving a piece 3-4 cm long sticking out, then with this device you can get close to any part. In addition, the temperature of the new tip will be significantly lower, which will reduce the risk of overheating of the printed circuit board parts.
Therefore, before you buy an electric soldering iron for microcircuits, you should think about whether you really need it. Of course, if a person often does this kind of work, this device is necessary. But under the condition of rare or even one-time use, it is quite possible to make do with improvised means by upgrading an ordinary device.
As for such devices for home use, the choice depends on qualifications. The fact is that soldering irons are produced in different capacities, on which the heating speed and temperature height depend. The power range ranges from 30 to 100 W. It is this parameter that should determine which soldering iron to choose for your home. If you have little experience, then low-power devices of 40-50 W will be the most acceptable. As for 100 W soldering irons, they are not suitable for home use.
This type of soldering iron is quite sufficient for home use.
Important! When choosing a soldering iron, you should also pay attention to the fact that different solder is used for each power. If devices with high power require a refractory material, then for weak ones, on the contrary, a softer one.
Related article:
Inverter welding machine : which one is better for home and garden, an overview of the market, as well as secrets of use, useful tips and recommendations from experts, you will learn after studying the materials in the article on our portal.
What is a soldering iron for microcircuits and why you can’t do without it when repairing modern devices
Let's start with the fact that any SMD components, which include microcircuits, cannot tolerate overheating at all. It is possible that they will work immediately after the repair, which is unlikely, but this will not last long. It is for this reason that it is necessary to use a special soldering iron for microcircuits, the heating temperature of which is regulated. Let's look at this in a little more detail.
In general, soldering irons can be divided into 4 types:
- Gas - such devices are intended mainly for soldering connections in junction boxes. Their main disadvantage is the difficulty in working, and therefore for beginners without experience it is better to abandon such a soldering iron;
- Spiral type electric soldering iron - such devices are the most common. One of the disadvantages is the rather long warm-up time. At the same time, it should be noted that for home use it is the most optimal. Quite durable. With proper operation, the service life can be 10 years or more;
- Ceramic type - differs from the previous one in the heating element. The disadvantage is that it is quite fragile. It can fail at the slightest mechanical impact. But it warms up almost instantly;
- Pulse type soldering iron. Such devices, together with a thermostat, are called soldering stations. The only disadvantage we can note is the high cost. And yet it is justified by functionality. This soldering iron heats up very quickly and is ideal for working with modern microcircuits.
Thus, we can conclude that today’s conversation will be devoted specifically to pulsed devices. And yet there is also a place for ordinary spiral or ceramic soldering irons, but more on that a little later. First, you should understand in more detail the advantages and disadvantages of each type.
How much does a soldering iron for microcircuits cost in stores and online?
This type of tool is quite difficult to find on sale. Tips are most often sold for conventional soldering irons, which can also be used to solder microcircuits. But if you want to purchase a separate device for these tasks, then look better and you will see that they are still on sale. The cost of such devices starts from 300 rubles, for very simple devices for home and infrequent use, and can reach about 6-8 thousand rubles for equipment designed for professional use.
It will be interesting➡ What is a digital ammeter and why is it better than a regular one?
Whether to choose a ready-made soldering iron for microcircuits or to make one yourself is up to everyone to decide for themselves. Sometimes it is enough to change the tip in your existing soldering iron to a thinner one or a more convenient shape. Any job requires its own tool, and the work of dismantling or installing microcircuits requires a special soldering iron, which in skillful hands will ensure high-quality contact of the microcircuit with the board tracks, and cleanliness, beauty and, most importantly, normal operation of the installed device.
Which soldering iron should you choose?
Learning to solder correctly is easy, but only if you choose the right tool. Among the wide variety of these devices, an amateur craftsman who decides to start repairing office equipment should choose an acoustic soldering iron, which is small in size and has good performance. It has a low heat capacity, which is desirable for fine soldering work when assembling microcircuits. It is better for a novice master to opt for a device whose power does not exceed 40 W. It is important that the soldering iron is also not weaker than 15 W, since the power in such a product will not be enough even to connect simple wires of office equipment. It is preferable to buy a tool with a three-way grounding plug. Its presence will prevent possible voltage dissipation during the movement of electric current to the metal tube.
An industrial soldering iron is suitable for connecting calibration wires, chassis and stained glass work.
What and how to solder microcircuits
Modern radio-electronic devices cannot be imagined without microcircuits - complex parts into which, in fact, dozens, or even hundreds of simple, elementary components are integrated.
Microchips make devices light and compact. You have to pay for this with the convenience and ease of installation and the rather high price of the parts. The price of a microcircuit does not play an important role in determining the overall price of the product in which it is used. If such a part is damaged during installation, when replacing it with a new one, the cost may increase significantly. It is not difficult to solder a thick wire, a large resistor or a capacitor, all you need is basic soldering skills. The microcircuit must be soldered in a completely different way.
To avoid annoying misunderstandings, when soldering microcircuits it is necessary to use certain tools and follow certain rules based on extensive experience and knowledge.
Soldering equipment
To solder microcircuits, you can use various soldering equipment, ranging from the simplest soldering iron to complex devices and soldering stations using infrared radiation.
A soldering iron for soldering microcircuits should be low-power, preferably designed for a supply voltage of 12 V. The tip of such a soldering iron should be sharply sharpened to a cone and well tinned.
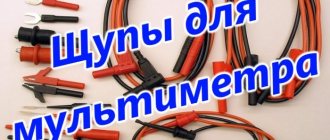
To desolder microcircuits, a vacuum desoldering pump can be used - a tool that allows you to remove solder from the legs on the board one by one. This tool is similar to a syringe in which the piston is spring-loaded upward. Before starting work, it is pressed into the body and fixed, and when necessary, it is released by pressing a button and rises under the action of a spring, collecting solder from the contact.
A hot-air station is considered a more advanced equipment, which allows both dismantling of microcircuits and soldering with hot air. This station has in its arsenal a hairdryer with adjustable air flow temperature.
A piece of equipment such as a heat table is very popular when soldering microcircuits. It heats the board from below, while installation or dismantling is carried out from above. Optionally, the heating table can be equipped with top heating.
On an industrial scale, soldering of microcircuits is carried out by special machines using infrared radiation. In this case, the circuit is preheated, soldered directly, and the contacts of the legs are cooled step by step.
How to learn to solder wires?
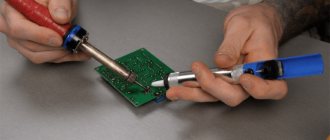
So how do you connect the wires? The operating sequence is standard for all types of soldering. The connected ends of the wires are tinned. But for reliable fastening, it is recommended to twist them tightly together. During the procedure, the soldering iron tip is directed to the joints with one hand, and solder wire is brought to this place with the other.
In some cases, twisting the wires is not possible. Then the ends of the wires to be connected must be laid parallel to each other and compressed with pliers. The work is performed with one hand, the second one directs the soldering iron tip with solder to the joint. Holding the ends of the wire should be done after removing the soldering iron tip from the soldering area.
Sometimes there is a need to connect the end of one wire to the middle of another. Twisting in this case is done by twisting the end of the wire around another to which it is attached.
It must be remembered that butt soldering of wires is not possible, since its reliability depends on the strength of the mechanical connection.
The question of how to learn to solder wires is one of the most pressing among Internet users. Having mastered the technique of splicing and soldering, craftsmen have the opportunity to independently, without the help of specialists, perform a number of the following tasks:
- seamless heating equipment;
- electric guitar cord extension;
- connecting a USB cable to an antenna, etc.