What is needed for repair
The bare minimum for repairing a garland is a stationery knife, electrical tape and a multimeter with thin probes.
It's even better if you have solder, flux, a soldering iron and a small Phillips screwdriver.
Safety precautions
You can inspect, repair and touch a faulty garland only when it is turned off. Otherwise, due to your carelessness and carelessness, you risk getting an electric shock. Even if the garland is 12V or 24V.
If you receive an electric shock and feel unwell, be sure to consult a doctor, especially if you have heart problems.
Also, do not solder live wires. The same applies to testing LEDs and other radio components with a multimeter.
Visual inspection
It doesn’t matter what kind of garland you are repairing, be it LED or light bulbs. First you need to look at the integrity of its wire.
Start with a fork. There may be damage in this place, since it is not uncommon for the plug to be pressed when plugged into the network.
The wires must be straight, without cuts or breaks. If there is at least one break, it needs to be corrected.
How to fix a garland if it blinks randomly in any mode
Reason 1. Capacitor failure
Drying, leaking or swelling of the electrolytic capacitor causes the controller to malfunction.
How to fix
Carefully inspect the capacitor. If it is swollen, darkened, or electrolyte leaks are visible on it, then replacement is necessary. Examine the case to find out the rating and voltage, and then find an analogue with parameters no less than the original ones. Carefully unsolder the old capacitor and install the new one, observing the polarity.
Reason 2. Resistor failure
Burnt resistors also cause problems with the controller and unstable operation of the lighting modes.
How to fix
Check the resistance of the resistors with a multimeter and replace the faulty ones with working ones of the same value. If the parts are visually intact, it is still better to replace them to eliminate the malfunction.
Restoring broken contacts
Found a cliff? You can do without soldering.
It is enough to strip the wires and twist them.
Of course, it would be ideal if you have a stripper, but you can get by with a utility knife.
Carefully run the blade along the wire insulation in one direction, slightly pressing it along the surface and twist it. Do this carefully so as not to cut off any excess wires.
You can also use side cutters or wire cutters. However, as a rule, garlands have rather weak wires and can be easily damaged by sudden movements. Therefore, it is better to use more gentle methods of removing insulation from wires.
You can also remove the insulation with a soldering iron or matches. But this method is not very good either. Firstly, it produces a lot of toxic smoke. And secondly, it will not be possible to accurately measure the required length of insulation to be removed. And it may melt unevenly.
We remove the insulation with a utility knife if there is no stripper.
Next, bend the two wires parallel to each other and tightly twist their exposed parts together in one direction.
Now carefully move the twisted part of the wires back to the insulated side, and twist everything with electrical tape.
This type of twisting and insulation will be much better than if the wires were in one cavity, rather than parallel to each other.
An alternative to duct tape
You can also use heat shrink. But they have two main disadvantages compared to regular electrical tape.
The first thing is that you need to accurately select the heat shrink in diameter so that it fits tightly around the wire after heating.
And the second is that it is much inferior to electrical tape in terms of insulation quality. Still, it is better to use electrical tape than simple heat shrink. Moreover, over time, heat shrinkage can completely move away from the insulated contact of the electrical circuit.
We strengthen the damaged contact by soldering
Sometimes you can't do without soldering. And soldering the wires will additionally strengthen the contact of the wires compared to conventional twisting.
Twist the contacts in the same way as shown earlier.
Next, apply flux to the wires to be soldered (you can use regular alcohol rosin).
Take solder to the soldering iron and go over the soldering area in one go.
Soldering should be neat, without unnecessary “snot” (large lumps of solder).
Good soldering can strengthen the contact of the wire so much that when you try to test it for strength, you can damage other sections of the wire.
In the same way, we isolate the place of the soldered contacts with electrical tape, as in the case of twisting.
Checking the control board
If everything is in order with the wires and plug, then we move on to checking the control board. It is usually packed in a box. The power supplies come to this box, and the control wires go out to the garland.
Disassemble the box. This usually requires a small Phillips screwdriver.
Next, pull out the board. The board contains electronic components. They also need to be visually checked for integrity. There should be no traces of soot on the radio components. And electrolytic capacitors should not burst into flames.
If it is possible to check the parts with a multimeter, turn it into dialing mode and check the radio components for a short circuit. For example, the diode should not ring briefly.
Also pay attention to the back of the board.
The soldered wires on the board must be intact and not move away from the contact pads. Solder if necessary if they come off or seem too flimsy.
If you soldered the board, do not forget to clean it with a brush and alcohol or gasoline.
Design and diagram of the garland
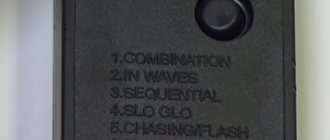
LED garland control unit board
Externally, an LED garland is no different from a regular one. It also contains wires, lamps and a control unit, which is the most important element.
The unit is a small plastic box with buttons that can be used to change the operating mode. Usually manufactured in a high-quality housing with IP44 protection level. The level of protection depends on the room in which the garland will be installed. Frost-resistant products will be required outdoors. There are soldered wires inside the block. There is also a board inside on which the controller, thyristors, resistors, capacitor and diode bridges are soldered. Expensive models may be equipped with a fuse.
LED garland diagram
LED Christmas tree garland circuit
The power supply receives mains voltage. It passes through a diode bridge and resistors, then it is smoothed by a capacitor, after which the voltage is supplied to the supply controller. When the button is closed, the modes switch. The controller controls thyristors, the number of which depends on the number of backlight channels. After passing through the thyristors, the voltage is supplied to the LEDs.
The variety of backlight colors depends on the number of outputs. If there are only 2 lines, the garlands will work in two modes - dim and light up in turn. More expensive products may have more channels.
Monotonous check of the garland
If you find no problems with the wires, plug or control device, then the next step is to check the integrity of the LEDs or bulbs.
LEDs or light bulbs in garlands are usually connected in series.
It is enough for at least one LED to fail, and the current will stop flowing through the circuit.
What causes light bulbs and LEDs in garlands to fail?
As a rule, the main reasons are:
- Network interference and ripple;
- Physical damage;
- Overheat;
- Poor quality of parts.
Network interference negatively affects the operation of light bulbs and LEDs. Physical damage - well, it’s clear that if a light bulb or LED is physically damaged, it will not be able to work.
But overheating and poor quality parts are a different matter. The problem is that the lights and LEDs (especially them) are quite sensitive to the ambient temperature.
Manufacturers of garlands usually use cheap LEDs to keep the price of the final product low.
When the garland is working, it heats up a little. This is a common phenomenon, but it is precisely because of this that the resistance of the pn junction of the LED decreases.
And since it decreases, it means the current flow increases. And sooner or later, one of the LEDs experiences a breakdown of the pn junction.
With light bulbs it's a little different. The filament, of course, does not have such a dependence. There are other processes going on there. But the problem is generally similar.
There are two options to solve this problem. Either limit the current using a limiter on a transistor, or simply connect resistors to the LEDs. Read more about the process of operation of an LED and a resistor in this article.
But in order to reduce the cost, manufacturers do not do this. It just turns out to be more expensive than without them.
You need to solder a resistor to each LED. This is the only way resistance compensation will work when the temperature is exceeded.
There is no point in modifying the garlands. It will cost several times more than it costs. And you also need to take care of the insulation of resistors and soldering points.
Visual inspection
Carefully inspect the light bulbs or LEDs for integrity. They should not be cloudy, damaged or torn. Have you noticed this one? This means that it must either be changed or the wires connected at the break point with each other.
Searching using backlight
You can also check the integrity of light bulbs or LEDs simply by illuminating them.
With backlighting, dimming of an LED or a broken filament of a light bulb will be immediately visible.
Testing LEDs with a multimeter
Switch the multimeter to dialing mode.
An LED, like a regular diode, conducts a large current in only one direction, but at the same time it begins to glow. If you connect the multimeter probes to the LED in the forward direction (plus to the anode, and minus to the cathode), the LED will light up. But it will light up dimly due to the fact that the multimeter supplies a small voltage in this mode, so as not to damage the pn junction of the part being tested.
If the LED or wires are large enough, then the multimeter's battery simply won't be enough to light the LED. Therefore, look at the multimeter readings. A working LED will show some value on the multimeter. And if you measure incorrectly or the part is faulty, the multimeter will show a break (infinity or number 1 on the left on the display).
The probes should be thin, with needles. Why with needles? But simply because otherwise you will not ring the chain.
You can make such probes either by soldering, or by attaching a needle to the multimeter probes with a thread and additionally securing it all with electrical tape.
If you decide to make such probes, make them shorter, not like that. What are they presented in this article? Long needles may become bent after frequent measurements.
Two dialing methods
There are two options for measuring using probes with needles.
The first is to try to get through the LED insulation.
This doesn't always work.
The second is piercing the wires.
Not a very good method either. If the garland is outdoors, the wires will begin to rot from small punctures.
And the tactics are simple. Divide the garland into two segments, and gradually shorten them, slowly reaching the center.
Now you can either replace the old LED with a new one, or simply solder the two contacts together.
If you decide to install a new LED to replace the old one, it should be similar in power to the others. Otherwise it will burn out.
As a rule, a maximum of 3-5 LEDs can be removed from a garland, depending on its size. If you remove more, the garlands will quickly break again. This time the number of burned out LEDs will be higher.
All of the above is true for light bulbs.
How to repair an LED garland with your own hands
Quite often a situation arises that last winter the device was perfectly working, but now it does not work as it should, for example, the LED garland lights up dimly or does not turn on at all. There are also frequent cases when one color of the LED garland out of several does not light up. It is quite possible to carry out repairs and bring the device into working condition on your own. To successfully solve the problem, you need to have an idea of what kind of breakdowns occur most often, as well as possible ways to repair an LED garland in a given case.
How to fix an LED garland: a separate section does not light up
The most common failure is that one or two colors of the garland do not light up. It happens that an entire section does not work. In this case, it is worth starting the repair of the LED Christmas tree garland by disassembling the control unit in order to make sure that all contacts are securely fastened to the board and a broken wire did not cause the malfunction. If you find that the problem is hidden in this particular place, the detached contact must be fixed. You can learn more about this procedure from the video on how to repair an LED garland located below.
If the cause of the breakdown was not found in the control unit, this indicates that it is hidden in the common wire. The fact is that for LED garlands, unlike conventional ones, a parallel connection is used, which eliminates the possibility of a garland malfunction due to the burnout of one element. Therefore, your task is to check the common wire for damage, bites, etc.
How to repair an LED garland if it is completely faulty
If the LED garland does not light up when the power is connected, the problem can also be fixed with your own hands. The LED garland requires a standard inspection for damage to the power cord and power supply. Make sure that all pins are securely connected to the chip and to the board. If all connections are in order, most likely the board itself has burned out.
At this stage, you need to make a decision: is it worth repairing the garland or will it be easier to buy a new one? Of course, if we are talking about an inexpensive Chinese garland, it will be easier to replace it. If you decide to repair the old one, use the tips provided.
The control unit can be replaced with a starter from a fluorescent lamp. Depending on how powerful it is (127 or 220 Volts), the LEDs will blink at different speeds.
You should start by checking exactly how the LEDs in this garland are connected. Here you should be interested in how the extreme elements of the groups are connected to each other. If the connection is made using anodes, you will have to look on the Internet for a diagram of a New Year's garland on LEDs and make some changes to connect the extreme elements with cathodes. This is due to the fact that for normal operation of the garland through the starter, a 5-watt resistor is needed, which will supply voltage to the anode with the required resistance. In addition, you need to include the diodes in the circuit in such a way that they can pass reverse current from the network through themselves.
You can repair a broken Christmas tree garland yourself
Understanding the circuit of an LED garland and repairing it yourself is quite a troublesome task. Therefore, it will often be much easier to buy a new one.
Replacing individual elements of an LED garland
If it is necessary to replace a separate LED that has failed, this can be done quite simply. You just need to disconnect the garland from the power supply to avoid electric shock, unsolder the burnt-out element and install a new one in its place. The main thing in this is to maintain polarity.
Particularly worth noting are the methods for repairing garlands such as duralight. Sometimes you have to deal with such a phenomenon as a malfunction of a separate section of it. But here the solution is simple: you need to locate the problem area (you can do this visually or using a tester), and then simply cut it out, using the special marks that the manufacturer makes as a guide. The non-working part can be thrown out, and the working parts can be combined using a special connector.
Breakdowns are often caused by animals that can chew through the device’s wires.
Bottom line
As a result of the repair, 3 burnt out LEDs had to be removed.
We check the work - the garland is working again.
Naturally, you cannot leave the garland on unattended.
Another unusual search for faulty LEDs
You can also try to look for a faulty LED or light bulb using Brovin's camera. Working LEDs will light up if you lean them against a working kacher. Of course, this is not a very safe method from the point of view of the influence of interference on parts, but it can significantly speed up the search for a faulty part.
There is also the option of searching for a faulty section of the garland using a wiring detector. But this will not work if you have a garland with stranded wires.
Post Views: 176
Soviet style garlands
Garlands produced in Soviet times are reliable. Another feature is that they can be repaired, while not all Chinese-made products can be repaired. Modern devices and tools make it possible to identify faults and carry out repair work.
Required set of tools and materials:
- soldering iron;
- indicator screwdriver;
- insulating material;
- pliers.
The garland uses a serial connection circuit. In other words, if one light bulb burns out, the entire system stops functioning.
We check the lamps for integrity. If the light sources are not damaged, check how they are screwed into the sockets. If necessary, screw the lamp into the socket until the end.
Advice! If you need to replace a colored light bulb, but a replacement is not available, it is recommended to paint the light source with tsapon varnish.
If the steps described above do not give a positive result, take an indicator screwdriver and look for the area where the contact is interrupted in the conductor. The broken contact is not necessarily located in the wire, so we also check the cartridge. If the problem is a broken contact, we restore its functionality using a soldering iron. If necessary, we connect the conductors directly.