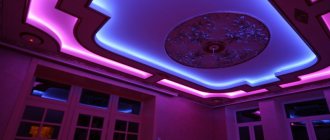
If you have studied all types of ceilings up and down and settled on plasterboard structures, then we hasten to congratulate you on your successful choice: they look fresh and interesting in almost any room. Especially in combination with spectacular lighting, which creates a special atmosphere within its radius of action. It may seem to you that such repairs will require professional installation, but this is not at all the case: absolutely anyone can make a ceiling with lighting from plasterboard with their own hands! We reveal all the installation secrets for owners who want to transform their living space.
Where to begin?
Of course, with drawing up a work plan. Before proceeding directly with the installation, you must decide how you see your future ceiling, how many levels will be involved in it, what type of lighting will be integrated into the already installed structure. The completed sketch allows you to evaluate the entire scale of the work and develop their correct sequence.
Since a lot of dust will be released from plasterboard ceilings during installation, take care to protect the walls and floors in the room from it. To do this, you can use regular plastic film. Treat the damp surface of the ceiling with a primer.It would also be useful to prepare the following tools:
- drill, screwdriver
- knife
- dowels, screws
- screwdriver and pliers
- hacksaw
- metal scissors
- level
- roulette
- pencil or chalk
In accordance with the surface area, also stock up on sheets of plasterboard, hangers needed for organizing the frames, as well as profiles to the wall and parallel to it.
The procedure for installation in a plasterboard box
To start such an operation, you will need to acquire materials (plasterboard sheets, CD and UD profiles, fasteners, dowels, putty and serpyanka, water-based paint and the diode tape itself), the necessary tools (a hammer drill, a screwdriver, a grinder, a tape measure, metal scissors, a hacksaw , a stationery knife, drills and bits for making various holes). Initially, you should decide on the general appearance of the plasterboard structure - its shape, size, the presence of a niche for the ceiling cornice, the number of spotlights, etc.
Next, follow these steps to install hidden lighting:
- Clean the surface from excess construction and finishing materials (wallpaper, putty, any structures).
- Make a marking showing the plan for installing the profiles on the walls and ceiling. To do this, be sure to use a level or tape measure to align their direction with the ceiling or floor.
- Using a concrete hammer drill or a drywall drill, using the finished installation diagram, drill holes for the dowels. They should be located at a distance of 30 - 40 cm from each other.
- Secure the UD profile with dowels to the ceiling and walls.
Rice.
3: fasten the profile It acts as a starting strip, so the fastening of the ceiling profile should be as tight and rigid as possible. Do not allow the profile to become unsteady or under-pressured by quick installation.
- Cut the CD profile to the required length to form transverse and suspended frame structures.
Rice. 4: cut the profile
You can cut the profile with a grinder, a hacksaw or metal scissors.
- Attach the resulting posts and crossbars to the UD profile. The fastening of the profile to the metal is carried out using self-tapping screws with a press washer.
- Route the wiring through the box. For multi-level ceilings, this procedure can be performed when the upper tiers are already installed.
Rice. 5: Run the wiring - Sew the bottom and sides of the box with sheets of drywall. The same self-tapping screws with a press washer or any other metal screws are suitable for fastening them.
Rice. 6: Sew with plasterboard - If the hidden lighting consists of spotlights rather than a strip or cord, they should be mounted on a profile.
- Cover the remaining area with sheets, putty the surface, treat with a primer and paint with water-based paint.
Rice. 7: finishing work - If you use LED lighting with tape, hide it in a special niche. If contour lighting is also provided in the place where the cornice is attached, immediately install it there too.
Rice. 8: laying LED strip in drywall - Connect the hidden backlight to a power source.
We install the main frame
- Step back 10 centimeters from the top point of the ceiling and draw a horizontal line around the perimeter of the room.
- Secure the wall profile according to the markings made.
- Attach parallel guide profiles in increments of 40 centimeters, use hangers to fix them to the ceiling.
- Cover the resulting structure with pre-cut drywall.
The first step in making a backlit ceiling from plasterboard with your own hands is done: you have mounted the frame.
Installation of LED strip in the baseboard on the ceiling
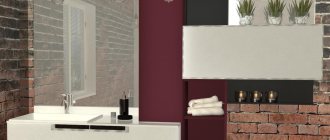
If you want to install LED lighting in a particular room and at the same time make plasterboard structures, then you should choose a material that is thicker and wider. This is quite simple to explain - LEDs are very bright, and such characteristics of drywall will protect human eyes from harmful effects. If the drywall is too thin, the LEDs will shine through too much.
Ceiling lighting with LED strip under the baseboard photo
Lighting the ceiling with LED strips under the baseboard with your own hands will not take you too much time and if you do everything correctly, you will get an excellent result. So, first of all, you need to install a special plinth on the ceiling. Do not forget that you also need to leave a gap where various types of products with LEDs will then be placed. An interesting fact is that the LED strip has a base that allows it to be glued to almost any base. In order to do this, it is enough to remove this protective layer. Thanks to this feature, you can attach the tape in a matter of minutes.
Before installing the LED strip on the ceiling, carefully inspect the baseboard for dust or dirt. If they are present, they must be eliminated without fail. Otherwise, the tape may stick very poorly or, after some time, even peel off from the ceiling. If, in your individual case, the length of the product exceeds what you need, then you can cut off some part of it. It is worth noting that this can only be done in those places that are intended for cuts, otherwise you will damage areas of the product and the LEDs will not work on them.
Illumination of a stretch ceiling with LED strip from the inside photo
In this situation, if you need to connect several separate parts of the LED strip, you should use a special electrical connector. When the tape is installed in the ceiling plinth, it must be attached to the power supply. To do this, use the wiring that is located at the ends of the product, installed at the factory. At the same time, do not forget to maintain polarity, which is very important for the full operation of LEDs.
Then, using terminal blocks, connect the power supply to the 220V network according to the diagram. The controller, as well as the power supply, must be hidden behind the baseboard so that they are not visible. Please take into account the fact that these devices cannot be installed in places where there is no air access. The lack of oxygen can have a very negative impact on the operation of both the power supply and the controller itself.
How to make a niche for organizing lighting?
The next stage is a box for hidden lighting. It is mounted according to markings that can be drawn along the ceiling of the first level. Then fasten the suspension stands cut from the profiles according to the markings, using a screwdriver and self-tapping screws. If this step is performed correctly, you will be able to give the second-level frame the required shape.
Before you start covering the resulting box with material, you need to lay out the electrical wiring in order to be able to conveniently mount the main lighting - lamps.
At the end of installing the niche, attach a sheet of drywall to the end of the resulting box, where your lighting is hidden.
How to make backlighting: materials and options
Lighting for a stretch ceiling, which is installed in 95% of cases, is a chandelier or lamps, the selection of which takes into account a number of parameters (lamp power, type of PVC film, etc.). But that’s not all – there are many more options for organizing lighting.
Illumination under a suspended ceiling is made using the following materials:
1. A diode lamp is a device that is small in size and is used when decorating a ceiling structure in the form of a starry sky. A special feature of LEDs is the presence of special diffusers that guarantee an optical effect. The device is installed together with an optical fiber cable and the use of a step-down transformer device. The diode lamp is installed in a special circuit, which imitates the glow of stars of various sizes.
2. Fiber optic cable. Such a conductor is a group of filaments made of plastic or glass, which are framed in a special sheath. The peculiarity of the cable is that it does not allow light to be distributed beyond the boundaries of the fiber. The product is fastened using the fan method. The process is complex, but the end result is amazing. To improve the effect, a projector is placed on the main structure, a cable and LEDs are attached. Afterwards the “star” ceiling canvas is stretched. Next, 2 mm holes are made in the surface, where the light guides are mounted.
3. LED strip. Illumination under a suspended ceiling is often created using LED strip. Essentially, it is a printed circuit board in which light sources are installed at certain intervals. Built-in LEDs can have a single-color or multi-color glow (here it all depends on the crystals used in the devices). The main advantage is ease of installation. Modern tapes have a sticky layer that securely fixes the product to a hard surface.
4. Neon cord. The essence of the product is to supply current to a pair of copper wires, after which the phosphor located between them emits a glow. Power source - batteries or converted direct current (the role of the converter is played by the inverter). Neon cord is in demand when organizing the illumination of the boundaries of a stretch ceiling, as well as when organizing lighting from the inside. Now let's look at how to make lighting under a suspended ceiling.
Let us immediately note that the installation of the lighting device is carried out in a special box with a recess.
Watch the video: Translucent stretch ceiling with LED lighting
Main requirements when installing the box:
- the installation step of the box frame is no more than 0.6 meters;
- plasterboard sheets are attached to the top of the box;
- the joints of the plasterboard product are closed with putty and special tape;
- At the point where the profile of the tension structure is fixed and the box is fastened, it is worth mounting a mortgage using a profile. The main purpose of the mortgage is to strengthen the structure (on completion of installation, the pull-off force is 55-60 kg).
Practical part on decorating ceiling lighting with your own hands
- Check the operation of the LED strip and begin installing it on the second level of the plasterboard ceiling.
- The power supply from which the LEDs will be powered must be placed in the place where the wires are routed and connected to a network with a voltage of 220 V.
- Use electrical tape to secure the lights to metal areas of the ceiling.
An important point:
the greater the distance that needs to be covered with tape, the more solid the power supply is required, since if different sections are connected in series, the intensity of the glow will differ significantly. Pay attention to this nuance in advance, since blocks with higher power are much larger and will take up much more space in your box.
A video to help you better design LED lighting for a plasterboard ceiling
Neon lights
This type of lighting was originally used to illuminate street signs. Essentially, it is a flexible, glowing wire. It can be bent and cut, and the energy consumption is negligible.
One of the positive properties of such a cord is the diffusion of light at 360 degrees, which allows you to implement various design tasks.
Duralight
Structurally, it is a flexible tube with LEDs or conventional incandescent lamps inside. The flexibility of the device allows it to be mounted in very inconvenient places. In addition, duralight has excellent strength and water resistance, since the distances inside the tube between the lamps are filled with PVC.
These are the main types of lighting devices used in the design of premises; which one to choose depends on the preferences of what you want to have in your room.
Ceiling design with hidden lighting
Most often, hidden ceiling lighting is installed when creating a two-level ceiling.
To do this, the first level is initially assembled in the form of a suspended ceiling made of gypsum plasterboard, and a second tier is placed on top, but with the features of future use. Often such multi-level systems have non-standard shapes and can be combined with stretch ceilings.
When planning lighting in a plasterboard ceiling, you need to think in advance about its location and stretch all the wires.
Hidden lighting is installed on the second level in a niche specially assembled for it, which can be open or closed. A closed recess for illumination provides for an additional border around the perimeter. With an open design, there is no such addition, which will allow you to equip lighting in low rooms.
What should be the thickness of plasterboard for the ceiling and why?
The niche itself for the lamps can be made of foam plastic or plasterboard.
GCRs have more advantages over foam plastic, the main ones are the following:
- Sheets of material are mounted on a durable metal frame, which means the entire structure is very durable.
- This ceiling is heat-resistant, which allows the use of any type of lighting fixtures, even incandescent lamps.
- The lamps can be fixed directly to the frame profiles, which will only strengthen the entire structure.
Design is only possible using materials intended for this purpose:
- Metal profiles: CD, UD and arched.
- Suspensions and connectors (crab connections).
- Fastening material (anchors, dowel-nails, self-tapping screws).
How to assemble a ceiling for hidden lighting
The whole process can be divided into three stages:
- First level assembly.
- Creation of the second tier.
- Finishing and installation of lamps.
First level assembly
As in any other case when working with drywall, the frame is initially assembled. At the same time, it has no structural differences from a conventional single-level suspended ceiling made of gypsum plasterboard.
- The lowest angle is measured, from which marks are taken in the remaining angles. This will be the level of the first tier of the ceiling. At the same time, we must not forget that wiring will be laid under it, and if spotlights are also installed, the distance from the ceiling should be at least 100 millimeters.
- At the mark of the future level, guides from the UD profile are attached to the walls with dowel-nails.
- The longitudinal and transverse frame slats are mounted in the guides, additionally secured with suspensions to the ceiling.
The metal parts are fastened together with direct connections or “crabs”. Attachment points are provided by small self-tapping screws - “bugs”. Direct hangers are fixed to dowels corresponding to the ceiling.
When installing an LED strip, it is ideal to first check the work on the floor.
After assembling the base, wiring is carried out and the first level is sheathed with plasterboard. In this case, finishing is not carried out, but the assembly of the second tier begins.
Second tier
- In the case of hidden lighting, you need to assemble a frame for arranging a niche for lighting devices. To do this, mark the guides on the ceiling and wall.
- The UD profile base must be fastened to the frame slats of the first level. They are secured with self-tapping screws.
- Cut racks are inserted into the guides, which are placed vertically and horizontally, connecting to each other with “bugs”. Horizontal profiles should protrude above the edge of the frame; they will be the load-bearing basis of the future niche.
- When installing a closed niche, another one is attached to the edge of the horizontal profiles, which will serve as a border.
- The assembled frame contains wiring for powering the future lighting.
- After this, the base is sheathed with sheets of material.
As with any type of drywall work, the joints between the sheathing should be on rack profiles. The screw caps are pressed into the surface so that they do not form unnecessary protrusions.
After covering the gypsum boards, finishing work begins. Puttying and finishing are carried out in the same way as during normal work with drywall.
Backlight installation
For backlighting, LED strips with less than 60 diodes per meter are most often used; it is not recommended to use too many lamps.
It is also necessary to use a transformer that converts electricity. Initially, it is better to test the entire scheme on the floor, and then begin installation work.
The LED strip itself has double-sided tape, which allows it to be attached to almost any surface. After installing the tape, a transformer is connected to it and the light device is connected to the network.
Properly assembled lighting has a very long service life, which will allow the use of such lamps for many years.
Room lighting options
The main question that arises before anyone who decides to make a backlit ceiling from plasterboard with their own hands is the choice of light sources for organizing a unique lighting scenario in their room.
At the moment, it is customary to divide all existing light sources according to the type of installation into two groups - open and hidden lighting. There is another, more practical way of classification - primary and secondary lighting.
According to it, the main light sources include the following types of lamps:
- chandeliers
- hanging
- invoices
- point
But the LED strip
most often acts as additional lighting. In some cases, especially in the case of multi-level plasterboard ceilings with a complex lighting arrangement, spotlights along with LEDs can be used for a common purpose - as auxiliary lighting that exists parallel to the main open ceiling lighting.
Let's look at examples of the use of classic chandeliers, the time of which, it would seem, has long passed. But what seems does not always objectively reflect reality, and the photos below clearly demonstrate the relevance of this type of lighting with a creative approach to the principle of their placement.
If you use a chandelier to light a room, remember that it is not mounted to a plasterboard structure, but to the main ceiling through central wiring, so take care in advance of access to a site organized specifically for it.
Suspended and overhead lamps are a fairly common type of lamps, which are not always justified with a suspended plasterboard ceiling due to the fact that they make the room visually very low.
Spotlights are often called mortise lamps - they are mounted in pre-prepared holes in a plasterboard sheet. They are excellent for zoning space and can act as both primary and additional so-called night lighting, helping to give your room an original light ambience.
See how easy it is to create a real designer paradise on a plasterboard ceiling in your apartment or house using hidden lighting, organized using a sticky LED strip.
Assembly options
Today in a house, if there is a suspended one- or two-level suspended ceiling or made of plasterboard, you can make hidden lighting with your own hands of the following types:
- in a niche made of plasterboard. Such installation is considered more expensive and time-consuming;
- in a special polystyrene foam ceiling cornice. Suitable for tension type suspended structure. This type of lighting installation is considered more reliable and less expensive.
Any of the given lighting design options is available for you to do it yourself. The main thing is to follow the technology and the installation will be done conscientiously. In this case, the ceiling must be at least two-level.