Smart home concept
A modern smart home is several devices combined into one home automation system. They work both autonomously, according to a given program, and with remote control.
What can Sonoff RF Bridge 433 do?
This is a central hub that controls other smart home devices.
Main advantages:
Can convert 433 MHz radio signals for WiFi wireless network. In the application for iOS or Android, four buttons are assigned to the remote control, which operates at the same frequency of 433 MHz. This enables remote RF control of 16 different devices via a smartphone app over a 2/3/4G WiFi network.
We recommend reading: what it is and how you can use the Sonoff 4CH Pro 4-channel Wi-Fi relay.
Sonoff is suitable for controlling RF devices with a frequency of 433 MHz for interaction with devices of the same type. This:
- switches;
- sockets;
- light bulbs;
- anti-theft alarm. An emergency message is sent to your smartphone in real time wherever you are - anywhere in the world;
- fire protection system. The concentration of smoke inside the room is controlled;
- protection against home invasions;
- alarm. Set a timer to open/close curtains at a specified time. In the morning your curtain will wake you up;
- locks and so on.
This control unit is the heart of all smart devices from Sonoff. It works in conjunction with a Wi-Fi router, which makes it possible to remotely monitor and manage all devices registered in the system.
Where can I buy
You can purchase the device either in a specialized store or online in an online store. In the second case, the budget option for purchasing products on the Aliexpress website deserves special attention. For some products there is an option for shipment from a warehouse in the Russian Federation; they can be received as quickly as possible; to do this, when ordering, select “Delivery from the Russian Federation”:
| Smart relay SONOFF RF | Wireless remote control SONOFF RF Bridge | Smart switch SONOFF RFR3 |
| Smart remote control SONOFF RF433 | Smart switch SONOFF 4CH R3/PRO R3 | Set of relays and switches SONOFF |
A little about the cloud
But still, you will not be able to control the relay without the Internet, because... control occurs not through the local network, but through the Internet, i.e. the same Chinese cloud that we mentioned above. And it doesn’t matter whether control is via Wi-Fi or the Internet, control access is always via the cloud, and to access the cloud you need Internet access.
By the way, if you need a similar device, but with an additional radio control function from the remote control, you can order the Sonoff RF version relay.
If you want to control the load where there is no Internet network at all, then you can use the Sonoff version G1 relay (GSM/GPRS with SIM card support). This manufacturer also has relays with temperature and humidity sensors Sonoff TN10 / TN16 and two-channel (for controlling two independent loads) Sonoff Dual relays.
In general, the manufacturer Sonoff has many different devices, we will tell you about some of the most interesting and significant ones on the pages of our website, so subscribe to the newsletter so as not to miss interesting releases.
Thank you all for your attention. And we ask those who already use this relay to share in the comments about the places where it is used, so that other readers of the site can highlight useful information for themselves when using this gadget.
If the article was useful to you, then share it with your friends.
See also on the topic:
Remote control of street lighting. Modern methods.
Home automation using the BeNext system as an example.
Smart GSM socket. Device and principle of operation.
Switches with remote control. What does the market offer?
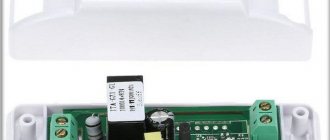
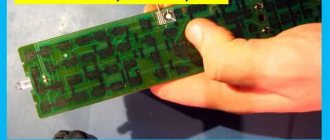
Appearance
As always, a proprietary control device:
- With excellent quality work.
- With ergonomic design.
- Using quality materials.
- It is easy to use.
This is a black parallelepiped, no larger than a matchbox. In the photo below, for clarity, it is next to a regular round AAA battery.
On the side you can see a microUSB input for a 5 V power cable and a hole for pairing with a phone via the eWeLink application.
Controlled by Sonoff RF Bridge chip ESP8285. For contacts with other Sonoff devices, there are two internal antennas - a receiver and a transmitter.
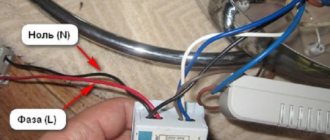
Connection
One RF bridge supports up to 4 RF remote controls in the eWeLink program. There are many instructions on the Internet. Now let's start setting it up.
Install the eWeLink application on your phone.
Add device
Create an RF bridge using a micro USB cable. The green LED will light up.
Setting up work in the eWeLink application
Download the eWeLink application to your gadget from the AppStore or PlayMarket. Register an account. Entering your email is required to receive a confirmation code. The password is at least eight characters.
After registration, we get to the main menu of eWeLink. Relay control is only possible using this application. Control from a computer is only possible by installing a virtual machine with mobile OS or by sending http commands after reflashing the relay.
Sonoff Basic pairing
We connect the gadget to the home Wi-fi network, and Sonoff Basic to the 220v network.
Only 2.4G Wi-Fi networks are supported.
Press and hold the button on the Sonoff Basic until the LED indicator starts flashing quickly or flashing 2 times and lights up.
In the application, press the + button, then Quick Pairing. The wireless network name field will be filled in automatically with the name of the network to which the gadget is connected. All that remains is to enter the Wi-fi password. Next we wait for pairing.
After successfully finding the device on the network, under the time we will see the inscription “Registering...”. Enter the name Sonoff Basic to display in the application. Click add device. Pairing is complete, as indicated by a constantly lit green LED indicator.
Sonoff Basic will appear in the main menu of the eWeLink application in the OFF state. To start it, tap on the OFF button and get the ON status.
Clicking on the name takes you to a separate settings menu. The connection activity icon is displayed on the right. If we are working within the same network, there will be an icon indicating a local network.
Pairing
Using a small screwdriver or match, press and hold the pairing key for 7 seconds until the blue LED blinks 3 times quickly.
Adding an account
On your phone, open eWeLink. Press "+".
- For Android, select the 1st icon, click the “Next” button;
- For iOS, select the appropriate symbol. In accordance with the flashing light diode, press the “Next” button.
EWeLink will automatically search and connect to the device.
Enter your online SSID and password:
- when you are not going to set a password, leave this field empty.
Remember: eWeLink exclusively supports 2/4 G and WiFi communication protocol. 5G+WiFi doesn't work!
Give the device a name to complete pairing.
Perhaps the device is “in standalone mode” on eWeLink, then it takes some time (1–2 minutes) to pair with the router and server. If the green LED lights up, then the mechanism is in online mode. When eWeLink still shows “offline”, simply turn off the eWeLink program and restart.
Add remote control
Prepare a remote control with 433 MHz radio frequency.
Enter the RF bridge control interface. Click "+" to add RF remote control.
Important! Please note that regardless of the type of HF remotes, the maximum number you can add is 4 (1-4 buttons/curtain/alarm).
If you want to add a 4 button remote control, select "4 buttons" from the drop down menu and press the button. Confirm. Then you will see 4 device buttons on the interface. As you can see there are Button0, Button1, Button2, Button3. You will need to register the keys with RF Remote button ABCD - each separately.
If you want to add devices such as:
- 433MHZ RF infrared sensor;
- RF door sensor and so on.
Each button has its own script.
Training with RF buttons
Press and hold the 0 key on the app until you hear a beep from the RF bridge. The red LED of the RF bridge will begin to flash quickly, indicating that it is in learning mode. Then quickly press the “A” button on the remote control. You will hear a couple of beeps and the red LED of the RF Bridge will blink twice. This means that the learning process was completed successfully. Button 0 will become available for use.
If you use another RF remote control to learn with Button0, it will overwrite the previous codes. Repeat the steps above to explore other buttons. If you do not have time to successfully complete the “training” process within 1 minute, it will be put into “timeout” mode and exit the training mode.
Notes:
- Keep the distance between the RF bridge and the RF remote control within 30 meters.
- If you wish to cancel the pairing buttons, please remove the added RF remote control.
- One RF bridge supports adding up to 4 remote controls.
Now one RF 433 can be controlled by 4 radio remote controls at 433 MHz. Which successfully allows you to control up to 16 radio-controlled devices through the application. To do this, just pick up your smartphone, select the eWeLink synchronization program and indicate what exactly the button should do.
To use the device:
Download and install the Ewelink application from the Appstore or Google Play.
Hold the button on the device for 20 seconds
Launch the Ewelink app and click the magnifying glass icon
Follow further instructions in the program
FAQ:
Account registration and account login The password must be at least 8 characters long, the authorization code is valid for 30 minutes
Connection to Z- Wave, Zigbee, etc. The equipment operates on a Wi-Fi network with its own set of applications and its own cloud server; third-party specialized protocols and servers are not supported.
Setting up the control panel for the RF To program the remote control button, you need to press the button on the relay 2 times and wait for the LED to blink once, then press the desired button on the remote control, for example, button A. To add a second remote control, you must perform the same steps and program the same button . The remote control buttons should be considered as control channels, and the relay is controlled by only one channel, thus the same relay cannot be assigned to button A of the first remote control and to button B of the second at the same time. If you add button B on either remote, button A on both remotes will stop working.
How many remote controls does one relay support? One relay supports up to 8 remote controls.
How many relays does one remote control support? One remote control supports up to 4 devices.
What type of battery does the remote control use? L828 A27 12V
General access
When sharing access to a second account, status changes are displayed synchronously in both accounts. When access is denied to the second user from the main account, the device disappears in the second account.
Firmware update
The device firmware is updated directly from your account in the software
What is the state of the relay when the 220V power supply is turned off/on? When the power is turned off and on again, the relay is loaded, the contact is open
Is it possible to control the shutdown with a button on the Dual relay ? Control is only possible from a smartphone
Is it possible to operate relays TH10 and TH16 simultaneously based on sensor readings and according to a schedule ? No, when automatic operation based on a temperature/humidity sensor is enabled, the scheduled, timer, and cyclic timer functions are blocked.
Is it possible to set an operating schedule in relays TH10 and TH16 based on sensor readings ? No, operation is carried out in constant mode, switching between auto (by sensor) and manual (by schedule) modes is done manually from the application
What ports need to be open for the devices to work?
Source