Description
The Sonoff basic version relay switch allows you to control electrical appliances using a mobile phone. This is achieved by connecting the internal Wi-Fi module of the relay to the home router and providing the router with Sonoff access to the global network.
Sonoff Basic is a compact device that can be easily placed:
- Behind the ceiling;
- In a brick niche;
- In the bowl of a chandelier;
- Inside the lamp.
The kit includes 2 protective caps and screws for fastening during installation.
Programming the smart home system
A smart home control system via the World Wide Web involves the use of a client application. To create it, you will need to think through all the schemes and features of the functioning of engineering subsystems. After this, programmers begin to develop a software product. As a result, the client - the owner of an apartment or house - receives a utility for remote control of air conditioning, electrical appliances, and lights. The owner of the program will be able to set or change the operating parameters of certain elements with just one click.
There is also an alternative method of monitoring equipment in a smart home - GSM control. This system is characterized by reliability, because its operation requires the use of SIM card slots in the smart room equipment. Such devices are subsequently controlled by commands via digital code in messages received from the mobile phone.
Types of models
The manufacturer offers a choice of models from the Sonoff World On series. There is a difference between them and it lies in the method of use:
- Sonoff World On (basic version) is suitable for controlling home appliances such as lamp, chandelier, CCTV camera, freezer.
- Sonoff World On RF is the same relay in the basic version, but comes with one control panel. This solution is well suited for controlling gates or raising barriers.
- Sonoff World On TH is equipped with sensors for measuring temperature and humidity, so the gadget is recommended for use in a greenhouse, next to a boiler or air conditioner.
- Sonoff World On Duo, 4CH and 4CH PRO - work with 2 or 4 devices simultaneously. More suitable for industrial applications.
We recommend reading: review and instructions for using the 4-channel version of the Sonoff 4CH Pro relay.
The type of connection to the device and pairing with a mobile phone is generally similar, so the article discusses further interaction with the simplest relay model.
The process of connecting the smart home system
Remote control via the Internet provides the ability to:
- make sure that household appliances have been turned off;
- find out about uninvited guests visiting the territory, about gas leaks;
- monitor the proper operation of heating and water supply systems;
- open and close curtains, blinds, windows;
- prepare for returning home, for example, turn on the air conditioners or coffee machine.
The control center is configured through special equipment that connects the owner’s gadget to special sensors and modules of household appliances. The software product is synchronized with the “control master”, thereby obtaining the rights to remotely change the parameters of the smart home.
An intelligent building is connected to a control unit at a distance not only when using algorithms that were developed by programmers. It is also possible to combine all devices in one cloud storage. Through it, direct remote control of gates and other household components occurs.
Specifications
Sonoff Wi-Fi relay has the following characteristics.
| Parameter | Meaning |
| Max current | 10 A |
| Supply voltage | 90–250 V |
| Wi-Fi protocol | 802.11 b/g/n |
| Operating temperatures | 0°C to 40°C |
| Weight | 0.05 kg |
| Dimensions | 88×38×23 mm |
The base of this relay is the Chinese microcontroller ESP8266.
How it works
The devices are based on the ESP8266 microcontroller. He is responsible for connecting to Wi-Fi and he is also responsible for processing commands and controlling the power relay. On the Internet you can find instructions, diagrams and firmware for self-assembly of such a relay, but given the low cost of Sonoff (from $4), this is not rational, unless it will be interesting for electronics enthusiasts.
The device operates not within your home network, but through a cloud server. That is, you need to connect to the Internet from your smartphone to control electrical appliances. In the absence of the Internet, even if Wi-Fi works, not all devices from the line will work, for example, wireless control without Internet access is possible on the RF and Basic models. But if your relay does not work without the Internet, you can control connected devices by pressing the button located on its body.
To connect this Wi-Fi relay with a smartphone you need:
- Download the eWeLink application and register in the application.
- Connect the relay, press and hold the button on its body.
- Release the key when the LED indicator blinks.
- After that, in the application you need to click on “search for devices” and set the network connection parameters.
- Next, come up with a device name.
- Now you can begin to fully use the device.
The ability to control your devices from anywhere in the world is the main advantage of Sonoff working via the Internet, rather than a local Wi-Fi network. This approach allows you to organize remote heating switching on before traveling to a country house or automate the watering of plants.
Installation and connection
For the relay to work, it needs 220 V power. From this fact it follows that the automation can be disguised anywhere without difficulty. (on the ceiling itself, walled up under a lighting fixture or decoration, in a switch box, in sight for manual control, etc.).
For surface installation it has 2 mounting holes (on the back). The connection diagram is implemented as follows:
- Terminals L and N on the input side (the designation is indicated directly on the front side of the relay) are supplied with phase and zero from a 220 V supply;
- The cross-section of the connected cores must fit within 1.5 square millimeters. Otherwise, there will be problems with attaching the cores to the terminal blocks.
- At the other end of the wire there should be a plug, which in the future will be connected to a 220 V network.
As an example, a power cable of the PVS brand (3 wires - brown, blue, yellow) was used for connection.
Install and tighten using a screwdriver:
- Brown - phase to terminal L.
- Blue - zero to terminal N.
- Leave the yellow one unconnected.
On the reverse side (output) connect the adjustable device in the same way.
After installation, cover the connection area with protective covers. The teeth will allow you to fix the connected wires and protect them from breaking. After installing the cover, tighten it with the mounting screws.
To connect a load of up to 10 A, the relay can be connected according to this scheme.
If the rated current exceeds 10 A, in order not to burn the device, it is recommended to use a contactor in the circuit.
Using the contactor you can control:
- Single-phase and three-phase load;
- Direct and alternating current.
After connecting to the power circuit you can:
- Operate manually;
- Pair your smartphone with the relay and control it via WiFi.
Sonoff relay for smart home controlled via Wi-Fi and Internet
Hello, dear readers and guests of the Electrician's Notes website.
In my previous publications, I introduced you to the Sapphire-2503 remote light switch and the Livolo touch switch, controlled both manually and from the control panel.
But today I would like to draw your attention to the Sonoff relay (switch) of the Basic version with the ability to control directly from a mobile phone via a Wi-Fi network or the Internet.
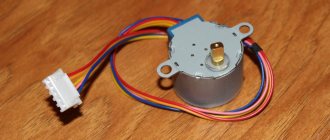
The Sonoff Basic relay is a small device (88x38x23 mm), which can be easily placed behind the ceiling space, in a building niche, or in the bowl of a chandelier or lamp.
Its cost at the time of publication of the article is slightly less than 300 rubles. As you understand, this is quite reasonable money, and for such a modern device. I purchased it on the well-known AliExpress trading platform (the link will be at the end of the article).
The kit included two protective covers with mounting screws, but, unfortunately, there were no instructions.
The Sonoff relay has the following technical characteristics, some of which are displayed directly on its body:
- maximum controlled load current 10 (A)
- supply voltage from 90 (V) to 250 (V)
- wireless standard 802.11 b/g/n
- security protocol WPA-PSK/WPA2-PSK
- operating temperature from 0°С to 40°С
- weight about 50 g
Sonoff Basic relay capabilities:
- load management via Wi-Fi
- Internet load management
- load control according to a given timer, both with direct and countdown
- load management from multiple mobile phones
These are the capabilities of the Sonoff relay. It can be safely used in smart home systems and for other various needs and requirements.
First, I will tell you how to connect Sonoff, and then we will check all its declared control methods in practice.
So, let's go.
Installation and connection of Sonoff relay
For the Sonoff relay to operate, it needs a supply voltage of 220 (V), which means it can be installed without any problems in a place convenient for you, for example, in the bowl of a chandelier or directly under a suspended ceiling, as well as directly in the junction box if there is enough space there.
To attach the relay to the surface, it has two mounting holes.
The connection diagram for the Sonoff relay is very simple.
The phase and zero of the 220 (V) supply voltage are connected to the terminals (L) and (N) on the (Input) side, respectively. Naturally, when connecting, do not forget about the color marking of the cores.
Please note that the connected conductors must have a cross-section of no more than 1.5 sq. mm. But I still tried to connect wires with a cross-section of 2.5 sq. mm. As a result, a rigid (single-wire) wire can still be connected without problems, but a flexible (multi-wire) wire with an NShVI sleeve tip is inserted into the terminal with great difficulty, so it even had to be slightly flattened and deformed.
For example, I used a power cable of the PVA brand, which just has a cross-section of 2.5 sq. mm. At the other end of the cable there is a plug, which I will later connect to any socket with a voltage of 220 (V).
The load phase and zero are connected to terminals (L) and (N) on the (Output) side, respectively.
To make it easier to connect the load, I connected a socket to the relay output.
By the way, terminal covers not only have a protective function, but also act as clamps for power wires or cables.
This is how everything turns out beautifully and neatly. Sonoff relay connected.
As a load, I connected an LED lamp, the design of which I described in detail in one of my articles.
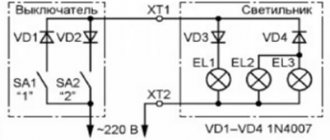
Here is a simple example of a Sonoff relay wiring diagram for a group of lamps.
By the way, it is not necessary to use only a lamp or a group of lamps as a load. You can safely connect any other load to the output terminals, not exceeding the rated current of 10 (A). And if you still need to control a load with a current value above 10 (A), then you can connect it to a contactor, and use a relay to control the coil of this contactor.
In this regard, we can add that when using a contactor, you can control at least a single-phase load, at least three-phase, at least alternating current, even direct current.
It will look something like this.
Thus, the scope of application of Sonoff relays is very wide and varied. It can control at least one light bulb, a powerful single-phase electric heater, a three-phase electric motor, etc. It all depends on your needs and requirements.
Now let’s look at all the possibilities for controlling the Sonoff relay in more detail.
I will not open the relay and look at its structure; there is already plenty of information on this matter on the Internet - look at the relevant resources on electronics. And judging by the reviews, the performance of the relay is quite decent. By the way, for those interested in knowing, the relay is assembled on the basis of the famous Chinese microcontroller ESP8266.
Load management via phone via Wi-Fi network
Before I talk about controlling the relay via Wi-Fi, I will say that it can also be controlled manually. To do this, there is a small recessed black button on its body. So, when you press it briefly, the relay turns on, and when you press it again, it turns off. Moreover, for this it is not necessary that the relay be connected to a Wi-Fi network - control will also be carried out in Offline mode.
But besides this, the button also contains other functionality, which I will discuss below.
To implement the ability to manage load via Wi-Fi and the Internet, you need to install the eWeLink mobile application on your phone. This application can be found for both Android and iOS devices. To make it easier to find the application, you can use the necessary QR codes on the packaging.
For Android devices, the eWeLink application can be downloaded for free from Google Play and installed on your phone without any problems. The program interface supports Russian.
For iOS devices, this application is available in the App Store. I have not tried to download and install this application on an iPhone or iPad, so if you have tried this application on iOS devices, please post your results in the comments.
After installing the eWeLink application, you will need to immediately register by indicating your country and your email address. In this case, the phone must be connected to the Internet.
After this, a verification code will be sent to your email (valid for 30 minutes), which must be entered in the appropriate “Email code” line. On the same page you must enter a password to log into your future account (at least 8 characters).
By the way, letters reach the mail services Mail.ru and Mail.yandex.ru (Yandex mail) without problems. But as far as I know, letters with a verification code do not always reach the Gmail.ru mail service (Google Mail), so please take this into account.
Next, go to the eWeLink application and click “Add device” (blue round button with a plus).
Then you need to pair the relay and router by long-pressing (for 5 seconds) the same button on the switch body, after which the green LED on the relay will blink. Check the box for the first connection mode and click “Next”.
Now you need to select our Wi-Fi network from the list and enter its password. To avoid having to enter a password every time, you can check the “Remember password” checkbox. Click “Next”, after which the search for our device and its registration will begin (it took me no more than 2-3 minutes).
After successful pairing, the relay automatically transmits data to the Chinese cloud (Amazon AWS or Coolkit), which makes it possible to control it via the Internet. But I will return to this a little later.
Next, enter the name of our found device. Here, enter any name that will easily distinguish it from other similar devices (in case you have more than one). For example, I labeled it "Relay 1".
As you can see, our relay is now displayed in the list of all devices (for now it is the only one in the list, but others will appear in the very near future).
When the relay is online, the green LED on its body is always lit. As soon as the LED starts blinking, it means the connection with the router or the Internet is lost. It is precisely by this indicator that it is convenient to determine whether the relay is online (Online) or not (Offline).
While I was testing this device, I did not notice any problems with network loss. The device is always online and responds stably to control commands.
Now you can try to turn on the relay via your phone. To do this, click on “Relay 1”. A red message immediately appeared indicating that it is necessary to update the eWeLink application, although the update is not displayed on Google Play.
We go to the device settings (three dots in the right corner) and see that the application has the current version 1.5.2, and a newer version 1.5.5 is available. Click on the “Download” icon and the application update begins. After the update, the red inscription disappears, and in the settings we can see the new current version 1.5.5.
Remember!!! The main condition for the relay to work is the availability of Internet access.
If Internet access suddenly disappears, the green LED on the relay body will start blinking, and the application will display Offline mode on its tab, i.e. not available for management.
So, to turn on our “Relay 1”, you need to enter it and click on the round virtual button in the center of the screen. Moreover, you can control the relay from the general list of all devices by clicking on the corresponding small button (on the left). In general, whatever you like.
When the relay is in the off position, the button is white with a gray background around it. When the relay is turned on, the button changes its color to green, and the background around it becomes blue.
In addition to the banal principles of control, you can set the time for turning the relay on or off using a timer by setting the appropriate date and time for its control.
What was surprising was that the relay operates according to a given timer even when it is offline, which means that all specified timer programs are stored directly in the relay’s memory.
Click on the “Add timer” button and go to the timers settings page. Each timer is configured to either turn the relay on or turn it off. There are two options for setting the timer:
- one-time (one-time triggering on a given date and time)
- repeated (periodic triggering on a given date and time, including indicating specific days of the week)
In addition to the countdown timer, there is a countdown timer. Very necessary functionality for certain purposes. It is configured similarly to a direct timer, only with the possibility of a single operation.
In addition to the forward and reverse timers, there is a cyclic timer in the “Settings” tab (three dots in the right corner).
In this tab you can configure various options for relay operation cycles. I won’t talk about this in detail, because... Everything here is simple and intuitive.
The total number of configured timers, including the cyclic timer, can be no more than 8. And be careful, because when different timers overlap each other, none of them may work!!!
Also in the settings you can specify in what position the relay will remain if the 220 (V) power supply is suddenly turned off. There are three options here. By checking the appropriate boxes, you can choose that when the 220 (V) power supply reappears, the relay can either turn on, turn off, or remain in its original state.
By the way, this is a very convenient feature. Just remember about the nuance of the controller (switch) for a radio-controlled chandelier, which, when the 220 (V) power disappears and reappears, for some reason always turns on, even if it is in the original state. Imagine that you are not at home, the voltage in the network “blinked” a little and the controller independently turned on the chandelier. Such an incident will not happen here, because... in this case, everything can be customized to suit your needs.
In addition to the above, all your connected devices in the eWeLink application can be grouped together and combined in various scenarios.
Is it possible to control the relay from several phones at once?
Can! Naturally, in this case, you need to install the eWeLink application on each phone.
There are two options here. The first option is to log into the eWeLink application with the same name and password from different phones and control the relay.
The truth is, if you log into the application on one phone, and then at the same time log into the application using the same username and password, but on another phone, then an error will occur on the first phone and the application will automatically exit. In this case, the second phone remains in the application and can be used to control devices.
The second option is to delegate control of the relay to another user who is registered under a different account. Access to relay control can be given to another user by clicking on the “Share device” button.
At the same time, I would like to note that when controlling a relay from one phone, its status is displayed almost instantly on all phones that are connected to it.
Load management via the Internet
In addition to controlling the relay via your phone via a Wi-Fi network, it can also be controlled via the Internet from anywhere in your location, i.e. absolutely from anywhere in the world where there is Internet access.
So, to control the switch via the Internet, you need to log into the same eWeLink application using your name and password that you specified during registration. And then everything is by analogy. It’s the same application, the same settings, the same control buttons, etc., the only difference is that you are not at home within the coverage area of your Wi-Fi network, but at a distance of hundreds and thousands of kilometers from home.
A little about the cloud.
But still, you will not be able to control the relay without the Internet, because... control occurs not through the local network, but through the Internet, i.e. the same Chinese cloud that I mentioned above. And it doesn’t matter whether control is via Wi-Fi or the Internet, control access is always via the cloud, and to access the cloud you need Internet access.
In this regard, various craftsmen have already figured out how to untie this device from the Chinese cloud or make control only through a local home network. For those interested, this information can be found on certain resources.
By the way, if you need a similar device, but with an additional radio control function from the remote control, then you can order a Sonoff relay of the RF version.
If you want to control the load where there is no Internet network at all, then you can use the Sonoff version G1 relay (GSM/GPRS with SIM card support). This manufacturer also has relays with temperature and humidity sensors Sonoff TN10/TN16 and two-channel (for controlling two independent loads) relays Sonoff Dual.
In general, the manufacturer Sonoff has many different devices, I will tell you about some of the most interesting and significant ones on the pages of my website, so subscribe to the newsletter so as not to miss interesting releases.
You can buy a Sonoff relay here:
- Sonoff Basic: https://goo.gl/jXyNm3
- Sonoff RF (with radio control): https://goo.gl/TRPqN6
- Sonoff G1(GSM/GPRS with SIM card support): https://goo.gl/EkpTdp
- Sonoff TN10/TN16 (temperature and humidity sensor): https://goo.gl/MWAL5p
- Sonoff Dual (two-channel): https://goo.gl/a7rV56
And by tradition, a video based on the article, where you can more clearly see the configuration and control of the Sonoff relay:
Wi-Fi connection
To fully control and manage Sonoff from your smartphone, you need to install the Ewelink application. It is available for iPhone and Android devices. The software can be found in the Play Market, App Store and using the QR code on the Sonoff box.
After installing the utility, go to it:
- Complete registration, select a country and email (the gadget must have Internet access).
- Find the verification code on your email inbox and enter it to complete registration.
- After entering your password in two fields, complete registration and log in to your profile.
- Next, in the utility, click the “Add device” button.
- To pair a mobile smartphone and a relay, hold the black button on the Sonoff case for about 5 seconds.
- As soon as the LED flashes green, check the box next to the first option and click next.
- From the list, select your home or office Wi-Fi network and enter its SSID and password (check the box next to “remember data”).
- Wait for the smartphone to detect, connect and configure the connection to the relay.
- After successfully registering your device, you can rename it in the application as you wish.
- Then click the “Finish” button.
Built-in Web interface
Main menu of IP relay RODOS-9
To gain access to the device’s web interface, you need to open any Internet browser and enter its IP address (default 192.168.1.20), after which you will be taken to the main page displaying the status of the built-in relay.
By clicking on the “Main” button in the upper left corner of the screen, you can return to the main page from any section of the web interface.
The “Setup” button opens the device settings section and control of the built-in relay. This section is protected by a login and password (default login/password admin/admin). To work correctly with the device via the web interface, JavaScript must be enabled in the browser.
Fig.6 – Ethernet relay RODOS-8 – main page
Relay control section
Fig. 7 – Ethernet relay RODOS-8 – relay control page
In this section of the web interface, the relay built into the device is controlled. There are 3 options available:
- “ON” – turn on the relay;
- “OFF” – turn off the relay;
- “SET” – send a pulse with the duration specified in the settings section (switching on and then switching off).
Section for relay settings and displayed names of the web interface
This section allows you to set the names of the built-in relay and the device itself, displayed in the browser. To set new names, you need to enter them in the appropriate text boxes and click the “Save” button. The allowed length of the relay name is 0...8 characters; The allowed length of the device name is 0…13 characters.
The “off” and “on” buttons determine the state of the built-in relay after power is applied to the device; If the “mem” button is turned on, then when the device is turned on, the state of the relay that was before it was turned off will be reproduced.
A tick in the “Secure management” field blocks access to managing built-in relays via HTTP GET requests outside the zone protected by login and password.
In the “SET Pulse duration” field, the duration of the pulse supplied by the SET command (Relay Control section) is specified in seconds. Acceptable values are 1…999.
Fig. 8 – Ethernet relay RODOS-8 – relay settings page and displayed names of the web interface
Network settings section
This section is intended for managing the device’s network settings, as well as setting a login with a password for the protected settings zone and relay control. The allowed length of login and password is 6 characters.
Fig. 9 – Ethernet relay RODOS-8 – network settings page
Remote control
If the Sonoff device is online, the green LED on its body lights up statically. When the LED blinks periodically, it indicates that the connection with the router or the Internet has been lost.
To remotely activate or deactivate the load, in the application, click on the relay icon and click on the large virtual power button in the middle.
The timer function is present, so you can configure the control option based on filters:
- Repeat or once;
- Days of the week;
- Date and time;
- Application on the current or next timer.
There is also a second countdown timer. Filters are as follows:
- Enable or disable;
- Enter the day, hours and minutes.
The third (cyclic timer) allows you to set certain cycles (after what time the relay will turn on and after what period of time the relay will change its position). It is also possible to indicate the time and calendar date of the beginning of this cycle.
Set multiple timers with caution. If one time is superimposed on top of the second, then neither the first nor any other programmed timer will perform its intended action.
In the parameters there is an item that allows you to set in what position of the circuit the automation will remain if 220 V suddenly disappears from it:
- Click on the relay icon and click on the three dots.
- Select "Settings".
- Activate the desired label next to “Power to switch”.
When power is applied to the relay, when:
- “On”—the device will turn on.
- “Off” - it will turn off.
- “Stay” will be in the same position as before turning off.
It is recommended to maintain the current version of the application, so in the settings of the utility itself, next to the “Software version” item, the “Download” button may be active.
Control from multiple phones
To interact with the relay through several smartphones you can:
- Log in to the Ewelink application from one profile.
- Delegate rights to another profile in the application itself.
To delegate:
- Open the application and expand the connected relay to full page.
- Click the “Share” button and in the new window “Share device”.
- Enter another account and click OK.
Now the relay will be activated on another account and can be controlled. Synchronization of such parameters as: status, timers, settings will work immediately.