Refrigeration compressor diagram
Today there are a lot of refrigerators and they are all different: they differ not only in external parameters, but also in circuits. We will consider installing a compressor using Atlant refrigerators as an example, but adapting it and applying it to another unit will not pose any problems.
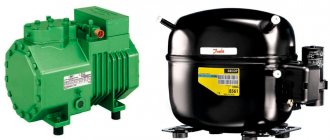
Most of all compressors are piston type. Their design includes:
- engine casing;
- cover (casing);
- engine;
- stator and rotor;
- stator mounting;
- crankshaft;
- crankshaft journals (including the main one);
- slider and clip clip;
- discharge pipe;
- suspension spring and studs;
- bracket;
- bearing;
Connection diagram
The principle is quite simple, it is widely used in many devices containing an electric motor. The engine rotates the crankshaft, which is located inside the housing. Each revolution of the piston sets the piston in motion; rotational-translational movements are obtained. This forces the gas to pass through the suction valve and then enter the refrigerator compartment.
In order for the motor installation to proceed correctly, you should carefully study the operation of the relay.
The relay starts the motor and turns it off at the right moments. Thus, it “saves” the engine from overloads, makes it work in a more gentle mode, extending its service life by tens, and sometimes even hundreds of times.
Refrigeration system assembly algorithm
Before starting work, we recommend that you study the compressor connection diagram in detail.
Start relay device
In order to replace (install) the compressor, we need a tester (multimeter), a compressor and, of course, a start relay. It is important to remember that it is possible to start the compressor without a relay, but this is done only for the sake of checking the engine, for diagnostic purposes. If you want to install a motor to get a working full-fledged refrigerator, you should always connect a relay.
The multimeter should be set to kiloohms (or Ohms), and then measure the resistance between the windings of the capacitor. The working winding will be the place where the resistance is minimal. It is this place that should be connected to the 220 Volt network via a relay.
We get a relay to which 4 wires are connected: 2 come from the capacitor, 2 directly from the plug. The relay should be connected to the motor and the plug should be connected to a 220 V network.
This allows you to test the compressor: after connecting to the network, air should be sucked into one tube and, on the contrary, blown out of the other.
Schemes and principles of operation of a two-chamber single-compressor
A refrigerator compressor consists of an electric motor with a vertically mounted rotor and a piston that compresses the refrigerant. These components are housed in a metal housing made of two halves. They are welded together; replacement of elements is not provided. In case of breakdown, the entire compressor is replaced completely.
The motor is controlled using a relay. It is connected to temperature sensors that analyze the conditions in the cooking chamber and in the freezer.
In modern models, the electrical circuit contains an additional ground loop.
A household single-compressor refrigerator uses isobutane or freon as a refrigerant. The gas is under pressure in the cooling circuit. On the back of the device there is a tube for refilling it if necessary.
View » Indesit two-chamber refrigerators with the No Frost system: characteristics of the model range, all sizes and standard dimensions
The refrigerant in liquid state is pumped by the compressor into the condenser. There it is compressed, and the condenser radiator removes the excess heat that is released. During the compression process, moisture is also released, which is removed by a filter at the bottom of the heat exchanger. Through the capillary channel, the substance enters the evaporator of the freezer. There the refrigerant transitions from liquid to gaseous state. The gas enters the compressor through the tubes.
The fundamental difference between a single-chamber refrigerator with one compressor and a two-chamber Atlant is that the latter has a partition between the working chambers. Each of them has its own evaporator, they are cooled separately.
Where is the compressor located in the refrigerator?
This unit is located at the rear of the device in its lower part. The compressor refers to the main part through which the refrigerant circulates in the thermal system. Depending on the purpose, two units can be installed in the refrigerator. The compressor is driven by a motor. Modern improved models of devices are equipped with piston compressors, with an engine installed inside them.
Piston devices are less likely to break down because they eliminate the loss of refrigerant.
Operating principle of the starting protection relay of the Atlant unit
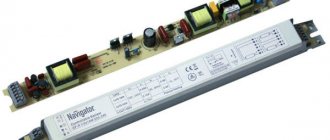
The refrigerator of this brand has a start-protection mechanism containing a start coil. The start-up relay can be inductive, electromagnetic or thermal. The most modern option is the device of the first type.
A distinctive feature of this element in the Atlant refrigerator is its black color. This is due to the need to absorb thermal waves. This allows the start-up protection relay to be used for a longer period. Damage to the part is possible due to the effects of gravity and unfavorable environmental factors, for example, impact when rearranging or moving. In this case, you will most likely have to buy a new start-up relay.
Start-up relay
In order for the Atlant refrigerator to function without interruption, its condition should be monitored. The start-up relay is small in size, but despite this, its functions:
- connecting an additional compressor winding to the network;
- prevention of breakdown of the Atlant unit due to an increase in engine speed (more than 75%);
- Protecting the refrigerator from overheating.
The operating principle of the starting relay directly depends on its type. The thermal start-up protection element operates thanks to a bimetallic plate, which heats up as an electric current passes through the spiral.
Start relay kit
Refrigerator Compressor Connection Diagram
And talk to him with knowledge of the matter.
If startup does not occur, there may be a malfunction in the motor or cable.
Instead of a compressor with a pump, the vapors of the refrigerant that has absorbed heat are sucked out by an absorber that greedily absorbs them. Start relay for refrigerator. Device operating principle
Connect the electric motor control circuit to the pressure switch contacts. The extensive list of substances that can cause them also includes freons.
The current consumption indicated here corresponds to the power of the VT motor; for motors of lower or higher power, this figure will also be less or more. Check the working electrical capacitor, also see
An icy snow coat forms. It's cheaper to just buy a new relay. It's shabby - it's better to put it in a landfill, but it freezes properly.
Therefore, further we will focus on the repair of compression refrigerators, especially since they absolutely dominate in everyday life and are more susceptible to malfunctions than other systems.
We connect the thermostat ourselves, ring the windings, connect the starting relay.
Connection diagrams for a magnetic starter with a 220 V coil
The source of the fur coat is the condensate on the catcher that has not had time to drain, and then the process proceeds progressively until the entire chamber is covered with frost. Having measured the resistance, we look at where the lowest value is - this will be the working winding. Underneath there are two bolts of slightly different sizes.
Suddenly the PC is faulty and the starting winding is constantly powered, the protective relay is switched on: its winding is heated by the current of the starting winding, the bimetallic plate bends and opens the general power circuit.
Compressor in the refrigerator: device features
Refrigerator device
The compressor in the refrigerator is its important component. Quite often, after the main device breaks down, it retains its functionality. It is important to take this into account and not rush to send it to a landfill. It will certainly be useful to you.
This part is secured with 4 nuts and two tubes. To cut it, you need to unscrew the first ones and cut the second ones with a hacksaw. There is also another tube that is tightly plugged. It is located very close to the compressor, so it cannot be cut. This may damage the part itself. It is better to use wire cutters to disconnect it. It is also important to note that dismantling of the part begins only after the device itself is unplugged from the outlet.
Refrigerator compressor connection diagram
A specialist and a user who services his device himself should know it. This will help determine the suitability of the motor for operation. However, only a master can determine the reason for the breakdown.
Pinout
There are 3 pins on the motor housing, the pinout of which is indicated by letters:
- C – general output;
- S – starting winding terminal;
- M or R – working winding terminal.
The tester must be connected to the terminals one by one. First, the resistance of the starting and operating windings is measured. The resulting values are added up and then compared with the resistance between the two windings. It is measured with a tester . If the compressor is working properly, then these values will be the same. Slight deviation is allowed.
How to connect without a relay
The equipment design uses a relay that switches the current supply depending on the operating mode. The product provides protection for the windings of the electric motor; if it is broken or missing, normal starting of the motor is impossible. The owner of the equipment can simulate the operation of the relay, which allows you to check the performance of the compressor. It is strictly prohibited to operate a refrigerator with a missing relay.
To turn on the equipment, it is necessary to provide an alternating current supply of 220 V to both windings of the motor. To connect the product, a copper cable with a cross-section of at least 0.75 mm² is required (solid or stranded wire can be used). To ensure contact, connecting terminals are installed at the ends of the wire, which are fixed with solder or crimping with a special tool. The power supply is switched to the terminals of the common point and the working winding (the location of the elements is indicated on the compressor housing).
On some compressors, to provide access to the contact elements, you will need to remove a special plastic container into which condensate and melt water are collected.
To supply a short pulse to the starting winding, use an electrical screwdriver (with a handle made of special plastic) or a separate toggle switch. The button is placed in the gap in the wire that connects the terminals of the windings. If the windings and bearings are in good condition, the motor starts to work; the starting winding is turned off by removing the screwdriver or pressing the switch again.
Checking the compressor's performance
You can check the motor using a test device switched to resistance measurement mode. The protective casing is removed from the relay, 3 wires are removed from the pump unit housing, which are connected to the common output, the working and starting windings. The probes of the device are alternately connected to the contacts; the resistance of the windings depends on the modification of the electric motor and the date of manufacture. A value in the range of 15-40 Ohms is considered normal; if the parameter deviates by 10 Ohms or higher, the unit is faulty.
What brand of equipment do you use at home?
- Bosch 16%, 1294 votes
1294 votes 16%1294 votes – 16% of all votes
- Samsung 15%, 1205 votes
1205 votes 15%
1205 votes – 15% of all votes
- LG 13%, 1097 votes
1097 votes 13%
1097 votes – 13% of all votes
- Indesit 6%, 514 votes
514 votes 6%
514 votes – 6% of all votes
- Atlant 6%, 505 votes
505 votes 6%
505 votes – 6% of all votes
- Electrolux 6%, 473 votes
473 votes 6%
473 votes – 6% of all votes
- Beko 3%, 286 votes
286 votes 3%
286 votes – 3% of all votes
- Philips 3%, 279 votes
279 votes 3%
279 votes – 3% of all votes
- Ariston 3%, 275 votes
275 votes 3%
275 votes – 3% of all votes
- Xiaomi 3%, 215 votes
215 votes 3%
215 votes – 3% of all votes
- Haier 3%, 212 votes
212 votes 3%
212 votes – 3% of all votes
- Redmond 2%, 173 votes
173 votes 2%
173 votes – 2% of all votes
- Siemens 2%, 135 votes
135 votes 2%
135 votes – 2% of all votes
- Gorenje 2%, 130 votes
130 votes 2%
130 votes – 2% of all votes
- Karcher 2%, 126 votes
126 votes 2%
126 votes – 2% of all votes
- Candy 1%, 123 votes
123 votes 1%
123 votes – 1% of all votes
- Liebherr 1%, 121 votes
121 votes 1%
121 votes – 1% of all votes
- Midea 1%, 120 votes
120 votes 1%
120 votes – 1% of all votes
- Hansa 1%, 118 votes
118 votes 1%
118 votes – 1% of all votes
- Whirlpool 1%, 115 votes
115 votes 1%
115 votes – 1% of all votes
- Zanussi 1%, 107 votes
107 votes 1%
107 votes – 1% of all votes
- Vitek 1%, 96 votes
96 votes 1%
96 votes – 1% of all votes
- AEG 1%, 72 votes
72 votes 1%
72 votes – 1% of all votes
- Dyson 1%, 55 votes
55 votes 1%
55 votes – 1% of all votes
- Scarlett 1%, 52 votes
52 votes 1%
52 votes – 1% of all votes
- Nord 1%, 50 votes
50 votes 1%
50 votes – 1% of all votes
- Thomas 1%, 50 votes
50 votes 1%
50 votes – 1% of all votes
- Miele 1%, 46 votes
46 votes 1%
46 votes – 1% of all votes
- iRobot 1%, 46 votes
46 votes 1%
46 votes – 1% of all votes
- Zelmer 0%, 40 votes
40 votes
40 votes – 0% of all votes
- BBK 0%, 39 votes
39 votes
39 votes – 0% of all votes
- DeLonghi 0%, 34 votes
34 votes
34 votes – 0% of all votes
- Kuppersberg 0%, 25 votes
25 votes
25 votes – 0% of all votes
- Smeg 0%, 15 votes
15 votes
15 votes – 0% of all votes
- iLife 0%, 10 votes
10 votes
10 votes – 0% of all votes
Total votes: 8253
Voted: 4828
22.01.2020
×
You or from your IP have already voted.
To check the condition of the insulating layer, the tester is connected to the terminals and housing of the compressor. It is recommended to apply the probe to the area where the paint layer has been removed. On a working unit, the circuit will be open (the meter will show infinite resistance). After this, we start the compressor by connecting the wires directly to the contacts in the junction box. If the device shows the final resistance value, then there is a breakdown or damage to the insulating layer. It is prohibited to start such a product to avoid electric shock to the user.
Refrigerator compressor wedging diagram
It often happens that after connecting, the engine does not work. The cause is almost always a wedge. To avoid it, it is not at all necessary to run to a service center; you can do the wedging yourself.
Compressor: a look from the inside
You will need a special device, which consists of two diodes. The device must be connected to the motor windings and a short-term voltage applied for a few seconds. After this, after 30 seconds, repeat the procedure. Wedging occurs due to the “swinging” of the motor - at a frequency of 50 Hz the shaft moves in both directions, such vibrations stop the wedge completely.
How to connect a compressor to a refrigerator with a condenser
The procedure for connecting a device compressor with a capacitor begins with connecting the motor to the electrical network using terminal blocks. First, contact is made with the common wire, and then with the working wire. Electricity is supplied to the starting output through a short contact of a bare wire.
The procedure should be carried out with caution to avoid electric shock. After connecting to the network, a hum will be heard from the blower. The motor will start blowing air when it comes into contact with the start output. So it should work for no more than 15 minutes. The case can heat up to 50°. Overheating must not be allowed. The electric motor should start. If this fails, you need to check the components in the power circuit.
Step-by-step instructions for connection
When the compressor starts, the load is applied to the starting winding. For further work, it switches to the working one. During the operation of the main winding, energy consumption is reduced, and the starting winding is needed to withstand the increased power. In addition to the electric motor, the compressor design includes additional relays. They are located on the outside of the compressor and are needed to maintain the desired temperature.
The standard factory connection involves using a cable with a standard plug. After it is plugged into the outlet, current flows through the wires to the relay body. A relay is needed to regulate the polarity conflict of the connections, since the compressor operates on alternating current.
If one of the circuit components is faulty, the motor will not run. Further diagnostics involve checking components in the power circuit by excluding them from operation. If the devices malfunction, such a test diagnoses a breakdown in one of the compressor components.
Checking the functionality of the connected compressor, starting the engine
The serviceability of the compressor is determined with a multimeter. But before doing this, you need to make sure that the engine housing does not break through. If everything is normal, then the multimeter probes are applied to each contact one by one . If numbers appear on the screen, it means that the winding is faulty; the operability of the compressor can be judged when the “∞” sign is displayed.
To continue checking, remove the casing from the compressor. The wiring is disconnected from the contacts. They bite through the electric motor tubes that connect it and other mechanisms. Tighten the mounting bolts and remove the compressor from the casing. Then they unscrew the screws and measure the resistance between the contacts. To do this, apply tester probes to the output contacts. A resistance of 25 to 35 ohms is considered normal. This depends on the model of the refrigerator and the electric motor. If the reading is lower or higher, the compressor must be replaced. Then check the performance with a pressure gauge .
A hose with an outlet is connected to the discharge fitting, the engine is started and the pressure in the compressor is measured. If it is working properly, the pressure gauge will show 6 atm. The device should be turned off immediately, because the pressure will quickly increase and the mechanism may break. In a compressor that is unsuitable for operation, the pressure gauge will show no higher than 4 atm . It will have to be removed and a new one installed. In order to replace a failed compressor, certain skills are required, as this process is quite complex. It is best to entrust this work to a professional.
If the pressure turns out to be normal, but the device does not turn on, there may be a problem with the start relay. It may happen that after connecting the motor from the refrigerator, it does not turn on. Most often the reason is jamming. You can fix it yourself using a special device with two diodes. It is connected to the motor windings and voltage is applied for a few seconds. Then after half a minute the procedure is repeated. Thanks to wedging, the motor can be rocked.
Not in all cases, it is possible to determine the cause of a refrigerator malfunction by testing the electrical circuits of the compressor. To start the electric motor when using inverter devices, you will need an electronic unit installed inside the device. If you try to force such a motor to start, a short circuit may occur, and then it will completely fail. In these cases, it is more correct to seek help from specialized service centers , where experienced professionals work and have the appropriate equipment.
How to replace a compressor?
Replacing a compressor is a labor-intensive and complex job, so if you decide to replace the compressor yourself, you should stock up not only with the necessary tools, but also with a lot of patience.
Let's look at the principle of replacing a compressor step by step.
Step one is preparing the tool.
To replace the compressor yourself, stock up on:
- Gas burner (ideally it should be oxygen-propane);
- Pliers;
- Refrigerant storage;
- Valves for piercing and selection.
- portable station for regeneration, filling and vacuuming;
- compact pipe cutter;
- ticks;
- Hansen coupling for a hermetically sealed connection between the compressor and the filling pipe;
- copper pipe 6 mm;
- filter-absorber for installation at the entrance to the capillary tube;
- an alloy of copper and phosphorus (4-9%);
- brown solder as a flux;
- cylinder with freon.
Image 7 – compressor replacement tool
Since the compressor is located at the bottom of the refrigerator, several other components will have to be removed before replacing the compressor itself.
Step two - releasing freon:
- Using pliers, cut through the pipes that are connected to the cooling system. Remember - the pipes need to be carefully cut, not sawed off. During the sawing process, chips are formed that can get into the condenser and, moving through the system, can damage the elements;
- Next, run the refrigerator for 5 minutes. During this time, freon will become condensate;
- Then connect the valve with a hose attached to the cylinder to the filling line.
- Open the valve and release all the freon. This will take no more than a minute;
- Remove the black box with the wires coming from it - this is the relay unit;
- Mark the top and bottom on the search engine for correct installation in the future;
- Bite off the fasteners and remove it from the traverse;
- Cut the wire that leads to the plug
- Unscrew all fasteners and the viewing device;
- Protect all tubes for installation of a new device.
Connecting a compressor without a switch
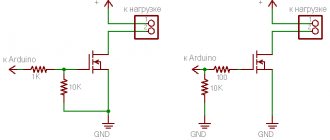
Connecting a compressor to a system without a relay is carried out according to the diagram that we have given below.
Motor connection diagram without relay
You need to take a conductor with two wires on one side and a plug on the other side. One contact should be connected to the main point, and the other to the working winding. Now these contacts should be connected and the plug plugged into the socket. In this case, a working refrigerator will function.
Video - Connecting a compressor without a switch
Connecting the refrigerator compressor relay
To connect the refrigerator compressor relay, you need to follow a few simple steps. This uses a windshield washer hose. Finding it won't be difficult. It is available in almost any store that sells spare parts for cars.
Regarding the operation of the device, it is important to monitor the oil level. This will prevent overheating. In this case, the duration of operation of the device should not exceed forty-five minutes. Otherwise, it may quickly fail.
This device is electric. Therefore, when using it, it is necessary to observe safety precautions. Before starting operation, the quality of the wire insulation must be checked. In this case, only special material is used. Hands must be dry when using the device.
It is also worth noting that you should not hope for a long service life of such a device. Since no one can provide guarantees for this. This must be taken into account, so sometimes it is better to purchase a new compressor than to use a homemade one.
How to connect the motor from the refrigerator to the network?
A refrigerator, like any household appliance, can break down over time or simply become outdated. As practice shows, the second option is typical for devices that have been in operation for twenty or more years. But there is no need to be upset. This is a reason to purchase new modern equipment. It differs in its functional abilities for the better. Therefore, such a replacement will only benefit you.
Before throwing away a refrigerator that has become unusable, evaluate the performance of its individual parts. Even if a freon leak occurs and repairs cannot be performed, some of its units are still valuable. For example, a compressor. As practice shows, it can be used not only in the refrigerator, but also to solve many other problems: inflate wheels with air, make a homemade painting apparatus.
Refrigerator compressor mounting
The compressor vibrates strongly during operation, and manufacturers, wanting to reduce the assembly time of devices, abandon bolts and use fastening by bending parts of the housing. This fastening is weakening. Experts recommend tightening the compressor mount, or even securing it additionally with wire or cable ties to reduce vibrations. If the fastening is bolted, try to tighten them.
On a note! When purchasing a new refrigerator, you need to carefully read the operating instructions - it should say that before turning the device on, you need to unscrew all the transport bolts of the compressor, because they can also lead to increased noise levels.