Chandelier with remote control - device and installation
LED chandelier with remote control in all its glory
This article is devoted to how to properly connect and secure an LED ceiling chandelier with a remote control.
I spoke in detail about the repair of such chandeliers in another article, please read it.
Such chandeliers appeared on sale several years ago, people buy them willingly, the device is relatively complex (for a chandelier), so the topic is relevant.
I will not describe why such ceiling chandeliers are needed and how good they are, as is usually done in such articles. I'll get straight to the point.
I have already published several articles on chandeliers on SamElectric, and I will provide links along the way.
Connecting a chandelier with a control panel yourself
Before installing the lamp on a ceiling suspension, you need to connect it to the network and check the functionality of all elements, especially the remote control and controller. The general connection diagram is shown below.
To simplify the check, we find zero and phase at the wiring terminals on the ceiling, after which we connect the chandelier using chips and a long two-core cable.
It is important not to confuse the network connection to the controller
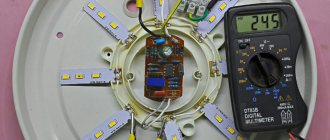
In order to check the operation of the remote control and controller, it is necessary to connect a network extension cord from the ceiling to the controller input. Instead of a load, we connect the multimeter in dialing mode and try to turn on the chandelier circuit from the remote control. If there is a malfunction, then you need to check the operation of the transformer for halogen lamps and the driver for LEDs.
They need to be connected separately to the black common and yellow or white wire. In order not to damage the electronics of the chandelier, it is necessary to connect at least one halogen to the output of the transformer.
Testing to turn on the flashlight from the remote control “on the ground”
If everything works, we assemble the circuit and attach the parts inside the chandelier body. If there are problems with the remote control, you will need to check the power and voltage at the test point. If the remote control is old, then the problem with turning on the chandelier could arise due to the activation of the contact surface of the buttons.
Check before installation on the ceiling
Fastening and installation of a chandelier with remote control
To install the lamp, as a rule, a mounting plate or hook is used. Before hanging from the ceiling, remove the extension cord and hang the chandelier on a hook on a short half-meter cord. This makes it more convenient to assemble the wiring, then we connect the input phase wire to the controller, and the zero wire to the common zero of the circuit.
We connect the wires leading to the halogens and LED backlight according to a temporary circuit. Next, using the remote control, we check how reliably the lamps turn on. We leave the assembled chandelier turned on. After 10-15 minutes, turn it off, disconnect the phase and check with your hands for the presence of very hot areas. If there are any, it means that the transformer or wire cross-section is selected incorrectly.
Checking the heating of the blocks
After passing the test, you can remove the cord and fix the chandelier to the ceiling. One way to connect a chandelier with a remote control is shown in the video
How to set up a remote control for a chandelier
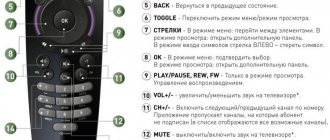
The remote control device has several buttons, their number coincides with the number of controller channels. There is no point in interfering with the operation of the remote control electronics, since the command signal is encrypted to increase noise immunity. The lamps on the chandelier can be turned on by pressing a certain button on the remote control; a second press, as a rule, means a command to turn off. Channels can also be switched by repeatedly pressing the remote control button with “D”.
The simpler the device, the less often it breaks
The latest models of controllers also have a brightness adjustment function and a timer for automatically turning off the lighting.
Installation of a chandelier with remote control
The most important question is why does a chandelier need a remote control if there is a switch? And is a switch necessary at all if there is a remote control? In this part of the article I will answer these questions.
The remote control is needed to remotely switch different operating modes of the chandelier. As a rule, in a chandelier, which is controlled from a remote control, there are several light groups - 2 or 3 groups of LED lighting, to create various lighting effects, and 1 or 2 groups of halogen light bulbs, actually for lighting.
Each group is powered through its own power supply (adapter, or electronic transformer), with the exception of those rare cases when 220V light bulbs are used.
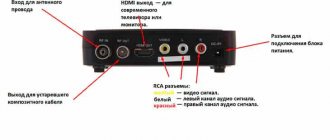
The photo shows the devices that make up the chandelier circuit:
How does an LED chandelier work?
The remote control is carried out via a radio channel. This means that it is not at all necessary to point the remote control directly at the chandelier, as we do when controlling a TV. The radio channel consists of a receiver (controller) and a transmitter (remote control).
The range of such a remote control can be different, it all depends on the needs of the client. For example, for a small chandelier in a standard apartment, a control panel with a range of up to 10m is suitable, and for chandeliers used in public places, remote controls with a range of 100m are used.
The remote control is always used in conjunction with a receiver; they are tuned to the same frequency. And they are sold as one set. The receiver supplies power to the controller, which creates light and color effects by outputting various signals to the LEDs. LEDs, as a rule, are used in different colors, and together with glitter and glass (or even crystal) they create very beautiful light and color effects.
Typically, the receiver and controller are located in the same housing and may be called a remote switch, wireless control panel, etc.
The minimum number of groups of such a switch is one; two- or three-channel ones are more common. I have never seen more than three channels.
Effects are switched by pressing buttons on the remote control.
What about the switch? Firstly, it is needed for its main task - turning off the chandelier. In other words, power is supplied to the chandelier through it, and sometimes it is much more convenient to turn off the chandelier with a switch than with the remote control, which still needs to be found and picked up.
In addition, the controllers make it so that every time you turn on (supply power) a new lighting effect is turned on. So, the switch is also a light mode switch. And in principle, even if the remote control is lost or the batteries are dead, the chandelier can be controlled quite well.
In addition to the controller with the receiver, the chandelier body contains electronic transformers and power supplies for LED and halogen lamps.
Everything will be shown below in the photo.
Enough theory, let's move on to practice.
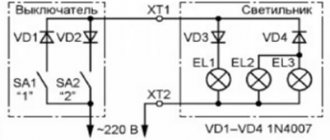
Connection diagram for chandelier with remote control
The main design element is the signal switching controller. Most often, this is a non-separable box that contains information about connecting LEDs - LED, or halogen lamps - H. On Chinese controllers, the information may be in hieroglyphs with poor duplication in English.
The block shows a channel connection diagram
Such devices may be designated “Wireless Switch” or “Control Switch,” which means a switch controlled by a remote control. The most popular models are Y-2E and Y-7E. If one of the models is found, then we can consider ourselves lucky with the controller in the chandelier. Model Y-7E is best suited for home luminaires controlled by remote control.
Its structure includes:
- Three control channels, two of which are 1000 W each, respectively, for halogens and LEDs for a chandelier, one is 200 W for fluorescent light sources;
- Switching system for input alternating voltage 240V;
- A receiver that provides capture of the control signal from the remote control at a distance of up to 8 m.
The diagram for connecting different types of lamps to their channel is shown below.
At the input to the controller, a pair of blue and brown wires is used; this is the standard color for the input voltage circuit. If you have doubts about the correct connection of the ceiling wires to the microcontroller unit, you can additionally look for the INPUT or input sign.
How to connect an LED chandelier
The very fact of using a universal controller in a lighting device simplifies the task, since the device paired with a remote control can be removed from the chandelier and used in any other lamp. In addition, it is possible to use a chandelier for one type of light source - halogen or LED, without compromising the design. You just need to guess which pair of contacts corresponds to the button on the remote control.
Block for LED chandelier without remote control
It’s another matter if the LED chandelier is connected using a monoblock that has only one pair of pins. As a rule, the input to the block is made with wires of any color. Since the controller is not grounded, there is not much difference where to solder the zero and phase. At the output of the Chinese there is a pair of colored wires without markings.
In addition, before assembling and hanging the chandelier, you need to check how the remote control works and whether the unit heats up under load. Separate tests are carried out on the range of signals from the remote control.
How to connect a halogen chandelier with a remote control
The connection procedure is no different from the LED version. The only addition is the installation of a step-down transformer for the halogen lamp.
The appearance of the step-down transformer is shown in the photo.
The trance power should be greater than the total lamp consumption
The number of electronic converters is equal to the number of halogens; as a rule, one or two blocks are used for each group of lamps, depending on the power and connection diagram.
Connecting and installing an LED chandelier
In this article, an LED chandelier with a remote control is installed in place of the old one. This is what the ceiling looked like after I removed the old chandelier. I found out and signed the location of the wires - zero, phase 1, phase 2. Two phases - in the sense that the old chandelier was turned on via a 2-key switch.
Wires from the ceiling to connect the chandelier
The connection diagram for a chandelier with a remote control is no different from the connection diagram for a regular chandelier.
We don’t need a hook, since LED chandeliers are always mounted on a bracket (mounting bar), for example, as I wrote about this on SamElectric in this article. And if the ceiling is suspended, then the bracket is attached through an embedded block, which is attached to the main ceiling.
It’s worth saying here that in the area of the chandelier, plasterers usually don’t bother, and the ceiling there is usually very uneven.
Therefore, additional effort is required to install the bracket. For example, add washers or knock down uneven surfaces so that the chandelier hangs evenly and there are no gaps.
Of course, the wires look completely unpresentable, and here you can’t do without my favorite Vago terminals.
Mounting the bracket and preparing the connection
We use a hammer drill and install two 6 or 8 dowels in the ceiling. If possible, it is better to mount such a bracket with 4 dowels, but in this case I was satisfied with the reliability. The bolts on which the “front” part of the chandelier will be attached must be placed “on the ground”. Do not forget that if the bracket bends during fastening, the bolts will “go away” and it will not be possible to insert them into the holes without problems.
Don't forget about the technological piece of hard wire, which I have written about more than once, for example, in the article about installing a wall lamp. Or we ask someone to hold the chandelier while we connect the wires to the chandelier through its standard terminals.
The decorative nuts with which the chandelier is screwed to the bracket should be in the back pocket of the trousers before being raised to a height.
As a result, we have this beauty:
LED chandelier in operation
The same chandelier, from a different angle, is shown at the beginning of the article.
Source
How to assemble a chandelier correctly
After opening the packaging box, check the completeness of the delivery. Must be:
- LED lights.
- halogen lamps
- power unit.
- Remote Control.
It would seem that there is nothing difficult about assembling and connecting it to the electrical network.
In fact, it is, but a lot of time is spent unpacking and preparing for assembly of all its components. When everything is unpacked and prepared for installation, you can safely begin work. A controller and power supply are installed in the chandelier body, which will be fixed to the ceiling. They must be limited in freedom of movement, that is, they must be carefully secured in the case using double-sided tape.
How chandeliers with remote controls work
You may wonder what the remote control is for when it can be turned on and off using the installed switch. Then the next question arises about the need for the switch itself if there is a remote control.
Typically, such chandeliers have not one, but several light groups, LED lighting to create lighting effects and halogen bulbs for lighting, all of which can be controlled remotely.
The control circuit operates using a radio channel, this allows you to control devices outside the line of sight, the coverage range is from 10 to 100 meters.
The remote controls always work in conjunction with receivers tuned to the same frequency and are sold in one set. The receiver controls the controller that controls the creation of lighting and color effects. There are buttons on the remote control to control the effects.
The controller can also be controlled using a switch. It is programmed and configured in such a way that every time the switch is turned on, a new light mode will be activated. The chandelier housings also contain power supplies for LEDs and halogen lamps.
How to connect a chandelier with a remote control
To perform connection work you must have:
- multimeter
- sampler
- insulating tape
- knife, wire cutters, pliers with insulated handles
The connection diagram is quite simple. A new chandelier is usually installed to replace an old lamp. An LED chandelier with remote control can be connected if three wires come out at the connection point. If there is a switch installed in the wall that has two keys, then there will definitely be three wires. In apartments built according to new projects, four wires can be installed, one of which will be grounding.
It needs to be determined, and the easiest way to do this is with a multimeter. Be sure to turn off the machine in the apartment panel. One probe of the device is connected to grounding, which can be a metal heating radiator or a metal box on the apartment panel in the entrance. The second probe is brought one by one to the cleaned wires on the ceiling. The wire that shows resistance will be grounding.
Next, using a probe or indicator, determine “zero” and “phases” on the wires and mark them, since further work will be carried out with the power supply turned off and even a probe will not be able to determine them.
If there is a hook from an old chandelier on the ceiling, remove it; it will not be needed. LED kits always include brackets for mounting to the ceiling, so these should be installed. Pay special attention to this so that one day it does not fall from the ceiling.
To control the operating modes of LED lamps, they can be equipped with remote ones, and some models also come with stationary control panels. Their connection diagrams are somewhat different. The stationary remote control is installed in place of the switch in the wall. With its help, in addition to lighting control, you can search for a lost control panel.
When installing a stationary control panel, we again remind you of the need to turn off the power supply, remove the switch and disconnect the wires from it. The next step is to connect the common wire to any phase wire on the ceiling. When the power is turned on, there will be supply voltage on the connected wires. These wires are connected to the input terminals on the remote control. The third conductor must be connected to the output terminal.
The execution of commands coming from the remote control is carried out by the controller, which must be connected to the chandelier. The order of its connection and diagram are available on the back of the controller box. The controller is usually mounted in the chandelier body under the ceiling. Terminals marked N and L connect wires that were doubled under the ceiling. The third conductor is waiting to be connected to the “output” terminal. If there is a fourth, grounding wire, it is connected to the yellow wire of the lamp.
How to connect a chandelier with a remote control yourself: step-by-step instructions
You need to assemble the lamp on the floor, then attach it to the ceiling.
Decorative elements are hung on the chandelier after the work is completed. Before connecting, be sure to turn off the power to the room! Working under voltage is prohibited.
Connection instructions:
- connecting the control unit;
- connection of phase and neutral wires to terminals;
- fixing the chandelier to a special strip on the ceiling;
- installation of light sources;
- adding decorative elements.
The method of mounting a remotely controlled device on the ceiling is similar to classical devices.
Installation and fastening of LED chandelier
The fastening takes place on a special fastening strip - a bracket. It is attached to the ceiling with bolts. Next, you need to connect the power wires to the power supply and the ground wire. Then, using decorative nuts, the chandelier is attached to the ceiling.
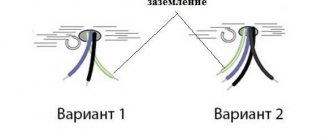
Correct Wire Connection
To connect the controller correctly, you need to carefully study the diagram located on its case or in the passport.
Usually its wires are already connected. The phase is connected to terminal L (or a brown or red wire), and zero is connected to terminal N (black or blue).
Grounding must be connected to the PE terminal (yellow-green). The ground terminal is usually not used in older houses.
Ground connection
Grounding is mandatory in new-style houses. The yellow-green ground wire is connected in the same way as the phase and neutral wires to the PE terminal. Then it is fixed with a bolt to the chandelier body. If there is no such fastening, you can simply insulate the contact and not connect it.
Advantages of LED lamps with remote control
Today, LED ceiling chandeliers with remote control are more fashionable than ever. They can be found in homes, offices, cafes, hotel rooms, banquet halls and other institutions.
The advantages of such lighting devices:
- convenience - you can adjust the lighting level from any part of the room;
- energy efficiency – built-in LEDs save energy;
- a variety of modes - using lighting in the room you can create the desired atmosphere;
- durability - the device will last for many years;
- affordable price - especially applies to Chinese chandeliers.
Programming the chandelier remote control
To properly configure the remote control, carefully read the instructions included in the package.
Setting up the remote control
To link the remote control to the chandelier, follow these steps:
- turn off the lamp using the fixed switch and wait 10 seconds;
- point the remote control at the chandelier;
- press the CH1 button on the remote control and hold it, during this time turn on the lamp with the switch, the panel should flash and then turn on - such a characteristic flickering indicates the binding of the remote control;
- then release the CH1 button.
Synchronization of the chandelier and the remote control was successful. The whole process takes about a minute.
Using the remote control, you can remotely adjust the operating mode, select integrated lighting or turn on the lights separately.
One remote control for several lamps
One remote control can control two or more radio-controlled chandeliers, and not simultaneously, but separately.
To program the remote control to work with several lamps in the house, synchronize with each lighting fixture in turn. This feature is very convenient, because if the remote control breaks down, you do not need to buy a new device. However, there is a drawback - you will have to carry the remote control in all rooms.
If necessary, you can program the universal remote control for a specific luminaire model. In this case, the firmware is done - it is better to entrust it to a specialist.
Control via smartphone
Modern chandeliers can be controlled using a phone or tablet from Samsung, Xiaomi, Lenovo, HTC, etc.
You can synchronize a smart device with a ceiling lamp using:
To connect your smartphone to the chandelier, you need to download a special application. You can do this for free for Android, Apple or another OS. Then open the program, select your preferred signal transmission method and control your lighting in a convenient way.
Operating principle of remote controlled chandeliers
Before creating a remote control, you need to find out how such chandeliers are designed and how they function. In addition, the question very often arises: what is the remote control for if there is a switch?
The main function of the remote control of a chandelier is to switch its existing operating modes from one to another. Each such lamp has 2, 3 or more light groups, with the help of which various lighting effects are created. Halogen bulbs are also installed here, providing basic lighting and also divided into groups. Each group is supplied with electricity through its own power supplies - adapters or electronic transformers. This equipment is not required when using 220V bulbs.
To control it via the remote control, a radio channel is used, so it is not necessary to point it directly at the chandelier. This is the main difference from controlling TVs. The radio channel includes the remote control itself, which acts as a transmitter, and the controller, which plays the role of a receiving device. All remote controls have different ranges, depending on the need and the specific situation. For small chandeliers, 10 meters will be enough, and for lamps from public places this parameter can reach 100 meters.
Where to buy LED chandeliers with remote control wholesale?
In any lighting store, diode lamps with remote control occupy a significant part. To sell truly high-quality products and satisfy the needs of any customer, it is important to choose a reliable supplier.
The Profit Light company carries out wholesale deliveries of high-quality Chinese LED chandeliers to Russia on favorable terms. Here you will find the widest range of ceiling and wall lamps, including those with control panels. You can also separately order the remote control and other components for chandeliers.
We offer high quality lighting products at great prices. When ordering from us, you will receive a guaranteed product and free delivery to any city in the Russian Federation.
Source
Anatomy of a chandelier with remote control
You need to start repairing chandeliers with a remote control by studying its structure. After all, its filling is somewhat different from the usual electric lighting device. As a rule, all controllable chandeliers have 3 main electronics units:
- LED lamp;
- lamp with halogen elements;
- relay with a radio signal receiving module, which is transmitted from the remote control.
An LED lamp has in its design several LEDs of different colors, which are necessary for systematically changing the color of the backlight. This is, in fact, a purely decorative element, which, however, often breaks. To power the LEDs, the design of the electronic filling contains a special capacitor, which reduces the voltage in the network to the value required by the diodes, and the diodes themselves are connected in series, so when one burns out, the entire circuit goes out. Repairing an LED chandelier with a remote control most often comes down not to replacing individual diodes, but to replacing their entire unit - this is both faster and more reliable.
Halogen lamps receive their energy from special transformers that pulse the supplied voltage. If the cause of the breakdown is the halogen lamps, then you need to check each of them with a multimeter. If everything is in order with them, then it makes sense to check the transformers - there are several of them in such a chandelier, so you will have to tinker.
The radio control relay, depending on the specific model, has a certain number of electromagnetic relays that are necessary for switching currents of different powers. The relay receives power from a quenching capacitor, and excess energy is lost in the bowels of the ballast capacitor. According to statistics, the weakest point of the radio control relay is the place where it is soldered into the common board - over time and hours of operation, it can simply fall off.
Another mandatory element of a radio-controlled chandelier is the remote control. This is a fairly simple device with a minimal set of functions and buttons. The electronic circuit of the remote control is incredibly simple and reliable, so the most common reason for the remote control to fail is simply dead batteries.