Why doesn't the electric meter spin when the appliances are turned on?
In fact, if the electric meter is induction (with a disk), then the reason for its stopping may be an imbalance in the settings of the current coils and voltage coils, a misalignment of the disk axis, a loosening of the bolt on the current coil jumper, or a banal thickening (drying) of the lubricant of the disk axis.
the author of the question chose this answer as the best
add to favorites link thank Vladlen [24.9K]
more than a year ago
To be honest, usually the counters, on the contrary, start spinning faster when they break down. But in your case the reason is trivial, the counter is simply broken. And if you did not contribute to this, for example using magnets, then the reasons may be primarily due to the fact that the lubricant has dried out. Or with problems in the counter mechanism itself. These include voltage surges that can damage current-carrying coils. There may also be jamming of the axis on which the disk is attached. And this can occur due to a sudden surge in voltage and, naturally, when the mechanical parts of the meter overheat. But as they say, it’s not worth finding out the reason. since the meter is sealed, but it is necessary to call a representative of the city power grid. But before that, you can call the city power grid and report problems with the meter.
favorite link thank Yasmin [4K]
7 months ago
If you have an electric meter with a disk that must rotate when electrical appliances are turned on in an apartment or house, then there may be several reasons why it does not rotate. For example, power surges in the network, wear of mechanical parts, failure of an element in the circuit. There is no point in opening the meter or removing the seal, because all legally installed meters are sealed by specialists from the energy supply organization and only they have the right to remove the seal. If you break the seal, you will have to pay a fine and the electricity consumed will be calculated based on the maximum possible load. You need to call the energy supply company, call a specialist and install a new meter.
more than a year ago
Most often, in this case, the breakdown occurs due to the fault of the homeowner, who, in an attempt to save money, uses various methods for braking. In this case, you need to eliminate traces of your illegal activities as quickly as possible. Maybe an old meter whose disk supports, which are made of stone instead of bearings, have worn out. The counting mechanism may jam due to wear on the gears. The contacts at the connection point of the electric meter may well become loose. In any case, you won't be able to do anything yourself. You need to call an inspector from the organization that supplies electricity to you and he will record the breakdown and give the go-ahead to replace the meter or repair it.
favorite link thank Elden [50.4K]
more than a year ago
The first reason can be identified as simple - I didn’t notice, since there are meters (whatever they are) that spin so slowly and weakly that their operation is simply not noticeable, especially if the consumers are quite low-power. You need to take a closer look and check the meter after a while.
The second reason is jamming or sticking of the disk, this especially often happens when the meters are old and the parts have worn out, and sometimes it happens that debris or even dust gets under the rotating elements, which slows down the work, and often after a long period of not using the meter, it simply the lubricant dries out.
The third reason is a breakdown of the electric meter, which can also be caused by wear, destruction or breakage of parts inside the mechanism.
In any case, the first thing you try to do is spin up the counter, i.e. connect high-consumption devices and lightly tap the meter body.
Failure can also be caused by failure of electrical components.
But in any case, in order to avoid fines and other sanctions, it is best to call a specialist who will check the device.
favorite link thank Kim Jong-un [266K]
more than a year ago
Electricity meters are different, the reasons for failure can be different.
Why is this information not being circulated, which is called “for oneself”, because only organizations with a license for this type of activity have the right to repair, “tear” and install seals.
As I understand it, you do not have an electronic display of the reading device, but a mechanical one (that is, the numbers rotate or do not rotate).
Such meters have a control board to which the reading mechanism is connected.
There is a capacitor on the board that can “dry out” (become unusable).
If you disassemble the meter, take out the board, turn it over, you can get to the capacitor in question.
“Treatment” is replacing the same capacitor (soldered off).
Another reason may be an attempt to unscrew the meter in the opposite direction; in some models, a jumper is installed that does not allow the numbers to rotate in the opposite direction; the jumpers are broken and, as a result, the meter “stands up” tightly.
In any case, you need to call the Electric Networks and call a specialist.
favorite link thank STELS [16.3K]
8 months ago
Mechanical electrical energy metering devices are usually “spinning”. The disk rotates due to the induction field of the coils - the first reason is the malfunction of the coils. The disk drives the counting mechanism; if the disk is spinning and the display is standing, it means the worm gear on the disk shaft is worn or broken.
A common reason for the meter to stop when there are working consumers on the network can be our ubiquitous neighbors - cockroaches. To get inside the meter, these insects are attracted by the heat emanating from its nodes, and they simply get stuck in the wire mechanisms.
Call representatives of the energy supply organization - let them activate it and, after removing the seals, find out the reason for the shutdown.
add to favorites link thank brownie [23.3K]
There may be several reasons:
The first reason is if the owner himself did something chemically and stopped the electric meter, for example, removed the zero supply from it, and grounded his electrical wiring in order to steal electricity.
The second reason is a simple breakdown of the metering device, which is often possible from a significant voltage drop, which happens during a thunderstorm or during accidents on power lines, as well as simply from the breakdown of an electrical device when its service life is exhausted or factory defects in parts.
The third reason is incorrect connection, it happens that during repair or maintenance work, street networks may be confused and connected incorrectly, then phase and zero may be swapped, or two phases of 380 volts may be connected to the consumer input, in which case the meter will stand or it will burn out altogether.
In any case, do not interfere with it yourself, since the metering device is sealed and violation of the seals entails penalties, regardless of the reasons for the violation!, turn off the switch and call the regional workers.
Meter Mercury 201 » Instructions » Taking readings
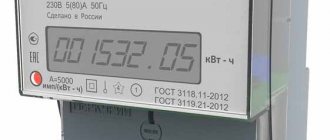
Hello, dear readers, today our topic of the day is the Mercury 201 electric meter. This is a single-phase, single-tariff meter. It is very common in the household segment, as it attracts with its inexpensive price.
Taking readings on a mechanical reading mechanism (single tariff)
Single-tariff meter models with mechanical or electronic display: 201.2;
201.4; 201.5; 201.6; 201.22 and 201.7; 201.8 To take readings from Mercury 201 of these models, it is enough to rewrite all the numbers before the decimal point or before the digit highlighted by a frame; the digit after the decimal point is a fraction of a kilowatt/hour; they do not need to be taken into account when taking readings.
All Mercury 201 models have a comma or a number highlighted with a frame, so there shouldn’t be any difficulties. On meters where an electronic counting mechanism is installed, a dot is displayed instead of a comma.
Taking readings on an electronic reading mechanism (multi-tariff) 201.8 TLO
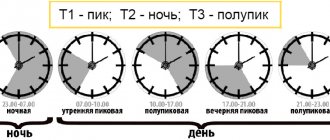
The multi-tariff version of Mercury 201 includes 201.8 TLO - this is a multi-tariff meter for metering electricity according to the day/night plan, also if there are more than 2 tariffs, then peak, half-peak.
This meter has an automatic mode for displaying information on the display with a short interval of 4 seconds. What information will be displayed is configured through the configurator program when programming the meter. If the cyclic display is not turned off, the information on the display will change; if it is turned off, we will see the readings at the current tariff.
To take readings from the meter, we will need the following indicators: Total number of kilowatts/hour for all tariffs (if we pay according to a single tariff plan) Number of kilowatts for tariff 1 Number of kilowatts for tariff 2
To do this, wait until a numerical value appears on the display with the [Tariff 1] icon in the upper left corner and [kWh] in the lower right corner. This is the current value of the total electricity consumption at tariff 1. We write the number from left to right to the point.
Next, we need to record the meter readings at tariff 2. To do this, wait until the meter cyclically displays a numerical value with the [Tariff 2] icon in the upper left corner and [kWh] in the lower right corner. We write down this value.
To calculate the total amount payable1) Multiply the number of kilowatts at tariff 1 by the price per 1 kilowatt/hour according to your tariff.2) Multiply the number of kilowatts at tariff 2 by the price per 1 kilowatt/hour according to tariff 23) Add the resulting values.
To calculate the number of kilowatts that were wound over the last (current month), you need to subtract the meter readings at the same tariffs that were a month ago from the current indicators for tariffs, then proceed to calculating the amount to be paid in 3 steps as shown above.
If you pay according to a single tariff plan, then you only need to rewrite the value of the total consumption of kilowatts for all tariffs. To do this, wait on the display for a number with icons [Tariff 1 2 3 4][kWh]
To find out the total value for the last month from the current one, subtract the total value for tariffs for the last month. To find out how much to pay for light, multiply the resulting number of kilowatts by the price for 1 kilowatt/hour according to your single-tariff plan.
At this point, the mission to take readings from the Mercury 201 meters is considered completed. In order not to get confused in the readings, it is recommended to take readings monthly, or even better, on the same day of the month. Additionally, for general knowledge, you can watch a video about meters of this model. We also attach instructions to the article for the 201.8 TLO meter, which may come in handy; it contains detailed characteristics of the meter and operating rules. Instructions Mercury 201.8TLO_РЭ.PDF
Review of the Mercury 201 counter
Mercury 201 and its five models
Mercury 201
Mercury 201 is a modern meter for active energy consumption by consumers of the household electrical network. The device is manufactured, model 201 has several modifications, each with its own specifics.
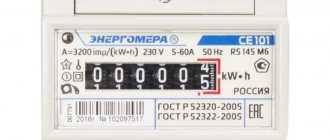
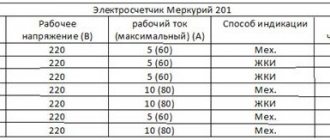
Externally, models of electrical measuring devices differ in indexes. Each of the five modifications of Mercury 201 has its own limit for measuring alternating current strength and its own way of displaying power consumption on the front panel. The maximum operating current of the device is from 5 to 10 A; the method of indicating readings can be either liquid crystal or mechanical.
The operating principle of the Mercury 201 meter is that the primary electricity consumption signals are generated by voltage and current sensors. Then they go to a converter controlled by a microcontroller. After decoding, the signals supply information to a mechanical or liquid crystal type output device.
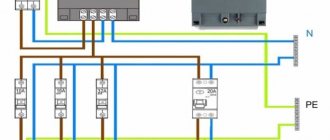
Connection diagram for an EM located on the general electrical panel of the floor (SNiP 31-110-2003)
The Mercury 201 electricity meter is designed both for independent metering of electricity consumption and for operation in an automatic information-measuring accounting system.
Now Mercury 201 brand meters are the most affordable and accurate. They replace older energy metering devices with rotating disks.
Changing the operating mode of the pulse output.
“Please tell me, the red meter indicator is blinking very often. Is this a malfunction or is it supposed to be like this? If there is a malfunction, how can I fix it, send it for repairs, or can I do it myself?”
We decided to make this request to the technical support department the topic of the next post on our blog.
If the indicator flashes frequently, so often that it is simply noticeable, it is most likely that the pulse output of the meter is operating in verification mode. In this case, it is not necessary to send the meter for repair. You can correct this state of affairs on your own. but of course, provided that you have all the necessary tools and equipment.
To change the operating mode of the pulse output, you will need to connect the meter to a PC. This procedure is described for example here.
If you use the Mercury Universal Meter Configurator software to connect, then the pulse output operating mode is configured on the “Load Control” tab.
On this tab, which we go to after successfully establishing a connection with the meter, regardless of the type of interface used, you will need:
- in the “Pulse output mode” field, specify “Telemetry”, and in the drop-down list select “A+ main.”
- click on the “Record” button
When using the software “Configurator of three-phase meters Merury 230”, it is necessary, after establishing a connection with the meter and opening the communication channel, to go to the “Meter Parameters” tab, and then by clicking on the line “Telemetry mode”, select “main A+” from the drop-down list and write down this is a change to the counter.
Why is the Mercury meter indicator blinking?
- in the “Pulse output mode”
indicate
“Telemetry”
, and in the drop-down list select
“A+ main.” - click on the “Record”
:
thank you, it helped, we were about to send it in for repair
Thank you, it helped, but why doesn’t the manufacturer set the main telemetry mode after testing the meter? I think this is a grave mistake; not everyone has the necessary equipment. Of the 300 installed meters, 11 were in test mode. They also couldn’t understand what was wrong, no matter what they did. But it turned out that this is what’s going on.
This was of course an unintentional mistake. This batch left the factory.
Good afternoon Tell me, if the pulse output is constantly on, what should I do then?
If the meter has an LCD, then look at the instantaneous power, is it there? What kind of counter are we talking about? AM, ART?
ART, with LCD, model 2005-2006.
ART allows you to view instantaneous power on the LCD. Check this setting. Well, anyway. Maybe it’s not constantly on, but blinks very often?
Tell me, does this somehow affect the readings of the device?
It does not affect the readings themselves, but it does affect the data stored in the power profile.
I wanted to take readings, but E0-1 blinks instead. What does it mean?
This error indicates that the built-in battery voltage is low. You can read more here: https://incotex-support.blogspot.ru/2012/09/blog-post.html
Why don't the new 231 counters count from the box? What could be the reason? From the store until the load was supplied, no one connected to them? And what to do with them? Should I take it to the store or give it to the manufacturer?
You need to take advantage of the warranty and send the meter to a service center. It may be possible to do this through the store where the meter was purchased. If not, you can send it by mail. Detailed information and contacts of the service center can be found here: https://www.incotexcom.ru/serv_rf.htm
Tell me why, when installing the program, the window “There is no library for Mercury 230” pops up?
Try contacting the programmer who developed this software regarding this issue. Programmer's address
Good afternoon, can you please tell me why the readings on the meter about the operation of the air conditioner are blinking? As soon as we turn it on, everything works fine. What could it be and how can I fix it?
Try checking the mains voltage with the air conditioner on. You can try to do this on the LCD of the meter itself, by pressing buttons, if it is a model with buttons. If the voltage is normal, then this is a malfunction of the meter and the meter must be sent for repair.
Apparently it blinks about 3-4 times slowly and 7-8 times quickly, then again 3-4 and 7-8. The meter underwent battery replacement at your repair shop. Not yet sealed by a Mosenergo representative. Is this how it should be or is there a problem here? Will the Mosenergo representative fix it?
Apparently it blinks about 3-4 times slowly and 7-8 times quickly, then again 3-4 and 7-8. The meter underwent battery replacement at your repair shop. Not yet sealed by a Mosenergo representative. Is this how it should be or is there a problem here? Will the Mosenergo representative fix it?
The LED should blink depending on the power consumption. The higher the power, the higher the blinking frequency. Perhaps you have periodic switching on of some equipment, which briefly increases the power consumption and the meter reflects this fact by increasing the frequency of LED blinking.
When checking the meter (230 AR) from 2002, the error is -2.0. How can I correct it?
Checking the electric meter | Electrician's Notes
Good afternoon, guests of the Electrician's Notes site.
Today I present to you a very interesting and informative article that will be useful to almost everyone.
You and I regularly buy various household appliances for our apartments and houses, and of considerable power. At the same time, daily electricity consumption increases. And every month we pay for electricity according to the readings of our home electricity meter.
If you suddenly suspect that the electric meter is counting incorrectly, then you can check it yourself without calling a controller or inspector.
Checking an electric meter is a comparison of two readings: the real (actual) reading of electrical energy consumption and the reading that we write off from the meter.
How to check an electric meter
1. Electric meter connection diagram
First of all, you need to know and check the connection diagram of the electric meter.
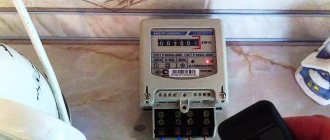
Self-propelling is a phenomenon when the disk of an induction meter or the light indicator on an electronic meter begins to rotate or blink without stopping when there is no load and there is voltage on the electric meter.
This is easy to check. You need to leave the input circuit breaker turned on (located in front of the electric meter) and turn off all the outgoing circuit breakers in the apartment panel.
We carefully observe the disk or light indicator of the electric meter. If the electric meter is not self-propelled, then the disk will make no more than 1 full revolution, and the light indicator should blink only 1 time in 15 minutes.
Chernivets Forum
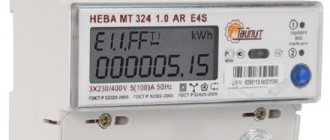
NEVA meters can withstand volts of voltage for 4 hours without damage. In winter the load will be kW, will it withstand such loads? Be sure to make sure that the contact of the incoming and outgoing wires is reliable. If the contact is poor, there will be overheating, which will damage the meter. Basically, there are two tariffs: 1st from to, and 2nd from to. In the Murmansk region there is a two-tariff and three-tariff system of payment for electricity. Like Show list of those who rated Your Personal Electrician in Murmansk on May 9 in QUESTION: Is it permissible to introduce Sip-4 with a cross-section of 16 kW . Will the contact weaken over time? ANSWER: Connections made using the meter terminals may become loose over time and require periodic pulling, so the wire must be securely fixed before being inserted into the meter. After installation, we noticed that the meter counts twice as much and the indicator light makes 16 blinks and a click, but there should be 32 blinks and a click. There are pulses per kilowatt. Accordingly, for one division of the decimal disk there are 10 watts, 32 pulses.
Mercury 201 counter
The electricity meter "Mercury - 201" is currently the most popular metering device in our country. Counters of this model successfully replace older models with a rotating disk.
In this article we will talk about what features and characteristics this metering device has, as well as how it is connected.
Features and technical characteristics of the meter
These metering devices have been produced domestically since 2001. This manufacturer has established itself as a high-quality one, producing both single-phase meters for household needs and complex three-phase designs.
This device has several modifications from 201.1 to 201.8. And also all units from this series can be divided into types depending on the permissible operating current and the method of displaying information about electricity consumption.
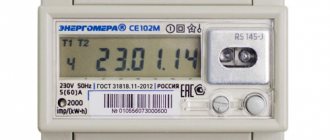
The Mercury 201 meter is a rectangular plastic case with an LCD display on the front with information about energy consumption. On the right side of the front side there is technical information in the form of a table. The device body is compact in size.
The lower part of the meter housing is removed and provides access to the device contacts. All wires are connected using a screw connection. To fix the meter on a vertical surface, you must use a DIN rail, which is equipped with almost all modern metering devices.
Depending on the configuration, these meters can be electromechanical, where a special drum is a reading device, or electronic, where all readings are displayed.
Thanks to polarity reversal, all meters in this series are protected from theft of electrical energy. It also has the following characteristics:
- Certain operating temperature indicators, which are between -20 and +55 degrees.
- The product is guaranteed for 3 years from the date of purchase.
- The maximum service life of the meter is 30 years after installation.
- The calibration interval is 15 years.
Requirements for the meter
Before purchasing an electric meter, you need to check whether it meets all the necessary requirements. This includes the presence of an accuracy class, usually for electricity metering devices this is the first or second class, which allows a measurement error of 1-2%.
It is also worth checking in advance whether the date of production and verification of the meter is indicated. It is imperative to check the number for availability in the State Register database of measuring instruments and the warranty seal on the device itself. And it’s worth making sure that you have the verifier’s mark and a protective hologram.
Connecting the meter
Before installing the meter, the following details are agreed upon with the energy supply company:
- Installation location. This is usually done outside the apartment or house, but installation can also be done inside.
- Model of the installed meter. Here you will need technical documents that were received upon purchase.
- Checking the quality of the electrical connection and wiring diagram.
Before connecting the meter, you need to carefully study the technical data sheet for the product, and also clarify the connection diagram. If the master is unsure of his abilities, then it is necessary to use the services of professionals. Very often, many questions arise regarding how to connect the Mercury-201 meter, but in fact there are no particular difficulties in this process.
A single-phase device is designed to include the following input contacts:
- Contact for entering a phase into the room from an external network. The wire is obtained from the electricity supplier.
- The ShVVP cable is intended for phase output into the connected room.
- Terminal for connecting zero from the general network.
- Zero output terminal to load inside.
Deciphering Mercury counter errors
During operation of Mercury electricity meters, malfunctions may occur.
To quickly understand the cause of the malfunction and the component that failed, at the Incotex factory, faults were coded into errors, information about which is displayed on the meter display.
Here is a list of the main errors of Mercury meters:
| Error code | Description | Recommendations | Note |
| E-01 | Battery voltage is less than 2.2 V | Replace battery | |
| E-02 | Memory function No. 2 is impaired | Check for associated error codes | |
| E-03 | UART1 | Send the device to the manufacturer | |
| E-04 | ADS function is broken | Send the device to the manufacturer | |
| E-05 | Memory communication error #1 | Check for associated error codes | |
| E-06 | RTC | Reset device time | |
| E-07 | Memory function No. 3 is impaired | Check for associated error codes | |
| E-08 | Reserve | ||
| E-09 | CS program error | Send the device to the manufacturer | |
| E-10 | MSP430 | Rewrite the array or re-calibrate the device | 3rd access level |
| E-11 | Error KS of the array of accumulated energy registers | Reset energy registers | 3rd access level |
| E-12 | Error KS device address | Write the device address | |
| E-13 | Error KS serial number | Send the device to the manufacturer | |
| E-14 | CS password error | Send the device to the manufacturer | |
| E-15 | Error KS array counter version | Send the device to the manufacturer | |
| E-16 | Tariff byte KS error | Restart the device | |
| E-17 | Error KS load control byte | Write load control parameters | |
| E-18 | Error KS power limit | Write power limit | |
| E-19 | Error CS energy limit | Record energy limit | |
| E-20 | UART parameters byte KS error | Write communication parameters | |
| E-21 | Error KS of indication parameters (according to tariffs) | Record display parameters | |
| E-22 | Error KS indication parameters (by periods) | Record display parameters | |
| E-23 | Timeout multiplier KS error | Write timeout multiplier value | |
| E-24 | Error KS byte of programmable flags | Restart the device | |
| E-25 | Error KS array of holidays | Record the holiday schedule | |
| E-26 | Tariff schedule array CS error | Record the annual tariff schedule | |
| E-27 | Timer Array CS Error | Restart the device | |
| E-28 | Seasonal transition array KS error | Record seasonal transition parameters | |
| E-29 | Device location array KS error | Record device location | |
| E-30 | Error KS array of transformation coefficients | Write a transformation list | |
| E-31 | Error KS of an array of accumulation registers by time periods | Perform initialization of energy registers | |
| E-32 | Error KS slice parameters | Perform power profile initialization | |
| E-33 | Error KS cut registers | Perform power profile initialization | |
| E-34 | Error KS event log pointers | Send to the manufacturer | |
| E-35 | Error KS event log entry | Restart the device | |
| E-36 | Error KS of the technical loss accounting register | Record technical accounting parameters. losses | |
| E-37 | Error KS power technical losses | Record technical accounting parameters. losses | |
| E-38 | Error KS of the array of accumulated energy loss registers | Reset energy registers | 3rd access level |
| E-39 | Error KS of phase-by-phase energy registers | Reset energy registers | 3rd access level |
| E-40 | Broadcast Message Arrival Flag | Read the word state of the device | |
| E-41 | Error KS log pointers PKE | Perform PCE initialization | 3rd access level |
| E-42 | Error KS log entry PKE | Perform PCE initialization | 3rd access level |
| E-43 | Reserve | ||
| E-44 | Reserve | ||
| E-45 | Reserve | ||
| E-46 | Reserve | ||
| E-47 | Time correction procedure execution flag | Wait for the time correction procedure to complete | |
| E-48 | Battery voltage is less than 2.65 V | Restart the device. If the error occurs persistently, replace the battery | |
technical specifications and connection diagram
The Mercury 201 electricity meter is a modern device for commercial metering of active electrical energy in an alternating current circuit. The company produces such devices. There are several modifications in the 201 series (for example, 201.3 or 201.5), which have their own specifications. This division is carried out due to the permissible operating current and the way in which electrical energy consumption data is displayed. This device can be used either independently or in conjunction with automatic energy metering and information systems. Below we will look at the technical characteristics of Mercury 201 and the connection diagram for this meter.
Features in design
By design, the Mercury 201 counter of any series has the same housing. This is a rectangular plastic case. This counter is screwless, making it maximally protected from break-ins, and the mechanism is quite sealed.
In the foreground (on the front panel) there is a liquid crystal (LCD) display, which displays the necessary information on electricity calculations. Near the LCD display (on the right side) the main technical characteristics are indicated.
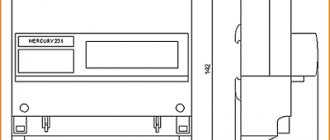
The design dimensions are compact and convenient and are: 105 * 105 * 65 mm, where 105 is the width and height of the device, and 65 is its depth. On average, the weight of the device ranges from 250 to 350 grams, depending on the series. Due to this size and weight, the mechanism can be attached to a surface without modification of additional fasteners. The meter is attached to the wall (or to any other surface that the consumer chooses) using a DIN rail.
The bottom panel in the mechanism is removable. Its purpose is to protect the contacts of the device. That is, if you remove it, access to the input electrical contacts of the device will be open. The connection itself to such contacts is carried out using a screw connection, as shown in the photo below:
Some basic technical characteristics make the meter more convenient to use. For example, the accuracy class has a technological margin, and thanks to the use of a shunt in the circuit, the direct current component can be accurately measured.
The figure below shows the overall dimensions (drawing) of the Mercury 201 device.
Basic and additional characteristics
Before you begin to study the technical characteristics of the device, it should be noted that the electric meter has special protection against the theft of electrical energy through polarity reversal. That is, if you change the phase to zero, the electric meter will still show accurate data and will not stop working.
The technical characteristics of the Mercury 201 meter differ depending on its modification. Descriptions of models from 201.1 to 201.6, their maximum load and other parameters are shown in the table below:
In addition to the basic values, the electric meter also has additional technical characteristics (such as temperature range, operating conditions, warranty period and service life). They are listed in the table below:
The main difference between the devices is that in some models the display of consumed electricity is shown on liquid crystal displays (indicators), and in some models there is a mechanical metering unit.
Also, some models have a PLC modem, with which you can record all changes in devices.
The Mercury 201 electricity meter has become very popular among residents of private houses and apartments. The reason for this is not only the technical characteristics, but also the affordable price. Due to the accuracy of measurements and reasonable price, the meter has gained recognition among electricity consumers.
The video below provides an overview of this meter model:
Connection diagram
The Mercury 201 meter is connected to the power supply, just like all similar structures for metering electrical energy. Only when connecting is the main thing considered the correct choice of conductor for the input and output. The input wire is determined automatically - it will be the same as determined by the manufacturer and power supply organization. For the output conductor, any wires are used (for example, SHVVP).
Below is the correct diagram for connecting Mercury 201 to the network:
So we looked at how to correctly connect this model of electric meter, as well as the technical characteristics of Mercury 201. We hope the information provided was useful to you!
Source
Connecting the meter
Before installing the meter, the following details are agreed upon with the energy supply company:
- Installation location. This is usually done outside the apartment or house, but installation can also be done inside.
- Model of the installed meter. Here you will need technical documents that were received upon purchase.
- Checking the quality of the electrical connection and wiring diagram.
Before connecting the meter, you need to carefully study the technical data sheet for the product, and also clarify the connection diagram. If the master is unsure of his abilities, then it is necessary to use the services of professionals. Very often, many questions arise regarding how to connect the Mercury-201 meter, but in fact there are no particular difficulties in this process.
A single-phase device is designed to include the following input contacts:
- Contact for entering a phase into the room from an external network. The wire is obtained from the electricity supplier.
- The ShVVP cable is intended for phase output into the connected room.
- Terminal for connecting zero from the general network.
- Zero output terminal to load inside.
All wires are connected in the specified sequence.
Important! Before starting work, the system is de-energized. To do this, turn off the switch, the machine, the plugs and the cable itself if it goes to the meter.
The connected wires are neatly arranged on the terminal cover using perforated cells. The cover itself is mounted on the body as tightly as possible.
After this, you need to once again make sure that the connection diagram has been followed and call a representative of the electric company who will carry out verification and install the appropriate seal on the meter.
Important! If the red light on the electric meter is on, this means it is connected to the electrical network.
Most Russians use the Mercury 201 meter to calculate electricity. These devices are installed in almost every apartment building in the country, and they are chosen, first of all, for their attractive price: depending on the region, it can vary from 550 to 600 rubles.
Mercury 201 is a single-phase electricity meter that replaced old meters with spinning disks.