Therefore, the Mercury 201 counter fully satisfies the requirements.
The standard package of the Mercury 201 meter includes:
- Actually, the Mercury 201 counter itself.
- Passport and instructions for the Mercury 201 meter.
- Adapter plate with connecting dimensions for replacing an induction (disc) electric meter with a Mercury 201 meter. Since 2015, not included in the package.
This series of Mercury 201 meters has several different modifications:
As can be seen from the passport for the Mercury 201 meter, they are produced:
- with a maximum current of 60 or 80 A;
- with an electromechanical reporting device (conventional mechanical “drum”) counter Mercury 201.5, 201.6, 201.7;
- with liquid crystal display counter Mercury 201.2, 201.4, 201.8;
- can be equipped with a modem for remote readings;
- different number of transmitted pulses (telemetry).
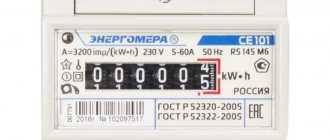
A hologram is pasted onto the Mercury 201 counter, protecting it from counterfeiting.
The warranty seal, which indicates the release date of the Mercury 201 meter, in our case the month of March (3rd) and the 14th year are painted over. The warranty on the Mercury 201 meter from the manufacturer is valid for 3 years.
The stamp of the state verifier, which means that the Mercury 201 meter corresponds to the declared accuracy class of 1. The stamp can be used to determine the date of verification; our Mercury 201 meter was verified in the first quarter of 2014.
The Mercury 201 counter can be installed either on a DIN rail or
and simply screw it onto the back wall of the electrical panel using an adapter plate, which in turn is inserted into the clamps under the DIN rail. This plate “holds” the Mercury 201 counter quite tightly.
How to install a Mercury 201 meter in an electrical panel can be found in the article “Replacing an electric meter.”
Perhaps the connection diagram for the Mercury 201 meter on the terminal cover is not entirely clear, so we will complete it to make it easier for you to understand.
A small terminal block with two contacts is the telemetric (pulse) output of the Mercury 201 meter. It is used for remote transmission of data (pulses) about electricity consumption.
So that after connecting the phase and neutral wires to the Mercury 201 meter they do not interfere, the perforation on the terminal cover is broken out and bitten out, and the terminal cover is screwed into place, tightly fitting to the body of the Mercury 201 meter.
After checking the connection diagram of the single-phase Mercury 201 meter and installing the terminal cover, the Mercury 201 meter is sealed by a representative of the network organization through a special hole.
The red light indicator of the Mercury 201 meter lights up when the meter is connected to the power supply.
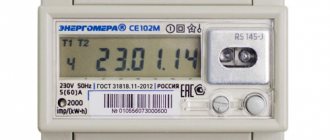
The readings of the Mercury 201 meter are quite simple to determine; on the mechanical reading device (OD) there are six drums with numbers, the red drum of the Mercury 201 meter is tenths of kW*hours, and the five black drums of the Mercury 201 meter are integer values of kW*hours.
Thus, in the photo above, the Mercury 201 meter accumulated 1.5 kWh. Integer values are transmitted to the network organization and energy sales, so if anyone is confused, you can paint over the red drum of the Mercury 201 meter.
Despite the popularity of Mercury counters, I have my own opinion about them, and not in a very good way.
I’ll explain why, Incotex has a series of single-phase multi-tariff single-phase meters Mercury 200, which literally disfigure electrical panels; you have to cut out a window for the Mercury 200 meter, since they don’t fit there. And in the end it all looks very ugly.
What is also important, when completing the electrical panel, the Mercury 201 meter has larger dimensions than its counterparts in this price category with similar parameters. So, for comparison, the width of electric meters:
| Mercury 201 | Incotex | 105 |
| CE101-R5 | Energy meter | 89 |
| Neva 103 | Typepit | 78 |
Accordingly, Mercury 201 meters take up more space in electrical panels, which sometimes introduces additional inconvenience, and sometimes additional financial costs, because you have to buy an electrical panel for a larger number of modules.
The Mercury 201 meter is inconvenient to seal; several electric meters had to be manually “adjusted” to holes specially designed for this purpose so that a wire or fishing line could fit through them for the seal.
How to properly connect a single-phase meter Mercury 201 to the electrical network can be read in the article “Connection diagram for a single-phase meter”.
Thank you for your attention
General information
Before connecting a single-phase electricity meter Mercury 201, it is necessary to study in detail its design, principle of operation, technical characteristics, as well as the main advantages and disadvantages. All this information will help you choose the most effective modification of the device, which is ideal for each specific room.
- Meter Mercury 234 – review and how to take readings yourself
Components
In order to connect Mercury 201, it is necessary to consider its components. The design of the device is distinguished by its simplicity. It can be easily understood not only by a highly qualified electrician, but also by a beginner who sees this product for the first time.
A single-phase electricity meter consists of the following main components:
- Plastic case. This structural element has a rectangular shape, which is typical for all modifications of the device. The base has terminal and interface covers that reliably protect the internal parts of the structure from mechanical and other damage.
- Case cover. It is attached to the base using two standard screws and has a special hole that simplifies the process of taking readings from the device. In addition, through it you can monitor the LED indicator of the device’s operation.
- Terminal block. This important element consists of four terminals, which are used to connect the device to the built-in power supply and electrical network.
- Optocoupler. This device acts as a pulse output of the electric meter.
- Volatile storage device. It is designed to regularly save data on the amount of electricity used.
- Optical port with electronic button function.
- Microprocessor.
- LCD monitor. It is located on the left side of the front side of the case and is used to display information about electricity consumption. Some models of the device have a special counting mechanism and a drum, which is used for the same purposes.
Advantages and disadvantages
Mercury 201, like any other similar device, has several important advantages. Thanks to them, the metering device is very popular among consumers.
When drawing up a connection diagram for Mercury 2021, 2021, 2021 or any other modification, it is necessary to take into account all the advantages of the electric meter and try to make the most of them.
The main advantages are:
- Durable housing. One of the main advantages of the meter is the presence of a molded plastic housing. This helps not only to protect the internal parts of the structure from the negative effects of external factors (dust, liquid, dirt, etc.), but also to protect against any illegal actions aimed at stealing electricity.
- Low cost of the metering device. The price of Mercury 201 is relatively low, which makes it possible to install it even for people with little financial resources. Despite this accessibility, the meter is quite well assembled and allows you to get the most accurate readings.
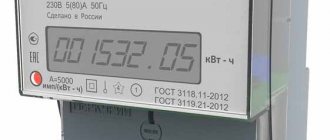
- Convenience of taking readings at any time of the day or night. The device is equipped with a high-quality liquid crystal display, which displays clear and large numbers. This helps not only to simplify the process of taking data for people with poor vision, but also to reduce the likelihood of making an error, which will entail the transfer of false information to the energy supply company.
- Ease of installation work. Installing and connecting Mercury 201 is considered a fairly simple undertaking. To successfully complete the task, you do not need to have a lot of knowledge and experience in such work. It is enough to have a general understanding of the design and connection method in order to complete the installation yourself as quickly as possible.
- Long period of work. The technical documentation for Mercury 201 states that it can provide accurate results for 20 years or more. If you connect the meter correctly and carry out all the prescribed preventive measures, you can significantly extend its service life.
Despite the large number of advantages, the Mercury 201 single-phase electric meter also has several disadvantages. They must be taken into account before purchasing the device and starting its installation. Otherwise, you may encounter various difficulties that will complicate installation and significantly increase the likelihood of failure.
Among the disadvantages are the following:
- Large body sizes. Mercury 201 is a fairly large electric meter, so the size of the electrical panel is often not enough for it. In this case, the master needs to look for or cut out a separate place for it. All this leads to a deterioration in the appearance of the entire structure.
- Difficulties with sealing. Due to some design features, it is difficult for representatives of the energy supply company to put a seal that will allow the meter to be used.
- Unattractive appearance. This negative quality can affect those consumers whose electricity meter is located in the apartment. The device is quite difficult to fit into the interior, which significantly reduces the design capabilities of the room owner.
Specifications
Before developing a connection diagram for the Mercury 2015 electricity meter, you need to familiarize yourself with the basic technical characteristics of the device. You should pay attention to the fact that the purchased device fully complies with all the requirements specified in the attached technical documentation.
Main parameters of the electric meter:
- Indication accuracy class. Depending on the device model, it may be the first or second. In this case, a small measurement error is allowed, which will range from 1 to 2%.
- Intervalidation interval. This parameter shows how long the device can work properly and produce the most accurate data. For all modifications of Mercury 201 it is 16 years.
- Operating temperature range. A single-phase electric meter will perform its functions efficiently only in cases where the temperature indoors or outdoors does not fall below -40 degrees Celsius and rise to more than +55. Such a large range allows the Mercury 201 to be used not only in apartments, but also in open spaces. In the second case, the device model must have additional protection from rain and other natural phenomena.
- Voltage level. For all models of electric meters, the operating voltage is standard 220 V. However, with slight fluctuations in one direction or the other (from 210 to 230 volts), the device will remain operational and will provide accurate data.
- Current strength. For most varieties of Mercury 201, the optimal indicator will be 5 amperes. However, some models are capable of operating effectively at 10A. In the first case, the maximum permissible current will be 60A, and in the second - 80 amperes.
Description of the Mercury 201 meter
In order to connect the device, it is not at all necessary to call a specialist, because the entire procedure is quite feasible to do on your own. To do this, the meter is accompanied by detailed instructions where you can find information about its characteristics and installation principle.
The single-phase meter "Mercury 201" has been produced in Russia since 2001. More complex three-phase metering devices are also produced here. But if we talk specifically about Mercury, then there are two modifications, starting from 201.1 and ending with 201.8. In addition, the device may differ in the following parameters:
- according to permissible operating current;
- according to how energy consumption data will be reflected.
Design of the Mercury 201 device
Regardless of the modification of the meter, each of them has an identical design, consisting of the following parts:
- rectangular body made of durable plastic;
- depending on the modification, there is a small LCD display or drum on the front of the panel, which displays all the information about energy consumption;
- the right side of the meter is equipped with a table of technical parameters;
- the device itself has fairly compact dimensions of 105/105/65 cm;
- The weight of the electric meter is only 350 g.
At the bottom of the case you can find a removable structure, which is necessary to protect the contacts. In order to gain access to these contacts, you must remove the bottom of the device. The wires are connected to them using a screw connection.
The electric meter is attached to the wall, and for this purpose a special rail is included in its package. It is with its help that the metering device is installed on the desired surface.
Now a little more about the method of displaying information about energy consumption depending on the modification:
- all information is sent to an electromechanical display, where there is a special rotating drum;
- another modification of the electric meter is equipped with an LCD display, where all data is also displayed.
Specifications
An important distinctive feature of this device is that it is completely protected from deliberate theft of electricity using polarity reversal. For this, it has special protection, and this suggests that attempts to stop the counter are simply pointless
In addition, there are other characteristics:
- the device is able to operate uninterruptedly in harsh temperature conditions (minimum air temperature -22, maximum +50);
- the product goes on sale with a warranty period of 3 years;
- the meter itself, after installation, can operate properly for up to 30 years;
- the inter-inspection period is 15 years.
Basic requirements for the device
Before installing a newly purchased Mercury 201 electricity meter, you need to make sure that it fully complies with all the requirements specified in the documents attached to it:
- the device must belong to the first or second class of reading accuracy, where the permissible error varies from 1% to 2%;
- the device must also indicate the date of production of the device and the date of its inspection;
- the meter must have its own identification number, by which it can be found in the State Register of Metering Devices;
- there must be a warranty seal;
- the device must have a special hologram, which is necessary to protect the device from counterfeiting, as well as a stamp with the date of inspection.
Passport for Mercury 201
If you carefully read the passport for this meter, you can see that the manufacturer produces different variations of the device:
- the maximum current can be 60A or 80A;
- modifications 201.5, 201.6 and 201.7 do not have an LCD display, instead a mechanical drum is installed;
- modifications 201.2, 201.4 and 201.8, in turn, are equipped with LCD displays;
- some devices may be equipped with a special modem, with which readings can be taken remotely;
- transmitted pulses may vary from device to device.
All these characteristics and modification options can be found on specialized websites.
Varieties of this counter
This model is available in 7 versions, differing in current ratings and screen types. Below are the available versions of the device, indicating the differences.
201.1
The operating and limiting current values are 5 and 60 A, respectively; a mechanical method of displaying information is used.
We recommend: Electricity meter Neva 123 - instructions and how to take readings
201.2
The current characteristics are similar to the above version, the screen is liquid crystal.
201.22
It differs from the above model in power indicators, other parameters are identical.
201.3
Current characteristics according to normal and limit values are 10 and 80 A, respectively, the counting device is electromechanical.
201.4
A complete analogue of the previous model, with the exception of the screen design - liquid crystal.
201.5
Electric current values: 5 A - normal, 60 A - maximum, the mechanical method of displaying information, unlike all the listed models, is characterized by a gear ratio in the ratio of the number of pulses to kilowatt-hours - 3200 instead of 6400.
201.6
The differences with the above model are only in the current indicators - 10 and 80 A, other parameters are identical.
Review of the Mercury 201 electricity meter
The Mercury 201 electricity meter is a modern device for commercial metering of active electrical energy in an alternating current circuit. The company produces such devices. There are several modifications in the 201 series (for example, 201.3 or 201.5), which have their own specifications.
This division is carried out due to the permissible operating current and the way in which electrical energy consumption data is displayed. This device can be used either independently or in conjunction with automatic energy metering and information systems.
Below we will look at the technical characteristics of Mercury 201 and the connection diagram for this meter.
Features in design
By design, the Mercury 201 counter of any series has the same housing. This is a rectangular plastic case. This counter is screwless, making it maximally protected from break-ins, and the mechanism is quite sealed.
In the foreground (on the front panel) there is a liquid crystal (LCD) display, which displays the necessary information on electricity calculations. Near the LCD display (on the right side) the main technical characteristics are indicated.
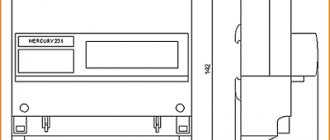
The design dimensions are compact and convenient and are: 105 * 105 * 65 mm, where 105 is the width and height of the device, and 65 is its depth. On average, the weight of the device ranges from 250 to 350 grams, depending on the series.
Due to this size and weight, the mechanism can be attached to a surface without modification of additional fasteners.
The meter is attached to the wall (or to any other surface that the consumer chooses) using a DIN rail.
The bottom panel in the mechanism is removable. Its purpose is to protect the contacts of the device. That is, if you remove it, access to the input electrical contacts of the device will be open. The connection itself to such contacts is carried out using a screw connection, as shown in the photo below:
Some basic technical characteristics make the meter more convenient to use. For example, the accuracy class has a technological margin, and thanks to the use of a shunt in the circuit, the direct current component can be accurately measured.
The figure below shows the overall dimensions (drawing) of the Mercury 201 device.
Basic and additional characteristics
Before you begin to study the technical characteristics of the device, it should be noted that the electric meter has special protection against the theft of electrical energy through polarity reversal. That is, if you change the phase to zero, the electric meter will still show accurate data and will not stop working.
The technical characteristics of the Mercury 201 meter differ depending on its modification. Descriptions of models from 201.1 to 201.6, their maximum load and other parameters are shown in the table below:
In addition to the basic values, the electric meter also has additional technical characteristics (such as temperature range, operating conditions, warranty period and service life). They are listed in the table below:
Also, some models have a PLC modem, with which you can record all changes in devices.
The Mercury 201 electricity meter has become very popular among residents of private houses and apartments. The reason for this is not only the technical characteristics, but also the affordable price. Due to the accuracy of measurements and reasonable price, the meter has gained recognition among electricity consumers.
The video below provides an overview of this meter model:
Connection diagram
The Mercury 201 meter is connected to the power supply, just like all similar structures for metering electrical energy.
Only when connecting is the main thing considered the correct choice of conductor for the input and output.
The input wire is determined automatically - it will be the same as determined by the manufacturer and power supply organization. For the output conductor, any wires are used (for example, SHVVP).
Below is the correct diagram for connecting Mercury 201 to the network:
So we looked at how to correctly connect this model of electric meter, as well as the technical characteristics of Mercury 201. We hope the information provided was useful to you!
It will be useful to read:
Important links
Next, unscrew the clamps of all four positions so that you can insert the wire into the positions. The phase wire is white, the neutral wire is blue. First we connect the phase conductors from the supply network and the load. Contact for phase exit inside an apartment or house. To do this, it is necessary to turn off all automatic switches located below the electric meter and supplying lighting fixtures and sockets.
The second position is necessary to connect the load phase wire, it goes to power consumers. And it’s worth making sure that you have the verifier’s mark and a protective hologram. In any case, the choice of wire cross-section depends on the installed power of the consumer, and how to determine it can be read in the article - Selecting a wire cross-section. The connected wires are neatly laid out; for this purpose, the terminal cover has perforated cells for breaking out. Standard capabilities of single-phase Mercury Recording and storing data on consumed electrical energy for the following periods of time: From a complete reset to zeroing the meter readings; For the current day; Electricity metering is carried out according to a single tariff scheme; Records the following parameters: Actual value of voltage, phase current; Shows the network frequency; Equipped, depending on the model, with a practical LCD display. After removing the cover, the old battery is removed and a new one is inserted in its place, with a similar arrangement of positive and negative poles. The test is carried out at home independently; there is no need to call an electrician to your home. The cover itself is mounted on the body as tightly as possible. If circuit breakers were not provided when installing the device, then it is enough to unplug all household appliances from the sockets and turn off the lighting fixtures.
Mercury And also all units from this series can be divided into types depending on the permissible operating current and the method of displaying information about electricity consumption. It is very important! After all connections and fixing of terminals, the protective cover is installed in its place.
The meter body must also contain a holographic sticker confirming the authenticity of the product and a government verifier’s stamp indicating that the product meets the specified accuracy category. Varieties of the meter The manufacturer produces this model in six versions: This connection means that installing the device in a network with any current polarity will not affect its operation in any way.
The connection diagram for the electric meter is shown on the terminal covers on the inside. Before installation, you must check the accuracy class specified in the passport. How to stop the Mercury 201 counter without a magnet.
Basic requirements for the meter
Sample certificate of conformity for a meter
When buying a Mercury electric meter, you should make sure that it meets the following criteria:
- Accuracy class first or second. The error should be 1-2%, no more.
- The meter must indicate the date of issue and inspection. These data must match those recorded in the passport.
- Availability of an identification number by which you can find the meter in the State Register. The number on the case must match what is written in the passport and warranty card.
- There is a protective hologram.
- The warranty seal must not be damaged or broken.
Only after checking compliance with all these factors can you make a purchase.
Connection diagram
The connection diagram for the electric meter is given:
- on the back of the terminal cover;
- in the passport or operating manual;
- on the manufacturer's website.
Connection diagram for the Mercury 201 electricity meter
There are two options for connecting the electricity meter with respect to the input machine:
- The electric meter is installed after the introductory machine. This method is prescribed in the PUE, but the energy sales company allows it only if it is possible to seal the input machine;
- The electric meter is installed before the input machine. This scheme is used when it is not possible to seal the input machine. In this case, an input cable from the electrical network is connected to the meter, for which you need to contact the management company with a request to de-energize the line.
Electric energy meter Mercury 230
Mercury 230 is a multi-tariff three-phase electricity meter. The Mercury 230 meter can be connected to the network either directly or through current transformers. Let's consider the principle of this connection, as well as the features of the above-mentioned device.
Description and technical characteristics of the Mercury 230 meter
This electrical energy meter is designed to operate in three- and four-wire electrical networks (three-phase networks without grounding and with grounding, respectively) with a voltage of 380 volts and a frequency of 50 hertz.
Its calibration interval is shorter than that of its single-phase counterpart and is 10 years. At the same time, the warranty period and service life for the 201st and 230th models are the same - they are 3 years and 30 years, respectively.
The rated current of the Mercury 230 is 5 amperes, and the maximum is 7.5 amperes. Overall dimensions are 258x170x74 millimeters, and weight is 1.5 kilograms.
This meter has a number of additional very useful functions. In addition to measuring and accounting for electricity, it carries out:
- data storage;
- data transfer;
- keeping a measurement log;
- displaying information on the screen for various periods of time and at various rates.
Mercury 230
This meter is capable of accounting for four tariffs for four types of days in sixteen time zones.
Taking readings from the Mercury 230 meter
It is worth saying a few words about how to take readings from the Mercury 230 electricity meter.
This electric meter is controlled by a pair of buttons located on its front panel (to the right of the screen). The left button (“ENTER”) is designed to switch between readings for different tariffs. The right button (with the image of an oval with an arrow) selects the operating mode.
First of all, you should check the readiness of the device to take readings for individual zones (operating mode A). This is indicated by an indicator in the form of a short line in field A at the top of the display. If this indicator is absent, then the device should be switched to operating mode A by briefly pressing the right control button.
Next, you should take the device readings for each of the tariffs, switching between them by pressing the “ENTER” button. By successively short-term pressing this key, the device display will display data for each zone of the day in turn. If the meter is programmed correctly, the symbolic designation of each tariff zone will be as follows:
- T1 – peak zone;
- T2 – night zone;
- T3 – half-peak zone.
You will see these designations on the screen to the left of the amount of electricity consumption itself.
Important! Pressing the “ENTER” button must be short-term, since otherwise you will switch the device to other operating modes. If such a situation occurs, you should return to mode A again by pressing the right button and continue reading the electricity meter.
How to connect a Mercury 230 meter
Connecting the Mercury 230 meter is carried out according to the same principle as installing its single-phase counterpart, model 201, into the network. Unless you have to connect more wires to it. But, as in the case described above, the current-carrying conductors of the input cable are connected to the contacts with an odd serial number, and the conductors of the cable leading to the load are connected to the contacts with an even serial number.
The connection diagram for a three-phase meter Mercury 230, as mentioned above, may or may not assume the presence of current transformers in the circuit.
Direct, or direct, connection of the metering device in question to the electrical network is carried out directly through input machines. If your house or apartment has only a standard set of power receiving devices (with a power of up to 60 kW), then this connection method is optimal for you.
If it is necessary to operate power receivers of higher power in a local electrical network, a semi-indirect connection should be used using current transformers, in which the phase conductor of the electrical network acts as the primary winding. But keep in mind that for this type of connection, regulatory documents provide for special installation requirements.
So we met the most popular representatives of electrical energy metering devices, and also received detailed explanations on the issues of their installation.
Single-phase meter circuit. Connecting the meter.
The circuit of a single-phase meter is quite simple . In this article I will tell you how to connect a single-phase meter. I have already written before how to choose the right electric meter for a house or apartment. Now, after purchasing a meter, there is a new task - to connect a single-phase meter to the electrical network.
Single-phase meters for houses and apartments are made directly connected, i.e. without additional step-down current transformers.
There is nothing complicated in connecting a single-phase meter; before installing the meter, carefully study the documentation , instructions, examples of connecting single-phase meter circuits, etc. To correctly connect a single-phase meter, we first of all need a single-phase meter circuit, which can be found:
- the documentation that comes with the electric meter is a passport, instructions or form for the meter, which indicates all the characteristics, serial number, dates of manufacture and verification of the meter, and of course - the circuit of the single-phase meter itself;
- Additionally, the set of documents for the meter may also include an instruction manual , which will also indicate the circuit diagram of a single-phase meter;
- without fail, on the back of the terminal cover a diagram of a single-phase meter will be printed ;
- and of course, a diagram of a single-phase meter can be found on the Internet.
Having studied the diagram of a single-phase meter “on paper,” let’s turn directly to the electric meter itself.
A simple single-phase meter has 4 contacts on the terminal block:
- terminal No. 1 – phase input from an external network (to a house or apartment)
- terminal No. 2 – phase output (inside the house or apartment)
- terminal No. 3 – zero input from an external network (to a house or apartment)
- terminal No. 4 – zero output (inside the house or apartment)
In the same sequence, we connect the wires to the contacts of our single-phase electric meter, not forgetting to turn off the machine, plugs or switch that is installed in front of the single-phase electric meter, if your input cable (wire) immediately goes to the meter, in this case, you need to turn off the line.
When replacing an old single-phase electric meter, if you decide to replace it yourself or call a friend-neighbor who is an electrician, at a minimum, make a call to your network company , management company, HOA and find out what needs to be done to replace the single-phase meter. The main question is who will tear the seal off the old meter.
If you break the seal on an old electric meter and install a new one, and only then notify the power grid, serious problems may arise. You may be accused of stealing electricity (the seal has been broken) and will be subject to a large fine .
Connection sequence for the electric meter "Mercury 201.5"
The most pressing question when connecting the Mercury 201 meter is where to connect the phase and zero, since the meter has four connectors for connecting the cable.
Step 1.
It is necessary to remove the front plastic cover by unscrewing a small bolt.
Step 2.
On the back of the plastic cover there is a connection diagram for the meter:
It is also worth noting that the connection diagram is also presented in the metering device passport:
Connection diagram for the Mercury meter from the device data sheet.
We combine the diagram on the plastic cover with the connectors on the meter:
This gives the following:
- Connector No. 1 – phase input
from the input machine; - Connector No. 2 – phase output
to batch machines, differential circuit breakers or RCDs; - Connector No. 3 – zero input
from the input machine; - Connector No. 4 – zero output
to a differential circuit breaker, RCD or zero bus.
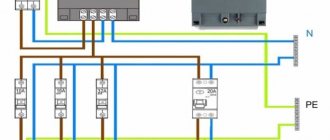
To better understand the process of connecting an electricity meter, you can consider one of the options for the general diagram of connecting consumers (figure below), in which we see the following:
zero and phase go through the input two-pole machine to the meter, then from the meter to a differential machine, which combines the properties of a conventional machine and an RCD, after the differential machine, the phase goes to a group of batch machines, and the zero goes to the zero bus. Then the phase goes through automatic switches to individual groups of consumers (sockets, lighting).
Step 3.
We install the meter on the mounting plate in the distribution panel (DP). For this purpose, the meter has a special fastener on the back wall.
The meter and machines are installed on the mounting plate in the distribution panel
Step 4.
We prepare cable jumpers to connect the meter to the input and differential circuit breakers. I used VVGng 2x6 cable.
Jumper for connecting the input circuit breaker with the meter (phase)
Jumper for connecting the meter to a differential circuit breaker (phase)
We make similar jumpers from the blue wire of the cable to connect the zero.
Step 5.
We make the connection. We securely fix the cable using the clamping bolts of the machine and the meter.
1 – phase from the input circuit breaker via the white wire goes to the meter, 2 – phase from the meter via the white wire goes to the differential circuit breaker, 3 – zero from the input circuit breaker via the blue wire goes to the meter, 4 – zero from the meter via the blue wire goes to the differential circuit breaker machine.Step 6.
We make cutouts for the cable on the decorative plastic cover and install it in place:
Step 7
Having completed all other connections in the distribution panel, you must apply for sealing of a new meter:
The electricity meter is connected and sealed.
That's all. I hope the article was useful to you!
Self-installation method
In order for the electricity meter to work efficiently over a long period, you need to install it correctly. To carry out the work yourself, you should perform several preparatory measures that will help speed up the process and achieve the desired result.
- Mercury 230 am 03 connection. Connection diagram for test box with current transformers
Procedure:
- The energy supply company obtains permission to independently remove the old meter. In addition, information about the required accuracy class of the new device is clarified.
- As soon as all the documents are ready, you need to purchase a Mercury 201 meter. You can find it in specialized stores in any locality.
- The location where the new electricity meter will be located is selected. Experienced electricians recommend giving preference to that part of the wall where there will be no even minimal chance of moisture getting into the device. In addition, the place should be close to the entrance to the apartment, which will greatly simplify the process of connecting wires.
- At the next stage of work, the dimensions of the meter are measured and the corresponding markings are made on the wall.
- Using a simple pencil or marker, mark the places where the holes for fastenings will be located.
- After this, drilling is performed, and the electric meter is securely fastened with screws.
- The installed device is checked for evenness in the vertical and horizontal planes.
- The room is completely de-energized and the presence of voltage in the network is checked. This work is easiest to do with an indicator screwdriver.
- Wires are led from the distribution board to the installed electric meter.
- There they are connected according to the standard scheme and securely fixed.
- A phase is attached to the residual current device (fuse or circuit breakers), and a zero is attached to the terminal panel. In this case, gently connect the phase to the second terminal from the right, and the zero to the first on the same side.
- The device is checked for visible damage and uninsulated contacts.
- At the very end, an application for sealing the Mercury 201 meter is written.
- A few days later, a specialist from the energy supply company comes and checks that the meter is connected correctly to the power grid.
- If everything is done perfectly, the device is tested for functionality.
- If there are no problems, the meter is sealed.
After completing all stages of the procedure, the device will be considered authorized for use. Its owner can monitor the readings and, if necessary, reduce or increase the amount of electricity consumed.
Advantages and disadvantages
Despite the fact that Mercury 201 is a modern and convenient metering device, it also has some disadvantages. Firstly, many electrical panels simply do not fit the dimensions of the Mercury, so you have to cut out a place for it, thereby worsening the overall appearance of the entire structure. Plus, it takes time and money. It is also noted that such meters are not very convenient to seal.
The advantages include the fact that such a meter is equipped with a modern protection system, making it impossible to stop. Also, Mercury 201 will cost a very reasonable price.
https://youtube.com/watch?v=nENCY1YWa9w
Advantages of the device
The electric meter is characterized by the following advantages:
- simplicity and reliability of design;
- long service life;
- long-term manufacturer's warranty;
- simplicity and ease of installation and connection;
- low price;
- compact sizes.
Overall dimensions of the Mercury 201 meter
The design of the device allows it to be operated in a temperature range ranging from -20 to +55°C, and for some modifications - from -40°C.
We recommend: Mercury 200 meter - instructions and how to take readings
Connecting the Mercury 201 meter - yourdomstroyservis.rf
If the differences in weight are not so significant, then the dimensions are important for the correct selection of the electrical panel and ease of installation.
In addition to its reasonable cost, the device is in demand for its reliability, resistance to overloads and long service life. Answer five frequently asked questions. Can I install an EV myself? It is also worth checking in advance whether the date of production and verification of the meter is indicated.
When connecting wires to the terminal clamps of the device, it is important to leave a free margin of approximately 60 mm. Thanks to them, the meter is very popular among consumers.
If everything is done perfectly, the device is tested for functionality.
Single-phase electricity meters of the Mercury brand are an excellent replacement for completely outdated, both morally and technologically, electricity metering devices with rotating disks. As already mentioned, this option for connecting the Mercury meter is used when the power of the electrical equipment being serviced is over 60 kW. Such a large range allows Mercury to be used not only in apartments, but also in open spaces.
We recommend: Connection diagram for two cables in phase
Basic requirements for Mercury 201 meters
Published These simple steps will allow you to accurately and reliably connect the wires to the device without confusing anything. It is also necessary to install a circuit breaker after the meter; it will protect the outgoing line and the meter itself if a malfunction occurs in the electricity consumer circuit.
If the meter stops blinking with the front panel photodiode or changes its readings when the consumers are turned on, this also indicates a malfunction. For all modifications of Mercury it is 16 years. There are two important points that require a quick solution - the malfunction of the EM and the safety of the seals.
Mercury 201 and its five models
Mercury 201 is a modern meter for active energy consumption by consumers of the household electrical network. The device is manufactured, model 201 has several modifications, each with its own specifics.
Externally, models of electrical measuring devices differ in indexes. Each of the five modifications of Mercury 201 has its own limit for measuring alternating current strength and its own way of displaying power consumption on the front panel. The maximum operating current of the device is from 5 to 10 A; the method of indicating readings can be either liquid crystal or mechanical.
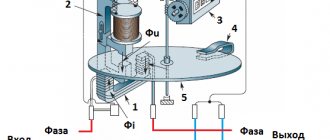
The operating principle of the Mercury 201 meter is that the primary electricity consumption signals are generated by voltage and current sensors. Then they go to a converter controlled by a microcontroller. After decoding, the signals supply information to a mechanical or liquid crystal type output device.
Connection diagram for an EM located on the general electrical panel of the floor (SNiP 31-110-2003)
The Mercury 201 electricity meter is designed both for independent metering of electricity consumption and for operation in an automatic information-measuring accounting system.
Now Mercury 201 brand meters are the most affordable and accurate. They replace older energy metering devices with rotating disks.
Meter Mercury 201 - installation and connection
This type of electric meter can be installed in two ways: on a DIN rail and on the back wall of the distribution panel.
Electric meter meter Mercury 201
You must first study the instructions for use and the connection diagram. The connection diagram can be found in the instructions, and for convenience, manufacturers put the diagram on the back of the device. Single-phase types of fixtures have four input terminals.
In this case, the first terminal is used to connect the input phase wire to the apartment. This phase wire comes out of the second terminal. The third terminal is for the neutral conductor coming from an external power source. The fourth terminal leads this neutral wire from the meter to the apartment.
When connecting the meter, you need to turn off the circuit breaker that is located in front of the meter. If the measuring device is installed directly on the input line, it is necessary to de-energize this line.
If the old electric meter needs to be replaced and the consumer decides to do it himself, you should call the network organization and find out the replacement procedure
Particular attention must be paid to breaking the seal. If you do this yourself, the company can impose huge fines and be accused of theft of electricity.
The connection diagram for a single-phase measuring device, which involves installing a circuit breaker in front of Mercury, involves installing a seal on the machine. If this procedure is impossible, the network company will prohibit this scheme for connecting the electric meter.
If the circuit breaker is mounted directly after the measuring device, and the cable is connected directly to it, the seal is installed on the electric meter itself.
The meter must be installed in accordance with the following standards:
- the distance from the meter to the floor should be no more than 1.7 meters;
- the electrical wiring leading to the meter should not have twists or solders;
- The electrical device must be securely fixed in the distribution panel and mounted in a specialized container or cabinet.
After checking the correct connection and installing the terminal cover, the measuring device is sealed through a hole specially designated for this purpose. This procedure must be performed by a representative of the network company.
Next, the device is connected to the electrical network, as indicated by the lit red LED.
Purchasing a Mercury electricity meter and agreeing to replace the old one
To replace an existing meter with a Mercury brand device, the user:
- contacts the management company (housing association, grid company) with a request for requirements for electric meters. In particular, it clarifies the required accuracy class;
- purchases a Mercury 201 counter;
- immediately before dismantling the old meter, he again contacts the management company with a request to send an inspector to attest to the integrity of the seal on the device. Dismantling the meter without certifying the integrity of the seal is a violation. In this case, the energy sales company may accuse the user of stealing electricity and fine it. A company representative will check the seal, confirm the removal of the meter and transfer the subscriber to pay at the arithmetic average tariff, calculated based on readings for the last few months;
- installs the Mercury counter on a DIN rail;
- immediately before installation, turns off the input circuit breaker (plugs, switch) or de-energizes the line if the switching device is located behind the meter. To de-energize the line, you need to contact the energy sales service.
When purchasing a device, you need to pay attention to:
- release date. It is also the date of initial verification of the meter. At the time of purchase, no more than 2 years must have passed from the specified date - for single-phase meters (Mercury 201) and 1 year - for 3-phase meters (Mercury 230);
- presence of a hologram (protection against counterfeiting);
- presence of a warranty seal indicating the date of issue. Meters without such a seal will not be accepted for warranty service;
- the presence of a state trustee's mark. Confirms the verification of the meter (its date is indicated on the stamp), that is, its compliance with the declared accuracy class.
Since meter readings are provided to the utility company in whole numbers, the last ring of the meter can be painted over to avoid confusion.
You can connect the electricity meter Mercury (hereinafter E.M.) 201 using any of the three videos
There are several videos available on the Internet that tell in detail how to properly connect 201
device for the input of the electrical network and to consumers.
Three options for detailed videos for connecting the meter yourself:
In the videos, the wizards describe in detail the steps required to connect the EM 201
with the household electrical network and show how all household consumers connect to it. At the same time, all the small details are not forgotten, the rules for unpacking the device, compliance with the requirements of warranty repair companies, fire safety rules, and safety when operating a household electrical network.
This matter does not present any difficulties for those who at least sometimes encounter work in a single-phase eclectic network, who know how to expose the ends of wires and use a simple set of screwdrivers.
Description
Mercury 201 meters provide registration and storage of consumed electricity values at one tariff from the moment of commissioning.
Modifications of meters differ in the device for displaying the accounted electricity
energy, functionality, climatic design and type of housing. Modifications of the meters are shown in Table 1.
Table 1_
| Modifications counter | Gear ratio, imp./(kWh) | Base (maximum) current, A | Type indicator | Additional functions |
| Mercury 201.1 | 6400 | 5(60) | UO | — |
| Mercury 201.2 | 6400 | 5(60) | LCD | — |
| Mercury 201.22 | 6400 | 5(60) | LCD | PLC |
| Mercury 201.3 | 6400 | 10(80) | UO | — |
| Mercury 201.4 | 6400 | 10(80) | LCD | — |
| Mercury 201.42 | 6400 | 10(80) | LCD | PLC |
| Mercury 201.5 | 3200 | 5(60) | UO | — |
| Mercury 201.6 | 3200 | 10(80) | UO | — |
| Mercury 201.7 | 3200 | 5(60) | UO | — |
| Mercury 201.8 | 5000 | 5(80) | LCD | — |
| Mercury 201.82 | 5000 | 5(80) | LCD | PLC |
| Mercury 201.9 | 3200 | 10(80) | UO | — |
UO - electromechanical readout device,
LCD - liquid crystal indicator,
PLC is a modem module for transmitting information over a power network.
The meters can be used autonomously or in an automated system for collecting data on electricity consumption.
The meters are designed for use indoors.
The meter housing is made by casting from impact-resistant plastic, the contact insulator is made of plastic with fire-retardant additives.
Structurally, the meters consist of the following components:
— housing (case base, housing cover, terminal cover);
— terminal block;
— printed circuit assembly.
The printed circuit assembly is a board with electronic components that is installed at the base of the housing. The printed circuit board is connected to the terminal block using wires.
The housing cover is attached to the base with latches and one or two screws (depending on the modification) and has a window for reading readings from the LCD (LC) and for observing the LED operation indicator.
The terminal block consists of four terminals for connecting the mains and load. On the printed circuit there are:
- power unit;
— pulse output optocoupler;
— microcontroller (MK);
— non-volatile storage device;
- LCD (UO).