There are several options for timers powered by 12/24/110/220 volts. This article discusses a model with 220V mains power.
Review of the electronic timer Cn101A. Appearance, internal structure, connection, configuration and programming, features. The Cn101A timer, or as it is also called, a weekly timer, can be used for automation at home and in the country, in the garage and in the workshop. Automation of watering, lighting, heating, etc. The possibilities are limited only by imagination.
Electronic programmable timer Cn101A. Appearance.
Cn101A timer capabilities
- Real-time clock to control the switching on and off of the load at specific times of the day;
- Internal backup power supply—short-term power outages are not a problem;
- Load control via relay - galvanic isolation of load and timer; the ability to connect both mains and low-voltage loads;
- Programming of up to 17 pairs of events (on/off), indicating for each - a day of the week or a series of preset days and times;
- The independence of each event from others, i.e. You can program one event to turn on only, for example on Monday at 7 am, and the second only to turn off, for example on Friday at 8 pm.
Thanks to the ability to select not only a specific day, but also many preset lists of days (only weekdays, weekends, every other day, etc. - discussed below), the number of events can be increased many times, since one entry can cover the events of the entire week at once or several certain days. Events act as triggers that switch the current state, so they can be stacked on top of each other, giving you great flexibility in load management.
The minimum relay response interval is 1 minute. The maximum is a day minus 1 minute. If you set the on and off times to the same value, the timer will not work. Programming will be discussed in more detail below.
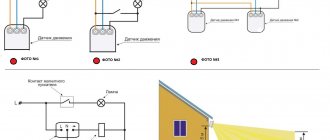
The timer has 4 outputs. The connection diagram is drawn on the back of the case. One pair of contacts, designated as “ Power ”, is supplied with 220V mains voltage, and the other is connected “into the gap”. By default, or in the de-energized position, the relay contacts are open.
Timer setting example
Let's assume that you need to configure the device so that it turns on every day for 4 hours from 19:00 to 23:00. Below we will tell you how to achieve this.
Go to system settings. For this we need the Timer key. After clicking on it, the message On 1 appears. Next, select the day of the week, and since we need to configure the device to turn on daily, we press the Week button until all days of the week appear on the monitor. Then select the desired time by turning on the Hour key. In this case, we are not interested in minutes, so we do not touch the Min button.
We save the turn-on time indicator by clicking on the Timer button. After pressing, the information is saved, and the message Off 1 appears on the monitor, with which you need to set the shutdown time. Set the desired parameter (in our case we are talking about 23:00). Using the Week key, select the days of the week, click on Hour and set 23:00. The programming mode is exited using the Clock button.
Buying an electronic socket timer can be considered a fairly simple task. Electronics and household supply stores have a fairly wide range of similar products. If you still have any questions, the sales assistant in the store will give advice on connecting and using a particular device.
Source
Scope of application of the Cn101A timer
The possibilities for using the timer are very wide and are limited only by your imagination and the total number of supported intervals. For example, based on it, you can emulate presence in the house, when lighting or sound sources will turn on and off at specified intervals, simulating the presence of owners in the house. You can use the timer to control lighting or watering in a greenhouse or on a site, flushing water treatment filters, controlling ventilation and many other connected load options. That is, it is possible to automate many cyclic processes that require periodic actions at a given time.
Setting the auto shutdown timer
Algorithm for setting the air conditioner to turn off:
Press the Timer Off button on the remote control. This will activate the indicator on the display and the timer icon will flash. This indicates that the device is ready to set the required parameters.- Use the plus and minus keys or Timer +/- to set the deactivation time for the air conditioner. The principle is the same as with setting the parameters for turning on the device - a single press adds one minute to the time. To speed up the process, press and hold the plus or minus key. After this, the time will begin to count down quickly. To adjust the parameters, release the key and, with a few single presses, set the correct value for the device deactivation time.
- The last manipulation is saving the specified parameters. To perform the procedure, press the Timer Off key and hold the button for 5 seconds. This will cause the clock icon on the display to stop blinking. This means that the settings are saved and the air conditioner will turn off at the specified time.
- If you press the Set/Cancel button within 10 seconds after setting the parameters to turn off the air conditioner, the parameters will be canceled. This allows you to quickly cancel the specified information. If there is no such need, do not press the indicated key for 10 seconds.
The difference between turning on and deactivating the air conditioner is at least 30 minutes. This means that you cannot set a timer to turn it on, and then set the device to turn off after 15 minutes. The minimum gap is half an hour. In addition, the maximum difference between turning the device on and off is 24 hours. This means that you cannot set the air conditioner to turn on and then turn it off after 30 hours. The gap between options should be no more than one day.
Instructions. Setup. Setting the time and intervals for the Cn101A timer.
All settings are made using five main and three auxiliary buttons.
- “P” (Program) – button to switch to event time programming mode;
- “D+” (Day+) – button to increase the day of the week readings;
- “H+” (Hour+) – button to increase clock readings;
- “M+” (Minutes+) – button to increase the minutes;
- “Dial” is a button for switching to the mode for setting the current time or exiting the programming mode. Time indications for the day of the week/hours/minutes are set by holding it down with the “ D+ ” “ H+ ” “ M+ ” buttons;
- “C/R” – button to reset the settings of the current event. Operates in event programming mode; When pressed for a long time (about 8-10 seconds), all programs are cleared, the date/time is not reset;
- “c” — button to reset the device to factory settings. When pressed, all settings are reset;
- “Manual” - Manual load control. Has 3 modes: On - load is on;
- Auto - depending on the timer event settings;
- Off —the load is turned off.
Setting the current time
First of all, you need to set the current time, including the day of the week. The time is set by pressing the button with the image of a dial and, without releasing it, the “ D+” to indicate the day of the week and the “ H+” and “M+” to set the hours and minutes, respectively. The changes are only increasing, as can be understood from the names of the buttons. Whenever the hours or minutes are changed, the seconds are reset to zero.
Event programming
The next step is to indicate the time when the built-in relay will operate and supply or turn off power to the load. P button once . You can select the on or off event you want to edit by successively pressing the “ P ” button. After approximately 20 seconds of inactivity, if no button is pressed, the timer will exit the interval programming mode.
You can forcefully exit the settings editing mode by pressing the button with a dial image. In this case, all settings will be saved in the device’s memory and will take effect, taking into account the changes made. If in the new settings any interval falls within the current time, the timer state will change accordingly. That is, if at the moment it should be turned on according to some program, it will turn on. And vice versa.
Setting the event time
We enter the programming mode by pressing the “ P” button. The current settings of the first event appear on the screen, as evidenced by the number “ 1” at the beginning. First, the settings for triggering the timer to turn on are indicated (the inscription “ On ” in the lower left corner of the screen). By default, all data is empty, the time is not set (“ —:— “). When you press any of the “ D+ ” / “ H+ ” / “ M+ ” buttons, the timer is set by default to “all days” and the time “00:00”.
Using the “ H+ ” / “ M+ ” buttons, sequentially select, respectively, the hours from 00 to 24 and minutes from 0 to 59, at which the custom event will be triggered.
D+ installation button to select the required combination or specific day for the timer to operate. The selected days of the week are displayed on the screen in the top line. Possible preset options:
- every day;
- all days except Sunday;
- weekdays only (Monday to Friday;
- weekends only;
- Monday Wednesday Friday;
- Tuesday Thursday Saturday;
- Monday Tuesday Wednesday;
- Thursday Friday Saturday;
- one specific day of the week, selected by successively pressing the “ D+ ” button, starting from Monday.
P button again in programming mode will lead to the transition to the switch-off time settings for the current timer. The next press goes to the settings for enabling the second event, again to the settings for disabling it, etc. round. The timer number is displayed at the very beginning in small numbers “ 1 “..” 17 “, the event type “ ON ” or “ OFF ” is in the lower left corner of the screen.
Pressing the “ C/R ” button in the timer programming mode will delete the settings of only the current event displayed on the screen. This does not affect other settings. A long press (8-10 sec) in any mode will reset all settings except date/time.
It is not necessary to configure both actions (turning on and off) for each entry at once. Although the counter is a relay with 17 pairs of time-programmable on/off events, each of the resulting 34 events is independent of the others.
For example, you can specify only the enable event. Then, when the specified time arrives, the load will turn on, but shutdown will not occur. Or another option - in the first interval we indicate the inclusion from morning to evening every day (on weekdays/weekends/every other day, etc.). In the second - turn off before lunch and turn on after.
| Time | 8:00 | 13:00 | 15:00 | 20:00 |
| 1st interval | ON | OFF | ||
| 2nd interval | OFF | ON | ||
| RESULT: | ON | OFF | ON | OFF |
As a result, the timer settings, overlapping each other, will consist of daily switching on the load from morning to evening, with shutdown at lunchtime. And all this with the help of only two programs out of 17!
That is, each of the 17 records is independent of the others and the counter’s behavior will consist of the superposition of all programmed events on top of each other
Reset all Cn101A timer settings
If necessary, you can completely reset all settings, including records of programmed intervals and time settings. This is done by pressing the small “ c ” button, slightly recessed into the body. In this case, the device will return to the factory state, with the time settings at 0:00 Monday and missing timer events
Manual load control
The Cn101A timer provides manual control using the Manual button located in the upper right corner of the case and has 3 modes:
- On —load is on;
- Auto - depending on the timer event settings;
- Off —the load is turned off.
Switching between modes is carried out by sequentially searching “Off” - “Auto” - “On” and back. The status of the current mode is displayed under the current time numbers with small icons of a light bulb on or off and the inscription “Auto”. The current load state is also displayed by a red indicator at the top left of the device. When the load is on, the indicator will light up.
And finally, a short video review of programming the Cn101A timer:
Programmable Timer - Time Relay CN101 (12-220V)
A reliable and easy-to-use timer for turning on/off devices according to a given program for a given time - hours, days, weeks. Excellent for automatic lighting of aquariums, greenhouses; automation of incubator lines; turning on/off the lighting of a house, store, shop window; operating time of underfloor heating, heating, etc.
The built-in battery ensures uninterrupted operation of the watch. A full charge lasts for 60 days. When connected to the network, the battery. charging
Specifications:
- power supply - 12V. 220V
- number of programmable modes - 17
- time discreteness - 1 min
- contact load - 16A
- built-in battery - 1.2V, 40mA
- operating temperature from - 10 to + 40° C
- overall dimensions - 60x60x32mm
- full time range - 1min - 168hours
- language - Chinese
Before you begin, you must set up the real-time clock. To unlock the lock, press the C/R .
Clock setting:
- Press and hold the clock button.
- Without releasing the “clock” button, select the day of the week with the D+ .
- H+ (hours) and M+ buttons to set the correct time.
Setting the timer: The timer can perform one of 17 programs. Press the P to select one of the timer programs. In the lower left corner of the display you can see its number and the value: on - on (closing a contact) or off - off (opening a contact). Then press the D+ to select the day of the week on which the timer will run. The names of the days will light up at the top of the display. After this, select the timer operating period using the H+ (hours) and M+ (minutes) buttons to set on or off any of the 17 programs. Using the MANUAL you can control the relay. Turn on, turn off or set to automatic mode - AUTO .