The use of ceiling and wall lamps allows you to abandon old-fashioned and not always practical chandeliers. Especially if the ceiling height of the apartment does not exceed the standard 2.5 m. Wall and ceiling lighting devices allow you to change and enhance the interior of your home quite effectively and without radical alterations. All that’s left to do is choose a suitable design and decide how to install and connect the lamp yourself. The task of installing household lighting devices does not pose a particular problem; it is enough to know the basic installation techniques and be careful when working with electrical wiring.
Lamp installation options
There are several main types of lighting fixtures used at home. From a huge number of models, several basic options can be distinguished, differing in the design of the lamp shade and the method of attachment to the load-bearing surface of the wall or ceiling:
- Ceiling lamps, usually in the form of ceiling or box-shaped structures;
- Wall sconces and ceiling lighting systems for universal purposes, used for local illumination of a designated small area;
- LED point devices, built-in and wall-mounted.
Modern lamps, regardless of the light source used, are conventionally divided into two types of devices - built-in and wall-mounted. Each of them has its own characteristics and conditions. The first type is also called hidden due to the fact that to install such a device you will need to make a special niche in the wall or ceiling. It does not have a body, only a supporting frame and an outer front panel.
The second type of lamp is designed in the form of a single body, on which there are brackets with which the device is installed on a wall or ceiling.
Important! The method of installing and connecting the lamp to the wiring directly depends on the mounting design of the lighting device.
The greater the weight of the lighting structure, the more difficult it is to mount it on a vertical wall and even more so on a ceiling surface.
It is clear that the installation location and the specific type of lamp are selected at the interior planning stage. All elements used to connect and install lighting devices are usually hidden under the decorative cladding of walls or ceilings, so the installation process begins long before finishing work.
Wall lamps: installation and connection
In general, the direct purpose of the lighting device is to locally illuminate some area in the room, or to create an accent of light flows on a particular object. Such devices look impressive, beautiful, and at the same time create romantic, calm and relaxing light flows in the house. When the installation location has been determined, it is worthwhile to place the electrical cable inside the wall (that is, in the groove) in advance. Sometimes it is laid behind drywall.
Algorithm of actions
- Before starting electrical work, it is imperative to de-energize the electrical cable.
- Study in advance the instructions that are usually included with the lighting device according to the proposed scheme, and disassemble the lamp.
- Apply the body of the wall-mounted lighting fixture with special holes for fixing the lamp to the wall surface in the place where you plan to install it.
- Mark the holes with a pencil.
- Set the case aside.
Please note that if the body part is not round in shape, then it must be aligned to the profile level before you start making markings. Otherwise, the device will hang unevenly.
Order:
Using a hammer drill (if we are talking about a concrete or brick wall) or a drill (if the wall is made of aerated concrete or plasterboard), make holes, taking into account both the depth and diameter of the fastening elements used.- Fix the base (i.e. body) of the device to the wall surface.
- Connect the lighting device to the electrical network using the terminal block, which is located inside the lamp.
- Check the operation of the device after connecting.
It is important to know! The voltage from wall-type sconces should be rated at 220 W. If it turns out that the voltage is much lower, it is necessary to provide for a hidden installation of a power supply, which is necessary for high-quality work.
Rules for installing ceiling lamps
Before installing a ceiling light with your own hands, you need to prepare:
- Before starting the installation process, be sure to familiarize yourself with the type of tow hook. This is very important, because the types of such hooks differ greatly from each other and depend on the type of ceiling covering. Considering the fact that manufacturers do not include several types of hooks in the package, you may need to purchase it yourself.
- Be sure to buy special drills and dowels for the tow hook, which must match perfectly in size.
- Prepare all the tools - an electric drill and a hammer drill.
The photo shows what a hook for installing a pendant lamp looks like. The main stage is:
- Drill a special hole for the dowel.
- Next, screw in the tow hook.
- Secure the product.
It is interesting that very often in residential buildings that are built of reinforced concrete, holes with ready-made fastening elements are already provided. Consequently, installation steps are reduced. If the ceiling surface is made of wood, the installation process will be the same as for conventional ceilings. Finally, suspended ceiling structures require the use of specially shaped hooks, and if the shape is the most common, then you should definitely add a washer.
Suspended plasterboard ceilings - installation nuances
The most important point here is that the hook is installed at the stage of installing the hanging frame. This feature is due to the fact that the place where the lighting fixture is fixed will not coincide with the slats of the ceiling structure.
Recessed lighting and installation
Built-in lighting devices differ from all previous samples by a completely different installation principle. For this method of light supply, it is necessary to prepare the holes in the suspended ceiling structures in advance.
How to mount a lamp on a suspended ceiling
The circuit is quite simple, and it consists of a power source, a switch and a lighting device, and it is identical in manufacturability to the connection diagrams of the simplest samples. Spot lighting devices involve the use of lamps with a total power of 12 W. As for installing lamps in a suspended ceiling with your own hands, the lighting device is mounted on a specialized suspension, or rather, on the base surface. Take into account the fact that suspended ceilings are easy to damage, and therefore it is necessary to provide the ability to make holes using forces from specialist installers in stretched ceiling fabrics.
It is also important that for suspended and suspended ceilings there are specially shaped hooks that look like plates. If the lighting device is intended specifically for such a ceiling, then the mounting elements are included in the kit.
Step-by-step instruction
This method for mounting on a ceiling surface makes it possible to install both overhead and suspended products, and it does not matter what the ceiling surface is made of - concrete or even suspended.
- Prepare all the necessary tools and materials (screws, dowels, keys, screwdrivers and electric drill).
- Holes must be made for the dowels.
- Screw the bar onto the screws.
- Using bolts, nuts and screws, install the lampshade.
As you can see, there are difficulties, but having a working and high-quality tool, suitable elements and dexterity will bring you closer to excellent results. The main thing is that you know about the different installation methods and choose the right algorithm of actions for your own individual case. If difficulties nevertheless arise, then use the advice or photo reports of highly qualified craftsmen.
Preparation for installation and connection of the lamp
The main part of the work on installing and connecting the lamp will need to be done before the wallpaper is hung and decorative plaster is laid. First of all, you will need to perform several preparatory steps:
- Select the correct location for installing the lamp. The installation point is chosen in proportion to the weight of the lighting device, its dimensions and planned functions;
- Plan and cut a channel in the wall for laying electrical wiring from the junction box to the installation site of the switch and lamp.
The easiest way is to drill a channel from the box to the connection point for the sconce in a brick or plaster-block wall using a hammer drill. In extreme cases, the mounting groove for laying and connecting electrical wiring can be knocked out in a couple of hours with a chisel and hammer.
The situation is a little more complicated with concrete slabs. In this case, the channel to the installation site of the lamp will need to be cut with a grinder, or the harness will need to be hidden under the baseboard, and the vertical sections of wires to the connection point will need to be covered with decorative covers.
Advice! When laying wiring to the connection point of the lamp, use traditional marking methods with laying and turning the harness at right angles and strictly along the horizon line.
If the walls and ceiling are supposed to be lined with plasterboard slabs, the wiring from the box to the connection point for the lighting fixtures will need to be laid in advance. Typically, the harnesses are wrapped in a corrugated hose and tied to the supporting profile in the space behind the slabs. At the location where the sconce body or lampshade is installed, a hole is cut in the plasterboard board through which the harness is routed out for connection to the internal wiring of the device.
Preparation for work
Installing a sconce on a wall requires initial preparatory work. It is advisable to do the wiring for installation during repairs, before wallpapering. To do this you need:
- decide on the location of the wall lamp;
- cut out a place in the wall for laying the cable (the length from the distribution box to the point of connection to the switch).
Not a problem if the wall is made of brick or gypsum block. The channel is made with a hammer and chisel or perforator. It is more difficult to work with concrete floors. For work you will need a grinder. If such work cannot be carried out, then the wire is routed behind the baseboard, and the connection to the electric lamp is masked with decorative overlays.
Cable laying is carried out using the traditional method: turns at right angles along the horizon line.
If the walls are to be covered with plasterboard, then the wiring is carried out before the slabs are attached. The cable must be placed in a corrugation and attached to the profile. A hole is drilled in the drywall where the sconce is installed, and a wire is pulled through. Next, it remains to connect the sconces.
View this post on Instagram
Posted by Sergey (@papikyansergo) November 16, 2021 at 9:25 PST
Installing wall lamps
Depending on the connection diagram used, home lamps are conventionally divided into two categories - with a toggle switch built into the housing and an external additional switch. The first type of lighting fixtures is usually used to illuminate the comfort zone. Usually these are wall structures in the form of wall sconces or ceiling lamps mounted into furniture, located at arm's length from the place of rest or sleep.
The second type is used to illuminate corridors, kitchens, storage rooms - any auxiliary room where it is necessary to illuminate the space for a short period of time, and that’s all. The connection of such lamps must be carried out in pairs with a remote switch located on the wall next to the entrance to the room.
Selecting the number of lamps depending on the area of the room
The recommended uniform room illumination is 300 lux. To achieve such illumination, you need to install several recessed lamps in the room. To determine their quantity, use these tables.
The table shows the number of recessed lamps depending on the length (L) and width (W) of the room with a ceiling height of 2.5 meters.
Number of halogen lamps 220V without transformer
Number of 220V lamps with incandescent lamps
Number of 12V low-voltage lamps
Installation of a wall lamp
The installation of a wall lamp always begins by marking the housing mounting points. The body is applied to the wall and leveled horizontally using a building level, after which you need to use a simple pencil to trace the outline of the back wall.
Traditionally, wall lights are attached to the wall surface in one of two ways:
- Using dowels with a threaded head. In this case, the body is attached to threaded dowels driven into the wall using a pair of nuts designed as decorative elements. Installation of a light lamp is allowed on wooden and plastic boards, drywall or even plaster;
- To install more massive structures, use a transitional mount in the form of a bracket or support bar. First you need to mark the points for installing plugs in the wall along the holes in the device. The transition mount is leveled and fixed with self-tapping screws or dowels. Only after this can the lamp housing be installed.
The heaviest lampshades are installed on the wall using dowels. In this case, the role of the transition mount is played by the metal rear wall. On its surface there are holes for screws for fastening to the wall and threaded holes for screwing and installing other parts of the case.
The correct position of the entire lamp depends on how accurately the rear wall is installed. In most cases, the holes for the fasteners have a small gap, so in case of a slight miss, the position of the housing can be slightly adjusted.
Wall lights.
Wall lamps are used as additional, and sometimes main, light sources. In the bedroom they are located mainly in the bedside area, at a low height (here it is more convenient to use lamps with a built-in switch), as a light source for reading, a night light, and also to create an intimate mood. In the hallway, in the bathroom, or in the toilet, such lamps are often used as a source of main lighting. In this case, they are mounted closer to the ceiling and turned on using an external switch.
Regardless of the external design, all such lamps are attached to the wall surface using 2 (rarely 3) dowel nails. Depending on the design of the device, two installation options are used.
In the first case, the mounting holes are located in the device body, under the cover - the diffuser. The diffuser is removed, the lamp is pressed to the future installation location, in such a way as to ensure unhindered input of power wires (they are laid in advance, but the voltage is not connected), after which markings are made. Next, the lamp is put aside, a hammer drill is taken and 2 (or 3) holes with a diameter of 6 mm are drilled. After this, you can secure the lamp using dowels and nails. The next step is connecting the power wires and screwing in the light bulb.
So, after the light bulb is screwed in, you can check the functionality of the lamp by applying voltage. If the light bulb and electric the cartridge is OK, everything should work fine. In this case, you can install a cover - a diffuser, having first, of course, turned off the lamp. After installing the diffuser, the lamp turns on again, and if everything works fine, it means the installation was done correctly.
In the second case, a special installation frame, which is part of the design of the lamp, is attached to the wall, to the place where the power wires are connected. It is made in such a way that it can be easily removed by unscrewing two screws with decorative heads. After the frame is attached, the power wires are connected to the wall surface, the lamp body is put back on, and the screws are tightened. After that, you can check the functionality by screwing in the light bulb and applying voltage. If the lamp and bulb are in good working order, and the wire connection is not broken, the result will not be long in coming.
Connecting the luminaire wiring
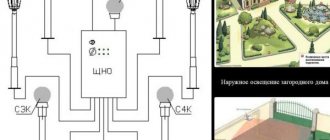
The connection diagram for a wall lighting device is practically no different from the methods used for any other lighting devices. The classic connection diagram with a remote switch is shown in the figure below.
If you need to connect several lamps, then you will need to lay your own neutral wire from the distribution box to each lighting point. The phase wire is connected from the switch. In this case, one conductor is used for all lighting devices.
Zero always goes directly, and phase only through the switch. Even if the lamp is equipped with an internal switch, the connection is still made only in this way. Therefore, before connecting the contacts of the electrical wiring and the wires of the lamp, you will need to check the markings of the neutral and phase wires using the attached passport, so as not to confuse them during assembly.
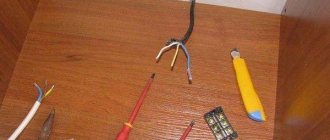
Before installation and connection, you will need to check the wiring and the lamp itself. Initially, we cut the wires of the electrical wiring harness to the required length and connect them to the contacts in the junction box. It is clear that during installation it will be necessary to turn off the toggle switch of the line supplying power to the box we need.
The next step is to connect the harness terminals at the installation site to the device wiring. Before connecting the contacts, we turn on the packet switch on the switchboard for a short time and use an electrical probe to check which of them is zero and which is phase. To avoid mistakes during further connection and installation, we mark each contact with a colored felt-tip pen.
Advice! Before assembly and installation, be sure to carry out a test installation, connect the contact chips of the lamp to the electrical wiring without installing it in place. This is done in order to check the operation of the switch, socket and lamp.
Sometimes it is necessary to align and bend the flexible contact elements in the socket to ensure reliable contact. Before installation and assembly, the lamp is allowed to work for 10-15 minutes in disassembled form. If the socket and body do not heat up, the lamp shines with a stable light, without crackling or blinking, then the structure can be assembled and installed on the wall.
How to install a recessed light
To install, you first need to make a plan:
- Calculate the level of lighting in the room (the number of lamps multiplied by the power of the lamp and divided by 20, the answer is the number of square meters that the product can illuminate)
- Take into account all light sources in the room (chandelier, sconces, floor lamps, etc.)
- Outline the location of lighting elements in the ceiling (shaped, linear, starry sky, spot, etc.)
- Buy the lamp itself
IMPORTANT: Do not cut a hole in the ceiling before purchasing the lamp itself - the cut hole may not coincide with that indicated in the specifications of the model. Ideally, the installation of suspended ceilings and lighting is carried out parallel to each other.
Wiring
Installation and connection of wires is an integral part of the installation. Required:
- Outline a drawing of the circuit, where the number of lamps, the transformer (if any), and the leads to the switch are noted.
- Select the wire. It is important to find an insulated, moisture-proof wire. ShVVP or VVG 3×1.5 are recommended, since they are used primarily for connection and can withstand air humidity up to 98% and temperatures up to 35 degrees. In our climate these are optimal indicators. These wires are also suitable for installation in the bathroom, as they can withstand being in rooms with high humidity.
- Place the power supply network under the ceiling (stretch, plasterboard, etc.).
Features of installation and connection of built-in lamps
The fashion for using built-in lamp models came simultaneously with the advent and spread of technology for finishing walls and ceilings with plasterboard, plastic and MF boards. A small space between the wall and the decorative slab allows you to hide the lamp body and wiring, leaving only the reflector and light source on the surface.
The connection diagram for built-in lighting devices differs from conventional wall sconces or lampshades only in the presence of an additional power supply, which simultaneously plays the role of a protective device. The main difference is in the method of attaching the housings to the decorative plate.
Features of installation and connection of a recessed lamp in the ceiling
Built-in structures cannot be installed in concrete floors. The product will not stick to concrete and will fall out. Built-in lamps are suitable for suspended or plasterboard ceilings.
To install the lighting fixture in a suspended ceiling, you need to insert the installation ring that comes with the kit. It will fix the edges of the ceiling sheet so that the body does not dangle in it. The ring is attached with special metal clamps, and the lamp clings to the connecting ring with clothespins.
If the ceiling is made of plasterboard, there is no need to install a connecting ring. The craftsman carefully drills a hole of the required diameter in the ceiling, into which the device itself is attached with clothespins.
Installation of ceiling lights
Immediately after installing the supporting frame of the suspended ceiling, it is necessary to plan the points where the installation of lamps is expected. According to the drawn up diagram, the wiring harnesses are laid along the supporting metal ceiling profiles. If you plan to use LED lamps or strips, you will need to provide a place for mounting and connecting the housing of the low-voltage power supply.
Most often, the installation of ceiling lighting fixtures is carried out on a standard spring suspension. Each built-in model has its own installation size, which must be indicated in the product passport. After assembling the plasterboard or plastic ceiling cladding, a hole of mounting diameter is cut in the ceiling slab using a ring drill. All that remains is to pull the wires out of the previously laid wiring harness and connect them to the lamp connectors. To install the device, it is necessary to compress the side springs and install the housing into the mounting hole.
Larger box shades are attached directly to the steel ceiling frame prior to assembly before the ceiling tiles are installed. Next, the lamp is dismantled, leaving only the adapter pin mount. After laying plasterboard or MDF boards along the previously installed pin fastening, mark the position of the housing, cut a hole in the cladding and connect and assemble the lighting device.
Methods for installing a built-in lamp
Installation of a built-in lamp in the ceiling depends on the type of ceiling covering and the type of device. The ceiling can be suspended or concrete. Recessed lamps can be:
- rotary;
- non-rotating.
When installing recessed ceiling lights, you can choose different types of light bulbs:
- halogen;
- incandescent lamps;
- luminescent;
- LED
It is not necessary to buy the same type of light bulbs every time. They can be changed, since their insertion depth is the same.
Installation of recessed lamps requires compliance with a certain sequence of actions:
- calculate the number of lighting points for each room;
- take into account additional light sources;
- make markings for new light bulbs;
- buy a lamp;
- install.
There is no need to make holes in the wall or ceiling before purchasing lighting elements, since they have different body diameters.
Installation of built-in ceiling lights is impossible without laying wires. To route the wires, you need to draw a diagram of the wiring path. The diagram indicates the number of devices, the number of residual current devices, and the path to the switch. Wires must be insulated and protected from moisture. If the lamps will be installed in the bathroom, sealed lighting fixtures will be required. Electrical wiring can be done in an open or closed manner. When installed openly, the wires are hidden in plastic cable ducts. Hidden installation requires wall chipping.
Types of lamps for wall installation
When selecting lighting fixtures for the wall, you need to pay attention to:
- strength and intensity of light flux;
- tension force;
- consumed electrical power;
- shutdown method;
- type of light bulbs.
Incorrectly selected light bulb power or switch type can lead to deformation of the housing. You cannot use light bulbs with a higher rating than indicated on the packaging for the chandelier.
To install a wall lamp in the bathroom, sealed lighting fixtures and switches with additional insulating protection are used.
Switches can be located on the power cord, mounted in the wall and connected to the device through hidden wiring, or placed in the luminaire body. In addition, some sconces are controlled by remote control. This is convenient if you use the lighting device before bed.
The lamps can contain different light bulbs:
- light bulbs with an ordinary hardening filament;
- halogen;
- luminescent;
- energy saving;
- LED (preferred).
The housing can be made of metal or heat-resistant plastic. These materials protect against high temperatures and overheating. Using wall lighting, you can visually expand the area of the room and focus on a specific area.
Installation of a recessed luminaire - work for all types of recessed luminaires
Installation of any type of recessed lamps is done in three stages:
1 - Using an electric drill with a bit installed, drill a hole of the required diameter in the ceiling. The diameter of the installation hole is indicated on the passport for the lamp.
2 — Remove the electrical power supply cable into the resulting hole. Clean it and connect it to the lamp.
3 - Insert the lamp into the lamp, bend the fastening “antennae” and insert the lamp into the drilled hole. The antennae straighten and the lamp fastens.
Note: When installing a luminaire with an individual transformer, first connect the transformer, and then connect the luminaire. When installing one transformer for several lamps, it is better to install the transformer when laying the electrical wiring. If this has not been done in advance, then the transformer must be installed at the first lamp in the line of lamps powered by this transformer.