- Purpose and design
- How does a siphon drain work?
- Types of drainage devices under the sink
- Pipe
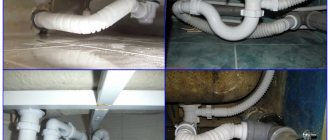
- Corrugated
- Bottle
- Dry siphon
- Siphon for bathroom, washbasin or kitchen
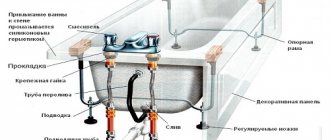
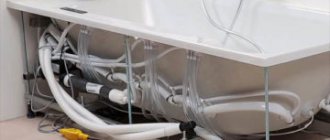
- Features of installing a drain with overflow
- System assembly
- Installation of the structure
- Functionality check
The sink drain is an important element. When installing it, you need to study the stages of assembling the system. An important point is the selection of products.
Elements for assembling the drain system
Preparing to connect the sink
Determining the installation height of a plumbing fixture (for more details: “Installation height of a sink - at what height to install it correctly”). The sink, not equipped with additional accessories, is located at a height of 850 millimeters. At this level, draw a horizontal line - it will be the guideline for installing the washbasin. The top surface of the plumbing fixture must correspond to it.
If there is a support leg or when the sink is installed in a cabinet, there is no need to determine the height of the plumbing fixtures. This parameter depends on the size of the leg or cabinet.
Marking mounting locations on the wall.
Before installing the fastening system, it is necessary to make appropriate markings on the wall. The sink bowl has mounting holes for connecting the sink to the sewer. The plumbing fixture is applied to the wall, as in the photo, its upper edge is aligned with the drawn line and the places where the holes for fasteners will be located are marked. This work is easiest to do with two people. One person should hold the washbasin near the marked line, and the second at this time can mark the places for fasteners from below. If there is a leg or a supporting cabinet, installation work is simplified - the plumbing fixtures are placed on a support and the mounting points are marked on the wall.
How to properly assemble a water seal
The water seal device has instructions with a picture. If the device is in the form of a flask, then a water seal is applied to the attachment point in order to correlate the dimensions and put marks. Check how firmly the bottom plug is screwed on. It is worth unscrewing it and checking the quality of the rubber gasket under it, then screwing it back on. This check is mandatory, since this element is under constant load during the operation of the drainage system. The ends of the connecting elements are of poor quality and have burrs. They should be ground off to avoid tearing the gaskets.
Water seal mechanism glass
After checking the quality of all structural elements, fold the glass of the water seal mechanism, you need to screw the lower part of the device. To do this, the spout with rings for sealing and nuts for tightening the connections is inserted into the hole in the upper part of the body and secured with a nut.
Attention! Do not overtighten the nut; cracks and damage to the fastening system may occur.
Overflow system assembly
The assembly of a particular model of overflow system depends on the design features. A modern overflow consists of a telescopic tube, which is adjusted according to the height of the drainage system and the given construction dimensions of the sink.
Corrugated hose
The overflow system can be a corrugated hose, which easily stretches and takes the desired size, is attached to the overflow holes, all connecting elements are equipped with gaskets, they must be purchased if not included. The nuts must not be twisted to avoid damaging the fastening system.
Installation of a drain device
The next stage is the installation of a drainage device. Before the siphon tube is completely connected to the sewer, a filter grid is screwed onto the washbasin drain hole, cleared of contaminants.
Siphon assembly
The upper part of the siphon tube with the O-ring is inserted into the hole at the bottom of the washbasin. The socket will be connected to the grille with a long screw. The second pipe end is inserted into the water seal flask. The drainage pipe is connected to a large-diameter drain using a cuff; this method creates a hermetically sealed connection between the parts of the device and also prevents the penetration of slop odors into the house.
Reference! If a violation of the sealed connection of the pipe with the cuff is detected, it is necessary to dismantle the cuff, dry it completely, lubricate the surface with silicone sealant, and reconnect it to the sewer.
Installation work on connecting a kitchen sink.
A mortise or countertop sink in the kitchen is mounted a little differently than a washbasin in the bathroom.
Installation of sink mounts
Perform this work in the following sequence:
- holes are drilled in the wall according to the markings;
- dowels are driven into them;
- then special mounting pins are screwed in.
Instructions explaining how to connect a sink in a bathroom or kitchen involve the use of dowels, nuts, mounting pins and plastic inserts that are included with the plumbing fixture.
When screwing in the studs, you should pay attention to the depth of their installation, since it should allow you to hang the washbasin bowl and screw the fastening nut. This means that the part of the stud protruding from the wall should be of a length that is slightly longer than the thickness of the sink and has an extra centimeter and a half for tightening the nut.
Hidden drain-overflow system
A modern alternative to the conventional system.
Its presence is outwardly invisible and practically eliminates flooding. Due to the absence of an extra hole in the sink, it looks more aesthetically pleasing and the surface is less dirty. The hidden “drain-overflow” system is quite complicated to implement and the combination with it increases the cost of the sink, but it is a very convenient and aesthetic option.
Device.
Some manufacturers use CLOU technology: a hidden siphon is used for overflow, located behind the back wall of the bowl and connected by two channels to the drain pipe. If the drain is blocked by a built-in bottom valve (of a special design), the water in the overflow device will rise along with the general water level and when it reaches the maximum specified height, the excess volume will overflow through the siphon partition and go into the drain pipe below the bottom valve. There is another technology: as soon as the water reaches a certain level, the system will automatically recognize this and open the drain plug itself.
- 1 of 2
On the picture:
Connecting the washbasin to the water supply
Mixer installation
. When connecting a sink to a sewer in a bathroom or kitchen, you can install the faucet after attaching the plumbing fixture to the wall, but experts recommend doing this work before attaching the washbasin. The fact is that all connections to it and the fastening process are made from below (read: “How to choose a faucet for the kitchen - types, features, principle of operation, selection rules”).
Mixer installation work is carried out in the following sequence:
- depending on the type of mixer, one or two pins are screwed in;
- Before installing the faucet in the kitchen, install the hoses supplying hot and cold water and tighten them using an open-end wrench. Tightening is carried out with moderate force and very carefully, taking into account that after installing the mixer on the sink, they will no longer be able to be tightened;
- according to the washbasin connection diagram, you need to route water supply hoses through the holes in the sink;
- On the back side of the studs, sealing rubber bands, a pressure washer and fastening nuts are put on, which are tightened with a wrench.
You should pay attention to how correctly the mixer spout is positioned - the product is installed at a right angle relative to the mounting wall or the side of the sink adjacent to it.
Types of siphons
Modern devices in this category are made mainly of metal or plastic. Metal products are more expensive, require more careful maintenance, and are usually preferred in cases where communications are not hidden behind a cabinet or wall, but remain visible.
Metal siphon
Plastic analogues are more practical and therefore have become widespread. This option combines strength and light weight well. Such products are easy to install, and their replacement does not require significant costs. In addition, they are much less demanding to maintain and use than models made of metal.
Siphons made of plastic
Water seal options
The main options for water seals are represented by three main types:
- bottle
- corrugated
- pipe
Bottle type is traditionally in demand due to its simple and effective design. The bottle-shaped part provides a water seal, which reliably prevents the penetration of unpleasant odors from the sewer. Modern models allow you to connect not only a sink, but also a dishwasher and washing machine to the drain.
Bottle water seal
Corrugated - represented by a flexible corrugated tube connecting the drain hole to the entrance to the drain. When using this scheme, it is important to lay the tube in the correct double-bent position, due to which a hydraulic plug will form. The flexible hose takes up very little space and can be used in any limited space, such as a small bathroom. Such models are cheap and easy to install and use, but they cause criticism due to the accumulation of dirt in the folds of the corrugation. If a blockage occurs, this part will require replacement.
Corrugated siphon
Pipe - a current, higher quality, but also more expensive analogue of a corrugated hose - a pipe connection. Instead of corrugating the water seal, it is replaced here with a curved pipe, the material for which is metal or polypropylene. The cost of such models is higher. They are sometimes difficult to install due to the need to accurately align the rigid pipe with the drain socket, so before connecting the kitchen sink to the sewer system or providing drainage for the washbasin, the serious and responsible task of choosing and purchasing suitable equipment is solved. Careful measurements must be taken to ensure that all plumbing parameters match the piping system being purchased.
Pipe water seal
Mounting the washbasin on the wall
The sink is secured after completing the connection to the water supply:
- the sink with the mounted mixer is placed on mounting studs that are screwed into the wall;
- insert plastic inserts into place;
- Finally, tighten the nuts.
As for washbasins that have a support, their connection begins with installation on a pedestal or bedside table.
Connecting hoses to the water supply system
. A gasket is placed between the tap and the sealing nut. The nut does not need to be tightened too much, since the rubber gasket usually seals well. It can be tightened after the test (after turning on the water supply). If a leak occurs at the connection, the nut will need to be further tightened.
Advantage of plastic pipes
About 30 years ago there were no traces of plastic pipes. Internal sewer systems were made primarily of cast iron. The material does not rust for a long time and is reliable, but the installation of such pipes caused a lot of problems due to their heavy weight. In addition, the inner surface of cast iron is rough, which leads to frequent blockages. Repairing or dismantling them is also problematic.
Cast iron was replaced by pipes made of polyvinyl chloride (PVC), polypropylene and polyethylene. The cost of plastic is relatively low, it is light in weight, plastic pipes are easy to cut, join, and dismantle.
- Polyethylene pipes (PE) are characterized by an operating temperature of 40-50 °C.
- Polypropylene pipes (PP) can withstand temperatures up to 95 °C, the operating temperature is 65 °C, they are durable and elastic.
- PVC pipes have a working temperature of 45 °C, they are highly rigid, easy to bend and connect to other elements.
Thus, where there is a hot drain, it is better to install PP pipes, and PVC is quite suitable for cold drains. Another advantage of polypropylene is that its price is lower than PVC.
Plastic drainage has one drawback - noise during the passage of water. To reduce noise, pipes are secured with clamps with rubber gaskets or sound-absorbing material is used.
Photo: Connecting a plastic pipe to a cast iron pipe
A few important notes
Before you start connecting the sink, you need to take into account some of the nuances of the work:
- to connect the kitchen sink to the sewer, you do not need to tightly tighten all the connections, since in this case the rubber sealing gaskets can be damaged;
- in the case when, when checking the quality of connections between the pipe and the cuff, there is a leak, then it is necessary to remove the cuff and thoroughly dry the surfaces that are to be reconnected. Then the dry cuff is lubricated with sealant and the connection is made again;
- To connect a double kitchen sink, you should purchase a special siphon that has an outlet to two pipes.
Every home craftsman, subject to the installation rules, can connect a sink or kitchen sink with his own hands.
Insertion into the riser
It’s good when the sink remains in the same place where it was installed before, but sometimes situations arise when, to connect the sink, you have to make a cut into the sewer riser. It’s worth noting right away that if the tie-in is done incorrectly, then leaks may subsequently occur or the sewer will often become clogged, and incorrect actions can contribute to the fact that the sewer riser begins to clog.
The best option would be to insert it without dismantling the riser. Having purchased a device for such a connection, a hole is made in the vertical riser Ø110 mm using a 57 mm crown. A sewer insert is inserted into it and secured with a nut. All that remains is to connect the sewer pipe.
Replacing sewer drain pipes
The need to install a new sewerage system arises when old pipes are rusty, covered with scale on the inside or cracked fittings and do not perform their functions. Often, installation is carried out if the layout of the apartment is changed, an extension is made to the house, or plumbing fixtures are added.
- First you need to dismantle the old drain. Sometimes this takes more than one hour.
- Measurements and calculations are made to know how many meters of pipes are required, what diameter to choose and what fittings need to be purchased.
- Buy PP or PVC pipes and connecting elements.
Before dismantling the drain, the room is completely cleared of foreign objects and furniture that interfere with work. It is necessary to turn off the water, disconnect the drain hoses, remove the bathtub, sink, and toilet.
Photo: Sewer drain diagram
Next, you need to count all the devices to which the drain will be connected (sink in the kitchen and bathroom, toilet, washing machine, shower, etc.). Draw schematic diagrams of the devices, as well as their connections, to understand how to properly install the pipes.
The drain pipe for the toilet is taken with a diameter of 100 mm, and for draining from other devices, a pipe of 50 mm is sufficient. This diameter will ensure stable operation of the system.
Installation will be much simpler if all the parts for the sewer system are from one manufacturer. Silicone sealant helps ensure a tight joint, so you need to buy that too.