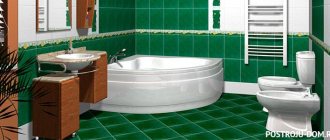
As a result of installing a shower cabin instead of a bathtub, there is more free space in the bathroom. At the same time, the functionality of this room is not reduced. Connecting a shower stall yourself should not cause any difficulties even for a novice home DIYer.
You just need to follow the simple rules for connecting it to the water supply and sewerage system, which are listed in the article we presented. We suggest that you familiarize yourself with the connection technology described in detail. Here you will find valuable advice shared by experienced plumbers.
To make it easier to understand, the information is supplemented by photo collections, diagrams and video instructions.
Shower cabins: photo
From the photographs you can understand that the choice of such plumbing fixtures on the market today is very wide, almost limitless. Shower enclosures vary in size, style, color and other characteristics. But regarding how to turn on the shower stall, the device of all models looks approximately the same. We'll look at how to do this using a standard classic cab as an example, this guide will work on any other model over 99% of the time.
Models may differ in their design:
- Type of installation (most often models are corner, but there are also those that are installed not in a corner, but near the wall).
- Shape (most often models have the shape of a square, a square with one rounded corner, or a rectangle).
- Pallet type (high or low pallet).
- Type of door opening (the door can move on rollers, moving to the side, or can be hinged).
- Type of glass (tinted, frosted or regular).
Here are the main division criteria and their distinctive features, this is not the entire list, but the main points have been listed.
Manufacturers' imagination is limitless. The models are very different, there are many of them, and they all look pretty nice. Making a choice is sometimes difficult. Sometimes it is the above criteria that help you decide, because not all options will fit in every bathroom (dimensions, etc.).
Helpful Tips for Cutting Costs
The question of how to make cheap bathroom renovations with your own hands worries many owners. To prioritize between savings and quality of room design, you should adhere to the following recommendations:
- Doing the work yourself. It is advisable to carry out most of the repairs yourself, since the prices for specialist services may exceed the cost of materials. It is better to carry out all dismantling work on your own.
- Having your own tool. It is necessary to think through the design features of the repair in such a way as to minimize dismantling work. A basic set of tools will help make the task easier and faster. In addition, this will significantly reduce financial costs. It is recommended to acquire at least a minimum set, which will include a drill with a set of drills (preferably an impact drill), a hammer drill with bits, and a cutting grinder with discs for metal and concrete.
- Economical materials. Purchasing budget building materials will help you save significantly. But there are things that you shouldn’t save on, since subsequent replacement may cost more than the initial purchase of quality products. But in some cases, you can reduce costs wisely.
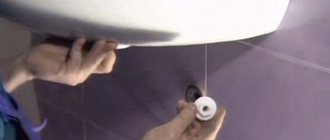
Inclusion
How to turn on the shower? We begin to consider the situation from the moment when everything is already fully installed and connected to all necessary communications (water supply, sewerage).
In the corner of the cabin there is everything necessary for control. Typically, the part that answers the question of how to turn on the water in a shower stall is a small pin. To open the water, you need to turn it up. Accordingly, to close the water, this pin must be turned down. Turning this mechanism to the left or right allows you to control the temperature of the water that is comfortable for you (hotter or colder).
Painting bathroom walls
Nowadays we have begun to forget about this option of wall decoration, such as painting. At one time, paint was considered the primary finish for a bathroom. This is the cheapest option of all finishing materials, although the cost will depend on the choice of paint.
The method of applying paint to the walls does not matter, whether it is a roller, a brush or a sprayer. The final result will depend on the skill of the painter and his artistic taste. When we talk about painting, we don’t mean simply applying paint to the walls. Although, if you wish, you can make beauty out of this option by choosing the right color scheme.
You can create real works of art with paint if you have some talent or use stencils. To get the desired result, it is advisable to use latex paints; they tolerate moisture well, and they have a richer appearance compared to conventional oil paints.
Modes
We learned how to turn on the water in the cabin. Now let's look at how you can change its operating modes. That is, how to turn on the water in a shower stall from a hand-held or ceiling-mounted shower head or wall-mounted nozzles.
There is another pin to switch modes; it is located directly next to the mechanism for turning on the water. By rotating this pin clockwise, you can switch operating modes. Switching the mode is accompanied by a click in the control mechanism; you need to rotate it until it clicks, so that you do not have two modes turned on at once (each half).
In general, washing in a stall is very comfortable and convenient if you fully understand how exactly it works. Many people who have always washed in the bathtub, having tried at least once to swim in the shower, almost immediately change their minds and believe that this option is much better and more convenient than a bath.
How to use the functionality
The electronic control panel is a very convenient way to configure equipment options. It is this that allows you to turn on and regulate such amenities as hydromassage, Turkish bath, steam and radio. A convenient control method using keys controls water pressure and temperature, lighting, and fan. In a word, all the electronics of the shower stall.
The control panel is equipped with keys that allow you to adjust the volume. So, by pressing the vol, + – key, you can select the desired volume.
Using the FM keys you can turn on the radio and tune in to the desired wave. How does this device work? You need to press the FM key, after which the display will show the station that was last selected. By pressing the TUN and plus and minus keys you can change the settings. If you want to search for a radio station, you need to press the + or – key and hold until it starts automatically searching. To memorize a radio station, press the M key, select the desired channel and activate the memorization mode by pressing the key again.
If your cabin has an ozonizer function, then that's just great. After all, it is she who can destroy all the bacteria inside. To activate it, you need to press the function key on the control panel and close the cabin after leaving it. The cabin can continue to operate normally after a quarter of an hour.
If you have purchased an expensive and spacious model of a shower cabin, then it should definitely have a steam generator. What does it give? This device turns the shower into a steam room. Look at the control panel and find the key that controls the steam generator. Click on it. When the indicator is activated, the steam generator will fill with water and begin to fill the cabin with steam. Its output will be ensured thanks to the flask that is located on the pallet. By the way, a steam generator can easily also have an aromatherapy function if you put various types of herbs into the flask or pour in aromatic oil.
A fan is an indispensable device that will allow you to feel freshness during hygiene procedures. It is also necessary to distribute steam evenly when the “Turkish bath” function is activated. The fan turns on simply: press the corresponding button. If during operation you want to disable the function, press the button again.
The control panel of some shower cabins has a “telephone” function. It is configured to receive incoming calls. The function is very convenient, since few people would risk taking their phone into the bathroom. When a call comes into the cabin, a characteristic sound is heard. In this case, the radio operation becomes quieter. To receive a call, you need to press the “phone” key. You can reset the call by pressing again.
So, we figured out the functionality. But you need to know some general aspects of operation so that the cabin lasts a long time and the electronics do not fail after a week.
Sources
- https://delaemvannuu.ru/dushevaya-kabina/kak-vklyuchit-dushevuyu-kabinu.html
- https://vashavanya.ru/ustroystvo-dushevoy-kabiny.html
- https://dvhard.ru/teoriya/96-ukhod-za-pnevmaticheskim-oruzhiem.html
- https://dushevayak.ru/obsluzhivanie/instruktciya_po_xekspluatatcii_dushevoj_kabinii.html
Exploitation
There are no special features, everything is simple and clear. If the water in your apartment is not completely clean, and there are no filters to clean it, then from time to time you will have to clean the watering cans and nozzles, which will become clogged with lime.
But it must be said that this is rarely required (usually once every few years). Of course, it will be better if a filter or filter system is installed to purify the water before entering the shower stall. The operating instructions do not require compliance with this item. But you and your loved ones can wash in this water. It is in your interests to create conditions so that your plumbing fixtures will last longer. Clean water is what you need for this.
The same applies to glass. Sometimes during use they will need to be washed, as they will lose their transparency over time. But this does not need to be done every time, however, caring for the bathroom is no easier.
Weapon storage
The weapon must be in perfect condition so as not to fail in battle. One of the important points in caring for pneumatic weapons is its storage.
Need to store:
- away from people, especially children;
- in a case/box/case – they come complete with the weapon, and if not, they can be purchased separately;
- in a prone position - especially applies to rifles, because if you put a rifle in a corner there is a risk that sooner or later someone will bend it;
- not under the bathtub - well, weapons don’t like water;
- not on the balcony - and changing weather conditions;
- in a discharged state - especially applies to gas cylinders, which they like to store from game to game with an equipped cylinder, we also discharge the magazines, there is also no need for excess pressure on the spring.
Manufacturers
There are three main categories among manufacturers:
- Famous world brands from Europe and the USA.
- Budget brands from China.
- Russian production.
The price usually matches the quality. The cheapest options are models from China. This is not to say that the quality of their performance is always terrible. There are models that will serve you for decades, but this is always a “pig in a poke” purchase.
Shower cabins from Europe and the USA are the most expensive and of the highest quality. These are models from the premium segment. If you can afford such products, then feel free to choose what you like.
Domestic models are somewhere between the two categories mentioned above in price and quality.
Let's say that absolutely all manufacturers have their own customers. As well as positive and negative reviews for all options. China still occupies the largest segment of our market.
On-site inspection
Next comes the stage of checking the weapon on site: charging and test shots. Here the operations are different for air rifles and pistols. The main rule is that we act according to the weapon’s passport - everything should be described there: in what order is it correct to load, how to shoot, what to shoot with, etc. We read everything, while reading we ignore the point SHOOTING AT PEOPLE AND ANIMALS IS STRICTLY PROHIBITED. This inscription is apparently highlighted specifically for visually impaired people; hardball players, as a rule, are sighted people, so this rule can be circumvented. During the check, you can also carry out zeroing; with an “oblique” barrel, you will not be welcome on the team (unless on the enemy team).
Special varieties
There are options that, for example, are equipped with a Turkish bath function or some other similar addition. Such shower boxes are much more expensive. Do you need such a model? You decide for yourself, because some will call it a waste of a significant amount of money, while others will think that this is a great way to relax after a hard day at work.
Also, we will not consider the question of how to turn on a shower stall of this type, because there are no differences. And the above-mentioned functions in these shower boxes are usually activated by turning the tap or using a separate button.
Mount the ceiling panel
Shot: @Alexander Kvasha / YouTube
Remove the protective film from the top of the cabin and install a rain shower head, lighting, fan and other components. Connect all elements in the sequence described in the instructions.
Attach the panel to the frame using clamps or screws. If there is no factory seal around the perimeter of the roof, it is advisable to treat the joint with silicone before installation for better tightness.
Enabling utility functions
Recently, you can often find relatively budget models that are additionally equipped with:
- Illuminated inside the booth.
- Radio receiver
- Video intercom.
These are the main auxiliary functions, but an incomplete list of “extras”. Of course, most often you will find exactly those pleasant additions that were listed above.
To turn on, turn off and control some of the functions there is always a special panel with control keys. Everything is intuitive, there is no need to dwell on this point.
Decorating bathroom walls with wallpaper
The desire to change the interior and diversify the usual canons leads to the decision to decorate the bathroom with wallpaper. But not all wallpapers are suitable for decorating a bathroom. For example, paper, non-woven and fabric wallpapers are too hygroscopic and permeable to water, so they will very quickly become unusable. To prevent this from happening, you need to choose them correctly.
Vinyl wallpaper comes in several types. For the bathroom, wallpaper made from smooth vinyl is suitable; although it is called smooth, it has a relief pattern and can be an alternative replacement for tiles. Wallpaper made from hard vinyl differs from its counterparts in that, thanks to its structure, it is possible to create a covering in the form of leather, stone, or imitate wooden or fabric surfaces.
Hanging such wallpaper will not be difficult. You need to first prepare the walls, cut out the wallpaper so that the pattern matches. The glue is selected in accordance with the characteristics of the wallpaper, and is applied both to the strips themselves and to the walls. The strips are laid end to end and glued from top to bottom, while running with a roller to remove air. It is more convenient to glue wallpaper together, in a warm room, without drafts.
in their texture and installation features they are similar to decorative plaster. They tolerate moisture and steam well, and with their help you can create a unique design, because the color palette allows you to combine the material. After liquid wallpaper is applied to the surface, it should be covered with a protective layer of varnish to enhance its moisture resistance.
But fiberglass wallpaper is ideal for such a room. This durable and durable coating can last a long time. Such wallpapers are environmentally friendly, they do not burn, they do not require an ideal surface, and are not susceptible to damage by dampness and fungi. In addition, such wallpaper is very strong, which can protect the walls from any damage.
This material is expensive, but it's worth it. After application, such wallpaper can be left in its original form, painted or, if desired, additional decoration can be made.
Typical faults
- The most common problem is when you add cold water and it gets hotter. This is not mysticism at all. The whole point is that the person who did the installation mixed up the hot and cold water connection inputs. The solution to the problem is to swap the water inlets. But some people simply put up with this problem and over time get used to the fact that cold water is hot and vice versa.
- When you turn on the water it doesn't come out. Check that the connection is correct.
- Flow. Check the tightness; if sources of leakage are found, you can correct the situation with silicone sealant.
Final assembly and testing
The cabin, connected to the water supply and sewerage systems, is assembled. Screw on movable and removable parts, side panels, doors. You should not immediately tighten the bolts and screws; it is better to do this after the cabin is completely assembled and all its components are in place. After making sure that everything is assembled correctly, tighten the fasteners.
It is advisable to seal the joints between the vertical panels and the pallet with sealant, even if the instructions do not contain such a recommendation. A thin layer of sealant will not become an obstacle when dismantling the cabin, but will protect against possible leaks. You can use simple silicone sealant, but it is better to buy a special plumbing sealant; it will not only ensure a tight seal, but will also prevent mold from developing.
Next, testing is performed. It’s not difficult, you just need to open the water and carefully observe the operation of all the components of the new shower stall
Particular attention should be paid to the functioning of the water supply and drainage. If droplets of moisture do not appear at the installation site of the mixer, and the drain copes with its task, then the connection is made correctly, all that remains is to check the operation of additional functions, and you can take a shower
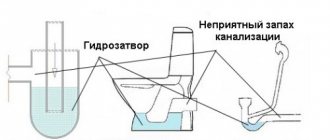
Connection to the sewer system
To connect a booth with a tray to sewer pipes, you should follow these steps:
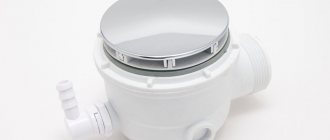
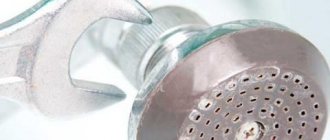
1. A drain is installed in the hole in the pan.
2. a siphon is installed.
3. A corrugated pipe is attached to it to connect to the sewer.
Installation of a flat siphon is mandatory, as it acts as a seal for odors from entering the sewer.
Attention! The corrugated pipe greatly simplifies installation work and also allows you to move the shower box without disconnecting the plumbing from the sewer.
Siphons are smaller in size, since their installation involves work in limited space.
A clogged sewer pipe cannot be cleared with a cable if the shower stall has a drain hole such as a mechanical click-clack plug. To do this, you need to move the box and disassemble the drainage system.
Attention! When installing a siphon, rubber seals and sealant are used to make the connections reliable and not leaking.
One end of the corrugated pipe is equipped with a cuff and inserted into the sewer inlet to make the connection tight and odor-proof. The size of the cuff must match the diameter of the tee for entry into the sewer.
Cabin features
Dear models. The cabin costs at least 30 thousand rubles. The plumbing is equipped with all the functions of closed cabins, and also has the properties of a Jacuzzi with limited functions. Cabins take up the same amount of space as a hot tub.
Attention! The most common modification is a corner booth with walls made of opaque material and front glass doors.
General requirements for installation. The material and model of the booth do not affect the installation features. All types of boxes have the same connection diagram and a common set of tools.
The difficulty of installation lies in the installation of a hole for draining water in the floor when there is no pan.
The simplest model for installation is considered to be a factory-made cubicle, which has a tray and a shower panel. To connect it to the water supply, you need to connect the drainage pipes to the water supply in the wall, and adjust the siphon device to release water into the sewer.
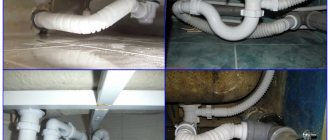
When installing a shower stall, the piping work must be completed.
Attention! If it is necessary to connect the booth to the power supply, you must first allocate an outlet for it, equipped with grounding on the wall.
It is more difficult to install a shower that does not have back partitions and a shower panel. The walls of the room act as partitions; instead of a panel, a mixer with a watering can is attached.
In this situation, the cabin is connected to the sewerage system, and the water supply tap is mounted to the wall. It is necessary to run pipes in the wall to the mixer, then make the external cladding with tiles.
Different models have their own position of points for water supply and drainage. Before starting work on piping, you need to buy a booth in order to calculate the parameters for this model.
Sometimes the drain pipe of the device is located in the floor under the screed, or a special pedestal or stand is built under it.
Attention! To allow fluid to flow by gravity, sewer pipes are laid at an angle of three degrees; it may be necessary to raise the cabin above the floor level to achieve the correct slope.
To use short flexible hoses for water supply, you need to install water outlets closer to the mixer.
With the shortest distance from the sewer pipe to the drain hole of the cabin, the likelihood of clogging is reduced.
Pallet installation. If the shower stall requires a tray, then installation of the device begins with it.
The base of the cabin has supports with which the height from the floor is adjusted, and the horizontal position of the side is also leveled using a level.
Attention! If the cabin has electrical appliances, they are mounted to the bottom of the tray from the outside, because placing equipment on the bathroom floor is strictly prohibited.
When installing the tray, you must maintain strict horizontality so that the water from the container drains completely into the hole. The bottom of the bath is made at a slope towards the drain hole. If errors are made during installation, the remaining water will stagnate at the bottom and form dirt stains after drying.
If there is no drain pan, install a drain in the floor. This elevation is made using cement mortar and covered with mosaics or tiles.
To complete this work, lay out the pedestal around the perimeter using ceramic bricks. A drain is installed inside it and connected to the sewer, and a concrete screed is made. Maintaining an angle of inclination towards the drain hole. To increase the strength of the screed, liquid glass or PVA glue is added to the concrete.
Attention! If a pouring podium is installed, then the surface of the floor under it, the walls on the sides and the screed are treated with a lubricant for waterproofing.
When laying tiles, waterproof glue is used, and the seams are treated with sanitary sealant.
The diameter of the drain pipe in both types of sewer connection is four centimeters.
With a smaller pipe size, the likelihood of blockages increases. A larger pipe is difficult to install in the limited space under the booth.