Photo from the site: O-vannoy.ru
The modern world dictates its own rules to people, forcing them to run faster through life, which is probably why in most apartments, as well as private houses, old, bulky and so comfortable bathtubs began to be replaced with comfortable and compact shower stalls, which significantly save time, while thus performing its functions, that is, providing high-quality washing at any time.
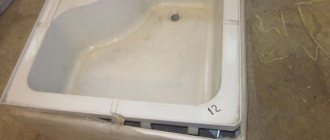
But this is not about this at all, but about the fact that the main load in the shower goes, of course, onto the tray, which is why numerous scratches, chips, cracks and other mechanical damage appear on its surface, which at first seem small and insignificant, but then can reach catastrophic proportions, when replacing this part remains the only way out of the situation. So is it possible to immediately organize the repair of a shower tray with your own hands, will it be advisable and justified financially, will it be possible to cope with such a difficult task and is it possible to carry out all the actions at home, we will try to figure it out.
How to repair a shower tray
During the operation of the equipment, a variety of defects can occur in the pallet: from very small cracks to deep scratches. Each case requires a specific approach. In addition, before repairing, you need to remember that the better you perform it, the longer the equipment will last.
Repairing minor flaws
If you notice a small, barely noticeable crack on the surface of the bowl, then you need to correct the situation immediately, since even such minor damage can lead to more global problems.
Restoring the coating in this case looks like this:
- carefully and slowly clean the edges of the scratch with a sharp knife;
- remove dust from the area with a damp sponge;
- wipe the area with alcohol or any other product with a degreasing effect;
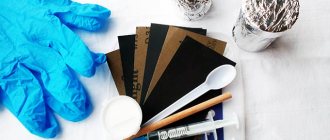
- put on safety glasses, a gauze bandage, rubber gloves and dilute the acrylic mixture according to the instructions;
- Apply the composition to the damage with a small brush or broom until it is completely filled with paint, and the layer protrudes slightly above the level of the bowl’s coating;
- wait for the composition to dry completely, and then clean off the excess using sandpaper.
Finally, a layer of polish is applied to the area.
Repair of deep cracks
If the damage is more significant, or even extends along the entire pallet, then painting will definitely not help. Here we need more drastic measures to restore the surface:
- Remove the pan completely. To do this, first turn off the water supply and disconnect all connected communications. If, while unscrewing the nuts, you find that they are difficult to remove, lubricate them with silicone-based lubricant: this will greatly facilitate the dismantling process.
- Wash the bowl thoroughly on all sides and wipe dry.
- Remove all debris and plaque inside the crack, and thus completely expand the damaged area.
- Use sandpaper to clean the outer and inner bottom.
- Remove dust again and degrease the surfaces.
- Using epoxy glue, apply a layer to the back of the bowl. Repeat the procedure several times. In this case, the layers should alternate: glue-fiberglass-glue-fiberglass and so on 3-4 times depending on the size of the defect.
- The inside of the pallet is processed a little differently. First you need to completely fill the chip with epoxy glue. To fill the crack as tightly as possible, use a rubber spatula. Next, the composition must dry completely.
- Sand off the excess and cover the bottom with acrylic paint.
- After the acrylic has dried, polish the bottom.
- Connect all pipes.
After performing such repairs, you will not only add strength to the bowl, but also extend the life of all equipment.
Sealing through holes
In fact, repairing through cracks is practically no different from repairing deep cracks. But in this case, you will need some kind of durable patch. Sealing holes is done as follows:
- The pallet is similarly completely dismantled, cleaned, and degreased.
- A patch is applied to the inside of the bowl. The same epoxy glue and fiberglass can act as it.
- Prepare epoxy glue according to the manufacturer's instructions and fill the gap with it so that it rises slightly above the bottom. In order for the glue to fill the hole as tightly as possible, it needs to be pierced with something long and sharp. For example, with wire or even a knitting needle.
- Apply another patch on top of the hole.
- Paint the completely dry patch with acrylic paint.
Repairing a through hole is only advisable if its size is less than 10 cm. Otherwise, this will not lead to results, since such damage has already lost its integrity and strength and it is better to replace the bowl with a new one.
Suitable adhesives
For repairs, it is recommended to purchase such compounds.
Desmokol
Desmokol is used in the shoe industry. This effective product glues not only polymers, but also wood, leather, iron and other materials. Suitable for repairing a shower stall only if it is not subject to sagging later. Otherwise, the result will be short-term.
Gelcoat
Its gel-like structure is convenient. First, a layer of fiberglass impregnated with the composition is laid out. Then it is covered with another layer. Thus, wait until it dries completely.
Epoxy adhesive
Epoxy adhesive differs in that it consists of a resin and a hardener of the same name. It can be one-component (ready for use immediately) or two-component (must be mixed in certain proportions with other compounds). In order to glue a pallet with it, you need to take:
- fiberglass;
- solvent;
- polyurethane foam;
- respirator;
- putty knife;
- scissors.
The bottom line is that you first need to degrease and then dry the surface. Epoxy glue is poured for 24 hours, left, combined with the surface and left again for this period of time.
Operating Instructions
Follow the step-by-step instructions.
Light damage
If the pallet is slightly cracked, but no noticeable damage appears, it is recommended to immediately repair the crack. Otherwise, it will begin to spread and cause big problems. Step-by-step algorithm of actions in this case:
- Remove moisture from the tray, wipe off the liquid with a clean rag and let it dry - if there are minimal cracks, there is no need to remove it.
- Wipe the area of the crack and the crack itself with a cotton swab dipped in alcohol.
- Apply regular acrylic glue.
- Allow to dry for required time.
- Apply a second layer.
A minimum amount of glue must be applied at each stage, in a several millimeter layer. In this case, it is better to let the composition sit for at least a day, and only after that apply the second and third layers. To polish the surface, if traces of the composition are noticeable on it, you can use fine sandpaper. But you shouldn’t try too hard - sandpaper can cause new scratches, which will lead to a crack.
Deep damage
Gluing a pallet if the damage is deep is not as easy as it seems at first glance. You will need:
- Dismantle the plumbing fixture.
- Treat two surfaces with a cotton swab soaked in ethyl alcohol.
- Apply a brush with glue to the most remote places.
- Gradually leveling the plane, ensure that the distance between the edges is the same on all sides.
- Fill the crack with adhesive.
The rule also applies here: you need to apply less glue, but leave it on longer. It will be great if a person who repairs a pallet with his own hands can not use it for at least one week.
Do-it-yourself elimination of through holes
Repairing a pallet if a through hole appears on it is the most difficult thing. But with the right amount of persistence, it can be done. You will need:
- Dismantle the pallet, removing all accessories that could be damaged if dropped or hit.
- Using a sander or drill, remove the chamfer to create a sharpened edge.
- Wipe until clean from dust and dirt, use a cloth with alcohol to remove grease.
- Cut patches from fiberglass or acrylic.
- Impregnate the parts with resin.
- Apply them to the previously cleaned edges.
- Turn the pan over and fill the crack.
Of course, if there is a through hole, the tray cannot be used. Even with service repairs, it is not always possible to achieve positive results. Therefore, in many cases it will be easier to buy a new pallet, if it is not expensive, than to engage in lengthy and expensive repairs of the old one.
Leak test
Checking the tightness of the connection is carried out in a state that has not yet been reassembled. You first need to fill the pan with warm water after it has completely dried. The device is placed on the floor covered with some kind of fabric or paper, this makes it easier to see whether moisture remains. If it is not there, then you can proceed to the second test - filling it with ice and hot water. If the pan reacts normally to water of different temperatures, then you need to check its exposure. It is necessary to stand in it, walk around, that is, apply the maximum weight with which they will act on the plumbing.
Causes of defects in pallets
On the domestic market there is a large assortment of shower cabins with trays, for which a mandatory warranty is issued upon sale. But in some cases, these obligations are unable to protect products from accidental breakdowns, which most often occur for the following reasons.
A manufacturing defect discovered during operation, consisting of voids in the pallet body or a violation of the geometry. In this situation, it would be most reasonable to try to exchange the defective product for a quality product.
Installation errors, which consist in incorrectly preparing the base for the shower stall when it is not leveled enough. Such a malfunction leads to unwanted deformations and gradual destruction of the overstressed material (under heavy loads it can simply burst).
Violation of the rules for handling a shower stall, which requires careful handling.
Small cracks form on the body of a plastic or acrylic pallet due to unacceptable loads when several people (an adult and a child, for example) walk on it at once.
In addition, serious damage occurs to work surfaces when heavy objects with sharp edges are dropped onto them. If the pallet unexpectedly cracks for one of the reasons listed above, first of all you should figure out how large the detected defect is, and only then proceed with repairs, if possible.
How to repair a pallet
During the operation of shower cabins, small and deep cracks, chips and holes may form in their bowls. Each case requires a different troubleshooting approach. Repairs must be carried out in such a way as not to redo the work done after a short period of time. Let's consider the list of measures that are carried out when eliminating various types of damage in the shower bowl.
This is the most common malfunction that occurs on shower trays. If you repair the crack right away, the destruction of the bowl will end there.
Small crack on the pallet
Such work must be done in the following sequence:
- Use a sharp knife to clear the edges of the crack. You need to scrape off the acrylic until the scratch walls return to their original color.
- Remove accumulated dust using a vacuum cleaner. Wipe the treated material with ethyl alcohol.
- Wear goggles, a respirator and gloves. Prepare acrylic paint for use.
- Using a brush, apply acrylic paint to the scratch. Depending on its depth, repeat the procedure several times until the paint level exceeds the level of the bottom of the bowl.
- After the paint has completely dried, smooth out all the sagging with sandpaper, gradually reducing its grain size.
If the damage is deep, it can quickly destroy the entire bowl, rapidly increasing in size. If the product has burst throughout its entire volume, then painting is not enough. More effective measures need to be taken.
deep crack
Here's what to do:
- Remove the bowl. To do this, you will need to turn off the water and disconnect all communications from the shower stall. If the bolts and nuts are rusty, they must be treated with silicone grease. This will make the process of unscrewing them much easier.
Removing the pallet
- Clean the tray from both sides of dirt, limescale and mold. Wash it thoroughly with soapy water, rinse with clean water and wipe dry.
- Expand the gap by removing plaque, dirt and fragile material from its walls that has split down to fibers. If there is such a need, then you need to make a through hole.
- Clean the bottom and working part of the container with sandpaper. The surface must be treated with a margin of 5 cm on all sides. Remove dust, degrease acrylic with medical alcohol.
- Mix epoxy glue and apply it to the back of the bowl, focusing on the areas cleaned with sandpaper. Press regular gauze or fiberglass tightly onto the epoxy glue. Repeat the process 3-4 times depending on the size of the gap.
- From the front side, fill the gap with epoxy glue. Wait a day until it completely hardens. Sand the glue with sandpaper and cover it with several layers of acrylic paint.
- Grind and polish the front surface. Install the product in place, connect the communications, check the functionality of the drain.
After such repairs, the pallet will become stronger than at the time of sale. Its service life will increase significantly.
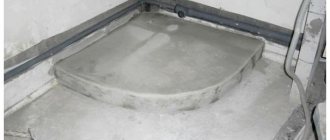
Shower tray
Repair of holes should be carried out in the following sequence:
- Remove the container from the base. This must be done very carefully so as not to damage its edges or split it. Clean the bowl from all types of dirt, wash and dry.
- Clean the edges of the hole from all contaminants. Remove protruding fibers and weak fragments. Degrease acrylic with medical alcohol.
- Apply a strong patch to the inner surface of the pallet, which is necessary to fix the filler and seal it. For this, epoxy glue and several layers of any durable material are used. It is best to use fiberglass, which is intended specifically for such purposes.
- Prepare epoxy glue according to the included instructions. Pour it into the hole so that it protrudes slightly above the surface of the bottom of the pan. To avoid voids in the epoxy filler, the resin must be pierced with wire in several places.
- Place another patch over the hole filled with glue. For this, epoxy glue and thin fiberglass are used. After drying, paint over the patch with acrylic paint.
Main types of breakdowns and their elimination
The most common type of damage to a shower tray is cracks. Depending on the degree of their depth, cracks are:
- through (holes);
- small superficial (no more than 35 cm in length and an area not exceeding 100×100 mm);
- a network of small cracks (scratches).
Causes
The main causes of cracks are:
- Incorrect installation. If during installation of the pallet the technology was violated, for example, the pallet was not leveled horizontally or the fastenings were not tightened tightly enough, then during its operation the load will be distributed unevenly, which can lead to the formation of cracks.
- Initial manufacturing defects of the product. This is a rather rare case, but sometimes before purchasing it is impossible to determine the presence of hidden internal flaws that can only appear during operation. But usually they are detected much earlier than the warranty period expires, so it is not worth repairing such a pallet.
- Carelessness during operation. The most common reason. When relatively cheap models of Chinese-made shower trays are used in the shower, sometimes it is enough to simply drop the shower head from your hands to cause a crack to form.
Step-by-step repair instructions
The specific steps to eliminate cracks directly depend on the type of crack. In general, in order to repair almost any cracked pallet on your own, you need to have the following materials and tools:
- ethanol;
- hardener;
- sandpaper;
- acrylic paint;
- epoxy resin;
- acrylic liner or fiberglass;
- stationery tape;
- liquid acrylic;
- brush;
- medium-sized rubber spatula;
- drill with a special attachment for polishing;
- angle grinder.
Many models of shower cabins come with a repair kit to repair cracks in the pan. Therefore, a number of the materials listed above can not be purchased separately, but can be used from this kit.
The simplest case is when the crack on the pallet is very small and runs only along its surface.
To eliminate it, you don’t even need to remove the product; you just need to dry it before repairing.
Using a brush, you need to cover the entire surface of the crack with acrylic paint in several layers and let it dry for 24 hours.
The process of repairing deep cracks and holes looks a little more complicated. In this case it is necessary:
- Dismantle the pallet if the damage is in a hard-to-reach place or if it is through.
- Use a grinder to widen the crack, making a chamfer along its broken edges.
- Clean the seam from all kinds of contaminants by rinsing it with water and degreasing it with ethyl alcohol. Under no circumstances should you use aggressive detergents for cleaning.
- Mix liquid acrylic with hardener in appropriate proportions according to the instructions.
- Apply the resulting mixture to the damaged area of the pallet using a plastic or rubber spatula in generous quantities so that it completely fills the crack. Then remove any excess acrylic that appears.
- If the crack is through, then on the reverse side, which has also been previously cleaned and degreased, patches made of an acrylic liner or fiberglass should be applied, generously soaked in epoxy resin.
- Seal the crack with tape and let the compound dry. This usually takes from 1 hour to a day (the duration depends on the composition of the specific repair kit).
- After the composition has dried, peel off the tape and sand the surface of the tray with sandpaper or an electric drill with a special attachment.
Regardless of the complexity of the work, all of it must be carried out in a well-ventilated area, since the materials used in the process (acrylic paint, epoxy resin, hardener) in a liquid state are harmful to the health of humans and pets.
Sealing process
You can work right on the spot (the glue is not as harmful to the body as the compounds mentioned above), but it is better to wear a respirator.
At the beginning of the work, you need to remove the stress from the damage: drill a small hole at the extreme point of the breakdown. No need for pass-through. 2-3 mm from the surface is enough. To prevent the scratch from going further, make 2 indentations along the edges. Choose a drill slightly larger than the width of the crack;
Use a file or sandpaper to sand the edge of the break so that it becomes smooth. For larger through-hole damage, a cylindrical grinder and plastic disc are recommended.
When reinforcement of the lower part is required in case of through cracks, the bottom must be covered with fiberglass impregnated with epoxy resin. Preferably in several layers. Each layer must dry for at least 24 hours.
Wash away all contaminants in the area where you will work and cover with a degreaser. Use an alcohol solution, as acetone or petroleum products will damage the surface. This preparation will enhance the properties of the glue;
Place a small piece of fiberglass into the crack. Apply one layer of glue on top with a spatula. A thick layer will not dry out in a day, so apply glue, carefully removing all excess. Do the same on the other side.
Before putting the pallet back, cover the crack under the bottom with foam. The damaged area will become more stable, and the crack will not go further.
Mixture for repairing acrylic products
When the shower tray is completely cracked, you can learn how to glue it together using a special mixture from the instructions included with the product. The mixture contains hardeners and liquefied acrylic. It needs to be prepared before pouring.
Related article: Shower cabin without tray
All cracks are filled with the mixture. It’s not scary if it ends up with excess, since the liquid will evaporate when it dries. The excess can then be removed using a rubber spatula.
The pan in the area of the crack must be covered with tape and left for a day so that everything is completely dry.
When the surface is dry, it should be treated with fine sandpaper.
The work is finished, you can install the bottom, assemble the cabin and check the seams for leaks.
Preparing the cabin for pallet installation
During the process, you need to be careful not to spill the mixture on the floor - it is difficult to clean up. But you don’t have to worry about the quality of the repair; the acrylic coating is practical and will last you a long time.
Best answers
White and fluffy))):
sealant
Count de Wall:
Your case is almost rotten - the plastic sticks very poorly. The sealant will not stick to the surface. You can try cyanoacrylate instant adhesives (small tubes like that...), but the surface needs to be thoroughly cleaned with acetone before work. And don’t breathe - the glue is poisonous. The crack will stick together, but The glue itself is not waterproof, so everything depends on the quality of pressing the walls of the crack against each other. In general... I would paint it with green paint and throw it away. If there is such a possibility...))))))))))))))))))))))))))))))))
RA1ABN:
If a person stands on the pallet, then no amount of gluing will help - it’s useless. We cannot see here where this crack is and why it formed. You can temporarily seal it with tape while you buy a new pallet.
Chairman:
The commentators are right: the matter is rotten, since the pallet will move under the weight of a person, and NO glue will withstand this, since the thickness of the surfaces being glued is SMALL. The only thing that can save you is to install a SUPPORT under the crack from the bottom of the pallet in order to relieve the load. Then you can merge it.
Belogurov Nikolay:
throw it all away, or something extraordinary
galino4kas galino4kas:
What if you try to fill it with pool solution?! Fill the entire surface of the pan! Good luck (Sales consultants can help)
Alexey Pastukhov:
Dorofeev is right... you need to remove the load from the pallet and then glue it or weld it with a soldering iron, it’s up to you…. the weight will crush all efforts...
Marmelad- Marmelad:
You can cover it with water-repellent sealant for the first time, and soon buy a new pallet. If you have large people in your family, you can install a metal one.
Rest.:
Acrylic... Here I encountered a similar problem. The options (and they exist - Materials for repairing yachts, etc..) turned out to be so time-consuming and expensive - it's easier to use a new one... Or by unloading the pallet, as correctly noted in previous posts... (that's actually why it cracked) Make an applique on the crack from fabric with epoxy glue... Or you can spend 2-3 days completely gluing it from fabric with epoxy resin... Sand it, prime it, paint it like new...
Mikola:
Try cutting another hole in this place for the drain fittings and installing it. The fittings can be connected to the sewer or plugged.
Anar Darkesheva:
I have a crack in my pan. Using the shower stall for 12 years. And they said that they were Chinese for 3 years... Maybe my cabin is Polish, I don’t know... The whole set needs to be changed. And the tiles too. Everything is glued to the wall. I'm afraid that during dismantling the tile will come off the wall... I've been living in this apartment for 12 years... I'll have to temporarily repair the crack until we get a new one... Let's think...
kostilka:
1. Make a support in the place of the crack, thereby removing the load from this place2. Buy fiberglass + epoxy glue. Seal the crack
Alexey Petrov:
pavilion epoxy glue
Anatoly Kichigin:
Carrying out repairs
When applying the composition, the technician must wear a mask and gloves.
Before you undertake to repair the surface of the pallet yourself, you need to determine the feasibility of this action. A large number of cracks and their rather large depth may indicate that it is better to replace this element of the cabin completely. After all, constant repairs will not lead to the desired result.
It is advisable to order a new pallet from the same company that made it previously, so that the fastening parts of the cabin and the pallet match.
It is advisable to perform all work that involves applying liquid acrylic outdoors or in a well-ventilated room. This will avoid toxic poisoning of the body.
When purchasing a shower cabin, you should inquire about the availability of a repair kit for the shower tray, as well as all instructions for installation and dismantling, and operating features. All manufacturer’s recommendations given for further use must be followed in full so that the integrity of the pallet is not compromised for as long as possible.
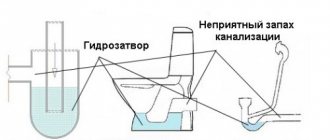
The cabin is leaking - what to do?
Incorrect installation
In most cases, the cause of leaks lies in improper installation and poor quality of seams. To eliminate the problem, it is necessary to carry out work to seal the components. This process goes as follows:
- The old sealant is removed from the cabin - a sharp knife is used for this. You need to act as carefully as possible, trying not to scratch the surface;
- dismantling the cabin frame - components are washed with soapy water, dried and degreased with a solvent;
- at the next stage, a new sealant is applied;
- a few minutes after applying the composition, you can begin assembling the structure;
- at the final stage, the joints are once again treated with sealant, and the excess is wiped off with a dry cloth.
When taking hygiene procedures, water splashes onto the walls and other elements. As a result, if not properly maintained, limescale deposits appear, the seals lose their elasticity, crack and begin to leak water. To prevent this from happening, you need to regularly use special care products. Then repairing shower cabins with your own hands will not interest you.
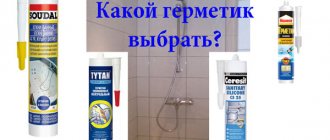
How to seal a shower tray - choice of glue
Modern shower cabins use trays made of acrylic (white plastic). This is a fairly durable and “warm” material, it is not afraid of moisture, however, under the influence of excessive load, acrylic can bend and crack. The acrylic surface can also be damaged by falling heavy objects.
If the crack is large, the best solution would be to completely replace the pan (they have standard sizes and are sold separately). Minor damage can be repaired at home.
It should be taken into account that acrylic has poor adhesion and special glue is required to glue it. It is also necessary to take into account that the restored surface will continue to be subject to stress, as well as the aggressive effects of moisture and detergents.
For quick repairs of deep scratches, chips and small cracks on the front side of the tray, a ready-made universal repair kit for acrylic bathtubs is suitable.
The kit is sold in plumbing stores and usually includes:
- solvent;
- liquid acrylic;
- hardener for acrylic;
- paste for polishing and giving the restored surface gloss;
- polishing cloth
- gloves, a stick for mixing components.
On sale you can find repair kits from various, “New Bath”, etc.)
To eliminate through cracks and holes on the back side of the pallet, it is necessary to glue a patch.
For it you additionally need to prepare:
- fiberglass sheets;
- EDP (epoxy glue);
- small spatula for applying glue.
Universal two-component EDP adhesive is sold as a mixing kit (epoxy resin + hardener).
EDP brand adhesive is made on the basis of epoxy resin, which is insensitive to moisture and other irritants. If you follow the proportions specified in the instructions, you don’t have to worry about the durability of the adhesive seam: the glued area will not be inferior in strength to the materials being joined.
EAF is the most affordable epoxy adhesive (a set of two components costs about 150 rubles), it also has more expensive imported analogues.
For example, Plexus MA 420 fiberglass adhesive, which is ideal for gluing composite materials and requires virtually no preliminary surface preparation. Its only drawback is its high cost (about 2,400 rubles per package).
Sealing cracks in an acrylic shower tray - step-by-step instructions
To repair an acrylic shower tray, you need to have easy access to its front and back sides. To do this, the cabin will have to be disassembled.
The order of further actions is as follows:
- We exclude further propagation of the crack. To do this, remove the tension from the zone of its formation. A few millimeters from the edges of the crack, you need to use a drill and drill to drill through holes of small diameter (3-5 mm);
- We glue the patch to the back of the crack. You must first remove dirt and degrease the surface to be restored. We cut out several patches of suitable size from fiberglass, which must be glued in several layers to achieve maximum joint strength.
Since the glue hardens almost instantly, you should act immediately. The resin is applied with a brush to the cleaned surface in generous quantities and covered with fiberglass. After the first layer has dried, the second and third layers are applied in a similar way. When the patch has completely set, the pallet is turned over and they begin to seal the crack from the front side.
- We fill the crack with liquid acrylic and polish it. In accordance with the manufacturer's instructions, prepare a liquid acrylic mixture and apply it to the damage. After drying, the surface is treated with polishing paste.
VIDEO DESCRIPTION
Useful tips
Almost all cracks and holes in the shower tray can be repaired yourself, but you should first determine the feasibility of the repair. If the damage is serious, it makes sense to completely replace the pan.
The composition for cleaning and degreasing the acrylic surface should be selected carefully, since some solvents can damage the outer layer of the tray. It is recommended to carry out gluing in a well-ventilated area
The restored pallet can only be used after the adhesive has completely dried.
It is recommended to carry out gluing in a well-ventilated area. The restored pallet can only be used after the adhesive has completely dried.
Features of the material
Acrylic is a material that is now used very often for the production of sanitary ware. Plus it looks great. Acrylic remains snow-white for a long time, sediment does not accumulate on it, it does not become covered with yellow spots, traces of rust and dark spots.
Unlike steel, acrylic options are lightweight. Installing them will not be difficult even for a novice master. A large selection of different shapes and sizes will allow you to choose the necessary tray for any shower stall in the bathroom. It is also resistant to noise (that is, if you drop something into the tray, it will not ring loudly, notifying everyone of its fall). Unlike metal, it is resistant to corrosion, that is, it does not have to be replaced due to the appearance of rust stains.
But, alas, acrylic also has disadvantages, which prevents it from being called a universal option for making pallets. The fact is that they are not so resistant to shock loads. Like, say, the same steel or cast iron. That is why the request for how to seal a crack in an acrylic tray is leading among consumers. An unpleasant situation often happens, and it can even be enough to drop a shower head or an ordinary ladle.
Acrylic shower trays have weight restrictions for the person taking the shower. For example, if it is designed for a shower by one person weighing up to 90 kilograms, then carrying out hygiene procedures in it for a person weighing more than 100-120 kilograms can cause a breakdown. If this does not happen immediately, then eventually the pallet will certainly bend and, under the weight, the next time it will simply break or crack.
Sometimes special frames are installed in acrylic pallets, which increase their functionality and, as a result, service life.