And yet, despite certain difficulties, the number of adherents of toilets with installation is constantly growing exponentially. The only important thing is that each stage of installation work is performed correctly.
What does a wall-hung toilet consist of?
Why is it so important to understand the features of a wall-hung toilet? Yes, because after this you will be much more likely to succeed in the process of installing the device. So, a standard toilet of this type consists of three parts, which include:
1. Steel frame (a reinforced element, since it is the basis for fastening the largest and heaviest element of the toilet, its bowl). It is strongly recommended to start the process of installing a wall-hung toilet with this component. The frame must be fixed to the wall and also attached to the floor, so that in the future the toilet can fully withstand the load of an adult’s weight. For this reason, under no circumstances should the frame be mounted on fragile walls, such as plasterboard partitions (there is a possibility that the fastening will be unreliable and the toilet will simply fall).
2. Drain tank (made of plastic, hidden from human eyes during the installation process by installing it in the wall itself). Its shape does not resemble the cistern of a standard floor-standing toilet, because it must fit in a rather narrow space. On the front wall of the tank there is a special cutout necessary for mounting the trigger mechanism. Modern wall-hung toilet cisterns almost always have a metered flush function, thanks to which you can choose the volume of water used for flushing.
3. Bowl (the only structural element of a wall-hung toilet that is not hidden from humans. It is also its most actively used part. The standard shape of this component is oval, although today on the market of similar sanitary products you can also find toilets with round, rectangular or even triangular bowls) .
Another integral component of the design of a wall-hung toilet is a set of fastening materials, through which the device is installed and mounted to the wall and floor. Such materials include Teflon tape, polyethylene outlet, elastic hose, and studs.
Installation of the structure
To install a built-in toilet structure with your own hands, fasteners are used, both included in the product kit and purchased separately (for example, elongated studs for mounting a toilet bowl). They must be taken with a margin of safety, as they will experience significant mechanical loads.
- Using a puncher, holes are made on the pre-marked marks for installing spacer dowels. Any installation model has fastenings in the vertical and horizontal planes.
- Using the bolts and adjusting nuts included in the kit, the installation body is installed and fixed.
It should be given the correct spatial position with appropriate fasteners responsible for horizontal or vertical orientation. When exposing the body of a plumbing product, use a building level.
Adjustment of the horizontal part of the toilet installation is carried out by the legs of the supporting frame, which are fixed in a certain position at the required height.
The vertical adjustment of the body is carried out by adjusting the anchor, which should then be securely locked.
When installing the equipment frame, it is necessary to maintain special precision and ensure high-quality fixation. The normal operation of plumbing fixtures without swaying under load, which can result in damage to both the ceramics itself and the panel covering the installation, largely depends on how reliable it is.
Positive and negative aspects of installing a wall-hung toilet.
Before you decide to install a wall-hung toilet, you need to consider the main pros and cons regarding this issue.
Positive aspects of the installation include:
- saving space occupied by the device;
- lack of an impressively sized drain leg;
- faint noise from water draining;
- extremely easy to care for.
However, we must not forget that installing a toilet with the designated design also carries a number of disadvantages, among which the following points stand out:
- the need to mount the flush cistern inside a wall or niche (otherwise the size of the projection of a wall-hung toilet will not differ from that of a standard floor-standing device);
- the likelihood of movement of sewer and water pipes;
- the need to create a special recess for the cistern.
Niche for installation
A niche is made in the wall for installation if the installation depth of the frame, materials and wall thickness allow such work to be performed. And in addition to the niche in the wall, they also cut channels for water and sewer pipes, which, like the installation, must be installed secretly.
Important. This method is not suitable for load-bearing walls made of bricks (for walls made of reinforced concrete, it is technically impossible to make a niche with your own hands). And if the arch of a niche can be reinforced with an insert made of a metal profile (standard practice for an opening), then this option is not suitable for hidden pipe laying - cutting horizontal channels in a load-bearing wall is prohibited at the regulatory level.
And without horizontal grooves, it is extremely difficult to make hidden wiring - only if the pipes approach the niche from below, and before it are laid in a screed or between the joists of a wooden floor.
For a niche in the wall, there is only one option provided by the manufacturer - for a block installation with an attached toilet.
In addition to this option, they also use a bathroom niche in which the water supply and sewer risers pass. In this case, a frame made of a metal profile is installed in a niche, and a frame installation for a wall-mounted toilet is attached to it.
Methods for installing a wall-hung toilet.
At the moment, two methods have been developed for attaching a wall-hung toilet: on an installation or on a concrete base. The owner of a plumbing fixture has the right to choose between these options, guided by only two criteria: if he wants an almost one hundred percent guarantee of fastening that will not come apart even under serious mechanical stress, then he needs to pay attention to installation. If the main goal is to install the toilet faster and without particularly significant material costs, then mounting on a concrete base is most suitable. Let us now pay attention to the aspects of each of these methods.
Installation of a wall-hung toilet on an installation.
The main feature of this method of attaching a wall-hung toilet is that the device is attached to the wall using a special frame pre-installed into it, which plays the role of an installation. In order to correctly carry out fastening using this method without the help of professionals, it is necessary to strictly follow the installation plan, which is divided into several stages:
— Installation of the toilet frame. This structural component of the device is attached to the floor and main wall using dowels inserted into specially made holes. Next, at the attachment point, the sewerage and water supply pipes are removed. The installation itself must be level. Requirement for it: complete parallel contact with the wall to which it is attached. At this stage, you need to determine the height of the toilet above the floor. This figure is forty centimeters, but changes at the request of the homeowners;
— Supplying water to the tank. At the request of the device owner, the eyeliner can be supplied either elastic or rigid. Remember, while the water supply is being installed, the tank valve must be kept closed, otherwise a situation may arise with damage to the water supply;
— Connecting the toilet to the sewer system. This stage begins with the toilet outlet being inserted into the sewer outlet, and after this operation the resulting connection is secured with corrugation. To accomplish this, the bowl of the wall-hung toilet needs to be screwed onto the installation for a short time. After this, it must be removed again; the time for its installation will come at one of the subsequent stages;
— Covering the work area with plasterboard. The sheets are attached to the frame already at the moment when it is fixed to the wall. Often, the user is provided with instructions for covering with plasterboard by the manufacturer of the product, who includes an algorithm of actions included with the toilet itself. Plasterboard covering can be carried out in two ways: either by completely covering the entire area of the wall, or by covering only the area of the installation itself. See the video of covering the installation with plasterboard below.
— Attaching the toilet bowl is the final stage, its essence: hanging this component of the device on a part of the steel frame using two small pins.
As you can see, there are no particular difficulties in independently installing a wall-hung toilet on an installation; you just need to pay great attention to the installation of the frame itself, since the reliability of the entire final result of the installation depends on its successful and verified fastening.
Installation of a wall-hung toilet on a concrete base.
This method differs from the previous one in that the toilet is mounted not on a frame built into the wall, but on a concrete base created by yourself. The standard list of parts required when installing a toilet in this way includes boards, nuts, screws and washers, two rods with threads no thinner than two centimeters and a length ranging from half a meter to eighty centimeters, a plastic pipe no shorter than ten centimeters, a drain coupling and silicone sealant. In the future, the algorithm for attaching a wall-hung toilet without installation looks like this:
— two rods are mounted into the main wall. In the future, they will be enough to withstand a load of four hundred to five hundred kilograms, which is enough to firmly seat the toilet;
— the height of the toilet is set, after which you can trim and install the flush coupling;
- on the boards that will be used as formwork, places for holes for fasteners are calculated, after which you can begin installing them;
— the depth of the rods is calculated (usually it should not exceed fifteen centimeters), after which they are fixed in the wall using special glue for concrete;
- then the toilet bowl is tried on, and then you can start concreting, the result of which should be a solid block of concrete that maintains the openness of the coupling and has protruding pins;
The further process of installing a wall-hung toilet on a concrete base does not have any fundamental differences with the process of attaching a standard floor-mounted toilet. The drain is connected, the joints are sealed, the bowl is installed on rods, which are secured with nuts on top. The final touch is to install the cistern above the bowl.
What makes this method of installing a wall-hung toilet fundamentally different from the previous one is that there is no need to purchase and install an expensive steel frame. It is with the help of this method of installing a plumbing fixture that it will be possible to save a lot of financial resources.
Preparation for installation
Necessary tool
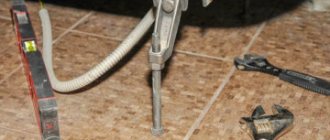
It begins with the acquisition of the necessary components, preparation of the workplace and tools. A hammer drill will be needed to make holes in concrete or brick, and a float level (convenient size 50-60 cm) to control the vertical and horizontal orientation of the product in space. You will also need: a set of wrenches, a hammer, drills or drills with carbide tips, possibly pliers, screwdrivers, a construction knife . To accurately determine the location where the toilet installation will be installed, you will also need a pencil and a tape measure . Having everything you need on hand will speed up the assembly process and save your nerves.
What to consider
At the preparation stage you need to consider:
- the accuracy of the niche marking and its suitability for installing the purchased model of equipment;
- It is better to purchase a toilet-installation product as a whole set in order to save yourself from selecting or adjusting equipment elements to match their sizes, from mismatching inlet and outlet holes;
- When purchasing, carefully check the completeness of the parts (supporting frame, flush keys, flush cistern, presence of adapters, fixing elements);
- the choice of fastening method for a block or frame structure, on which the successful implementation of installation work depends;
- You can select a model with electronic control and a convenient location of buttons for draining. Such products provide special comfort in subsequent use.
Taking measurements and markings
The diagram of the marking stages for installing a toilet is presented in the following parts:
- a center line is drawn on the wall, passing through the center of the future installation;
- the clearance between the wall and the structure is measured (it must be at least 15 mm, more is allowed);
- marks are drawn on the wall where the tank for draining the water will be located;
- marks are left on the floor, as well as on the wall where the structure will be fastened.
Accuracy and attention to detail at the preparatory stage will greatly facilitate subsequent assembly activities.
Cosmetic work after installing a wall-hung toilet.
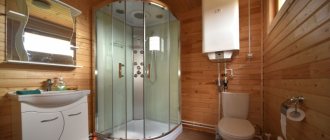
After completing the main stages of installing a wall-hung toilet, all you have to do is take care of the filing and finishing of the device. Regardless of the chosen installation option for the device, plasterboard sheets are used for its cladding. When installing a toilet with an installation, these sheets close the flush cistern and the steel frame, while the toilet bowl and flush button remain open.
When installing without installation, you can use plasterboard to cover the concrete base, as well as the drain pipe. The hole for access to the tank remains open.
Selecting a location and order of installation steps
When choosing the best location for the toilet, pay attention to a number of features of the room. Firstly, on its geometric parameters. Naturally, installation should be carried out where the plumbing fixture will interfere less. A good solution is a corner installation; it allows you to economically use limited space, and also helps to implement unusual design solutions.
There are corner installations on sale, but, in principle, a regular frame installation can be installed in the corner of the room.
Secondly, the proximity of communications, especially sewer lines, is important. Lengthening engineering routes will require the allocation of additional space for them. In addition, you will have to take into account the installation slope of the sewer (1.5-3 cm per 1 m), which, in the case of significant removal of plumbing, will increase the height of its attachment. These factors should be paid attention to, which will also facilitate further operations to organize drainage and water supply points for other bathroom equipment.
The order of performing work on assembling a toilet installation with your own hands is based on following step-by-step instructions, which define the following main stages:
- determining the location of a plumbing fixture with a frame or block system;
- installation and fastening of all structural elements;
- supply and connection of communications;
- checking all systems.
How to properly carry out preliminary marking?
To make markings, take a simple pencil or marker, a tape measure and a building level. All measurements are taken taking into account the dimensions of the installation itself. To ensure that subsequent installation is correct, first determine the location of the central axis of the structure and mark it with a straight line.
Then, using a tape measure, measure the distance from the conditional edge of the installation to the wall - it should not be less than 13.5 mm. Mark with strokes on the wall the area where the drain tank is expected to be located and mark on the floor and walls the places for the fastening mechanisms of the equipment.
When marking, be sure to use a level. It will help align the system vertically and horizontally, which will ensure its subsequent correct operation.
Correctly made markings make it possible to install the installation exactly where it will not clutter up the space and interfere with the entrance and exit to the bathroom.
Connecting communications
To connect to the water supply, the installation kit includes an inlet valve with an external outlet for a ½-inch pipe and an angle shut-off valve inside the installation.
For toilet installations with a bidet function, an additional tube is provided for the intimate hygiene fitting. And to ensure a comfortable temperature, such models are also connected to the electrical network to heat the water that is used for washing. And for this purpose, fastenings are provided for mounting the protective tube of the electrical wiring.
Equipment
Before installing the toilet installation correctly, check the complete set of the structure.
It includes the following components:
- Steel frame
. It is the basis of the device, so it is made durable and reliable. - Retractable brackets
. They make it possible to place the toilet at the desired height, placing it on the floor surface or a special podium. - Flush button
. The main element of the entire system, which looks like a plastic panel. Along with its main purpose, the button serves as an inspection hatch. Single fixtures only flush water. Double keys are equipped with the ability to control water pressure. As a result, it is spent more economically. Innovative developments include other additional functions in the control panel. This can be a double flush mode (economical and normal), or a stop flush (the ability to block flowing water).
A number of well-known companies have begun producing more modern contactless control modules. They work thanks to sensitive infrared sensors tuned to movement or obstacles. This makes it possible to transfer the functioning of the system to a fully automated mode.
Conclusions and useful video on the topic
The information you just read will be perceived much better if you supplement it with a video. We invite you to watch the installation of a wall-hung toilet with installation filmed on video.
The range of plumbing fixtures is expanding: toilets are being improved, updated, and become more and more attractive. But modern models, as a rule, are more expensive than traditional ones.
We recommend not to skimp on the quality and design of the product, but to save on installation by doing it yourself. This will help you buy what you like without significant damage to the family budget.
Tell us about how you installed a wall-hung toilet in your house/apartment. It is possible that you know technological nuances that will be useful to site visitors. Please write comments, post photos, share your impressions and ask questions in the block below.
Popular lines
Product from the Grohe brand
The reliability and quality of the toilet installation largely depends on the manufacturer.
Grohe is a German plumbing company that carefully controls the quality of its products. The reliability of the brand and the possibility of combining sanitary ware from different lines is confirmed by customer reviews.
Geberit is a Swiss brand that directly competes with Grohe. Once upon a time, it was with Geberit that Russian consumers began to become acquainted with installations for toilets. In terms of quality and price, the products are approximately comparable to Grohe.
TECE - the company offers premium German equipment at an affordable price. All products are compatible with each other. Installation is simple. You can install any installation yourself.
Viega is a German brand whose products are aimed at the mass consumer. When compared with the three main competitors, the cost of installation, all other things being equal, will be significantly lower. At the same time, the designs are reliable and meet all the latest technological requirements.
Cersanit is a Polish manufacturer that has earned its place in the top thanks to its high quality products and affordable price. This is the most budget option for the Russian consumer.
Customer Reviews
Alena, Moscow : “My husband and I spent a long time choosing an installation. I wanted to choose something that was optimal in price and quality, not very expensive, but a worthy option. We settled on Grohe Rapid SL 5 in 1. Even from its appearance it is clear that it was made to last.”
Roma, Moscow : “We installed the Ideal Standart installation. It turned out that she was not ideal at all. In 5 years - three repairs: the cuff does not hold, the inlet valve is broken, the buttons stopped working. In addition, the water entering the tank is too noisy. I don’t even want to estimate how much I overpaid for it. Grohe is much better."
Anna, Moscow : “I don’t regret at all that we installed the installation and wall-hung toilet. Although at the purchasing stage, an unpleasant discovery was that you need to buy an additional button, and it is not cheap at all. When I consulted with friends. They all said that Geberit could not be found better. They bought it. It has been in service for 6 years without any complaints.”
Tools
To install the installation you will need the following tools:
- stationery for marking the wall;
- a hammer drill to drill holes for fastening, along with drill bits appropriate for the type of wall;
- open-end wrenches;
- tow or FUM tape for sealing threaded connections;
- level;
- roulette;
- silicone sealant.
Additional tools may require pliers, screwdrivers, and a stationery knife.