Basic rules for connection
Before connecting your home theater to your TV, you need to check the package contents of the purchased device. The absence of any parts will certainly complicate the installation process of the structure. First of all, you need to make sure that there is a receiver. This device plays an important role in any home theater model. The receiver processes and reproduces the signal, transmitting the image to the TV screen and speakers . The second, but no less important detail is the audio system. Most often, it consists of 5 speakers and a subwoofer - an element of the audio system responsible for high-quality sound reproduction with low frequencies. And the last thing that should also be present in the home theater package is the signal source.
As a rule, this is a DVD player familiar to everyone.
After checking that all required elements are present, you can begin connecting the audio system. The main thing is to be consistent, otherwise you can get confused. In general, connecting a home theater to a TV is not difficult. Of course, you can take the user manual, which clearly shows the connection diagram. However, not all such documents contain a detailed explanation of the action. It is precisely for such cases that it is proposed to use the universal method of connecting a video system.
Connecting the TV to the receiver to display the picture on the screen
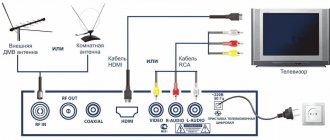
Modern TV models always have several HDMI connectors. With their help, high definition is obtained - a high-quality high-resolution signal. For connection, a special wire with corresponding plugs is used, which are included in the home theater kit. The “in” side of the wire is connected to the input connector of the TV, and the “out” side of the wire is connected to the output connector of the receiver.
If the TV does not have an HDMI connector, properly connect the receiver to the TV screen using a coaxial cable and three plugs of different colors, each of which is inserted into the deck with the corresponding color scheme.
European home theater systems have a SCART connector that also connects the TV to the receiver.
Connecting the receiver to an audio system to output sounds to the speakers
To output sound to home theater speakers, you can use several simple methods, namely wireless and wired connections.
The wireless option involves the use of special equipment that allows sound broadcasting within a radius of 30 meters. This special equipment is the Wireless System transmitter. It directs the audio signal from the DVD player to the receiver, and then the sound is sent to the speakers. The wired connection option is based on standard type cables.
Connecting the TV to the receiver to output sound to the speakers
Modern manufacturers are constantly improving the design of televisions. And first of all, they try to make them thinner. However, this feature negatively affects the quality of acoustics. And a home theater easily saves the situation.
At this stage, it is best to connect the TV and receiver via HDMI, and then configure the TV to transmit sound through external speakers.
It is important to carry out the presented manipulations in the specified order. Otherwise, the process of connecting the home theater will go wrong, which is why you will have to repeat the procedure.
Some users are sure that it is impossible to connect an old TV to a new home theater.
And this is the correct belief when it comes to TV models with a huge picture tube on the back wall of the structure.
Connection diagram for home theater to TV
The basic configuration of a home theater consists of a receiver and a speaker system. The receiver's capabilities are quite wide: it reproduces sound from disks, flash memory and even video cassettes. Because of this, it has a large number of different connectors, which must be connected in accordance with the diagram. Otherwise, it is quite possible that there will be no sound or image. It may seem at first glance that connecting a home theater to a TV is complicated, but it is not. First of all, you should have an idea of what you have to connect:
- Signal source. It serves as a DVD or Blue-Ray player.
- Receiver.
- TV panel or projector.
- Acoustic system.
- Digital optical cable.
- Amplifier.
Connecting the receiver to TV to display images
Before you connect your home theater speakers to your TV, you need to connect the receiver. This is done to ensure that the image is displayed on the screen. Modern TV panels that go on sale have a standard HDMI connector, which transmits video data and audio tracks in high quality. This option is simple and makes it possible to broadcast any content on the screen in good resolution. And not only from external media, but also online, which is very important for Smart TV owners. The connection is established using the included cable. To do this you need:
- Insert one end into the “audio/video out” connector on the receiver.
- The other end goes into the “in” port on the TV panel.
If there is no HDMI connector, then the connection is made using a coaxial cable and plugs of different colors, which are inserted into the corresponding color ports on the receiver and transmitter.
Connecting an audio system to the receiver to output sound to speakers
To output TV sound through your home theater, you will need to set up an audio system by connecting it to the receiver. The connection is carried out wired and wireless. As practice shows, the most reliable and reliable way to connect is through a wire. You don't even need to have an HDMI port. The connectors that are available on every TV will suffice, namely ports for wires with three plugs, called “tulips”.
Modern technologies allow you to connect an audio system wirelessly. The connection occurs through a built-in transmitter, which transmits the signal from the player to the receiver. Then the signal is distributed to the speakers. With this connection, high-quality sound is achieved, and the distance to the speakers can be about 30 meters.
Make sure that no objects are blocking the signal transmission.
Proper speaker placement for surround sound
Particular attention should be paid to the placement of speakers, since not only the sound quality depends on this, but also the creation of a three-dimensional effect. Those who do not know how to connect the speakers themselves can use the standard diagram below:
- Front speakers are installed to the right and left of the screen.
- It is advisable to place the central one under or above the TV. It is in this position that it will provide the best sound.
- Rear speakers are best placed behind the audience. This is done to get sound in Dolby Surround format.
- The subwoofer is installed so that the sound emanating from it is not blocked by furniture and other attributes of the room. It can be placed anywhere.
As a rule, the kit comes with a 5-speaker system consisting of a subwoofer and speakers, but other kits are also available. Experts recommend installing speakers so that they are at the same level as the viewers' heads. This is how you can achieve the optimal effect. There is no difficulty in assembling the audio system; you just need to strictly follow the instructions.
Video setup
Before you start adjusting the image, turn off the default automatic settings - manual optimization will allow you to achieve the optimal image. The picture for testing can be uploaded to a flash drive, and it must be connected to the TV via a USB connector. To set up your video yourself, you only need to adjust 5 basic parameters:
- boundaries;
- brightness;
- contrast;
- color correction;
- definition.
By adjusting these settings, you can watch TV through your home theater with an ideal picture.
Borders
In the right and left corners of the image there are arrows that should touch the edge of the display, but with only sharp ends. If the size is chosen incorrectly, the clarity will noticeably decrease, as a result of which the picture will be cropped. To change the boundaries, go to the menu. You are interested in the following sections: Overscan, PtP, Full Pixel, Original.
If you set the scaling incorrectly, the image clarity will noticeably drop. An illustrative example:
Brightness
By correctly adjusting this parameter, all shades with clear contours will be visible in the lower part of the image, for a total of 32 of them. Low brightness is a catalyst for increasing the gray color, due to which the picture merges in dark areas.
Excessively increased brightness will cause gradations to merge in the light areas of the picture.
Definition
The level of clarity is checked in the area where the 2 lines intersect. These segments should be without shadows and surrounded by halos. Mostly, clarity is rarely adjusted, largely due to the factory settings.
Some TVs have a parameter called “Gamma”. To test it, you need to use a test image + color bar.
This completes the image setup for watching TV through a home theater.
Color palette correction
In the example we have chosen, an indicator of correct correction is the color of the skin and face. Find a middle ground between dark and light areas. To establish a natural color palette, reduce the saturation, but avoid underestimating the color.
During the adjustment process, the white color should remain as such, that is, without any admixture of other shades. Carefully examine the color strip: there are translucent squares on it. To adjust, saturation is adjusted.
Contrast
Setting this parameter follows the same principle as optimizing grayscale. Correct adjustment requires visibility of all elements of the scale. If the setting is incorrect, some areas of the skin will change to negative.
After completing the settings, go back and look at the brightness indicators - it is possible that they will change. Then check the contrast further. Example of low contrast:
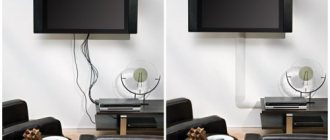
Cable connection order
It is important to understand that the main unit is the receiver. Playing devices should be connected to it. We look for OUT outputs on the back surfaces of the players. Found it? Wonderful. We insert wires with suitable connectors there. If there is a color marking, we comply. Now you need to find the IN inputs on the back wall of the receiver. We connect the second ends of the wires there. Don't forget about color coding, if there is one.
Home theater players can now transmit audio and video to the receiver. We do not insert the plug into the socket. Not yet. At all. The point is not only that you can get an electric shock, but also the equipment can be damaged.
Now we send the signal to the speakers of the speaker system. To do this, you need to connect the speakers to special contacts on the back wall of the receiver. They can be clamped or threaded. We strictly observe polarity and markings. If you connect the wires from the center speaker to the subwoofer terminals, it won't do you any good.
The next step is to connect a television receiver to the resulting system. If you think that there is a big difference in how to connect a Samsung, LG or Sony home theater, we hasten to reassure you. There are no particular differences.
Locate the VIDEO OUT port on the back of the receiver and connect it with the appropriate cable to the VIDEO IN jack on the television receiver. Connected? Fine. You cannot plug the plug into the socket yet. You need to check whether you have correctly figured out how to connect the speakers to the home theater, and it to the TV.
Have you made sure that the players are connected to the receiver, and from it the cable goes to the TV? Have you checked that all speaker wiring is connected in the correct order? If everything is correct, you can connect your home theater and TV to the network. Insert a disc or use another media and enjoy watching your favorite movie or video clip with stunningly realistic sound.
The most advanced models are made in a monoblock form factor - the drive of such combines is capable of reading any disc (CD, DVD and Blu-Ray). In this case, it is enough to connect the speakers to the AV receiver and run the cable to the TV.
How to output sound and image to TV
Most often, HDMI is selected to connect the receiver to a television receiver. It provides high quality picture and sound.
To use this type of cable, you need to make sure that the receiver has an HDMI Out output and the TV panel has an HDMI IN input.
If this is the case, you need to connect them, and then turn on both devices and assign the involved port as the broadcast source on the TV receiver.
When setting up the connection, the equipment must be turned off and de-energized. The advantage of this connection is that audio and video are broadcast simultaneously.
When purchasing HDMI, you should not choose cheap Chinese devices. They may not work or transmit signals intermittently, or produce poor picture and sound quality.
The SCARD connector can be used if an HDMI output is not available on one of the devices. This connection also provides a fairly good picture and sound signal. To configure, you need to connect the plugs to the corresponding OUT output on the receiver and to the IN connector on the TV. Some types of cables transmit only a video signal; in this case, the sound will be reproduced from the home theater speakers. The first type of cable is a component cable, consisting of three plugs of red, green and blue. The image is output analog and of fairly high quality. If one of the devices has a component connector, but the other does not, but has a SCARD, you can use a SCARD-to-component adapter. With this home theater connection, sound will not be output to the television receiver.
Another type of wire that can be used to connect a movie theater to a TV panel for picture output is called S-Video. This format is outdated, transmits only a low-resolution analog signal, but is still used by some users. The easiest and cheapest way to connect a TV receiver is to use “tulips”. This is an inexpensive wire with a yellow plug that connects the corresponding connectors on the equipment. The image quality with this connection is very low.
Stage 3: outputting sound to speakers
Modern plasma and LCD TVs provide high image quality, however, they usually cannot boast of equally first-class sound. Therefore, many users who want to get maximum pleasure from watching movies, comparable to going to the cinema, have a problem with how to output sound from the TV to a home theater.
The best option for outputting sound from a TV is to use an HDMI cable if there are appropriate ports and support for ARC technology. You just need to connect the devices to each other and configure the TV so that audio plays through external rather than integrated speakers.
If using the HDMI interface is not possible, then in order to connect sound, use an optical or coaxial cable. When connecting speakers to the receiver, you should pay attention to the labels of the connectors present on its rear panel: front speakers, center speakers, surround speakers, and subwoofer speakers.
How to output sound from TV to cinema
If the user wants to output sound from the television panel through the receiver to the speakers, he needs to use an HDMI ARC, optical or coaxial cable. Before you connect the TV so that there is sound in the cinema acoustics, you need to make sure that both devices have an HDMI ARC connector, and that the cable itself is high-quality and has version 1.4 (preferably 1.4b). This technology is called Audio Return Channel (ARC) and is used to transmit surround sound. To set up the connection, you need to connect the equipment (for the television panel, the connector marked OUT, for the receiver - IN), and then turn on both devices and activate ARC on them.
After this, you should select on the TV set the mode for playing a sound signal from an external audio device. Now, when watching television, the sound will come from the speakers connected to the receiver. To connect an optical cable from your TV to your home theater, you need to make sure that the TV has an OPTICAL OUT and the receiver an OPTICAL IN . It transmits a signal in good quality and is also immune to electromagnetic radiation. This means that there will be no interference during operation. The coaxial cable (RCA-RCA) is connected to the COAXIAL OUT and COAXIAL IN on the TV and receiver, respectively. It also provides high quality multi-channel audio. If these three connection methods are not suitable, you can use a standard “tulip” 2RCA-2RCA or 3RCA-3RCA .
In the second case, the yellow wire transmitting the image remains unconnected. You can also use adapters: mini Jack-2RCA, SCARD-2RCA , etc.
To use them, you need to find the audio output labeled OUT on the television panel, and labeled IN on the receiver. When using a cable with mini Jack-2RCA plugs on the television receiver, the headphone output is selected. When setting up a connection via the “tulip”, the sound signal will be analog and not of the best quality.
You can get an excellent digital signal using an optical, coaxial or HDMI ARC cable.
Conclusion Buyers often want to know how to connect a home theater to a smart TV. This is an easy process; you just need to choose the appropriate cable and connect the devices correctly with it.
To get really good audio and video signals, it is recommended to purchase only high-quality cable products and not use cheap Chinese analogues.
Real and “virtual” multi-channel audio
A true multi-channel audio track puts voice into the center channel and effects and music into the rear and front speakers. Or - in accordance with the distribution during recording (in some multi-channel audio standards).
“Virtual” multi-channel audio is distributed according to the spectral characteristics of the reproduced sound. Software and hardware parse the signal into components according to predetermined algorithms, and distribute sounds around the listening point, creating surround sound.
How to adjust the sound?
After connecting the home theater and setting up the video image, you can begin to “design” high-quality sound. The selection of the appropriate parameters occurs through the receiver menu displayed on the TV screen. Adjustments are made using the remote control.
- First of all, the bass of the front and rear speakers is adjusted . If the speakers are small, select the “Small” mode in the menu. For larger speakers, the optimal setting will be the “Large” mode.
- When adjusting the center speaker, it is recommended to set the mode to “Normal”. And for the highest quality sound, you need to switch the parameter to “Wide”.
- If it was not possible to place the home theater elements in a circular position , it is necessary to delay the signal from the central speaker, since it is located farthest than the rear or front elements of the audio system. Calculating ideal speaker distance measurements is quite simple. A sound delay of 1 millisecond corresponds to a distance of 30 cm.
- Next you need to adjust the volume. To do this, select the priority level on the receiver or on individual channels.
- Then the sound is turned on and the optimal parameters are manually adjusted .
There are no special features for connecting home theater wires. The connection can be made through “tulips” or an HDMI cable. At the same time, HDMI is capable of transmitting information from the media as clearly as possible. But the basic parameters differ significantly by model type and brand. Therefore, in the menu you can see functions that were not even discussed. In this matter, you must follow the operating instructions.
The connection process itself is a mechanical job that even a child can handle.
It is enough to insert the wires into the appropriate connectors according to the diagram attached to the user manual.
Special attention is paid to setting up acoustics . In home theaters, such systems consist of 5 or 7 speakers. First, speakers are connected to the TV, after which they are placed at an acceptable distance from each other around the circumference. Then you need to connect the subwoofer. This procedure is not at all complicated, which cannot be said about its manual setup, which should be entrusted to a professional.
Modern receiver models have automatic acoustic settings . To debug the sound, the home theater owner will need to connect a microphone to the receiver and place it on the audience seat. In this setup method, the microphone will play the role of a human ear. By launching the automatic optimization mode, the receiver will begin to select the optimal audio frequency options that will most accurately match the type of room. This process takes approximately 30 minutes.
After the receiver carries out automatic debugging, it is necessary to conduct a test run. To do this, you need to turn on the music disc and manually adjust the sound by removing the cutting frequencies. It is very important not to interrupt the automatic tuner. It is unacceptable to let the final stage take its course. Otherwise, you will have to re-adjust.
Sound settings
After connecting your home theater to your TV, you need to decide on the sound settings. The selection of optimal parameters is carried out through the receiver's on-screen menu. Changes to the basic parameters must be made using the remote control.
- We start by adjusting the bass in the front and rear speakers, select the “Small” mode if you use small speakers, respectively, for large devices the “Large” parameter will be the optimal solution.
- To adjust the central speaker, experts recommend the “Normal” mode. The large central speaker will provide excellent sound when the “Wide” mode is activated.
- If the elements of the audio system cannot be placed around the circumference, then the signal from the central speaker should be delayed, since they are located further than the front and rear ones. The calculation formula is simple - every 30 centimeters of difference in distance requires a delay of 1 millisecond.
- Adjust the volume level; to do this, set the priority indicator on the receiver or on the channels individually.
- We turn on the movie or audio disc and manually complete the setup, selecting the optimal parameters.
The specifics of connecting wires to properly connect an audio system are approximately the same, regardless of the manufacturer. As for the basic parameters, they can vary greatly depending on the model and brand. Therefore, do not be surprised if you find additional options in the menu that were not discussed previously. You can always trust the instructions from the manufacturer.
It should be noted that connecting is a purely mechanical job that anyone can handle. In fact, you just need to follow the step-by-step instructions and insert the wires into the appropriate connectors one by one. As for the settings, this is a more delicate job.
Speaker placement
Each individual room with its own layout has no analogues. The arrangement of living room furniture plays an important role in reproducing the sound of a home theater. And to avoid interference, it is necessary to place the speaker system out of the reach of cabinets or chairs.
The ideal placement of a sound system is an identical distance between the speakers and the viewer. However, it is very difficult to achieve the corresponding indicators in modern room layouts. Being able to set the front left and right speakers at the required distance is already an excellent indicator.
Ideally, they should be placed at head level, approximately 3 meters from the visual area.
Some home theater models have as many as 9 acoustic system elements. These are the front left speaker, front height left speaker, front right speaker, front height right speaker, center speaker, spatial left speaker, spatial left speaker, spatial right speaker, spatial right height speaker and subwoofer.
The central column should be directed towards the viewing area and located at head level. A huge mistake is to locate it on the floor or above the TV. With this arrangement, it will seem that the film's actors are speaking words as if they were in heaven or underground.
Rear speakers can be installed close or far from the viewing area. But the best option is to place them behind the spectator area, just above head level. It is necessary to maintain the most equal distance in order to get the clearest and highest quality sound. At the same time, you should not point the speakers directly at the viewer - it is best to turn the speakers slightly to the side.
Installing a subwoofer is a very serious matter . Incorrect placement distorts and inflates audio frequencies. It is best to choose a place for the subwoofer away from the corners, closer to the front speakers. You can place a houseplant on top of the subwoofer or use the structure as a coffee table.
To learn how to connect a home theater to a TV, watch the following video.
Sources
- https://televizore.ru/obzor/podklyuchit-kinoteatr-k-televizoru
- https://stroy-podskazka.ru/domashnij-kinoteatr/podklyuchit-k-televizoru/
- https://ProSmartTV.ru/tehnologii/podklyuchit-domashnij-kinoteatr-k-televizoru.html
- https://www.pult.ru/articles/domashnie-kinoteatry/kak-podklyuchit-domashniy-kinoteatr/
- https://seeiptv.ru/kak-podklyuchit-domashnij-kinoteatr-k-televizoru/
Setting up an LG home theater
The cinema can work with any TV, of any brand. But the work must be of high quality and complete. If you miss the settings somewhere and don’t adjust them to the required level, the viewing experience will be negative. Therefore, it is important to accurately calibrate the sound of your speakers.
What does the sound setting depend on:
- Situation;
- Distance;
- Ambient sounds;
- Sound direction.
After setting up your home theater, you should check if everything is working correctly
To become the owner of a personal cinema with ideal settings, you need to take everything into account. For example, furniture can both absorb sound and reflect it. The ideal room for surround sound is one that has a mixture of furniture with smooth and soft surfaces. The distance of the speakers should be equal to the distance from the user. This creates a better stereo image.
The speakers, which are located at the front, are turned towards the user.
It is necessary to position them so that the sound comes straight. This will allow you to pick up even small and soft movie sounds. And surrounding sounds should not interfere or distract from viewing. They are installed further and serve as a background. The Samsung brand is suitable for home cinema. It is not much inferior to LG, but reviews of it are mostly positive. In fact, with a good movie, it won’t matter whether it’s Samsung or LG. The main thing is high-quality sound and a good picture.