Purpose
A socket with a timer is a practical and already affordable way to automate your apartment. Not everyone can yet install a Smart Home system, but this mechanism can greatly help in controlling devices according to the chosen schedule.
Such gadgets are used to turn on and off lights or any gadgets . They can be mechanical or electronic and can be programmed for hours, days and even weeks in advance. All that is required of you is to set the necessary parameters on the panel.
Feron TM22
| Depth | Power | Voltage | Size: height | Width | Built-in diameter | Additional characteristics (description) |
| — | 3500W/16A | 230V | — | — | — | weekly |
terms of Use
terms of Use
Turning on the socket
1.Connect the socket to a 230/240V network and charge the battery for about 12 hours.
2.Delete all current information after charging by pressing the “MASTER CLEAR” button with a sharp object, e.g. pen or pencil.
3.You can make timer settings.
Setting the current time
1. Press and hold the “CLOCK” button, press the “WEEK” button until the current day appears, then set the current time in the same way by pressing the “HOUR”, “MIN” buttons. To quickly set the “WEEK”, “HOUR”, “MIN” buttons, you can hold them down until the desired day of the week, hour or minute appears.
2. Once the correct time is set, release the “CLOCK” button.
Installing programs
When checking programs, make sure that the settings do not overlap, especially when using a variation block. If program settings overlap, the timer will turn on and off according to the time set in the program, not the program number. The OFF program will take precedence over the ON program.
1. Press and release the “TIMER” button, “ON 1” will appear on the display. Now you can make the first adjustment of the switching time.
2. Press the “WEEK” button to set the desired day or several (group) days. Set the time by pressing “HOUR”, “MIN”.
3. Press “TIMER” to complete the first setting of the on time and proceed to set the off time, “OFF 1” will appear on the display, repeat steps 2.
4. Press “TIMER” again to finish the off setting and begin the second on setting. Repeat steps 2 and 3 to program the remaining settings. Press the “TIMER” button and hold for two seconds to quickly view the specified settings.
5. After completing the settings, press the “CLOCK” button. The timer is ready to use.
Example
You need to program it to turn on at 17:15 and turn off at 22:30 every day.
a) Press and release the “TIMER” button. The display shows “ON 1”.
b) Press “WEEK” until “MO,TU,WE,TH,FR,SA,SU” appears on the display.
c) Press “HOUR” until 17:00 appears on the display.
d) Press “MIN” until 17:15 appears on the display.
e) Press and release the “TIMER” button, “OFF 1” appears on the display.
f) To set the shutdown, repeat paragraphs. c and d until 22:30 appears on the display
Settings - On/Auto/Off
Operating modes cannot be changed during software settings.
1.Press “ON/AUTO/OFF” button to select one of three modes.
2.Programs can only be executed in “AUTO” mode. If “AUTO” mode is selected, the timer operates according to the settings. When “MANUAL ON” or “MANUAL OFF” mode is selected, all programs are ignored and the timer does not operate. When “MANUAL ON” mode is selected, the power output is always on. When “MANUAL OFF” mode is selected, the power output is permanently disabled.
3.If you change the “MANUAL ON” mode to “AUTO”, the timer will retain the “MANUAL ON” setting until the next timer setting.
Floating function
1.Press the “RANDOM” button, “RANDOM” will appear on the display, this means that the “RANDOM” function is activated.
2.If this function is enabled, the settings will be made in a floating advance from 0 to 32 minutes between 18:00 and 6:00.
3.To cancel this function, press “RANDOM” again, this function cannot be set during program setting.
12/24 hour mode
To change the time on the display to 12 or 24 hour format, press the “CLOCK” and “TIMER” buttons simultaneously.
Daylight saving time conversion
1.Press “CLOCK” and “ON/AUTO/OFF” at the same time, “SUMMER” appears on the display. The clock will move forward one hour.
2.To change to winter time, press the two buttons again, the clock will move back one hour. “SUMMER” will disappear.
Operating rules
The scope of application of these simple devices is very wide: a smart assistant can be used at home or in a country house to scare away thieves and create a mirage of the presence of residents by setting the appropriate function. It will help out with morning and evening watering of your favorite lawn, thereby saving the owners from the need to wake up early. And for rooms with animals, where electric waterers are installed and there is a need to periodically turn on the lights, they are simply invaluable.
The socket allows you to solve several problems at the same time:
- Operate electrical appliances (multi-cooker, washing machine, fan heater, etc.).
- Heat and illuminate rooms with animals, aquariums, turn the lights on and off.
- Automate watering and ventilation.
- Significantly save on utility bills by reducing energy consumption.
Why is it needed?
A socket with a timer will be indispensable, for example, when leaving, when there is a need to run all the streamlined processes in the absence of the owners:
- maintain the operation of the aquarium equipment (filter, compressor, lighting) within a certain interval;
- organize the operation of heating devices, prepare tea for your arrival from work;
- turning on the light or TV in random mode will protect the house from criminals;
- They are also used for agricultural needs (poultry houses, greenhouses).
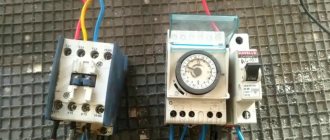
Features of a mechanical timer
The switching method in electrical and mechanical timers for sockets is the same. The only difference is management. In the first type, it is a processor, and in the second, it is a device that provides constant rotation, opening and closing contacts.
Distinctive features
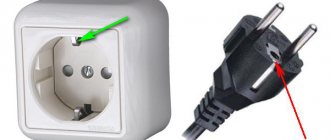
What makes a socket with a mechanical timer different?:
- Availability of a standard socket for electrical appliances.
- Mode switch On/Off.
- Timeline.
- Keys for programming.
- Plug.
- Time indicator.
The device is almost silent, operation is carried out thanks to a pulsed electric motor. About half a century ago, such a mechanism was identical to a clock mechanism.
Connection instructions
Inside, gadgets from different manufacturers are very similar to each other. The shell combines a connector for a plug (usually one) and the timer itself in the form of a rotating disk with divisions. There are specialized buttons along the outer edge of the shell.
The first button switches the mode of continuous power supply and adjustable . It is located on the side and in some models is equipped with a light indicator.
Instructions for use:
- Set the switch to Continuous Operation mode.
- Rotate the dial to set the current time (the corresponding mark should coincide with the fixed mark).
- Dip or lift the contacts on the outer edge of the drive to set the on and off steps (Please note, these steps must coincide with the desired commutation time).
- Insert the cord plug of the connected device into the timer socket.
- Connect everything to the network.
- Switch the timer operation from Continuous to Adjustable.
Important! Such a “smart” outlet only works when a device is connected to it, and the set mode will be strictly followed until it is disconnected from the power supply.
Instructions for setting up a mechanical socket timer
Sockets with a mechanical type timer have a dial with which you can set several operating periods. Such devices are configured as follows:
- use the rotating wheel on the socket to set the actual time;
- click on the digital segments opposite the numbers, setting the period for turning on the device;
- turn on the socket and connect the necessary device to it;
- Programming to turn off the socket is carried out using a similar method.
In mechanical sockets with a timer, the wheel must be rotated only clockwise, otherwise the mechanism may fail. This is due to the fact that a limiter is built into the running contract.
How to set up an outlet with a feron timer
Such sockets have a time scale, programming keys and a time indicator arrow on the front panel. The required working period is set to no more than twenty-four hours.
The setup is carried out as follows:
- The time in daily format is marked along the edges of the rotating disk. Between each digital designation there is a division of fifteen minutes. Turning the dial clockwise first sets the current time.
- There are small segments around the dial. They can be blue or black. Each sector holds fifteen minutes. By clicking on the required segment, you can easily set the timer.
- The mechanical timer socket is connected to the network after the necessary settings have been made. After this, the required electrical appliance is connected to the connector.
On the front panel of the socket there is a time scale, programming keys and an arrow pointer.
The timer functions only if the device that will be controlled is turned on.
Pros and cons of the miracle socket
The big disadvantage of sockets with a mechanical timer is that they are directly dependent on the supply of electricity . Power surges can cause all settings to go wrong. Another disadvantage is that such an outlet can be programmed only for one day; for a longer period it is impossible; in outlets with an electronic timer, these possibilities are expanded to a week or even a month.
Surprisingly, the undoubted advantage of this device is also its dependence on external power; unlike its electronic counterpart, it will complete its task after the power supply is restored. The price of such a timer is an indisputable advantage compared to more expensive electronic sockets.
Both types of sockets with a timer can be either stationary or in the form of a separate device (an adapter with a plug, which, in turn, is inserted into the socket). Any type is a convenient, practical and safe purchase.
Setting up an electronic socket with a timer
Sockets with an electronic timer are available for weekly and daily use. Unlike mechanical connectors, they are not as easy to configure. Such devices include a system for setting not only the current time, but also the day of the week. Also, electronic sockets are preset for one hundred and forty operating cycles.
Configuring such electrical network connectors from timers is carried out in the following way:
- turn on the device to the network to recharge the battery;
- indicate the actual day of the week and time on the switched socket;
- set the on and off period using the programming system;
- after setting, press the “Time” key so that the set current time is indicated on the display;
- connect the outlet to the network and connect the device to it.
During installation, care must be taken to ensure that these programs do not overlap each other.
How to set up a socket with a clear timer
This socket has ten programs for turning the device on and off, mode selection, a display with seconds and sixteen possible combinations of days of the week. The device also has a function for changing the time to summer and the ability to select time modes - twelve hour or twenty-four hour. Before setting up such an outlet with an electronic timer, the battery is charged for twelve hours. To do this, you need to connect the connector to the network.
After this, previously installed programs are activated by pressing the button marked “Master clear”. The button is activated using a sharp object - a pin, pencil or the writing part of a pen. Only then can programming of the electronic product be carried out.
Programming consists of the following stages:
- Press and hold the “Clock” button until the current time and day of the week are displayed simultaneously. The minutes are set with the “Min” key, the hours with the “Hour” button, and the days with the “Week” button.
- Press the “Timer” button once and set the on time. At this time, “On1” will appear on the screen. Next, you can set a timer to turn off the outlet. The date is set using the same keys – “Min”, “Week” and “Hour”. After setting, press the “Timer” indicator again.
- Using these actions, you can configure parallel tasks. You can view the entire list of actions using the “Timer” button, which should be held down for several seconds.
- After completing the settings, press the “Clock” key to put the timer into working order. In “Manual on” mode, the socket operates normally without programming. “Manual off” is a function to turn off the device. You can set the timer only in “Auto” mode.
User reviews
I work as a nurse and was always afraid of being robbed when I left for a day. I bought an outlet with a timer, and now, even when I’m not there, the lights turn on and off in the apartment on their own. I felt much calmer thanks to this little helper.
Svetlana
I installed a daily timer in the barn and for watering the greenhouse about a year ago.
I don’t understand how I used to live without this. Saves a lot of my time, and bills began to come in for a much smaller amount, since this smart thing never forgets to turn off the light, unlike a tired farmer. Michael
Mechanical
The heart of the timer is a drum with switch levers installed on it. The drum is driven by a micromotor. The actuator is a microswitch with one pair of contacts. Sockets with a 24-hour cycle are very popular; they are also called a daily timer. As a rule, one hour is divided into four parts, fifteen minutes each.
As you can see in the photo, the design of the Feron TM50 socket is quite primitive. Setting up such a timer comes down to setting the switches on the reel in the desired order in a certain time sector and forcing the manual setting of the current time by scrolling the reel clockwise to the pointer arrow. A switch is installed on the side of the relay to force the load to turn on. Let's try to use a small example to figure out how to set up a mechanical socket with a timer, model Feron TM50.
In this diagram, the operating time of the filter pump in the pool is distributed over the day:
- No food is served from 1 a.m. to 2 p.m.
- After two in the morning the pump turns on for fifteen minutes.
- From four to five it is off.
- At 6.00 the pool filter runs for fifteen minutes.
- Afterwards this happens at nine and twelve o’clock, again for fifteen minutes.
- At 3:00 p.m., peak bathing time, we turn on the pump for thirty minutes.
- At six and nine in the evening we make the pump run for thirty minutes.
- And the final cycle at twelve at night is to filter the water for 15 minutes.
There is an opportunity to save money if you correctly configure the socket with a timer and use a two-tariff electricity meter.
According to the settings in the diagram, it becomes clear that the consumer switches off during peak tariff hours, when the price per kilowatt of consumed energy is one and a half times the normal price. From eight in the morning until eleven, the device is turned off. The same goes for the evening peak from eight to ten in the evening. The rest of the time, the socket with a timer keeps the consumer turned on.
You can learn more about how to set up a mechanical socket with a timer in the video below:
Another popular model from Feron is TM32. The configuration features of this outlet are also discussed in the video review:
How does it work?
Let's consider what types of sockets exist and on what principle they work.
- Socket with mechanical timer . It is based on a clock mechanism. These sockets, when working, tick like the hands of a clock. The mechanism is wound up for the required time, and at the moment of operation the device is turned on or off from the network. This type of mechanical socket is more like the timer in Soviet washing machines, so they can only be set within one day. There is a variety of outlets with an interval of 15 to 30 minutes. This option will help you set up a more complex daily program.
By pressing buttons or their combinations on the dial, you can set the operation mode for the whole day. The number of operations is from 48 to 96 per day.
- Electronic timer socket. A more complex device with which you can create an entire daily program with a shorter on and off interval than a mechanical one. Thanks to this, you can configure more than 140 response modes. In addition, this variety often has an integrated motion sensor, which, of course, can serve as an excellent service in organizing lighting in the house.
Sockets with an electronic timer have their own variations in terms of their capabilities.
- Daily socket . With the help of such a programmable unit, you can set up a daily routine for 24 hours. This means that tomorrow the same regime will repeat as today. Sometimes this is not entirely convenient, since a person’s daily routine during the week may vary. For example, it depends on his work schedule. Such an outlet will have to be reconfigured every day to suit the conditions of the next day.
- Weekly socket . Such a device will help program the operation of devices within a week. Moreover, the regimes may be different every day. If the daily routines, for example, on Tuesday and Thursday coincide, they can be set identically by pressing the timer button. In such sockets it is also possible to set a random mode. By connecting a TV, table lamp, or both to the outlet, you can organize a primitive alarm system.
Random switching on of devices will simulate the presence of the owner in the house, which will certainly scare away intruders.
- There are switches built into the electrical system . Such devices are mounted in an electrical panel. Thanks to these devices, you can organize control of appliances throughout the house.