Attaching timber to a brick wall
When building a house or carrying out repair work in it, a need often arises in which it is necessary to fasten the timber to a brick wall. In most situations it carries a fairly heavy load, in others it serves only as a frame element onto which cladding material can be attached. This can be siding on the external walls of the room or internal drywall. Attaching a wooden beam to a brick wall will not cause any trouble for those craftsmen who are well-versed in the basic stages of installation.
How to attach timber to a wall made of aerated concrete. How to attach a Mauerlat to aerated concrete
Its resistance to external influences, service life, noise and waterproofing characteristics and strength depend on its correct fastening to the load-bearing walls and rafter system of the building.
The Mauerlat must be made of the same material as the rafter system. If metal structures are used, then metal beams, channels, and corners are used as the Mauerlat. For a wooden rafter system, the mauerlat will be made of wooden beams. The cross-section of the beams depends on the design load, the type of roof and the diameter of the rafter beams.
Before installing a wooden mauerlat on aerated concrete blocks, it is necessary to treat the wooden beams with an antiseptic solution that protects the wood from insects and rot. It is also advisable to wrap the beams with a layer of waterproofing material. For this you can use hydroisol, elastoizol, hydrostekloizol, steklomast. These materials will not weigh down the structure and will create a layer of additional moisture insulation.
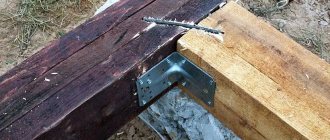
The Mauerlat is attached to aerated concrete walls using anchors, studs or metal wire. When laying beams, it is necessary to connect them at the joints with metal brackets.
Fastening diagram using studs (right) and staples (left)
Next, you need to attach the rafters to the Mauerlat. The connection occurs by cutting, tapping, sawing, but it should occupy no more than 25% of the timber. Fastening is done using self-tapping screws, bolts, angles, metal plates and polyurethane foam.
The main methods of fastening, starting with the most preferable:
- Fastening with studs. This type of fastening can be used in the construction of both simple one-story buildings and auxiliary structures: bathhouses, summer kitchens, garages, outbuildings, small country houses. This stud fastening method is preferred for most buildings.
- Fastening with chemical anchors. The beams are attached to aerated concrete using a special chemical adhesive composition: “liquid dowel”, glued-in anchor, etc. The composition is made on the basis of polymers and contains adhesives in the form of synthetic resins. A hole is made in the aerated concrete wall as for a regular anchor, which is filled with adhesive, then a rod (reinforcement) is inserted into the prepared hole, onto which the Mauerlat is then installed. The strength of this design is quite high, however, with a large perimeter of the Mauerlat, this method will be expensive.
- Fastening with steel wire. This method can be used if, even at the stage of laying the walls, a metal wire was inserted between the aerated concrete blocks. Holes are made in the Mauerlat, where the wire is inserted and the strapping is made. It is very important that the number of wire ties is no less than the number of supported rafters.
In what cases is it necessary to fasten the timber to the wall?
Fastening timber to brickwork is a fairly common construction operation that may be required in the following cases:
- When fastening various structures and interior elements.
- When performing redevelopment.
- During the process of insulation or cladding of the facade, in this case it is necessary to fasten the wooden sheathing to the brick wall.
- For installation of canopies and canopies adjacent to the house.
Below we will consider in detail how the timber is installed.
Installation of wooden sheathing
Attaching the timber to the foundation
The construction of a wooden log house still requires a concrete foundation. It can be strip, pile or slab. In any case, the question arises of how to fasten the wooden beam of the lower crown to the concrete. After all, the stability of the entire building depends on the quality of its fastening.
There are overhead installation and rigid fixation.
Overhead fastening of timber to the foundation
The first method implies that, laid on a flat base, the beam will be supported by the weight of the structure. The method is effective. It is used in cases where it is necessary to save time and money.
Fastening the timber with anchor bolts. Fastening the beam to the concrete base
The disadvantage of prefabricated and monolithic foundations, as well as concrete grillages, is the possible unevenness of their surface, which consists in the presence of differences in height, recesses, etc. This problem can become critical for timber laid on top, so it should be eliminated at the preparatory stage.
The upper cut of the concrete foundation or grillage is leveled by applying a layer of cement mortar to it. The horizontalness of the fill is checked using a construction or laser level. Next, waterproofing is laid in two or three layers on the concrete base at the junction with the timber, and only then the first crown of the timber house or the framing of the frame structure is installed.
The difference between the lower row and the elements above is the larger cross-sectional size of the lumber, which allows it to take on loads from the ground part of the structure and distribute them more efficiently to the underground structure. Preliminary layout and marking of the beams in place will help to achieve clarity in the spatial arrangement of the crown and the geometric correctness of its angles.
They are placed in the design position, fastened with temporary braces. At this stage, the placement points of anchor bolts and, accordingly, holes in the strapping elements are determined. If the fastening pins are already concreted and protrude from the foundation, then posts of the same size should be placed under the beam.
The pitch of the anchors is selected within half a meter, and the length of the rods is selected depending on the thickness of the beam and the size of the insertion of the fastener into the concrete layer. At the same time, they take into account the fact that the highest point of the anchor should not protrude beyond the upper plane of the first crown, so that when laying the next rows of the log house you do not have to deal with unnecessary interference. Each individual element of the wooden frame must have at least two rigidly fixed points to avoid any movement.
After marking the mounting points, begin drilling holes in the wood. First, use a drill bit, going deep to about a third of the height of the lumber. Then the recess is cleaned with a chisel, after which a small through hole is made with a drill. Its diameter should be 1.5-2mm wider than the corresponding size of the anchor bolt.
There are two main ways to determine how to attach timber to the foundation:
- first - anchors are already present in the concrete body;
- the second - the fasteners are installed together with the installation of the wooden frame.
In the case when the anchors are already installed in the foundation, the crown is simply put on them and secured with a fastening nut. Another method involves drilling holes in concrete with a hammer drill locally, that is, through a wooden beam. The depth under the anchor here should be approximately 100-120mm.
At the last stage, the horizontality of the first crown and the clarity of the geometry of the corners are checked. In case of slight distortions, it is allowed to place small planks under the flaws, but this is extremely undesirable, as it leads to the appearance of cracks.
Experienced craftsmen advise using self-unclosing anchors. With their help, work is greatly simplified and installation time is reduced. Anchor technology is used for all types of concrete foundations, including grillage foundations.
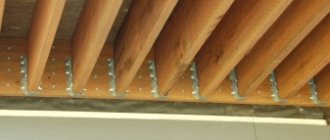
Fastening beams using anchors
With cement monoliths, masonry made of expanded clay concrete blocks, bricks, logs are connected with anchor bolts. A threaded rod is placed immediately during pouring/laying or clamped into a drilled recess when attaching the prepared timber to the finished foundation step by step.
It is necessary to pre-level the surface of the stone. The protrusions are cut off, the depressions are rubbed with a solution. The horizontal level is checked. Bolts on strip foundations are placed in increments of up to 0.5 m.
The corner joints are connected into a paw, a bowl, and metal plates for self-tapping screws. Under the anchor, the logs are drilled through, with a hole to fit the nut onto a wide washer below the plane of the beam. A drill is taken with a diameter 2 mm larger than the bolt. A uniform fit is achieved by alternately tightening the nuts by 3-4 turns.
Look
The joints of the fragments along the top must be strengthened and secured with staples. A cut is first made for deep seating of the connecting rod.
Installation of beams
The traditional way to attach the end of a wooden beam to a wall is to embed it in the brickwork. This design of the junction unit can be used in cases where the thickness of the masonry is 2 bricks (250 mm) or more. The reason is that the end of the beam must enter a specially prepared niche to a depth of at least 12 cm (half a brick). If the thickness of the partition is not enough, then the niche will turn out to be through, which is unreliable and ugly.
The ideal option is to provide niches for the beams in advance when building the wall. If this is not done, then they can be carefully hollowed out. Of course, the second support for the beam in the form of an extension frame must be made before installing the wooden product in the design position.
Installation of the supporting beam is carried out as follows:
- Antiseptic treatment of wood is carried out. The end intended for embedding in the masonry is wrapped with roofing felt.
- The end of the beam is inserted into the niche, and the second rests on the finished structure. The distance from the end of the element to the rear wall of the niche is 40 mm.
- The position of the bar horizontally and vertically is verified, its second end is secured in the chosen way.
- The gaps between the surface of the brick and the wood are sealed with cement-sand mortar grade M50.
The inconvenience of this method is that you need to spend time preparing the niches and waiting for the solution to harden well, otherwise during further assembly of the roof it will fall out in pieces. There is a more practical way: fasten a support beam of the same cross-section as the beams flat to the brickwork. It must be secured in such a way as to ensure the required angle of inclination of the beams when they rest on this base.
The support beam should be secured securely, using anchor bolts that extend into the thickness of the brick by at least 100 mm. The anchor installation step is 30 cm (3 fasteners per 1 linear meter). Afterwards, the beam rests on wooden structures at both ends and is secured with galvanized screws on steel corners.
Attaching the timber to the wall is done in different ways. In this case, the following parameters must be taken into account:
- wall material and decoration (aerated concrete, concrete, plastered, brick, plasterboard, etc.);
- beam section;
- the weight and scale of the structure that the beam must support.
These parameters determine which tools and fasteners need to be used to secure the beam to the wall. The following can be used as fastening elements:
- screws;
- nails;
- self-tapping screws;
- anchor bolts;
- metal and plastic dowels;
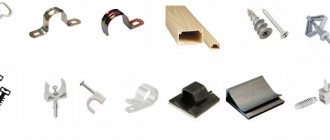
- U-shaped brackets;
- metal corner;
- wooden cotter pin.
Secure the timber to the concrete wall
Before attaching a beam to such a wall, it is worth assessing its dimensions, as well as the weight of the structure that it must support. If the beam is small and the structure is quite light, you can use technology using gypsum or alabaster mortar:
- a screw of the required diameter is tightly wrapped along its length with wire (it’s good if it’s copper);
Fastening a wooden beam to a brick wall - technology features
Attaching timber to a brick wall or to a wooden frame is a mandatory process for building a house. The installation steps are quite simple and easy to perform. But it is recommended to take into account surface unevenness and wall deformation. Thus, you need to choose fasteners, adhering to the height - this way you can hide all the imperfections.
The soft way
Used using special U-shaped brackets. He is endowed with both advantages and disadvantages. The main positive quality of the soft method is considered to be the speed of work, and the negative quality is the unguaranteed reliability of the frame fasteners; after a while, the finished structure may be subject to destruction. The fragility of the beam is also a negative factor during construction, since the sheathing can easily be damaged by an accidental impact.
Sheathing of panels with a wooden frame must be done strictly perpendicular to the panels of the element. The brick wall from below is laid with bars more densely than from above. The basic installation rule is to attach the timber to the slats every 40 centimeters at a height of one and a half meters and after 60-70 cm if the distance is greater.
This type of fastening of a wooden beam to a brick wall has been used in construction practice for a long time, and all professional craftsmen recommend using it. It is possible to attach a board or timber to brickwork only if there are nails, chops and blocks in large quantities.
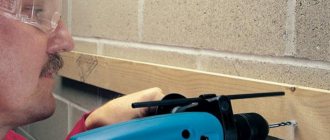
To carry out the work you will need a special construction tool - a bolt. It is needed to make even holes for installing fasteners on brick or concrete walls. A wooden chop is placed inside and carefully hammered in with light blows of a hammer, and a nail of the required size is driven into it using a block.
To install the beams on a brick wall with a full fit along the plane, you need to prepare the following tools and materials:
- electric drill;
- hammer-in dowels with plastic plugs;
- drills and drills with a diameter corresponding to the size of the dowels;
- hammer;
- measuring devices;
- pencil.
We suggest you familiarize yourself with How to fix floor beams to a wall
First of all, you need to make a marking, determining the position of the block on the wall, and outline it with a pencil. Then mark on the surface of the timber the places for drilling holes, which should be at a distance of 20-30 cm from each other. Further actions are performed according to the algorithm:
- Select a drill according to the diameter of the plastic insert for the dowel and drill holes in the block.
- Take a drill whose diameter is twice the original and make indentations so that the fastener heads go into the “sunk hole”.
- Attach the block to the designated location on the wall and apply markings to the brick through the prepared holes.
- Place a drill bit in a drill and drill blind holes in the brickwork. Place the timber, insert plastic plugs and nail it with dowels.
The length of the dowels must be selected so that they plunge into the wall by at least 50 mm. If the load is significant, then the distance between the attachment points is made smaller (10-15 cm), and the recess into the wall is larger (80-100 mm).
Fastening to anchors is carried out in the same order, the difference is in a more careful selection of the diameter of the drill and careful drilling.
If the hole is too large, the shank of the fastener will rotate inside and it will not be possible to tighten the anchor.
Separately, it should be said about how to support a wooden beam on a brick wall. This procedure is very important, since beams usually take on a large load or even serve as a ceiling. Therefore, embedding a beam into a wall (support) must meet certain strength and reliability requirements.
So, the installation of beams is usually carried out in special niches with a depth of at least 150 mm.
The process itself looks like this:
- The first step is to cut the ends of the beam at an angle of about 60 degrees.
- Then the ends of the part are impregnated with an antiseptic liquid, and after drying they are treated with resin.
- Next, the bottom of the niche is leveled and covered with several layers of roofing material.
- After this, the ends of the beam are wrapped with roofing felt and laid so that they do not reach the wall of the niche by about 40 millimeters.
- Then the remaining space in the niche is filled with concrete.
This completes the embedding process. It must be said that to add rigidity to the structure, additional fastening of the beam with an anchor is often performed. In this case, the anchor is installed during the process of laying the wall, and is located at a distance of about 12 cm from its outer surface.
Sealing scheme using an anchor
The other end of the anchor should protrude 20 cm into the room. In order to mount the beam, a hole is made in it corresponding to the diameter of the pin. This installation method is used in cases where it is necessary to obtain a particularly strong fastening.
The soft way
Peculiarities
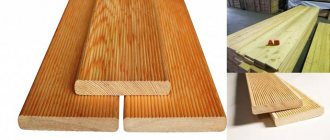
The use of wooden beams in construction is relevant when constructing walls made of concrete, metal, gas blocks, bricks and other materials. It is successfully used due to the fact that it can withstand severe mechanical loads. This building material is often purchased for load-bearing and interfloor structures.
Before starting installation, it is necessary to inspect the wall. If it has an uneven or deformed surface, you should consider eliminating these defects . This can be done by choosing the fixing elements in height, and the cross-sectional size of the beam also matters.
The specific distance between the material fastenings depends on these two parameters. It is necessary to calculate the gaps between the fixing parts of the profile depending on the chosen finishing: it is the cladding that determines the size of the building material. In general, fastening timber is a relatively simple process if you know the rules and limitations of its installation.
Environmentally friendly, practical, durable and easy to process, timber is certainly an ideal material for suburban construction. However, this wood material cannot be poured with concrete mortar, installed in brickwork or plastered.
Aerated concrete blocks are a soft material; screws with full-length threads are suitable for them, but it is better to use anchors, mechanical or chemical. To properly install an anchor with bending ribs or a wedge-shaped one, pre-drill a hole with a diameter slightly larger than the anchor. One type of anchor is perfect for hollow blocks and blocks made of cellular concrete - foam blocks, gas blocks, etc. The main “parts” of the anchor are a steel sleeve with ribs and a nut at the end. When the screw is screwed into the sleeve, the ribs bend and move apart, forming a “butterfly” that securely holds the anchor inside the material.
Chemical anchors hold even more firmly; they are suitable for all wall materials made of lightweight concrete and plasterboard, and for any wall materials. The principle of operation is the ability of synthetic resins to penetrate deeply into pores and adhere to the base. The weak link of fastening to porous blocks and drywall is not the fastener, but the base material, especially under the action of a vertical load, and chemical anchors help solve these problems. A chemical anchor is inserted using a special gun. The adhesive mass is squeezed into the drilled hole under pressure, and a fastening element is immediately inserted - a threaded pin or rod. The adhesive composition fills the pores of aerated concrete or other porous block, and after hardening it forms a strong and reliable fastening. The pullout force of a chemical anchor from a brick is more than 500 kg. The service life of chemical anchors is tens of years, they do not deform due to temperature changes, and are inert to aggressive environments. The latter is very important when working with aerated concrete, which is aggressive to metals. All fasteners for aerated concrete must have an anti-corrosion coating.
Fastening to aerated concrete and plasterboard walls
Aerated concrete blocks are a soft material; screws with full-length threads are suitable for them, but it is better to use anchors, mechanical or chemical. To properly install an anchor with bending ribs or a wedge-shaped one, pre-drill a hole with a diameter slightly larger than the anchor. One type of anchor is perfect for hollow blocks and blocks made of cellular concrete - foam blocks, gas blocks, etc.
Chemical anchors hold even more firmly; they are suitable for all wall materials made of lightweight concrete and plasterboard, and for any wall materials. The principle of operation is the ability of synthetic resins to penetrate deeply into pores and adhere to the base. The weak link of fastening to porous blocks and drywall is not the fastener, but the base material, especially under the action of a vertical load, and chemical anchors help solve these problems.
A chemical anchor is inserted using a special gun. The adhesive mass is squeezed into the drilled hole under pressure, and a fastening element is immediately inserted - a threaded pin or rod. The adhesive composition fills the pores of aerated concrete or other porous block, and after hardening it forms a strong and reliable fastening.
The pullout force of a chemical anchor from a brick is more than 500 kg. The service life of chemical anchors is tens of years, they do not deform due to temperature changes, and are inert to aggressive environments. The latter is very important when working with aerated concrete, which is aggressive to metals. All fasteners for aerated concrete must have an anti-corrosion coating.
For attaching a block to aerated concrete or plasterboard, the anchor method of fastening is the most durable, although costly. It all depends on the density (grade) of aerated concrete and the required load. To fasten the sheathing, it may be sufficient to use mechanical anchors - wedge-shaped or "spiral nails" type. The latter are convenient because they are mounted into a wall made of aerated concrete, driven in with an ordinary hammer. When driven, the spiral nail is screwed into the block without disturbing its porous structure.
The dowel, which in its working position resembles the spokes of a half-opened umbrella, bears the affectionate name Molly and is excellent for attaching wooden blocks to plasterboard partitions in order to secure paintings, light shelves or lamps on them. Molly is a type of expansion anchor bolt that has a sleeve with longitudinal slots, which, when the thread of the inserted screw is tightened all the way, folds and turns into an umbrella.
By using drywall, all kinds of structures are created and rooms are decorated. This material is quite fragile, so installation of heavy structures, for example, wall cabinets, is not provided for it. In order to reduce the load, fasteners are installed during installation of drywall.
Installation process:
- The wooden beam is fixed in the place where the cabinet will hang. It is fixed with self-tapping screws after installing the drywall.
- If the beam is light and has a small cross-section, then it is secured with dowels or drop-down anchors. Inside the drywall, the fastener opens and secures the structure. This happens after screwing in the screws.
If the cabinet is too heavy, the fasteners may not support the weight and come off. This will cause the drywall to break. Therefore, you need to carefully calculate the weight. Attaching the beam to a concrete base
The construction of a wooden log house still requires a concrete foundation. It can be strip, pile or slab. In any case, the question arises of how to fasten the wooden beam of the lower crown to the concrete. After all, the stability of the entire building depends on the quality of its fastening.
There are overhead installation and rigid fixation.
The first method implies that, laid on a flat base, the beam will be supported by the weight of the structure. The method is effective. It is used in cases where it is necessary to save time and money.
If there is no confidence in the reliability of the overhead installation, rigid fixation is used.
If the foundation is strip or slab, you need to make a decision in advance, because in this case it is necessary to pour special bolts into the grillage, to the studs of which the crown will subsequently be attached.
We suggest you familiarize yourself with How to install a shower cabin in a private house
Holes are made in the beams according to the location of the bolts. The foundation is covered with waterproofing. All unevenness in the concrete must be eliminated in advance. Then a wooden structure is placed on top so that the studs fall into the prepared holes and secured with locknuts.
To install the crown on a pile foundation, U-shaped brackets are used. First, the timber is cut and laid on piles to determine the size of the brackets. For accuracy, the latter are welded from corners and installed on the pile heads.
Waterproofing is laid, and a wooden crown is placed on top. It is worth taking a responsible approach to the issue of connecting corners. The staples are connected to the wood using self-tapping screws. Then you can proceed to the construction of walls.
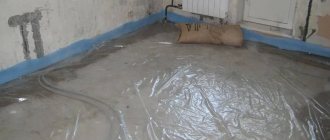
You can attach logs to a concrete floor using the method of attaching to a wall, but they do not use choppers, but plastic dowels or the locking part of the anchor. Sometimes logs are laid on insulation that has been laid in advance, fixing the position with a strong bond to the floor covering. It is important to choose the right type of wood depending on the purpose of the part. Before proceeding with installation, the wood must be treated with antiseptic and water-repellent coatings.
How to attach a wooden beam to a wooden wall?
In this case, the perforated fastening method is common both in roofing and in the furniture industry. Perforated elements are secured with nails, self-tapping screws or self-tapping screws.
Perforated plates connect parts in one plane, for example, roof installation. There are also corners of different widths to strengthen and connect the structure. For auxiliary elements of light weight, mounting tape is suitable.
The most common method of fastening wooden structures is with nails. Liquid nails are often used in everyday life, furniture assembly and construction. Using nails will seem like a very easy way, but we must not forget the technique of hammering a nail. If you use a bolt with a nut at the end, you can easily hammer a nail into any hard-to-reach place. Calculate in advance how long a nail you will need. For a more durable connection of the boards, the nails are driven in at an angle to each other. Wood that is too dry will split faster with a nail. If the timber is too dense, hold the nail in the middle with pliers to prevent it from bending. For large nails, you can pre-drill a hole that will be narrower than itself. Make a small drilling for the cap.
Fasteners
The beam can be secured with dowels, regular pins, or dowels. On strong, dense concrete, fastening is done with studs, dowels, and for a less reliable solution, dowels are used.
The pins are distinguished by a hexagonal head, which is tightened tightly with a tool; it is impossible to manually ensure the required tightening density.
The type of fastener depends on the size of the timber and the concrete base. An option is to deepen the fasteners the same distance as the nail goes into the beam, the same distance should go into the concrete. The best outcome would be to drive it into concrete to a depth twice the width of the block. For example, with a timber thickness of 15 cm, fasteners of 15, 20, 25, 30 cm are driven into the concrete. Recommendation - the reason for refusing fasteners in an apartment is that the other end of the hardware product may protrude through the neighbors' ceilings.
Types of hardware
When choosing dowels and studs, pay attention to the neck - the area under the head without threads. Threading begins with an indentation from the top edge; it is possible to achieve better attraction of the joists to the base.
The diameter of the connecting element must be large.
It is necessary to check the fasteners for chips, the amount of impurities, and a high percentage of soft metal content. The thread must be clear, the material must be durable and sufficiently hardened.
There is another fastening option - a quick-fix steel nail anchor, which is inserted into pre-drilled holes without a plug. The latter is not required; the nail has a metal sheath located around the rod. As the anchor is driven in, the shell expands, facilitating reliable fastening.