Installation technology for PVC cable duct
Installation of electrical wiring inside any residential, administrative or industrial facility is a complex and multi-stage procedure, during which many related tasks must be solved.
It is not enough to simply calculate all the electrical parameters and select wires, cables and equipment with the appropriate characteristics. It is necessary to achieve the required level of safety and aesthetics of the resulting system. Simply put, you need to isolate and disguise all its components as much as possible, while ensuring ease of access. The classic solution, which has been the only solution for a long time, is to place wiring and equipment inside building structures. In particular, the wires were hidden inside gutters (grooves) pre-punched in the walls and ceilings, as well as behind baseboards, suspended ceilings, and so on. The disadvantages of this solution are obvious:
- High labor intensity
- Low accessibility (to get to the damaged element, you have to tear off the baseboards or remove plaster from the groove)
- Impossibility of widespread use (not all designs and finishing materials allow this)
Today, an alternative option has appeared - external cable channels. These are special boxes that protect and disguise electrical wiring. They may differ in:
- In its own form
- Material of manufacture
- Hardness levels
- Protection class (IP)
- Installation method
- Designer design
The most widely used cable ducts are made of polyvinyl chloride (PVC), a modern polymer material that has an optimal combination of performance and consumer qualities. Let's consider the main advantages of this solution.
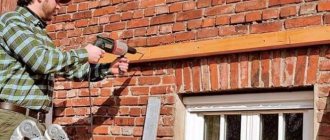
Fastening the cable channel to the wall using self-tapping screws.
If you decide to install a cable channel in a wooden house or apartment with plasterboard partitions, then the installation must be done with special wood screws. The fastening step depends on what load will be placed on the plastic box, or more precisely, how many wires need to be stretched inside, and what their cross-section is.
As a rule, to securely fasten a cable channel to a wooden wall or drywall, it is enough to screw screws every 40-50 cm. If the walls are uneven, it is better to reduce the fastening step, this will hide all defects and gaps.
You should not choose too long self-tapping screws for installing the cable channel. To securely fix the box in the wall, it will be enough to screw in fasteners about 40 mm long. For screwing, it is best to use a screwdriver with a Phillips bit.
Fastening the cable channel to dowel-nails.
You will need the following tools:
- Hammer.
- Dowel-nails.
- Sharp knife.
- Level and pencil.
- Screwdriver.
To begin, draw a straight line on the wall (ceiling) (for walls at a level) and prepare dowel-nails for work, from which you need to cut off the plastic cap with a sharp knife. This is done so that the channel fits tightly to the wall. We will use a concrete drill with a diameter of 6 mm and, accordingly, dowel-nails No. 6.
Next, attach the cable channel to the line and punch it with a hammer drill, going deep into the wall to the length of the dowel. Insert the cut plastic insert and screw the dowel-nail with a screwdriver until it stops. The next attachment point is located 40-50 cm, the extreme one 5-7 cm from the edge of the box. Insert the wire into the channel and snap the cover on.
How to attach a cable channel with glue (liquid nails).
Fastening with glue is not very reliable; it is used where others cannot be used, for example, for fastening to tiles. You can combine it with others - with fastening with self-tapping screws or dowel - nails.
To glue the box to the wall, glue is applied to it in a zigzag line, then pressed against the wall along the markings so that the glue is imprinted on the surface, and removed. After a few minutes, when the liquid nails have set a little (the time depends on the specific type of glue, this can be read in the instructions on the package), the box is pressed firmly against the wall again.
Remember that dismantling a cable channel glued to the wall with liquid air without damaging the coating or the electrical box itself is impossible. The cable can only be laid after the adhesive has completely hardened.
Fastening the cable channel to metal.
If there is a need to attach a cable channel to metal less than 2 mm thick or an aluminum profile, then we advise you to use metal screws, also called “bugs,” for fastening. There is nothing difficult about installing an electrical box on a metal surface; the main thing is to choose good screws and charge the screwdriver.
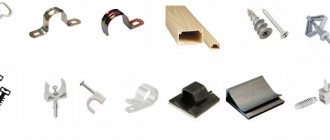
Fastening with clips
These fasteners are quite popular when laying open cables. The clips look pretty neat after installation. They can be of different sizes, shapes and be metal or plastic,
We invite you to familiarize yourself with Insulation of stove pipes: non-combustible materials for thermal insulation of stove pipes and ceilings
A simple version looks like a bow, on both sides of which there are holes for dowels or screws. A good and simple design, but there is a small drawback - for installation you need to drill two holes. This slightly increases installation time.
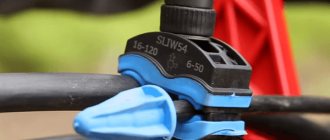
Made from metal strip. To install, first “wrap” the cable with it, align the holes and secure it to the surface. Can be used on the wall and ceiling. For the latter, they are inconvenient only because you need to drill a lot of holes.
Plastic clips
They are mainly used for installing corrugated cables for hidden and outdoor installation. Corresponding clip sizes are available for different pipe diameters. They are mounted on concrete walls using dowels, and on wooden surfaces using ordinary self-tapping screws.
The installation can be performed for one cable, or combine several pieces to secure a bundle of wiring. The design of the clips allows them to be assembled into a single block. Each side has locks (special grooves), which help securely connect the clips to each other. The layout using these elements is neat and even.
They are used for fastening cables or wires of various shapes; they can be made in plastic or metal form. The surface where it will be attached must be cleaned of all dust and dirt. The clip has a one-sided adhesive tape on the back. This type of fastener is used for attaching cables to plastic panels or furniture. There is no need to drill holes in expensive or brittle materials.
Clips with nail
They are made in the form of a plastic bracket, on the side of which there is a hole for a nail. They can be very different in shape. Used for open installation on wooden and similar density walls. In the photo above.
This fastening is very fast and convenient. It is often used when it is necessary to route telephone, television and other small cross-section cables along the baseboard.
A simple version looks like a bow, on both sides of which there are holes for dowels or screws. A good and simple design, but there is a small drawback - for installation you need to drill two holes. This slightly increases installation time.
Methods of fastening to walls made of various materials
Before you begin to attach the cable channel, regardless of its material, it is necessary to clearly assess what type of wall this manipulation will be carried out on. In accordance with this, select the fixation method.
It is necessary to clearly assess what type of wall the cable duct will be attached to.
Fastening the cable channel to dowel-nails
The most common type of installation, which is distinguished by its versatility, ease of installation procedures and low price. This option is suitable for hidden and open installation variations.
But, it is important to consider that dowels, just like self-tapping screws and self-tapping screws, must be tightened to the end. Otherwise, the cap that sticks out may damage the wire insulation.
The method is used on walls made of brickwork, as well as concrete monolith. The fixation step should have a distance of about 45 cm.
This option is suitable for hidden and open installation variations.
How to attach a cable duct with glue
To implement this fastening option, first cut the plastic structure into sections of the required length. Then apply glue along the back of the channel. After this, fixation to the surface is carried out. Hold it a little so the glue has time to set.
It is worth remembering that choosing adhesive compositions is recommended in extreme cases when it is not possible to mount in any other way. For example, when it is necessary to place a plastic structure on tiles or expensive wallpaper.
To implement this fastening option, first cut the plastic structure into sections of the required length.
Features of fastening with self-tapping screws
Most often, such fasteners are used on wooden surfaces or on plasterboard structures. In the second case, it is necessary to carry out the manipulation very carefully so as not to lead to coloring. The distance between adjacent screws is most often in the range of 35...45 cm. It is selected according to the cross-section of the wire and the materials of the wall itself.
Most often, such fasteners are used on wooden surfaces or on plasterboard structures.
Can nails be used for installation?
The use of carnations is extremely rare. There is no reason to choose them.
- They can only securely enter a wooden wall;
- At the slightest mechanical load, they can jump out of the wooden surface and cause damage to the wire;
- Cloves can serve as additional fixation to the glue to ensure increased reliability in case the adhesive composition dries out over time.
The use of nails is extremely rare.
Glue (liquid nails)
Fastening the cable channel with glue is not very reliable; it is used where others cannot be used, for example, for fastening to tiles. You can combine it with others - with fastening with self-tapping screws or dowel-nails.
To glue the box to the wall, glue is applied to it in a zigzag line, as in the figure, then pressed against the wall along the markings so that the glue is imprinted on the surface, and removed. After a few minutes, when the liquid nails have set a little (the time depends on the specific type of glue, this can be read in the instructions on the package), the box is pressed firmly against the wall again.
We suggest you familiarize yourself with the Juniper broom for a bath. Benefits, how to steam correctly
Installation stages
Installation of wire routes consists of a set of measures. They require a responsible approach. In addition to installation, a number of preparatory tasks should be completed. Next, we will dwell in detail on each of the stages.
Wiring diagram
First, a diagram of the electrical wiring in the room is made. You can create it yourself if you have an understanding of electricity. Otherwise, you will need to use the help of specialists.
Drawing of cable channel passage
The next step will be to make a drawing of the cable trays, taking into account the location of all junction boxes, switches and sockets. To do this, it is better to use a program with the ability to display three-dimensional images.
Wiring diagram for cable channels
Purchasing an electrical box with accessories
Next you need to calculate the required number of accessories. They are necessary for the aesthetic appearance of butt joints. To avoid further problems with installation, you should purchase accessories and cable routes of the same brand.
Marking the cable channel route
According to the previously prepared drawing, the markings for laying electrical trays are transferred to the walls. To maintain horizontal and vertical lines, use a plumb line and level. If you have a laser level, just use it.
Marking walls for electrical wiring
Preparing the cable channel for installation
At this stage, you will need to prepare the appropriate lengths of cable channels. It is recommended to cut as the boxes are installed. It is also necessary to keep in mind that mini cable routes are not equipped with longitudinal connecting accessories. To get a beautiful connection you need:
- Use two boxes, one of them mounted in one piece.
- Cut the second one to the required length along with the protective cover.
- First, the cut-off lid is installed on the solid box, and then the undamaged lid is snapped on.
Fixing the cable channel along the marked route
Fastening the electrical tray to the wall can be done with liquid nails, wood or metal screws, or dowel nails. It is recommended to screw in the fasteners in a staggered pattern. When using liquid nails, glue should be applied to the back of the box in a zigzag pattern.
Attaching the cable channel to the wall
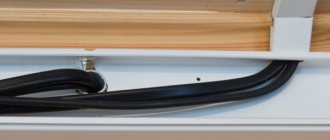
Laying and securing cables in the channel
When laying wires in a cable channel, you will need to adhere to the following rules:
- Power cables must be placed without twisting each other.
- Telephone, computer and television cable lines must be laid separately from power electrical wiring.
- The wires laid in the box are secured with spacers and clamps.
Preparation for installation
Necessary tools and equipment
To install the cable channel, the following tools are required:
- ruler, level, marker;
- screwdriver;
- miter box;
- hacksaw or file for PVC;
- drill or hammer drill;
- drill (size depends on the width of the screw head);
- hammer;
- glue or liquid nails.
The fastening of the channels depends on the surface. For wood, self-tapping screws are used; for stone or concrete surfaces, the channels are attached to dowel-nails. Liquid nails are used to attach the cable duct to smooth tiles or metal.
Preparatory work
Before starting installation of the cable channel, it is necessary to perform calculations.
- First, decide on the material and type of channels. Create a plan of your room, which will indicate the necessary types of ducts for all rooms. In the plan, show the route of each cable, the location of additional accessories in the form of connectors or bends. All this should be recorded in footage. Consider outlets and switches in your plan. Also, when drawing up a plan, keep in mind that the main canal should be thicker than the adjacent canals.
- The cable channel can be placed at any wall level. The location of the channel depends on the interior of the room. If you plan to attach the channels with glue, make sure the walls are level in advance. Adhesive fastening can only be used for small channel models containing no more than 3 wires.
- Before starting work on installing cable ducts, prepare fasteners suitable for your surface. For a concrete wall, use dowels; for a wooden wall, use regular metal screws. For gypsum board, butterfly dowels are most often used.
- After preparing the fastening materials and necessary tools, the last preparatory step will be marking the wall. Mark the straight lines of the future channel with a pencil. Use a level to get straight lines.
- Another important preparatory step is to determine the location of the base, as well as an idea of which wires will go into the cable duct. The cables must be freely located inside the channel. A large number of wires can cause them to overheat.
- If the walls are uneven, the base may become bent and the lid may be difficult to snap into place. When installing the system after finishing work, do not stain the channels.
- If you do not have the opportunity to purchase fasteners, you can purchase special channels in the store with adhesive tape attached to the base. These fasteners are considered temporary, as they are not capable of performing their function for a long time. You need to cut such channels with the lid latched.
How to attach a cable channel to a concrete wall - We build and repair
During the construction of a house, electrical wiring is installed in a hidden way, under the plaster. A complete replacement of the electrical wiring is usually carried out during a major overhaul. In this case, grooves are made in the wall, into which the wire is laid.
But what to do when there is no opportunity or desire to engage in dusty wall slitting? Or do you need to connect a recently installed powerful electrical appliance, such as a water heater? In this case, many choose the open method of laying electrical wiring, and fastening to the wall is carried out using a cable channel.
Several criteria are used to classify a cable channel:
- Size. There are small products for laying one wire of a small cross-section or large boxes designed to mount up to eight conductors of different cross-sections on the wall;
- Material of manufacture. They produce aluminum, steel and plastic structures. For indoor installation, plastic models are more in demand, and fastening steel and aluminum boxes is more often used when laying electrical wiring along the facade of a house;
- Location. The cable channel can be fastened in several places. The design of the product is maximally adaptable depending on the installation location. There are plinth, parapet, main and floor models.
Note! In terms of color design, the cable channel most often has a neutral white color, suitable for any decoration. Models that imitate a wooden structure are also popular.
Installation technology
The main advantage of a channel cable for open wiring is ease of installation. At the same time, the structure can be fixed on any surface: wall, floor or ceiling.
The surface material is of greater importance: the method of best fastening depends on this.
Let's consider the main installation options, as well as the types of surfaces to which the channel cable is attached.
Before you begin to attach the cable channel, you need to make markings on the surface: the location of the electrical wiring boxes is marked on the wall. This can be done with a pencil or chalk and a building level. It is important to maintain horizontal and vertical lines, since after installation the unevenness of the gasket will be evident.
Self-tapping installation
To secure the box to a wooden wall, use ordinary self-tapping screws. The recommended length is 2–3 cm. This method is suitable for wooden houses, bathhouses and other buildings. Self-tapping screws are also suitable for walls covered with wooden clapboard.
When performing installation, holes are pre-drilled in the bottom of the box, into which self-tapping screws are then screwed.
In plastic structures, holes can be made directly with a self-tapping screw during fastening.
The optimal distance between installation points is 30–50 cm, depending on the expected load on the cable channel (the number of electrical wires placed in the box).
Installing cable ducts on a concrete surface requires a more serious approach and additional tools.
This will require plastic anchors and a hammer drill or impact drill to make holes in the concrete wall.
This method is suitable for installing any profile: both metal and plastic, indoors or outside the building. The order of work is as follows:
- Holes for fastening are drilled at the bottom of the box. The distance between them, as in the previous version, is 30–50 cm;
- Then the cable channel is applied to the wall along the previously marked line;
- Using an awl or nail, the location of the fasteners is marked on the wall surface;
- Then, using a puncher, holes of the required diameter are drilled along the marks in the wall, into which plastic dowels are driven;
- After this, all that remains is to secure the profile using self-tapping screws.
To secure the electrical wiring box to a concrete surface, you can also use dowel nails, which are driven in with a hammer. But this option has a significant disadvantage - if it is necessary to move the structure, certain problems arise with dismantling such dowels.
Glue method
Another option for securing the cable channel is to use mounting adhesive for fixation. Most often, the adhesive composition “liquid nails”, produced under the Moment brand, is used for these purposes. This glue is available in tubes for a mounting gun or in ordinary tubes for manual application.
The adhesive installation method is used for attaching cable channels to plasterboard, PVC wall cladding (plastic lining or panels), as well as in bathrooms on ceramic tiles.
It is worth noting that only plastic wiring boxes are suitable for this method, since their weight is minimal.
The technology of the adhesive fixation method is as follows:
- An adhesive is applied to the back of the profile. To ensure maximum adhesion area, the glue is distributed in waves;
- Then the cable channel is carefully applied to the wall along the marking line and immediately removed;
- After 2–3 minutes, when the glue has begun to dry, the strip is reapplied and pressed firmly for several minutes.
After the adhesive has completely set, additional fixation is performed in problem areas. For fastening, use small screws or hammer nails.
In conclusion, here are a few recommendations that will come in handy when installing cable channels.
To facilitate profile connection, use additional elements offered by the manufacturer: T-shaped and corner structures, strip connectors, various bends and other accessories.
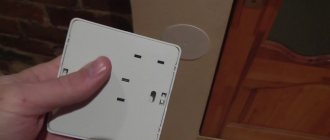
To install sockets and switches, it is best to use overhead versions of these products or use box models with built-in structures.
Separately, we note that the installation of external electrical wiring is carried out last, after all finishing work has been completed.
It is not always possible to make hidden wiring; sometimes it is more expedient to attach a cable channel to a concrete wall, since it is much faster, less dust and noise than when cutting concrete. There is always access to wiring, you can add or replace it with a more powerful wire.
Before you start purchasing cable channels, you need to decide on the following parameters:
- size, it depends on whether you need to lay one or more wires;
- material, they can be aluminum, steel or plastic, the latter are most often used indoors;
- Depending on their location, cable channels can be main, floor, or plinth parapet.
First, markings are made on the wall where the socket or switch will be and where the cable will go; for this you need to use a pencil, ruler and level. Since the concrete wall is very strong, the cable ducts are installed using plastic dowels.
To make the holes, you will need a hammer drill or you can do this with a powerful impact drill.
Holes are made in the cable channel with a pitch of 300-500 mm, then it is applied to the wall along the previously marked line.
We suggest you familiarize yourself with bituminous shingles: how to lay them
Classification of cable channels
Using a cable channel allows you to fix the cable on a base made of concrete, brick, wood, plasterboard, foam block, stone.
However, the attachment methods will be different.
Depending on the room, the schematic arrangement of the wiring lines and the number of wires in them, it is recommended to use boxes of various types.
Their detailed classification is presented in the table.
| installation location | floor | in their shape and appearance they are optimally adapted to the installation location; |
| main | ||
| skirting | ||
| color | Available in different colors and shades | fit harmoniously into the interior of the rooms |
| size | different channel volumes - for one, 2, 3 or more cables | dimensions from 12×12 to 100×60 mm; have different shapes of corners - from sharp to rounded |
| number of locks | with one | 2 latches – more securely hold the cover on the channel, reducing the possibility of deformation; |
| with two | ||
| product material | aluminum | covered with film; a variety of shades gives an attractive look; fireproof |
| steel | installed indoors or outdoors; Available with a galvanized surface in different colors; do not burn; susceptible to corrosion when scratched |
The market allows you to select products for specific operating conditions.
The most expensive option is aluminum, the cheapest is plastic. In any case, the latter should be taken, which do not burn, but melt.
Fastening the cable channel using self-tapping screws
This method is perfect for those who decided to install wiring in a wooden house or in an apartment where all the walls were covered with plasterboard. Here, the cable channel can be fastened using special wood screws. The number of screws in a certain area will depend on how many wires will run in this channel.
Typically, in order to securely fasten the cable channel, self-tapping screws must be mounted at a distance of 40 cm. This distance is considered optimal. If your house has uneven walls, then you can easily reduce the fastening step. Thanks to this, you can significantly hide all the unevenness. The wiring in the bathhouse can be fixed using this method.
Options for mounting the electrical box
The method of fastening electrical boxes is determined by the material from which the walls are made. Those wishing to independently install a plastic cable channel can:
- it is commonplace to glue the base to a wooden, wallpapered, painted wall, to a partition made of moisture-resistant plasterboard or lined with plywood, or any board made from pressed wood waste;
- screw with galvanized screws to a wooden surface;
- fix the base on a concrete or brick wall using dowel nails;
- combine the adhesive method with self-tapping screws.
Boxes with adhesive tape placed on the base in the factory are available for sale, but they are preferred to be used for organizing temporary wiring due to doubts about reliability.
The boxes must be cut together with the lids snapped on them. When constructing a route from several segments, you must try to ensure that the junctions of the two bases do not coincide with the junctions of the lids. Simply put, swap the lids: first cover the long section with the short lid, then the long one, and vice versa.
Specifics of gluing cable channel
Gluing is as easy as shelling pears, but you need to take into account that you need to completely forget about dismantling the glued box. You can’t just tear it off, only together with a piece of the wall or its decoration. True, installation will require a minimum of effort and time; the only consumables are glue, for example, “liquid nails.”
- We apply the adhesive composition in a kind of zigzag with a step between the “tops” equal to approximately 1.5 times the width of the box;
- We apply the base treated with glue to the wall, but do not fix it on it, but remove it to the side;
- wait until the remaining adhesive trace on the wall thickens;
- install the channel in place and press firmly;
- again we wait for the glue to harden.
For your own peace of mind and increased reliability, you can supplement the adhesive fastening with nails driven along the central axis of the box in increments of 50-60 cm.
Only after hardening will it be possible to begin laying the cable, which for convenience needs to be fixed in the channel. For permanent fixation, special plastic holders are useful. Thrifty craftsmen can use available devices: pieces of the cover or the cable channel itself. Temporary fixtures will undoubtedly need to be removed before attaching the cover.
Advice. It is more convenient to lay the cable in the constructed system, alternating with snapping the cover. Installed part of the wiring in the channel, then clicked it, etc.
The nuances of using self-tapping screws
You must first make holes on the inner surface of the channel base. In a narrow profile they can be arranged along one line, in a wide box in a zigzag pattern. The pitch between the holes depends on the quality of the wall alignment. For a flat surface, 50 cm is enough. If there are small gaps between the cable channel attached to the installation site and the wall, the step should be reduced to 30-40 cm. In general, “gaps” between the wall and the electrical box are undesirable. Installation of channels is carried out on a carefully leveled base.
We apply the section of channel cable prepared for installation to the wall and screw the screws through the formed holes.
Subtleties of using dowels with screws
The method is quite labor-intensive, used for constructing a cable line over brick or concrete walls:
- prepare the base of the channel: drill holes in advance;
- we apply it to the attachment point in order to mark the points of upcoming wall drilling through the existing holes;
- Using a 6-mm drill, we drill holes at the marked points for dowel-nails of the recommended size 6×40;
- again we apply the base of the box to the attachment point;
- insert the dowels and tighten the screws.
Without experience in installing boxes, it is not advisable to drill the base directly on the wall and immediately insert dowels. It’s good if the result of errors is closed directly by the cable channel. And if not?
Instructions on making corner joints
The main requirement of this work is the absence of visible “gaps” between the elements after snapping the covers. To avoid any cracks, you need to carefully measure and cut carefully, using a metal blade and a miter box or trimmer. Therefore, those who want to build a cable channel system on their own are strongly recommended to use accessories that hide all the flaws.
Minor mistakes can be masked with color-matched sealant, but there is still a way to create a neat corner transition. Instead of cutting two pieces at the traditional 45º angle, you can simply cut the walls of the bases to their full width. In such cases, the boxes are installed with an overlap. Cuts and cutouts on the walls of the cable channel are made with metal scissors.
We are convinced that there are no special tricks in fastening electrical boxes. Connecting sockets and switches to the mains laid in them is done in a standard way. If the performer is patient and mobilizes his own accuracy, he can rightfully be proud of the result.
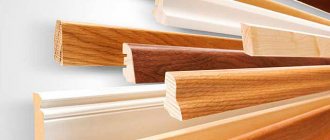
Skirting board with cable channel
A plinth with a cable channel is a convenient solution that allows you to simultaneously install a cable channel and create a seam between the wall and the floor.
To find out how long the baseboard you need, accurately measure the perimeter of the room and add 9% to the resulting length for scraps. You will also need fittings: external and internal corners, special connectors, end caps. The profile is available in standard length - 2.5 m.
The plinth can have a cable channel in the middle or consist of a profile attached to the wall and a plug (upper part); in the second case, the cable channel is located between the profile and the plug.
Regardless of the design, you can install such a plinth in several ways:
- on self-tapping screws,
- for liquid nails,
- on dowels.
You can attach a plinth with cable duct to drywall using self-tapping screws or glue; in a brick or concrete wall you will need to drill holes and hammer dowels into them. It is recommended to glue the cable channel only on smooth walls: in areas with defects, it may come off after a while. To mask wall defects, it is recommended to additionally secure the baseboard in these places to prevent a gap from appearing.
Unlike a conventional cable channel, you can drill holes in the wall directly through the baseboard. They are placed every 30 cm. To do this, the profile (the upper part or the decorative plug covering the channel must be removed) is pressed against the wall, carefully ensuring that there is no gap between it and the floor. Before attaching the plinth, remove debris with a vacuum cleaner. Press the profile back and insert dowel plugs into the holes, and then screw in the screws with a screwdriver.
To install the plinth on the outer corners, press it against the wall and make a mark at a distance of 3 mm from the corner. Then, following this mark, the profile and the plug are sawed off (for this it is convenient to use a miter box and a hacksaw for metal or wood) and installed on the wall. After laying the plinth, a special corner is placed on the corner. Corners can be with brackets or simply inserted.
We suggest you familiarize yourself with How to fix socket boxes in a brick wall
It is better to install the baseboard starting from the corner of the room. It is advisable to install entire skirting boards in visible places. If you need to carefully join two sections within a wall, use special plastic connectors. Plugs are placed at the ends.
The plinth makes it possible to distribute wires into groups. For example, wires that do not require frequent access (Internet, cable TV) can be placed under the base of the baseboard. The rest can be placed in a cable channel closed with a plug. In the version with a completely removable top, you can place the wires under and above the rib to which the plug is attached.