Corner connections
There are different ways to connect the beams to form an angle. Previously, they were traditionally attached “into a bowl”, making the joint not at the ends, but slightly retreating from them. The result was a cross-shaped joint with ends protruding outward. But there are many ways to avoid leaving such protrusions that interfere with the exterior finishing.
Since the beam has the correct geometry with a rectangular or square cross-section, it is much easier to connect than a log. Even rounded. This shape simplifies the marking and production of grooves and allows for tight joints.
Let's look at the main options for connecting timber at an angle to each other:
- Butt. The simplest method that does not require cutting or grooves. One beam is butted end to side of the other, in each row such joints are shifted and alternated, as in the previous photo. This connection is very fragile and requires additional fixation with perforated steel plates, staples or other fasteners. In addition, end-to-end corners, even with high-quality insulation, begin to blow out over time and let moisture in. Therefore, this method is used mainly for the construction of outbuildings and other non-residential buildings.
The joint is additionally secured with a bracket and a steel angle Source www.allremont59.ru
- Half a tree . This type of joint is very common, as it is accessible even to inexperienced carpenters. It involves removing part of the beam from the end to half its depth. The end result is steps that overlap each other. To strengthen the joints, they are drilled through and dowels are driven into the holes. They also fasten the beams along the length of the span between the corners.
Corner connection in half a tree Source 900igr.net
- In the paw. This fastener is very similar to the previous one, but the end is cut out not at a right angle, but at an angle.
- Dovetail. One of the most durable and reliable ways to fasten timber together. It consists of a tenon-groove locking device. Moreover, the spikes have the shape of a trapezoid, which increases the area of conjugation of the two elements and does not allow them to “spread apart”.
The shape and size of the tenon are selected so that it fits tightly into the groove formed by two tenons of the transverse rims Source stroyfora.ru
- Root thorn. Otherwise, such a connection is called a “frying pan” or “warm corner”, since it is windproof, without through gaps from the street to the room. In this case, the locking T-shaped connection is made secret by cutting out a rectangular or trapezoidal groove in the horizontal plane not to the entire thickness of the beam, but only to half. The tenon of the second beam repeats its shape. This joint is called a blind pan and is used to fasten the outer corners of a house. When constructing internal partitions, an open frying pan is often used, cutting a groove along the entire thickness of the beam. Additional strength is provided by driving a dowel into the lock.
Warm corner with rectangular and trapezoidal tenon Source i0.wp.com
See also: Catalog of timber house projects
- Into the bowl. The method is similar to joining a half-tree, but the grooves are cut not at the ends of the crowns, but with an indentation from them and the formation of residues protruding beyond the perimeter of the walls. The groove can only be on one side of each crown - and this is the simplest and easiest option to implement. Cutting can be done on two opposite faces, or on all four.
For reference! Four-sided grooves are quite difficult to manufacture; they are usually made in the factory when ordering a log house according to a finished project.
One of the options for connecting timber to each other using the “bowl” method with four-sided grooves Source utwood.su
These methods are used for any corner joints, not exclusively rectangular ones.
Simply, the ends of the beams are first sawed off to form bevels that give the desired angle at the junction.
Fastening technology: soft method
This method is used using U-shaped staples. The method has both advantages and disadvantages. The main advantage of soft fastening of beams to the wall is the speed of operation, the disadvantage is the unreliability of fastening the frame, the structure can collapse over time.
Among other disadvantages, the fragility of the timber is noted: the frame can be easily damaged by accidentally hitting it. Therefore, it is worth thinking about before you decide to do this work. However, there is still a solution: if the elements are laid to finish the walls from plastic panels, then, as a rule, no deformations are observed. It should be taken into account that the paneling of the panels with a wooden frame is carried out perpendicular to the panels of the element themselves. On the lower part of the wall, timber is laid more often than in the upper area. As a rule, fastening the timber to the wall to a height of up to 1.5 m is located every 0.4 m. Above this mark, the distance becomes larger and can be 0.6-0.7 m.
Related article: How to make a rough ceiling in a house
You can do this work yourself. Installation of the frame does not require any special skills in the field of construction; it is only important to follow the instructions exactly.
Connections in length
The standard maximum size of timber is 6 meters in length with different sections. This is often not enough to build the walls of a large house, install rafters or lay floor beams. You have to splice 2 or even 3 elements in the longitudinal direction. And it’s one thing when it is a crown that has support under it in the form of a foundation or an underlying crown, and another thing if there is no such support. We have to decide how to splice the beam along its length in order to withstand the load not only from its own weight, but also from the structures resting on it.
Such problems are solved in ways similar to those already described. The fastening is simply done not at an angle, but along the beams.
During the construction of canopies, gazebos and other similar structures, the jointed timber may not have any support Source i.ytimg.com
See also: Catalog of companies that specialize in the construction of houses made of timber
- Half a tree. A fastening unit already familiar to you, when symmetrical straight notches are cut from the ends up to half the thickness of the beam. Splicing with oblique notches will be more reliable. But in any case, additional fixation with plates, pins or dowels is required.
- Oblique castle. In this case, the connected ends are also cut obliquely, but the cuts are not flat, but stepped in shape with certain parameters for each protrusion. When combining two beams, they must exactly repeat each other. “Sliding” is prevented by an already proven method - driving dowels into the joint. Without a special tool, solving the problem of how to connect 100x100 beams together in this way is almost impossible.
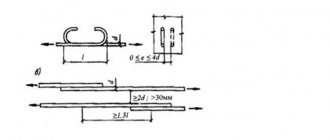
- Straight patch lock. At the ends of the beams, peculiar hooks are cut along their entire width. This is the most reliable splicing method for hanging beams.
Straight and oblique lock Source i1.wp.com
- Root thorn . This is the same type of connection that was described in the previous chapter. The spike can be either rectangular or trapezoidal. The trapezoid is much more reliable, as it prevents vibrations in the horizontal direction.
- On the key. If, when installing a main tenon, a tenon is formed at the end of one beam, and a groove is selected in the other, then in this case two grooves are made, the beams are laid end-to-end, and a key is driven into the resulting hole, repeating its shape. It is pre-coated with wood glue or PVA glue to increase the strength of the joint.
Note! When building walls, it is not enough to decide how to connect the beams together along the length. It is necessary to shift the joints relative to each other so that they do not coincide along the vertical line in adjacent crowns.
The production of locking joints is noticeably simplified and accelerated if you do not mark each beam individually, but make a template from thin and dense sheet material.
Features, required tools
There are several varieties used:
Scheme of preparation of logs for the assembly of a log house.
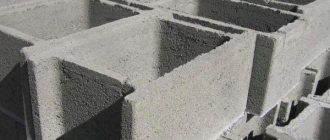
- Construction - sawn, or, as it is sometimes called, “shaggy” timber. In cross-section it is a square or rectangle.
- Profiled timber differs from construction timber by the presence on the upper and lower edges of a system of protrusions and grooves that ensure the pairing of individual crowns during the construction of the wall.
The design of the interface line involves laying a layer of insulation. Sometimes pairing is carried out without the use of auxiliary materials, as they say, dry.
Manufacturers can produce profiled timber in two varieties:
- solid - made from a single solid wood;
- glued - during production, individual lamellas are glued together.
When assembling a log house, regardless of the profile used, you will need the minimum required set of tools:
- saw;
- drill;
- hydraulic or laser level;
- construction stapler;
- sledgehammer.
In addition to the above tools, auxiliary materials are required for assembly:
- interventional insulation;
- wooden dowels;
- if necessary, metal pins with a diameter of at least M12.
Technology of screeding laminated timber with studs.
When constructing a log house from profiled timber, most often at the manufacturing plant, according to the project, a house assembly is prepared. The output is actually a construction kit, where each part is numbered. Using the included design drawings, and with at least minimal experience with the tool, it is relatively easy to assemble the entire structure on site.
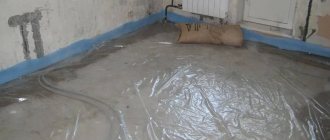
The basic rule for storing building materials on site is protection from precipitation and moisture from the soil. Therefore, it is best to organize a temporary storage place under a canopy. To prevent the ingress of soil moisture, all parts are placed on temporary stands. The distance to the ground level should be at least 20-30 cm.
Related article: Is it possible to glue non-woven wallpaper with vinyl glue?
Connection fastener
With the advent of modern fasteners made of durable alloy and galvanized steel, many construction processes have been simplified, including the installation of reliable connecting units in timber structures. Some of them have been used for a long time and are traditionally popular. Others appeared relatively recently, so they may be unknown to people whose profession and interests are not related to construction.
Traditional fasteners
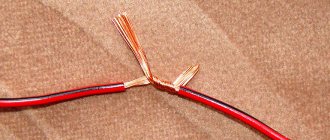
The simplest and most reliable of them are dowels or dowels made of hard wood. They blend perfectly with the base material without causing it to deform, crack or rot. In combination with adhesives, they allow for durable fastening.
Assembling a log house on steel dowels Source remontik.org
Pins are also metal. Their main advantage is their high strength and durability, which is why they are often used to fasten timber crowns vertically.
Nails and staples, which used to be almost the only types of fasteners for wood, are now trying not to be used in the construction of permanent buildings, since the ferrous metal from which they are made is incompatible with wood. It corrodes easily, damaging the wood and gradually deteriorating. For the same reason, it is not recommended to use homemade dowels cut from reinforcing bars.
Modern fasteners
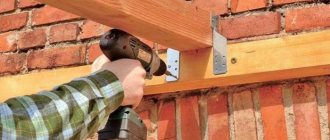
A wide variety of fasteners are made from perforated rolled steel with a thickness of at least 2 mm with an anti-corrosion coating. It is made from:
- plates of different lengths and widths with holes for screws and anchors. A large assortment of standard sizes allows you to solve problems such as connecting beams together along a length of 150 by 150, fastening rafters at the ridge part, or strengthening a sagging joint without lower support;
Galvanized connecting plate Source www.sibwindows.ru
DIY installation: step-by-step instructions
Schemes of rigid fastening of timber.
First of all, you need to make markup, which will be the basis for creating the project. This is done so that you can determine the level of the wall surface.
Next, you should measure the pitches of the fasteners. The distance in this case ranges up to 60 cm (the minimum gap is 30 cm). It is determined by the quality of the timber and its thickness.
The next step is strapping. To do this, lay the elements strictly along the contour of the wall being leveled. If you are planning to level one wall, then you need to attach the beam to the walls that are perpendicular. The use of pads is not required during installation.
Article on the topic: For music lovers: DIY crafts from CDs for home and garden (65 photos)
It is recommended to first make a small hole in the part to be installed. This must be done so that the screws can be inserted. Remember that the diameter of the drilled hole should be slightly larger than the diameter of the screw.
Then you take the product and apply it to the surface of the wall. You do part of this work with a hammer and nail. Your task is to transfer the mark for the hole to the surface.
The next stage of work is to drill the planned holes. As a rule, you must drive wooden chops or regular dowels into them.
Next, you install the wooden block in its place, securing it with a screw. However, you can use another method: the timber is attached to the chop with a nail, using a hammer.
Scheme of fastening the timber to each other.
Now you attach and install all additional contour elements. For convenience, you should stretch a thread between them. What is the thread for? Using it you will be able to determine the height of the block, and in all places where the beam is attached to the wall. This way you measure the distance that forms from the surface of the wall to the thread. Then we subtract the height of the element from this distance.
Then you should take pieces of plywood of various thicknesses and build a structure. During the work you will need an ax and a chisel.
Once the block is ready, you can start drilling a hole in it. The diameter of the hole made must be larger than the diameter of the screw.
Next, you should make holes in the beam so that you can later attach it to the wall. How to drill a hole depends on the height of the element, as well as the material from which it is made. For example, if the beam has a height of more than 6 cm, and the material is larch, then you need to use a drill with a drill with a diameter of 12 mm. When installing, take into account one important circumstance: the head of the screw must be completely inserted into the beam, do not allow any elevations, try to place the screw in the inner part of the element.
Related article: How to make a plasterboard ceiling in a hallway yourself
If the timber is of considerable thickness, then you should make holes up to 3 cm deep. Then we proceed to fasten the element to the surface using previously made blocks.
To make sure that the fixed timber is level, use a building level. If it turns out that the beam is attached to the surface a little higher than planned, then unscrew the screw and replace the head. You can also use the second method: unscrew the screw (just not all the way) and place spacers of the required parameters on both sides of the element.
If the beam is located below the planned level, unscrew the screw and change the head. However, if the difference in marks is insignificant (up to 2 mm), you can plan off the unnecessary part using a construction plane.