In the heating systems market, film heated floors have already transformed from exotic types of heating into a popular, effective and fairly economical alternative to classical systems. The reason is simple - the emergence of modern film materials, which are relatively inexpensive and accessible, do not require serious capital expenditures when equipping the premises and are quickly installed, even independently with minimal work skills.
This article will be a detailed analysis of the features of infrared film heated floors made in Russia and South Korea.
Please note that here we are considering infrared heated floors as an additional source of heat in residential areas. If you are interested in installing a film heated floor as the main type of heating system, we recommend using a heated ceiling based on appropriate film materials. This is an order of magnitude more effective.
Types, design and principle of operation of infrared film floors
Most of the film materials used on the Russian market for organizing heated floors are of South Korean or domestic origin. This is due to several factors:
- uniform heating of the material over almost the entire area;
- convenient standard sizes: mainly roll deliveries 100 m long of various widths (500–1000 mm) with a cutting pitch of 200–250 mm;
- several types of power ranging from 110–400 W/sq.m;
- record quality guarantees (10–20 years of operation);
- optimal price accessible to most consumers.
The most famous manufacturers of infrared film materials are Q-Term , Heat Plus , RexVA , STEM Energy , Hit-Lite and several other companies. These are carbon-based electric heaters, supplied in coils, the operating features of which we will analyze.
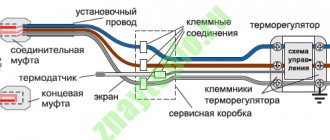
Installation of a film heated floor includes laying a special film across which carbon heaters are located (see figure) having a linear shape.
These heaters have a strictly calculated resistivity. When an electric current passes here, electrical energy is converted into thermal energy, that is, the film heats up. The resulting heat is evenly distributed over the entire surface, quickly warming up the coating of your finished floor.
Current-carrying copper strips (busbars) are located on both edges of the roll. A variety of standard sizes and marking of cutting lines allows you to cut the film material directly on site with virtually no losses. In addition, thanks to its great flexibility, elasticity and minimal thickness (only 0.338 mm ), the material adheres perfectly to any surface, without requiring special preparation when installing a heated film floor. The weight of one “square” electric heater is 0.4 kg .
The main types of power of South Korean films: 150, 220, 300, 400 W/sq.m (less common options are also available). The width of the material most often has the following steps: 0.5, 0.8 and 1.0 m . All South Korean heaters have proven themselves to be excellent. The main thing is an accurate connection diagram for the film heated floor, high-quality installation in accordance with the instructions provided and proper operation. Many of these heaters are suitable not only for equipping heated floors, but also for heated ceilings (including as the main heat sources).
Among Russian manufacturers of infrared electric heaters, ZEBRA EVO-300 WF occupies a special place. This is an excellent development, which gained fame after the release of popular heaters for heated ceilings (ZEBRA EVO-300 series SOFT, ST, PRO, EX). EVO-300 WF was created specifically for heated floors. "Zebra" is a modular device, equipped with a grounding loop and a housing made of aluminum foil .
The main advantage of the Zebra WF is one-way thermal radiation , in which up to 95% of the energy goes directly to heating, providing record system efficiency.
An approximate connection diagram for the ZEBRA EVO-300 WF film heated floor is presented below. .
Laying methods
Heat-saving properties depend on how correctly the insulation is installed.
Insulation of concrete floor
Most often, the rolled material is fixed to the concrete base using a special glue made on the basis of rubber.
- We prepare the surface. We level the slab so that there is no large difference in height. We seal all cracks and cracks with cement mortar.
- We spread the material on the floor with the foil layer facing up and cut it to the required length. We move the strip aside and apply glue to the place where it is laid. Let it sit for a few minutes according to the instructions for the glue. We lay and press the material well. We place the strips close to each other.
- We secure the joints with foil tape, which is sold in hardware stores.
You can secure the material with double-sided tape glued around the perimeter or dowels.
Wood floor insulation
It is most convenient to lay foil insulation on a wooden floor, which has a bottom self-adhesive layer.
Laying sequence:
Once the material has been laid, the selected flooring can be installed.
Foil insulation for heated floors
The base for heated floors must be flat without differences in height or defects. All errors must be eliminated.
- We lay out the foil material in strips end to end, and glue the joints with special tape.
- We install a system of electric or water heated floors on top.
- We lay hydro- and vapor barrier material. It will prevent concrete from leaking onto the floor heating elements.
- We fill the screed with a thickness of 30–50 mm, depending on the type of heating elements and the functional purpose of the room.
Insulation under floating screed
It is characterized by the fact that the slab is not rigidly fastened to the concrete screed; thermal insulation is laid between them.
- We prepare the base and eliminate all defects.
- We plaster the lower part of the walls.
- We stick damper tape around the perimeter of the walls; its height should be equal to the thickness of the floor: from the slab to the floor covering.
- We prime the base in two layers. Apply the next layer after the previous one has dried.
- We lay thermal insulating foil boards with the foil facing up. We use a metallized coating that is resistant to cement mortar. We lay the slabs strictly in a horizontal plane, close to each other. Uneven laying of insulation boards contributes to the formation of cracks in the concrete solution.
- We glue the joints of the plates with tape.
- We pour the concrete screed.
We looked at how to properly lay foil material for high-quality floor insulation. Thermal insulating material is always laid with foil on the outside; if you lay it the other way around, it will not retain heat fully.
Advantages of film heated floors
There are many advantages of heated floors, here are just the most basic advantages that stand out to everyone who has installed film heated floors:
- Quick heating of the room. Direct impact on the floor material significantly increases the heating rate compared to the vast majority of alternative systems.
- Ease and simplicity of installation.
- There is no need to make a screed: the material fits perfectly under most types of finishing coating: laminate, linoleum or carpet.
- The room loses almost nothing in height (we remind you that the thickness of the electric heaters is only 0.388 mm).
- You can be completely calm, no water leaks will threaten you.
- The infrared system works completely unnoticeably and absolutely silently, everything happens automatically according to your settings.
- Control is carried out using a thermostat, which is equipped with a remote temperature sensor that responds to changes in parameters within 0.5 degrees.
The manufacturer guarantees the flawless functioning of the infrared heated floor for 10 to 20 years (depending on the specific company). The actual service life of electric heaters exceeds 25 years.
Laying flooring on a heated floor
We have already said earlier that infrared heated floors can be installed under any type of coating, although the most common of them is laminate or ceramic tiles. In the latter case, the bonding layer is an adhesive mixture up to 2 millimeters thick with a reinforcing mesh. This coating design will allow the heat to be evenly distributed over the entire surface and will create a rigid layer to prevent damage to the film itself.
Before laying the laminate on the heating elements, lay a backing or thick plastic film, after which you can install the board. With soft floor coverings, such as carpet or linoleum, things are a little more complicated. First you need to lay the base or plywood or plinth boards, and then lay the finishing coating. The leveling layer is attached to the subfloor using dowels, nails or self-tapping screws (depending on the type of base).
Disadvantages of film heated floors
We do not idealize underfloor heating at all and objectively admit that it also has disadvantages. The disadvantages of such heating include:
- High heating costs for rooms with a very large area and high ceilings.
- Temperature restrictions. According to SanPiN (SNiP RF 41-01-2003 “Heating, ventilation and air conditioning”) the floor surface in rooms where people are constantly present should not heat up above 26 °C. And the floor temperature where people are temporarily located can be raised to 31 °C. Attempts to excessively raise the floor temperature (when the temperature outside is 30 °C or lower) will lead to discomfort: it will become too hot to walk on.
- Installation of film heated floors is possible only in open areas, free from furniture without legs. Otherwise, there is a risk of critical overheating of the film and its premature failure.
- The system dries the air. This occurs due to natural convection of air when heated. This is especially evident when using infrared heated floors as the main source of heating. In this case, we recommend installing humidifiers.
Energy consumption of film heated floors
To find out the maximum power consumption of the system, just pay attention to the labeling. For example, with a heater power of 220 W/sq.m for 1 hour of operation, 1 “square” of electric heated floor consumes 220 Wh (0.22 kWh) . Please note that the main energy consumption occurs when heating the room, and maintaining the set temperature requires periodic switching on, the frequency of which depends on the heat loss of the building envelope, as well as the parameters you set on the thermostat. Of course, the thermal insulation of the facility must be at least at the level of the SNiP recommendations of the relevant region.
The temperature sensor is located directly on the surface of the film material, under the finishing floor. Let's imagine that you set the thermostat to 26 °C, which is most comfortable for you. When this temperature value is reached, the sensor will record it, give a signal to the control device, and the thermostat will turn off the power. Then the floor will gradually cool down, and the speed of the process directly depends on the level of heat loss - and the thermostat will again supply power to the electric heaters.
Thus, the actual energy consumption at a particular facility directly depends on the frequency of system on/off . The greater the heat loss, the higher the consumption . We recommend that the floor be insulated (a layer of conventional building insulation 100 mm thick is sufficient). In this case, the specific average electricity consumption will be about 20–30 W per 1 sq.m of heated area.
The most common mistake made by buyers of electric heated floors is that they want to use them to insulate their floor. But the film material does not retain heat: its task is to generate thermal energy . And the resulting heat must be retained by special insulation materials , which must be included in the floor design. The modern market offers a lot of available options for insulation from various companies from different materials (Knauff, Isoverr, expanded polystyrene, etc.) with a thickness of 30 to 100 mm (the thickness is selected depending on the climatic characteristics of the region and the design of the insulation object).
What happens if the installation of a film heated floor is carried out without insulation? In some cases, the system can cope with heating your room, but in most cases it cannot. Without insulation, thermal energy will simply be lost, escaping into the atmosphere, into the ground, or absorbed by ceilings. But in any case, excessive consumption of electricity is inevitable, because the system will have to work almost constantly to compensate for heat loss.
Is it possible to use special substrates up to 5 mm thick, since they also reduce thermal conductivity? Yes, such a substrate is better than nothing at all. However, the effectiveness of insulation is manifested with a minimum thickness of insulation material in the floor structure of 100 mm.
Do-it-yourself installation of film heated floors
It is believed that bimetallic film can be laid in any way you like, cutting it into strips of arbitrary length and shape. Actually this is not true. There are a number of rules.
The ratio of the width and length of the stripes. You need to know what size your material is, because there is a maximum permissible length for width:
- width 500 mm – maximum 9 linear meters;
- 800 mm – 5.5 p/m;
- 1000 mm – 4.5 p/m.
Minimum joints. The more joints, the lower the reliability of the coating. Therefore, the decision on how to lay an electric heated floor, along or across the room, depends on its dimensions, as well as on the width of the material itself.
Correct cutting. This material cannot be cut, like a substrate, in any order. To understand where you can cut the film, take a closer look at its surface. As a rule, it is divided into square sections with a dark (graphite) coating. The material must not be pierced or cut in these places. In addition, it is forbidden to damage copper conductors (they are also clearly visible).
Sequence of actions when laying film
- We lay the sheets parallel to each other, avoiding overlap (end-to-end). Spread the film only with copper wires downwards. Important! If you accidentally pierced (pierced) the film through, you need to insulate this place on both sides.
- The side opposite to the one to which the connection will be made must be insulated. For this purpose, bitumen insulation is used, which has great reliability and protection of the coating. You need to cut the insulation a little larger than required in size, this will ensure greater reliability. To ensure that the insulation does not protrude above the general level, you need to cut a recess in the substrate and hide the insulated edge there. For better fixation, it is necessary to glue the insulated edge to the substrate with masking tape.
- In the same way, using tape, we fix the sheets together and the edges of the infrared heated floor.
- We install the thermostat. Read below about how to choose it.
- Using wire and copper clamps, we connect the heated floor mats to the thermostat. The connection must be consistent: just like the connection of strips in a sheet of underfloor heating.
- We attach copper clamps to the places indicated in the instructions. At this stage it is important not to pierce the material through. To do this, carefully insert one side of the clamp between the film and the copper core. The other part is carefully pressed against the film using pliers or light blows of a hammer. We do the same with each sheet.
- Now you need to connect the thermostat to the network and check the functionality of the heated floor. This job is best left to a professional electrician for several reasons. The specialist knows all the nuances and can connect the entire system to the network with a quality guarantee. In addition, a bimetallic film floor is characterized by the absence of grounding. To protect yourself and your loved ones, you will need to install an RCD (residual current device), which will de-energize a section of the circuit if a short circuit occurs. The installation of such equipment must be done by a specialist.
- System functionality check usually takes 15 minutes. This time is quite enough.
Installation of construction mesh
If the floors warm up evenly and there are no complaints about the operation of the heated floor, you can begin installing the construction mesh. What is it for? This material acts as a fastening base for the floor covering.
Regardless of the material chosen, it will shift slightly, expand due to temperature changes, and so on. In this case, it can damage the heated floor.
Attention! If you plan to lay tiles (in the case of a carbon film floor), laying metal mesh is strictly prohibited. The best option, as mentioned above, would be fiberglass.
It is better to attach the mesh to the floor. For this, dowels are used, which are inserted into the drilled holes. You need to drill in places where there is no black graphite coating.
Calculation of film heated floors
For the efficiency of an infrared heated floor, a correct preliminary calculation of its power is important. Let's give an example in which a heated floor is planned to be used as an additional heat source (that is, a boiler or central heating operates in parallel). In this case, it is enough to cover up to 50% of the floor with film.
To begin with, we determine the useful heating area. The usable area is only its open areas, not occupied by furniture, etc. The picture of the room below shows that the usable heating area is 8.6 sq.m (S = 4.1 x 2.1 m).
Based on the size of the usable area, we select the standard sizes and number of film electric heaters, while it is desirable to cover the entire usable area to the maximum. Here we will use South Korean film with a power of 150 W/sq.m with a width of 500 mm . You will get 4 sections of 4 meters each, that is, 8 sq.m of electric heaters with a total power of 1.2 kW (8 sq.m x 150 W/sq.m = 1200 W). We get a load current of 5.5 A (1200 W / 220 V = 5.5 A).
We recommend drawing up a laying diagram before installation. On it you will need to mark the location of laying the film sections, the distance between the strips, the connection diagram for the film heated floor, including the location of the power wires and the temperature sensor coming from the thermostat.
Note! It is strictly forbidden to lay electric heaters overlapping! There should be 10–20 cm . 50 mm is allowed between the heater strips .
Another very important point. At the site where it is planned to install film heated floors , there must be additional electrical power . Quite often, in its absence and high energy consumption (the system operates in several rooms simultaneously, including as the main one), the problem of network overload . This leads to constant operation of the input machine and other troubles.
In order to avoid such problems in the future, it is necessary to design the power supply parameters of the facility in connection with the additional electrical power of the heated floor.
Below we present the recommended maximum length of South Korean carbon-based film materials depending on the width of the roll and the specific power of the heater.
| Table No. 1. Recommended maximum length of South Korean carbon-based film materials depending on the width of the roll and the specific power of the heater. | |||
| Roll width (m) | Specific power (W/sq.m) | Recommended max film length (m) | |
| 0,5 | 150 | 10 | |
| 0,5 | 220 | 8 | |
| 0,8 | 220 | 6 | |
| 1,0 | 150 | 7 | |
| 1,0 | 220 | 5 | |
Laying film heated floors
It's time to understand the step-by-step instructions for laying film heated floors. If it will be mounted under an engineered board or laminate, prepare the following materials and tools:
- Rolled heated floor of suitable width and length;
- Scissors for cutting film base;
- Thermal insulation material;
- Thermostat with temperature sensor;
- Connecting wires;
- Scotch;
- Connecting brackets;
- Bitumen insulation;
- Soldering iron with flux and solder.
Let's go through all the operations in more detail.
Surface preparation and installation of insulation
As an example, let's take a situation where we have a new home that already has subfloors.
First, they need to be leveled to obtain a surface ready for installation. This is done using a floor leveling mixture (for example, a leveler from the Kreps brand is suitable - a bag weighing 25 kg costs about 280 rubles). Dilute the mixture with water in the indicated proportions, pour over the rough surface and wait two days until it hardens completely. The next stage is laying the heat-insulating layer. We recommend taking inexpensive Penofol for this. One of its sides is shiny - it reflects heat in the opposite direction, preventing it from going into the screed. If necessary, you can use any other types of thermal insulation materials, including tiles. They are fastened with mounting brackets or dowels with wide heads. Individual sheets or plates are connected to each other with tape.
Film marking
At this stage we will need a tape measure, a sheet of paper and a simple pencil.
We measure the dimensions of the furniture (length and width), draw a layout of the room, and place furniture elements on it. Where the furniture will be placed, film is not needed - we have already written about why this is done. In accordance with the data obtained, we buy film for film heated floors. We line wide areas with wide film - it’s more convenient. But in general, you should focus on the dimensions of the room. The film is cut according to the cut lines. We prepare areas of the required size and set them aside. We mark the places for laying the wires. If you don’t want to make a lot of intersections, we proceed as follows - we lay out the wires with phase and zero along the side walls of the room, lay out the film perpendicular to them, connect one end to the phase and the other to zero. How to connect a film heated floor using this method is shown in the figure below.
Thermostat installation, electrical connections
Now we know how to connect film heated floors in such a way as to avoid unnecessary crossings of wires - this way there will be less confusion, and crossing wires will not rub against each other.
Let's see how to run the wires and how to install the thermostat. This is done very easily - using a construction knife. Before installation, you need to figure out in your mind the wiring diagram and decide on the location of the thermostat. It is to the thermostat that we will pull the connecting wires to connect the film heated floors. To lay them, we make grooves in the thermal insulation. Here we make a cutout for the temperature sensor and connect the signal wire to it. After this, we send all the wires along the grooves to the thermostat. To prevent the conductors from falling out of the grooves, we secure them with tape.
Let's talk a little about connecting film heated floors. We have already said that there are contact pads on the film - it is to them that we will connect the wires using contact groups. These contact groups are compressed with pliers, as a result of which they fit tightly to the pads. But not all experts practice this approach - many of them strongly recommend soldering all connections for greater reliability and durability of the connections.
For our part, we also recommend soldering - it will avoid sparking, which, in turn, can cause a fire.
Do not rush to lay the floor covering - the film heated floor must be tested. We connect it to the power supply, set the temperature to +30 degrees, after 15-20 minutes we turn off the system and check all areas. If some of them remain cold, check the electrical connections.
Flooring installation
In fact, our film heated floor is ready, all that remains is to lay the floor covering. Let's consider three special cases:
- With laying tiles;
- With laying laminate;
- With laying linoleum.
In the case of tiles, thermal insulation becomes a stumbling block - it will interfere with normal contact of the adhesive with the subfloor and the tiles. Therefore, it is recommended to pour a thin screed over the thermal insulation, lay a film on it, throw a reinforcing mesh on top, and only after that start laying the tiles using tile adhesive. There is a second option - instead of an intermediate thin screed, lay plasterboard slabs.
With laminate, everything is simple - it has sufficient strength to protect the floors from squeezing. Therefore, we place a plastic film or substrate on the IR film, and then put the laminate on it. At this point, our warm film floors are completely ready for use. If you plan to use linoleum instead of laminate, then lay plywood or fiberboard on top of the backing or plastic film. We put linoleum on top of the hard surface.
Selecting the cross-section of the electrical cable for film heated floors
The choice of electrical cable cross-section for film heated floors is made depending on the area of the materials used and, accordingly, the power of individual groups of film heaters . These recommendations are compiled taking into account the electrical installation rules (ELI), as well as taking into account the underestimated wire cross-section data of some manufacturers. So, a wire marked 2.5 sq.mm actually turns out to have a cross-section of 2–2.1 sq.mm. Below is a table with the recommended cross-section of copper wire, depending on the maximum area of the heaters and the power of one group.
| Table No. 2. Selection of electrical cable cross-section for film heated floors | |||
| Film heater power (W/sq.m) | Cross-section of copper wire (sq.mm) | Recommended maximum area of film heaters of one group (sq.m) | |
| 150 | 1,5 | up to 12 | |
| 150 | 2,5 | from 12 to 20 | |
| 150 | 4,0 | from 20 to 30 | |
| 220 | 1,5 | up to 8 | |
| 220 | 2,5 | from 8 to 14 | |
| 220 | 4,0 | from 14 to 24 | |
If the area of the group heaters exceeds the values indicated in the table, then when connecting they must be divided into subgroups of permissible area in accordance with the recommendations. Example: 28 sq.m of infrared heated floor with a power of 150 W/sq.m can be easily divided into 2 subgroups of 14 “squares”. In this case, each subgroup is connected to the power line with a separate wire with a cross-section of 2.5 sq. mm.
Note! The choice of power wire cross-section for connecting an electric heated floor is very important. If you install wires with a reduced cross-section (relative to the recommended one), this risks overheating the wire, melting the insulating layer, which can lead to a fire!
Installation of infrared heated floor
Do-it-yourself installation of infrared film heated floors
Infrared film heated floor is a new material that has a high degree of energy saving. This material appeared on the construction market quite recently, but has already gained well-deserved authority.
Its distinctive feature is that it can be laid under absolutely any covering (laminate, tile, linoleum, etc.) and it does not require filling with a cement screed.
Infrared film flooring has another significant advantage. Its installation is not at all complicated and anyone can do it, and when moving to a new apartment it can be very easily dismantled.
Technical characteristics of infrared film floor
The infrared film floor has the following technical characteristics:
Its voltage in the electrical network is from two hundred twenty to two hundred thirty Volts and fifty Hz;
- Its power consumption depends mainly on the type of infrared film used (150 Watts per square meter; 220 Watts per square meter; 400 Watts per square meter);
- The working surface temperature should be up to forty-five degrees Celsius at 150 Watts; up to sixty degrees Celsius at 200 watts; up to eighty degrees Celsius at 400 Watts;
- Wavelength from seven to twenty microns;
- There is no electromagnetic field.
Calculation of infrared film floor
Do-it-yourself installation of infrared film heated floors
1. First you need to prepare the floor surface. Then we lay thermal insulation material on it. If you plan to put carpet or linoleum on the floor, then any type of insulation with a sheet thickness of three to five millimeters will suit you, and all joints will be glued with tape.
And if you plan to lay ceramic tiles on the floor, then thermal insulation made from technical cork with a thickness of two millimeters is suitable.
Do-it-yourself infrared film heated floor: diagram
2. Before installing a warm floor, you need to determine the place where you will place the thermostat. Then draw up and write down a detailed installation diagram so that you don’t make a mistake during the installation of the infrared film. Remember that the film is laid in places where there are open areas of the floor and there are no plans to install furniture.
Then we proceed to cut the film into strips of the sizes we need along special lines and lay them out with the copper strip down . and the contacts to the wall (the thermostat will be installed on it later) in accordance with the diagram you drew up.
4. Let's start connecting the film to the wiring. You need to install contact clamps on the edge of the copper strip, and then connect the contact wires to the clamps.
5. Next, insulate the connection points of the wires and clamps, as well as all the film cut points on the reverse side using bitumen insulation.
6. Then you need to connect the floor temperature sensor. This is done from the back of the film. And then be sure to insulate it.
7. After the film heated floor is completely laid, it is necessary to insulate all contacts suitable for it and connect it to the electrical network.
8. Before you start laying the flooring, you need to test the infrared heated floor. Pay special attention to the fact that there was no heating at the joints and various connections.
9. In order to provide additional protection, you can lay polyethylene film on top of the infrared film heated floor. Now you can begin installing the finishing coating for your floor.
Remember that when laying ceramic tiles, you need to allow the screed underneath to dry for about twenty days before you begin to fully use the heated floor.
Installation of infrared heated floors with your own hands video Therapeutic effects of infrared film heated floors
For many years in medicine, infrared rays have been used to treat many diseases. It has been proven that infrared light has a very beneficial effect on all damaged tissues.
Thanks to its effects, they gradually recover after surgery or serious injury. Using infrared radiation, film heated floors have a healing effect on the entire human body.
Scientists have proven that our body itself produces a certain amount of infrared rays with a frequency of up to twenty microns, but a film heated floor gives our body infrared impulses with a frequency of seven to twenty microns.
They are very similar to the infrared impulses of the human body. Therefore, this type of heated floor helps reduce fatigue and stress, and improves blood microcirculation several times.
Installation of infrared floor Construction of infrared floor
The main difference between an infrared floor and other heating is its operating principle. The energy of a warm infrared floor is not used to heat the air in the room, but is spent on heating objects located in its enclosed space. They, in turn, accumulate and release heat into the room, maintaining a natural microclimate in it. Infrared radiation is absolutely safe for the health of living beings and is comparable to solar heat.
The infrared heating system is made on the basis of elastic heating mats or Mylar film. The heating element has the form of conductive strips, which are located in 15 mm increments and are made using Carbon NanoTube technology. The electricity that initiates the heating element is supplied to it through copper-silver contacts. The entire system is sealed on both sides with a polymer, which has increased electrical insulation, fireproof and waterproof properties.
The infrared heated floor is connected to the electrical network through a thermostat in a parallel manner. The tightness of the connections, the high quality of the materials used and the use of carbon adsorbent spraying ensure the operation of the heaters in an efficient and continuous mode. Thanks to parallel connection, the system will function even if any of its sections fails. Sometimes this happens due to mechanical damage.
Main types of infrared floors
Warm infrared floors are available in two types: film and rod heating systems. They are produced in rolls with a width of 500 and 1000 mm.
Film floors are bimetallic and carbon. In the first option, the base of the floor is polyurethane, and the thermoelement is made of a copper-aluminum alloy. In the second, the carbon strips of the heating element, when connected in parallel, are laminated with Mylar film. Its presence protects the system from moisture and electrical breakdown. Film heated floors last about 15 years, their cost is 550-1100 rubles/m2.
In an infrared floor rod system, elastic mats combine flexible conductive bars and rods. The heating elements of the system are made of composite materials. During the entire operating time of the infrared rod floor, electromagnetic radiation is practically absent. This property makes it similar to film heaters. Its difference from them lies in the special design of thermoelements, thanks to which the rod floor has the ability to self-regulate and is not afraid of overheating.
The technical characteristics of this floor allow it to be installed in a cement screed and in an adhesive layer under ceramic tiles. The rod floor system can be safely used in rooms with humid air and even bulky furniture can be installed on it, which is not recommended when using film floors. The warranty period for the rod floor is 20 years, its cost is about 1,500 rubles/m2.
The infrared floor is powered from a 220 V network. If the room has good thermal insulation, the heated floor consumes 30-55 W/hour per 1 m 3 of space per day. The most comfortable temperature in a room with an infrared floor is ensured by installing a thermostat.
Advantages and disadvantages of IR floors
By installing an infrared heating system in the floor, you can get a lot of advantages, these are:
- Energy savings due to low energy consumption due to the high thermal conductivity of floor thermoelements.
- Possibility of installing an infrared heating system under any finishing floor covering.
- Easy installation of the heating system. It does not have to be laid in screed or tile adhesive. If necessary, you can install the infrared floor yourself.
- High reliability of the heating system, ensured by the method of parallel connection of its elements. Damage to one area of the floor does not interfere with the proper operation of others.
- Possibility of quickly transferring the system to another location. This is especially true when remodeling a room or moving.
- Uniform heating of the entire room due to the heat radiated from objects.
- The infrared heating system cannot freeze, overheat or cool the room.
- Independence from central heating mode.
- Hidden installation. Such a floor is invisible in the interior.
- Maintaining a natural indoor microclimate.
- Silent operation of the heating system.
- The healing effect of infrared radiation. For some diseases it serves as a means of prevention.
- Infrared floor film and connecting clips;
- Thermostats equipped with temperature sensors;
- Vinyl mastic insulation;
- Thermal insulation material, its basis should be lavsan or polypropylene film, but not foil.
- The infrared film floor must be laid in an area of the room that is free from furniture and household appliances.
This gender has very few disadvantages. First of all, this is the high cost of the models. If used incorrectly or damaged, the base of the infrared heating system may melt.
Materials and tools for installing infrared floors
To install the floor, you will need the simplest tools that are probably available in any home: wire cutters, a screwdriver, pliers, scissors and a mounting knife. In addition, you will need materials, the list of which is given below:
Depending on the type of coating, you can also add to this list: chipboard sheets with a thickness of at least 5 mm or plywood - like linoleum; reinforcing metal mesh - under the tiles.
Infrared floor installation technology
Laying an infrared floor is not particularly difficult and is carried out in several stages: preparation of the base, installation of thermal insulation, marking for the location of the heater, installation and connection of the system.
Preparing the subfloor
To make an infrared floor of high quality, you need to install it on a flat and dry base. The old floor covering must be completely removed until the wood or concrete base of the floor is exposed. The horizontality of the resulting surface should be checked with a building level; deviations should not exceed 3 mm.
After this, the wooden floor needs to be sanded and the concrete base needs to be sanded. The debris that will appear during these procedures must be removed, and then the surface must be cleaned of dust using an industrial vacuum cleaner.
A polyethylene film with a thickness of at least 50 microns must be laid on a clean base to waterproof the floor.
Thermal insulation is laid on top of the waterproofing layer. The heat insulator must be covered with lavsan or polypropylene film.
If you plan to make the final floor covering soft, such as linoleum or carpet, you should use a material with a soft layer, for example, infraflex, as a heat insulator.
If there will be tiles, parquet boards or ceramic granite on the floor, you must choose thermal insulation with a solid layer, for example, technical cork 2mm. After installation, the insulation joints must be secured with tape.
Marking the floor surface
Before marking begins, you need to determine the installation location of the temperature sensor, temperature controller and connection of the infrared film floor to the network. The thermostat is usually installed on the wall 10-15 cm from the floor surface.
When marking the floor for laying the IR heater, you must follow the recommendations below:
Features of installing infrared flooring
Upon completion of the preparatory work, we begin laying the IR heating film. It is advisable to do this along the length of the room: in this case, with a larger number of solid strips, you will get fewer connection points. The floor installation procedure is described below.
The heating film must be laid with the copper conductive strip down, the distance between the strips is taken to be at least 5 cm. When installing a heated floor under laminate or linoleum, they can be laid closely, thereby ensuring uniform heating.
The infrared floor strips must be attached to the thermal insulation with construction tape. This ensures the immobility of the elements for the convenience of subsequent actions. Cut lines located in the area of copper conductors must be treated with bitumen insulation. The same procedure should be performed with silver-plated contacts connecting the heating elements to the tape.
Contact clamps must be mounted on copper conductive strips: one half of them should be inside the film, the other half should be outside on the strip. The contacts are secured with pliers.
Connecting the IR floor system
At the final stage of installing the infrared floor, it is necessary to connect it. The system thermostat can be placed permanently or connected to an electrical outlet using a cord. At the same time, it should not interfere with the further arrangement of household appliances and furniture.
The floor temperature sensor should be located closer to the thermostat under the infrared film. It is secured to the film under the carbon paste with tape.
After installing the clamping contacts on the film, the power wires should be connected to them, and the connection points should be treated with a bitumen insulator.
Then the heating system must be turned on, set to a comfortable temperature and checked for insulation of the film cutting line, heating of all film strips and wire connections (using a test screwdriver).
After checking the operation of the system, we lay the flooring. Some of its types will require additional actions with heated floors.
If the finishing coating is linoleum, you need to lay fiberboard or thick plywood on the infrared film. If tiles are planned as it, a reinforcing mesh with 2 mm cells or fiberglass mesh with 5-20 mm cells will have to be mounted on top of the warm floor. They are attached pointwise with dowels to the base. Then you can lay the screed on top.
Important! Markings for fastening coatings should be done in advance to avoid damage to the heating elements of the system.
How to make an infrared floor - watch the video:
Warm infrared floors have an incomparable advantage over heating that uses the combustion of any materials. In addition to being silent, they also do not emit toxins at all. Therefore, they are actively used in medical and children's institutions.
Similar news How to connect an infrared heated floor
Today, non-traditional heating systems are quite widely used in modern houses and apartments. They are good sources of heat and help to significantly reduce electricity costs, which has a positive effect on the family budget. And that is why the question “how to connect an infrared heated floor” is so relevant. In this article we will look at how to properly connect an IR floor.
Technical characteristics of infrared heated floor
Before connecting this heating system, you should understand some of its features. Characteristics of IR floor:
- consumed power forty-five - 67 W/m2.
- The width of the film thermal coating is 50 cm.
- The maximum permissible length of thermal film coating is eight meters.
- power supply - 220 V at 50 Hz.
- The melting point of the film infrared heated floor is 130 C.
- content of infrared rays in the emission spectrum – 95%;
- The length of the IR beam is five to twenty micrometers.
How to connect an infrared heated floor - the importance of proper installation
Warm film IR coating is an alternative widely used method of heating a room of any parameters, which is powered from the mains. In this system, the area is heated from a special film (which contains a carbon mixture), heated by copper conductors on the sides. To avoid the problem of burning contacts, the design has a protective silver coating.
To connect a warm infrared floor you will not need a lot of effort and expense, it is only important to adhere to certain installation rules. We will consider all the connection steps below, and if you do not follow them, you may encounter certain breakdowns and improper operation of the system. The causes of the problems may be:
- Violation of electrical system installation diagram standards.
- Incorrect calculations regarding the ratio of the area of the room and the warmest floor covering.
- Use when installing materials that are not intended for the equipment of such a heating system.
- Violation of the installation stages of steam and heat insulation layers.
- When pouring screeds, use mixtures that are not suitable for IR film floors.
- Inaccurate calculation of the type of electrical supply wire and cross-section regarding the total load.
- Using materials with low thermal conductivity as the final layer. It is strictly not recommended to use natural carpet textile coverings on such a heating system.
If you follow all these simple rules and connect the infrared heated floor correctly. you will receive an economical, durable and safe heating system.
How to properly connect an infrared heated floor - steps
As mentioned above, it is extremely important to observe all the correctness of the installation technology of a warm floor system, the stages of which are:
- Cleaning debris and dirt, removing uneven surfaces, checking horizontal position. Remember that the warm infrared pod should be mounted only on a clean, perfectly flat surface, with a horizontal deviation of no more than three millimeters. If the slope is greater, you will need to correct the defect with a self-leveling floor.
- Drilling a place for a thermal regulator. It is necessary to perform vertical drilling of the grooves from the floor to the installation point of the thermostat. The next step is to make a hole for the thermostatic device. Then free the surfaces from debris and dust. Be sure to connect power to the device from the closest outlet. The IR floor thermal regulator is connected using the same technology as other types of electric floor heating systems. Grounding cables are secured with a terminal and are not mounted in contact.
- Installation of the thermal insulation layer. Reflective thermal insulation materials or others can be used. Remember that the thickness of the thermal insulation was three to five millimeters. This interlayer will contain holes for mounting cables and clips with film. When installing the heat-insulating layer, connect it with construction tape.
- Installation of IR floor. The film should be placed towards the wall with the thermostat (to reduce the cable length). The distance of the masonry from the walls should be ten to twenty millimeters, from powerful heaters - approximately one meter. The coating can be cut only in those light stripes that are located between the darker fabrics. The film must be laid end-to-end, then carefully seal the joint with tape. The film must be placed with the copper heating elements facing down.
- Reliable insulation of the ends of the film coating. In order to avoid any problems if any liquid gets on the heated floor, you should very well insulate the “bare” elements at the cut points of the copper material. This is best done using bitumen material in the form of a film. Be sure to recess the sections - clamp the thermal insulation into the previously made holes.
- Installation of clamps. Attach metal clamps to bare copper elements. Please note that one side of the clamp should be located between the copper strip and the film. Clamping the wire from below and from above is strictly not recommended: you can damage the film, which will lead to rapid breakdown of the heated floor.
- Painting cables and gluing them in parallel to the cable clamps.
- Installation of wires in the heat-insulating layer.
- Installation of the thermostat sensor.
- Connecting an infrared heated floor and checking its functionality.
- Installation of a soundproofing layer.
- Laying flooring.
To reinforce this, watch a couple of video installation instructions.
- Installation of electric heated floors under tiles Electric heated floors To increase comfort in the house, many property owners install heated floors. IN…
- Connecting an infrared heated floor Installation of an infrared heated floor: we do the work ourselves Non-traditional heating systems have recently become very widespread…
- Laying an infrared heated floor under a laminate Laying an infrared heated floor under a laminate - what do you need to know about the installation process? For the last…
- Pipes for water heated floors. Which ones to choose? The opinion of many people regarding the use of various types of pipes for installing a warm water floor is significantly ...
Thermostats for film heated floors
The thermostat is the control device, or simply the brain of the film heating system. It is this that allows you to automatically control and manage the heating process, maintaining a preset temperature. The main difference between thermostats for heated floors is the presence of a remote temperature sensor , which is located on the surface of the film, immediately under the final finishing of the floor.
We constantly monitor the equipment market, selecting thermostats for our clients that can definitely be trusted to control film heated floors. Such devices include 70.26, E 31.116, E 51.716, E 91.716, Wi-Fi SIU WF-1 and some others. You can freely find a description of the advantages and connection diagram for each device on our website.
Accessories and tools for film heated floors
This includes almost everything that can be included in the system, from the substrate to the machines, tape and connecting contacts to the tools that will be needed during installation. Let's look at the required components using the same example used above. So, the useful heating area is 8.6 sq.m, there are 4 pieces of film, the total power of the heaters is 1.2 kW. Based on this data, we will select additional materials and equipment:
- Substrate for heaters. Isolon with a thickness of up to 5 mm and an area of 10 sq.m. is ideal here. This provides additional thermal insulation and protects the film from accidental damage on the base of the floor. Attention! The substrate must be without metal coating (aluminum foil).
- Polyethylene. Performs a protective function against accidental water leaks. 10 m² of polyethylene with a thickness of 50 microns is sufficient.
- 10 A circuit breaker – 1 pc.
- Modular box (for 4 modules).
- PuGV wire 1 x 1.5 sq. mm – 2 pieces of red and blue, 10 linear meters each.
- Connecting clamps (clips) – 2 pcs. for each heater + spare pair, 10 pcs. in total.
- Bituminous tape for insulating the ends of films (at the rate of 30 pieces of 50 x 50 mm: 6 for each electric heater plus a small reserve).
- Household (ordinary) tape for fixing materials.
Installation tools: screwdriver, wire cutters, pliers, assembly knife, scissors, electrical tester.
Connection diagram for film heated floor
The film heated floor operates from a standard network of 220 V , 50 Hz . Connecting films to the network is parallel . A schematic diagram of connecting a film heated floor (again, we focus on our example) is presented below.
- Design group load data.
- 10 A circuit breaker.
- Thermostat RTC 70.26.
- Group wires PuGV 1 x 1.5 sq. mm.
- Insulation of the connection point of the group wire to the film.
- Insulation of current-carrying copper bars at the ends of the strip.
- Remote temperature sensor.