Home |GOST and SNiP |What is the minimum thickness of a floor screed according to SNiP?
Date: October 21, 2018
Comments: 0
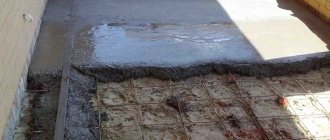
A layer of cement-sand screed is the basis for the final coating, representing the upper part of the base of the floor. The screed should provide a perfectly flat surface for finishing. The quality of the screed determines the service life of the floor of the room, strength, and thickness is of fundamental importance. A reduced layer will not have the necessary strength, and a thicker layer will cause excess consumption of the mixture. That is why SNIP regulates the requirements for the design, operation, and restoration of floors, describes the structure, and requirements for elements, including screeds.
Document structure
Building codes and regulations contain requirements for the design of floors intended for public premises, administrative facilities, industrial enterprises, and private homes. The document structure contains:
- general requirements for floor design features and its development;
- classification of coatings depending on strength and material thickness;
Today there are many ways to perform work related to leveling the subfloor for further laying of floor coverings
- interlayer requirements;
- list of measures to protect against water penetration;
- recommendations on the area of application and thickness of the screed;
- litter characteristics;
- requirements for the bases on which floors are installed.
Floor screed SNiP - clarifications for 2021
| ← Repair dictionary wiki: back to word list | ||
- Screed - main SNiP
- Rules for flooring
- Semi-dry screed - SNiP
- Acceptance of floor screed
The structure of building rules, which include SNiP for floor screed , is currently being formed as follows: the basis is the federal law “On Technical Regulation” (No. 184-FZ of December 27, 2002). This is followed by the federal law “Technical Regulations on the Safety of Buildings and Structures” (No. 384-FZ of December 30, 2009).
Calculate the screed (amount of mixture and its cost) using a special calculator.
Its norms are applied without fail, because they determine the conditions for the safe design, construction and operation of buildings and structures. Its provisions are of a framework, general nature. The relevant parameters are clarified through the publication and application of construction rules or the updating of old ones adopted during the existence of the USSR. At a certain stage, difficulties arose in understanding which SNiPs (currently called codes of rules) should be applied without fail. For this purpose, on June 21, 2010, the Government of the Russian Federation issued Order 1047-r, which approved the List of standards and construction rules (in whole or in part), the application of which on a mandatory basis ensures compliance with the requirements of the technical regulations. In addition, another list was approved by order of Rostekhregulirovaniya (No. 2079 dated 06/01/2010). It includes rules and standards, the application of which on a voluntary basis presupposes compliance with the terms of the technical regulations.
Basic SNiP for screed
The screed is an element of the overall floor structure. It is intended to create a smooth and durable base for laying flooring. It absorbs and distributes the loads that arise during the operation of the premises. In most cases, when renovating an apartment, a cement screed is used. On May 20, 2011, the updated set of rules SP 29.13330.2011 “SNiP 2.03.13-88 Floors” was put into effect (see order of the Ministry of Regional Development of Russia No. 785 dated December 27, 2010). It replaced the previous rules, which were published back in 1988 (see SNiP 2.03.13-88).
By that time, a number of provisions of the previous SNiP of 1988 had already been included in the “mandatory” list approved by Order No. 1047 (we are talking about sections 1, 2 (clauses 2.1-2.5, 2.6-2.9), 3-7 of the old rules). It is expected that during the transition period, this list will be updated taking into account the new sets of rules (their content and structure). Until then, the old rules apply as long as they are mentioned in the government order, i.e. new joint ventures do not yet cancel the old SNiP (see Letter of the Ministry of Regional Development of Russia dated August 15, 2011 N 18529-08/IP-OG).
According to clause 1.1 of the joint venture as amended in 2011, the rules apply to cases of floor design. The work itself on the manufacture of floors is carried out in accordance with SNiP 3.04.01 (see clause 1.4; in the text of the document, these rules are indicated without an index indicating the year of their adoption; now - 1987). These rules mostly regulate the conduct of finishing work (they determine, in particular, the types of finishing, as well as the permits associated with them). However, the provisions of SNiP 3.04.01-87 are not included in the list provided for by Order No. 1047, i.e. their compliance is not mandatory.
The provisions of the updated set of rules that normalize individual indicators of screeds are provided for in Section 8 (old SNiP - Section 5). In particular, the rules define:
- purpose of screeds (clause 8.1);
- minimum layer thickness (clauses 8.2, 8.6, 8.7, 8.9);
- its strength;
- tolerances regarding angular deviations (clause 8.13);
- conditions for the installation of expansion joints (clauses 8.14 and 8.15).
Requirements for flooring
According to clause 8.13 of SP 29.13330.2011, the clearance between a two-meter lath and the surface of the screed should not exceed 2 mm for coverings made of linoleum, parquet, and laminated parquet.
In accordance with clause 4.24 of the old SNiP 3.04.01-87, the horizontal deviation of the screed should not exceed 0.2% (and in any case no more than 50 mm).
It should also be borne in mind that the floor design must comply with the content of sanitary rules, and in particular, adequately ensure sound insulation of the premises - in particular, prevent the spread of impact noise. For this purpose, “floating floor” technologies are used.
In the specialized section of our website, you can also familiarize yourself with the rules for constructing Euro-screeds - both general requirements and tolerances, and standards defining manufacturing technologies for individual types of leveling layers.
SNiP for semi-dry floor screed
Recently, the technology of mechanized production of screeds, called “semi-dry screed” in Russia, has become widespread in the construction services market. This method of leveling the subfloor came to us from Western European countries along with the penetration of specialized mobile units designed for automatically preparing the solution and delivering it to the work site.
There is no specialized SNiP for semi-dry screed. The existing rules are applied on a general basis: for the design of floors - SP 29.13330.2011, and for their manufacture - the not yet updated rules 3.04.01-87, which regulate the conduct of work on applying insulating layers.
The mandatory application of these rules is established on a general basis: only those provisions that are listed in a special resolution of the Government of the Russian Federation are mandatory.
Acceptance of floor screed
Any screed is the basis for laying flooring. Before starting this work, you should check its condition and readiness for finishing the floor. Acceptance of quality screed (including semi-dry) includes:
- measuring the level of residual humidity with a special electronic or carbide hygrometer;
- tapping the base of the floor - the screed should not “bounce”, reveal cavities, kinks, peeling (when making a screed connected to the base) and unstrengthened areas;
- inspection of the surface of the screed: it should not be dusty;
- determination of planar and angular deviations (tolerances);
- in the case of a floating floor base - inspection of the quality of laying the fender, damper tape between the screed and vertical structures (trimming of such fender is carried out only after laying the finished floor);
- when installing floors on an area of more than 20 square meters. m - inspection of expansion and shrinkage joints, if such work was provided for by the project.
The project, technical specifications, as well as a written agreement of the parties may provide for other criteria for the quality of the screed, in accordance with which its acceptance will be carried out.
Author: Attractive Repair Studio.
Links
There is currently no reference in the article on this topic.
Read
- In recent years, the technology of mechanized floor screed or, as it is also called, semi-dry screed, has become quite widespread in the market for apartment renovation services. We talk about its pros and cons in a separate article on our website. In preparation for its writing, we asked our engineers and craftsmen to summarize their accumulated experience in carrying out these works directly in Moscow and the Moscow region.
Notes
No notes found for this article. We regularly edit dictionary entries. It is possible that additional materials will be posted at this location soon.
Basic terms
The rules use terminology according to which the floor is divided into tiers, components that have specific names:
- External covering
- the outer layer of the floor surface that absorbs the load during operation. - The intermediate layer
is a floor element that provides elasticity and is located under the top layer. - The waterproofing contour
is a layer that impedes the access of groundwater, wastewater, and liquids through the floor surface. - Screed
is a leveling layer that serves as the basis for installing the floor, which ensures the flatness of the base, distributes loads, and covers various communications. - The bedding
is the bottom layer that evenly distributes the forces from the floor and the weight of the screed onto the surface of the base.
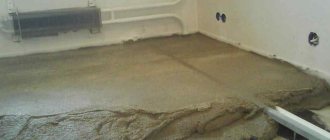
All work related to leveling the floor with cement mortars, even if done with your own hands, must meet certain requirements
Screed reinforcement
During the construction of a house or during a major renovation, in some cases, screed reinforcement . Which reinforcement option to choose depends on the final goals or the availability of additional finances. The “simple” method is an ordinary concrete screed, and a complex and expensive option, but one that guarantees the strength of the structure “for centuries”, is reinforcing all surfaces . Next, we will look at why and when it is better to carry out additional strengthening of the floor screed, as well as how you can carry out such reinforcement yourself.
To calculate a cement floor screed, you can use the cement floor screed calculator.
There are different options for screeds - their structure differs depending on the intended purpose of the work site.
The following variations are possible:
- On the ground or on the base plate - rough screed;
- On the covering slabs there is a floor screed;
- T.N. “self-leveling floor” is a screed used to level surfaces;
- A screed that includes an additional layer of sound or heat insulation.
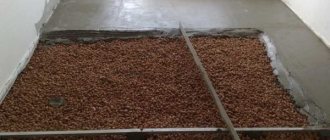
As a rule, if a rough screed is created, or when the screed consists of several parts that provide heat or sound insulation, then it is recommended to reinforce the screed . After all, the base on which the screed is placed in these cases is not solid and it does not ensure that it stays in a stationary state, but on the contrary, temporary impacts from bending and other loads are possible. And if the construction plan involves pouring an extremely massive concrete layer, then reinforcing the screed will help save concrete.
First, reinforcement calculations must be carried out, all design and operational requirements are drawn up, and based on these documents, you can choose which method of screed reinforcement will be used. The requirements of SNiP and GOST in this case are very diverse, therefore, carrying out independent calculations in this case is fraught with difficulties; you can easily miss one of the many details and, as a result, reject the work. Therefore, the best option is to use the services of a design organization that professionally deals with this type of work.
Screed reinforcement technology
After all the required measurements have been taken, the reinforcement of the screed occurs according to the following instructions:
Choosing a solution
When deciding on a coating device, make an economically sound, technically competent decision, taking into account the points specified in the standards:
- service life and structural strength;
- rational use of materials taking into account characteristics;
- the possibility of mechanizing work, reducing labor costs;
- the influence of negative aspects, the ability to violate the integrity of the flooring;
- hygiene and fire resistance.
When designing floors, standards require taking into account the degree of mechanical impact indicated in the table, as well as the level of influence of liquid on the surface. With abundant moisture, the rules require the floor to be constructed with a slope of 0.5 to 2%, which is ensured by pouring a layer of varying cross-section.
Cutting joints in concrete floors. How and with what to make shrink seams
Reinforced concrete screed is considered one of the most durable and reliable types of flooring. But we should not forget that concrete still remains vulnerable, in particular under dynamic influence. Cutting joints in concrete floors is the final stage in organizing the floor covering, allowing you to extend the life of the concrete screed.
- Concrete floors.
- Polymer floors.
The need for cutting seams
Hardened concrete mixture is a rather fragile material that is not capable of modification. And in a situation where a load exceeds its strength, deformation and destruction of the screed will occur.
Cracking of concrete occurs as a result of the formation of internal stresses resulting from temperature changes and deformation as a result of shrinkage. Cutting expansion joints in concrete floors prevents random cracking.
Types of expansion joints
There are three types of expansion joints:
- insulating;
- shrinkage;
- structural.
Insulation joints are installed in places where the screed touches other structures - walls, foundations or columns. The seam is cut through the entire thickness of the screed, eliminating rigid adhesion to a fixed object, which allows the floor not to depend on other structures of the building and not to react to changes that have occurred with them.
To create an insulating seam around the perimeter of the room, as well as around free-standing columns, insulating tape is laid before pouring concrete. Its permissible thickness is 10 mm.
In some cases, cutting joints is carried out in hardened concrete. Cuts are made to the entire depth of the screed and filled with insulating compounds.
Shrinkage joints help to avoid the appearance of chaotic cracks on the surface of the concrete pavement caused by uneven drying of the screed. Cutting seams of this type creates straight planes of slack in the thickness of the screed. As the concrete hardens, the seams will diverge slightly and cracks will form strictly in the specified areas.
Construction seams are formed at the points of contact between screeds poured at different times. They are performed at a distance of 1.5 meters from the seams of the concrete base and are located in a parallel direction.
General technology for cutting joints in concrete floors
When creating expansion joints, the following recommendations must be observed:
- cutting the seams should be done either after completion of the pouring, or later, when the screed has received the necessary strength. When creating joints using a wet composition, work can begin 4 to 12 hours after the end of pouring. The work may be delayed for a day, but no more. When the screed has completely dried, cutting joints in concrete - dry compound technology - is performed as early as possible to avoid destruction of the edges of the joint;
- The first test joint is cut a few hours after pouring, when the concrete begins to harden. If filler grains fall out of the screed during work, then the concrete is not yet ready;
- Before starting work, it is necessary to mark the surface using a rope or a long ruler. In the thickness of fresh concrete, seams can be made using a cutter, and in a dry screed by cutting;
- The technology for cutting joints in concrete floors has its own characteristics. So, the depth of the seam on average should reach 1/3 - 1⁄4 of the thickness of the screed. But if cutting is done on a fresh surface, then the indicator can be reduced. It is necessary to avoid T-shaped intersections of cut seams, since such an arrangement can provoke the appearance of unintended cracks.
Sealing expansion joints
Sealing joints is an important stage in the construction of a concrete floor. This is a mandatory procedure, since leaky cuts cause concrete cracking and shorten the life of the floor covering.
The following types of materials can be used for sealing:
- sealing harness made of foamed polystyrene. Remains elastic even at low temperatures;
- sealing mastics. The most popular material option. After hardening, it remains elastic and also prevents the penetration of moisture;
- hydroveneers are a material based on rubber, PVC or polyethylene. Profile tapes are laid directly in the thickness of the screed inside the seam during the pouring of the mixture;
- deformation profiles. They are steel guides with a layer of frost-resistant rubber. Installation of products minimizes the impact of loads on the concrete screed, which prevents the appearance of cracks.
Cutting expansion joints allows you to obtain a durable floor covering that is resistant to all types of mechanical loads.
Technical requirements SNiP
Cutting expansion joints does not allow for deviations in technology and is strictly stipulated in regulations. SNiP requirements are as follows:
- Expansion joints are placed perpendicularly in increments of 6-12 meters, depending on the type of floor and the total area of the room,
- In floors with a thickness of 5 cm, longitudinal and transverse seams are provided, at a pitch of 3 to 6 meters,
- The depth of the seam must be at least 1/3 of the thickness of the floor, and it cannot be less than 4 cm,
- Seams that coincide with the main seams of the building are made throughout the entire thickness of the underlying layer,
- For rooms where significant temperature changes are possible, the expansion joint should run along the axis of the columns and joints in the floor slabs,
- Seams can be made 2 days after the base layer of the floor has hardened,
- To create a seam in concrete floors, you can use slats with an anti-adhesive compound, which will later be removed, and the resulting groove will be sealed or a cord will be laid.
Main, interlayer and insulating coating layers: types and requirements
The choice of coating for certain types of premises is made according to the recommendations of the tables attached to the standards. They regulate the degree of influence of mechanical, thermal and liquid factors. In particular, the cement-sand surface of the production facility must withstand a specific gravity of 50 kgf/cm², a heating temperature of no more than 100 degrees Celsius and exposure to alkaline media with a concentration of up to 8%.
The thickness of the cement-sand composition, according to SNiP, in residential premises should not be less than 30 mm
According to SNIP recommendations, common types of coatings intended for domestic premises, administrative buildings, and public facilities are:
- Linoleum.
- Wood.
- Polyvinyl chloride tiles.
- Fiberboard.
- Parquet.
- Cement-concrete base.
The minimum thickness and strength characteristics of the material used for coating are given in the document table. When using a common cement-sand mortar as a coating, its minimum thickness at low intensity of exposure is 20 mm, and at moderate intensity - 30 mm. In this case, the strength of the material used should be 200-300 kg/cm².
As a layer, bitumen mastic, fine-grained concrete, as well as cement-sand mortars, the minimum thickness of which is 10 mm, are used.
At high levels of load on the coating, standards require waterproofing to protect the floor from exposure to liquids: ordinary water, oils, acids, emulsions, alkalis. The material used for insulation from moisture is concrete or polymer compounds. According to the requirements of the standards, 1-2 protective layers must be applied, depending on the possibility of liquid penetration into the material.
The minimum layer directly depends on the mixture used
Requirements for floor screed
The thickness of the cement-sand composition, according to SNiP, in residential premises should not be less than 30 mm. When performing work related to the installation of load-bearing building structures, one should take into account the importance of meeting their specific requirements. This also applies to floor screeds, both rough and finishing.
After all, the durability of the flooring materials, which will be installed later, will depend on their strength. So, before carrying out the work yourself, it makes sense to familiarize yourself with some of the fundamental requirements set out in the latest edition of SNiP, which a high-quality floor base must meet. What technical parameters are prescribed in SNiP for cement floor screeds that are important when installing them yourself in residential premises? Here are the main ones:
- minimum thickness;
- bending strength;
- the need for waterproofing;
- minimum layer over pipe communications;
- the need for reinforcement;
- location of expansion joints on the floor map.
The minimum layer directly depends on the mixture used. The thickness of the cement-sand composition, according to SNiP, in residential premises should not be less than 30 mm. For ready-made polymer-cement mixtures, especially those with reinforcing fibers included in the composition, smaller deviations are allowed (at least 15 mm). If pipe communications are located under the screed, the minimum layer is 40 mm, regardless of the characteristics of the solution used.
A waterproofing barrier is needed in those cases, and this is indicated in SNiP, when there is a threat of waterlogging of the screed due to various reasons, as well as when pouring liquid mixtures, in order to ensure proper hydration of the cement included in the mixture. This is necessary for high-quality crystallization of the binder during its maturation, on which the final strength of the structure directly depends.
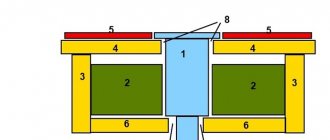
Diagram of the installation of an insulated reinforced screed in a residential area. A screed made using any technology is reinforced if its thickness exceeds 50 mm. This standard is prescribed in SNiP for rooms with a small and medium load on the floor surface, that is, residential. Reinforcement provides the base of the floor with additional strength and protects it from cracking. Indoor screeds less than 50 mm can be reinforced under certain operating conditions (temperature changes above a heated floor system, for example). Rough cement bases do not need reinforcement, since the main load falls on the overlying finishing layer.
A technological map of the floor, taking into account all the parameters of the screed, is developed when filling large areas. The map is a technological guide, a kind of project, which indicates the sequence of work, the characteristics of the materials used, the location of expansion joints and the distances between them, and other technical information.
When pouring a cement screed with their own hands, home craftsmen rarely pay attention to the requirements set out in SNiP. It is more important for them to know the rules for preparing the solution, the technological sequence of work, and the availability of visual information, which can be gleaned from videos of the corresponding content
Moreover, when it comes to the production of a finishing base from ready-made mixtures, it is assumed that manufacturers must ensure that their product complies with the requirements of SNiP and other regulatory documents. To correctly lay the screed, including the rough screed, with your own hands, all you have to do is carefully read the manufacturer’s instructions and do the work in accordance with the recommendations.
Price of work and materials for installing floor screed